This step by step diy project is about 2 post pergola plans. If you are tight on space in your backyard or you want to cover your bbq area, you should consider building a nice two legged pergola using my free set of plans. Take a look over the rest of my woodworking plans, if you want to get more building inspiration. Premium Plans for this project available in the Shop.
When buying the lumber, you should select the planks with great care, making sure they are straight and without any visible flaws (cracks, knots, twists, decay). Investing in cedar or other weather resistant lumber is a good idea, as it will pay off on the long run. Use a spirit level to plumb and align the components, before inserting the galvanized screws, otherwise the project won’t have a symmetrical look. If you have all the materials and tools required for the project, you could get the job done in about a day. See all my Premium Plans HERE.
Projects made from these plans
It’s that simple to build your DIY 2 post pergola!
2 Post Pergola Plans
Building-a-two-post-pergola
Cut & Shopping Lists
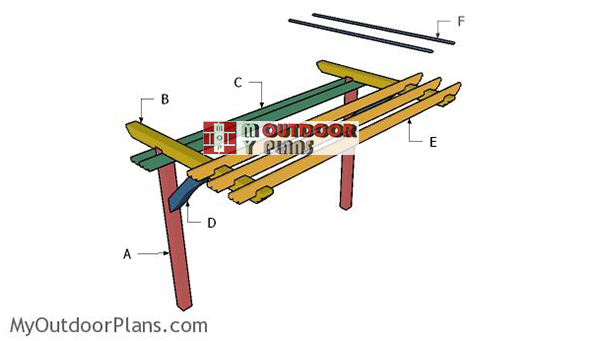
- A – 2 pieces of 6×6 lumber – 120″ long POSTS
- B – 2 piece of 6×6 lumber – 96″ long TOP SUPPORTS
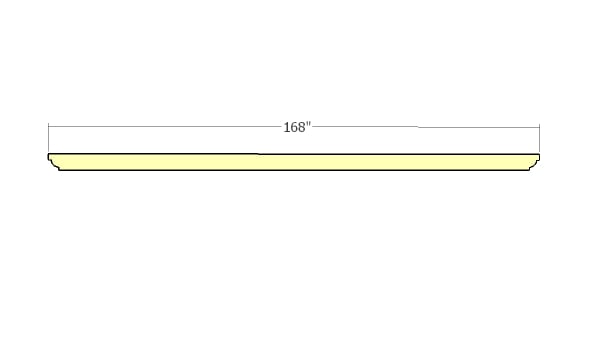
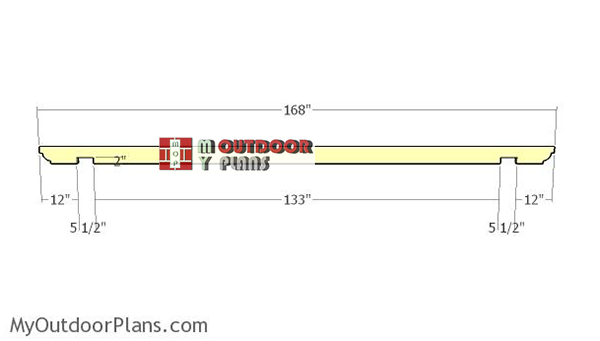
- C – 2 pieces of 2×6 lumber – 168″ long BEAMS
- D – 2 pieces of 6×6 lumber – 45″ long BRACES
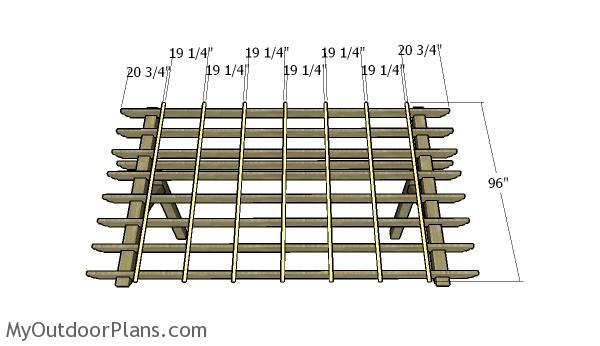
- E – 8 pieces of 2×6 lumber – 168″ long RAFTERS
- F – 7 piece of 1×2 lumber – 96″ long SLATS
- 2 pieces of 6×6 lumber – 10′
- 3 pieces of 6×6 lumber – 8′
- 10 pieces of 2×6 lumber – 14′
- 7 pieces of 1×2 lumber – 8′
- 1 1/2″ brad nails, 2 1/2″ screws
- 4 pieces of 8″ screws
- 4 pieces of 8″ carriage bolts
- wood filler , wood glue, stain/paint
- 6×6 post anchor 2 pieces
- post to beam connector 4 pieces
Tools
![]() Hammer, Tape measure, Framing square, Level
Hammer, Tape measure, Framing square, Level
![]() Miter saw, Drill machinery, Screwdriver, Sander
Miter saw, Drill machinery, Screwdriver, Sander
Time
![]() One day
One day
Related
2 legged pergola plans
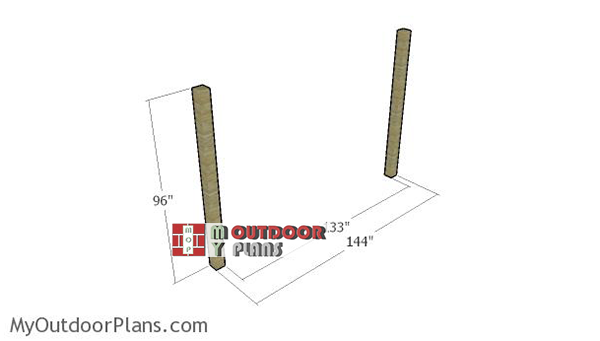
Laying-out-the-posts
The first step of the project is to lay out the posts for the pergola. Adjust the size of the posts to suit you needs and tastes.
Fitting the posts
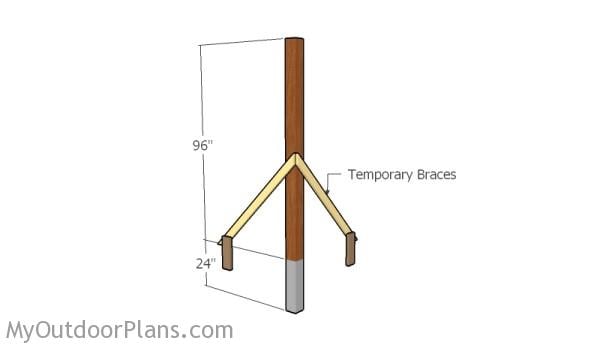
You can fit the posts directly in concrete or you can pour footings and set the posts in anchors. Dig 2-3′ holes into the ground and then install the tube forms.
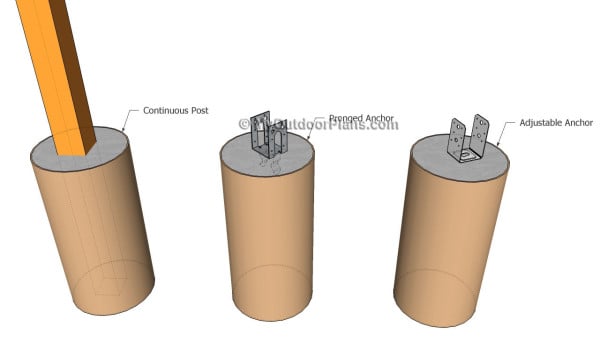
Anchoring the post into concrete
Your local building codes should specify a recommended depth for post holes in your area. For a structure like this one, plan on about two-feet in depth, as depth of your hole should be about 1/4 of the height of the wooden post. The holes should have about 10″ in diameter.
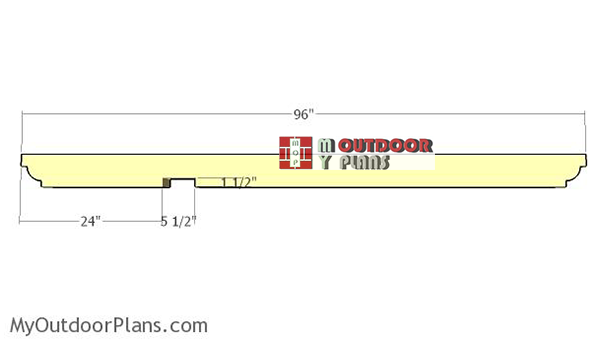
Building-the-top-supports
Continue the project by making the support for the shade elements. Cut the 6×6 beam at 96″ and them make a notch, as shown in the diagram. Mark the cut area and then make 1 1/2″ deep parallel cuts using a circular saw. Remove the excess with a chisel and clean the recess with sandpaper.
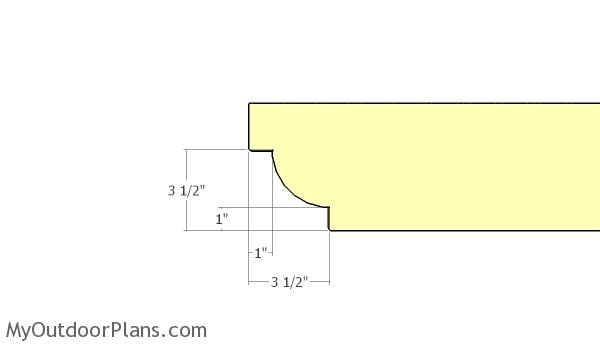
Cutting the decorative ends
Continue the project by making decorative cuts to both ends of the support beams. Mark the cut lines and get the job done with a jigsaw. Smooth the edges with sandpaper for a neat result.
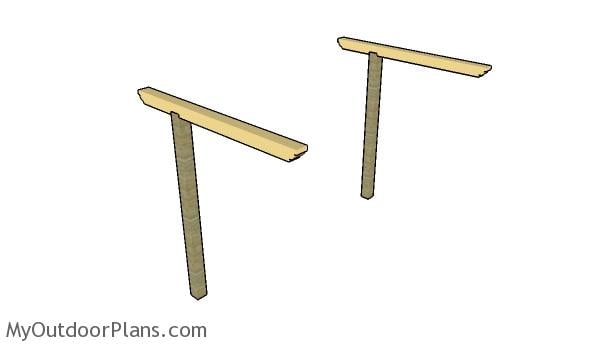
Fitting the top supports
Fit the supports to the top of the posts and align the edges with attention. Make sure the corners are square and leave no gaps between the components. Drill pilot holes through the top supports and insert 8″ screws into the posts.
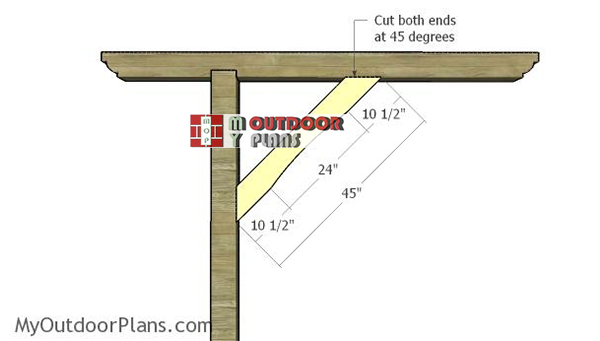
Fitting-the-braces
Continue the project by installing the 6×6 braces to the frame of the pergola. Cut both ends of the braces and then secure it to the posts with 3 1/2″ screws, after drilling the pilot holes.
Building the support beams
Build the support beams for the pergola from 2×6 beams. Cut both ends of the 14′ long beams in a decorative manner, using the pattern shown above.

Fitting the support beams
Fit the support beams to the 2 legged pergola, as shown in the plans. Center the beams to the top of the posts and clamp them into place tightly. Drill pilot holes through the beams and through the posts and insert 9″ carriage bolts. Insert at least two carriage bolts for each post. Use a spirit level to make sure the posts are plumb when drilling the pilot holes.
Building-the-shade-elements
Build the shade elements from 2×6 lumber. As you can easily notice in the plans, you need to make two notches to the beams so they fit easily over the 6×6 supports. Mark the cut lines to the beams, as shown in the diagram and then use a saw to make the notches. Smooth the recess with sandpaper.

Fitting the top rafters
Fit the shade elements to the supports, making sure you place them equally spaced. You can toenail them to the supports or you can use metal fasteners.
Fitting the top slats
Fit 1×2 slats to the top of the shade elements. Align the slats to the rafters as shown in the plans. Use 1 1/4″ screws or nails to secure the slats into place tightly.
2 legged pergola plans
Fill the holes with wood putty and let it dry out for a few hours. Smooth the surface with 120-220 grit sandpaper then enhance the wood with a few coats of stain or lacquer. Make sure you choose a waterproof product, as the lumber will be exposed to the elements.
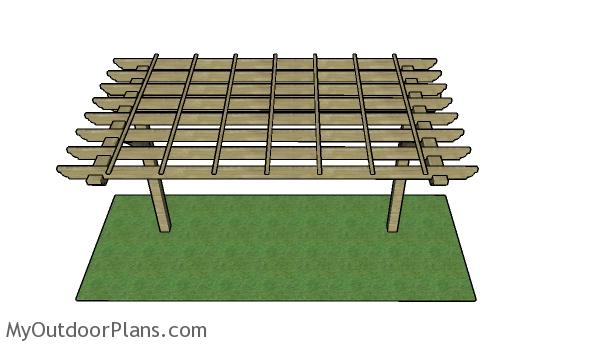
2 Post Pergola Plans
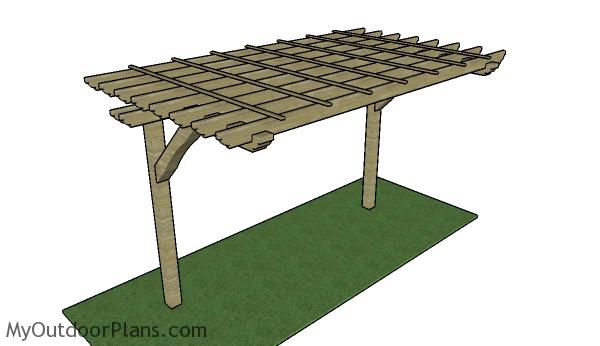
Seen from above, the pergola has a really nice design and it will integrate easily to any backyard. You can adjust the size and the design of the pergola so it suits your needs.
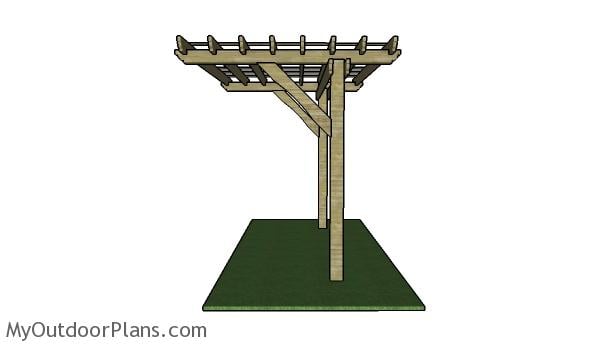
Two Legged Pergola Plans
This is a simple project you should be able to build in a few days without much effort. Remember that you need to adjust the size of the components so they suit your own needs and read the local building codes before undertaking the project on your own. If you want to score more point, you can even invest in more exquisite materials, such as oak or redwood. Premium Plans for this project available in the Shop.
If you want to get this project as a PDF file, with 1 full cut list and 1 full shopping list, check out the GET PDF PLANS button bellow.

This woodworking project was about two legged pergola plans free. If you want to see more outdoor plans, check out the rest of our step by step projects and follow the instructions to obtain a professional result.
EXPLORE MORE IDEAS FOR:
 |
 |
 |
 |
38 comments
Just double checking/ any concern using 6x6s for support beams? With the weight of the 6×6 – 8ft (tipping or leaning forward?) thanks
If you set the posts in concrete, you should have no problems with using 6×6 lumber for the support beams, especially that you will also fit braces. However, feel free to use other materials, if you wish.
We finished up the pergola using your plans with just a few tweaks last weekend. It turned out great. If you’d like to see a picture, just let me know your email address and I can forward it that way. Thanks again.
I’ve receive the picture. It looks awesome! Great job! Can you please tell me how much were the materials and how long it took to get the job done?
noticed that the plans are missing
Building the shade elements
Build the shade elements from 2×6 lumber. As you can easily notice in the plans, you need to make two notches to the beams so they fit easily over the 6×6 supports. Mark the????
thanks
I love this, just what I wanted! In the materiel list it says 8″ carriage bolts, in the step by step it says 9″” can you send this plan to my e mail? Thanks
It’s 9″ carriage bolts. See how you can save or print the plans HERE: http://myoutdoorplans.com/faq/
Interesting/neat design. I had some questions as I would like to tweak it a bit. I am using this over a Koi pond that runs along side 6ft stockade fence. I will secure the posts next to existing fence posts and may extend it to 20′ vs 14′ in your plans. This said will add a 3rd post / 10ft on center. I would like a little more overhang on the pond and really do not need the 24″ overhang on backside. Can I reduce the 24″? and also extend it two more feet or more over pond side and still have the necessary support? Also will this change the position of the 6×6- 45 degree braces? And if so how do you determine the position? Thanks Gary
You can remove the 24″ overhang. If you make the front overhang longer, this will not change the position of the braces. I would make them longer though, so they can support the longer overhang, and thus their position would change.
I’d like to reduce the size of the 6×6 support beam from 96” to 72”. 24” in the back and only 48” in the front. What size should I reduce the angled 6×6 support to ? Plans say it should be 45” for the 96” support beam, therefore curious to know what length I should adjust to for the 72” support beam…
36″
Wondering if these plans may be adapted on a smaller scale using 4×4 posts?
Yes, it will work.
I would like to have the 6×6 support beams have a slight rise(10-15 degrees) off the posts rather than the 90 degrees in plans. If possible, how would that change the cuts?
I am curious about this also. I want to angle the end opposite the posts so rain water runs onto the roof and into the gutters.
It is possible, it does change the angle of the braces and also the cut outs inside the horizontal supports that go on top of the posts.
Looking at building this over my outdoor kitchen. Kitchen is already done my only concern would be mounting 6×6’s to the slab. The slab is 4in thick. Do you have any suggestions?
did you ever figure this out?
I am looking to possibly build a 8 x 8 or 10 wide and 8 depth two post gazebo. Do you provide plans for these? Also, how do you feel about putting a metal roof on it instead of wood planks? I would appreciate your feed back. Thanks
I don’t have plans for that. To use metal sheets instead of the rafters, you would need a slope. The sheets should go with the slope of the roof, from front to back.
Also, what if I wanted to put a slight slop on the roof. Plus, would the metal roof need to go from side to side or front to back? Thank you
I have an odd-ball arrangement that has stymied my attempts at finalizing a Pergola plan,…….until now.
I’m printing the Plan as I’m writing this. I will modify the Plan to morph it into a modified “L” design. Hope to have it built by mid-to-late summer.
Will send photos then.
Many thanks for the Plan!
Good luck. I’m looking forward to seeing your project!
I have been looking at simpson strong tie ABA 6 in. x 6 in. ZMAX Galvanized Adjustable Post Base to attach the post to the concrete. Im a little skeptical in using something like this for a cantilever pergola and perhaps it would be better to just bury the post 2′ to 3′, does anyone have any sound advice on the matter.
For the 2 post pergola with 6×6 post, can the 6×6 post be mounted to concrete?
This is super helpful, thanks! Is it possible to do a 2-legged design that covers a 12’x12′ space instead of the 8’x12′? Would there be enough structural support to add an additional 4′?
I don’t see that possible.
Is it posible to build a scaled down version with 4×4 posts and 2x4s instead of 6×6 and 2x6s? I already have the materials and would love to put them to use on something like this. Maybe a 4 foot overhang rather than 6?
Yes, you could do that.
Would it be possible to build this to cover an 8×8 area? I need the two post design, but don’t have the 12 foot base area.
Yes, it is possible. Just make it shorter. The techniques are the same, you only need to modify the component size.
Has there been any sag with the 2x6x14 beams or any concerns with sag with those beams over time?
I’m looking for a DIY 3 Post L Shaped Pergola design approximately 12′ by 18′. does anyone have any ideas?
can these plans be modified to 18ft between the 2 posts? What size would the beam that spans the 2 posts need to be?
Great plans, thank you. If I cut the overhang from 2ft to 1ft and make the long side 7ft instead of 6ft, would the knee braces at 45″ in the plan be sufficient? If not, what length would you recommend?
Made the 2 post pergola. Love it! Pretty easy to do and looks great. I have pictures but don’t see where to upload.
I received your brag project. I will publish it shortly. Thank you for sharing!
Would this be strong enough to support about 1000 pounds? Could I mount a swing and that would hold 2 people ? Thank you