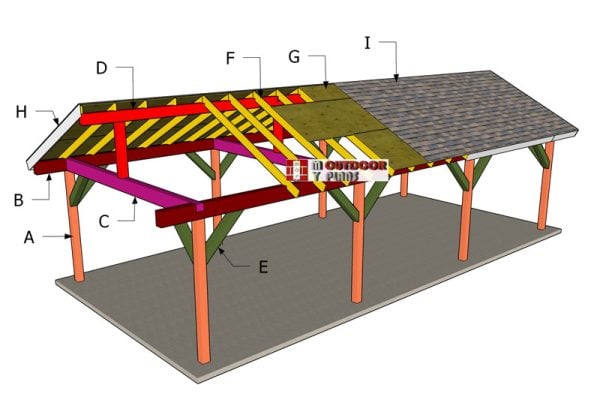
This step by step diy woodworking project is about a 16×36 outdoor pavilion roof plans. In part 2 of the project, I’ll guide you through constructing the roof, starting with the assembly of the rafters for a robust framework. In embarking on this 16×36 gable pavilion project, we’re innovating a space where imagination thrives, where every detail is optimized for efficiency and sustainability. Take a look over the rest of my woodworking plans, if you want to get more building inspiration. Check out the Shop, as well, for full list of Premium Plans.
When buying the lumber, you should select the planks with great care, making sure they are straight and without any visible flaws (cracks, knots, twists, decay). Investing in cedar or other weather resistant lumber is a good idea, as it will pay off on the long run. Use a spirit level to plumb and align the components, before inserting the galvanized screws, otherwise the project won’t have a symmetrical look. If you have all the materials and tools required for the project, you could get the job done in about a day. See all my Premium Plans HERE.
Projects made from these plans
16×36 Outdoor Pavilion Roof Plans
Building-a-16×36-pavilion—gable-roof
Cut and Shopping Lists
Tools
![]() Hammer, Tape measure, Framing square, Level
Hammer, Tape measure, Framing square, Level
![]() Miter saw, Drill machinery, Screwdriver, Sander
Miter saw, Drill machinery, Screwdriver, Sander
Time
![]() One day
One day
Related
- PART 1: 16×36 Gable Pavilion Plans
- PART 2: 16x36 Gable Pavilion Roof Plans
How to build a 16×36 pavilion roof
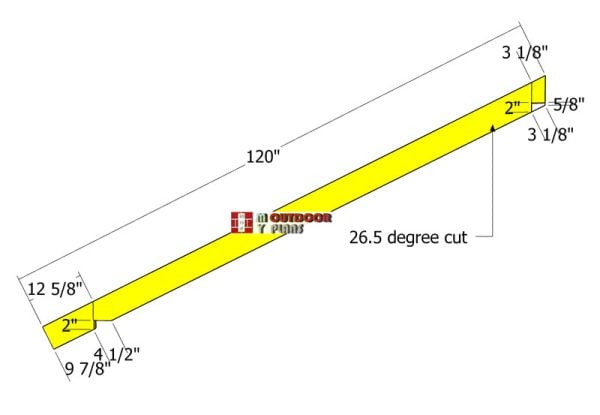
Rafters—diy-diagram
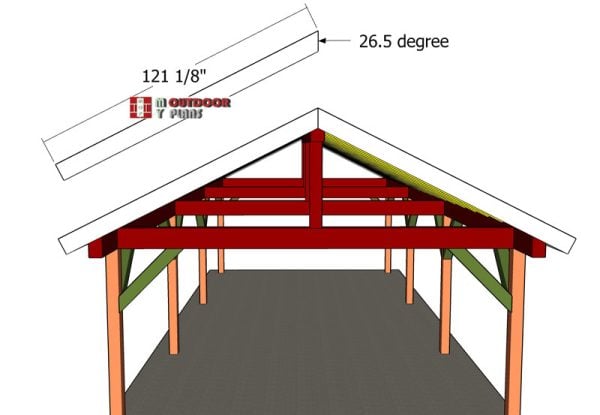
Use 2×6 lumber for the rafters. Use a circular saw to make the 26.5 degree angle cuts to the boards. Smooth the edges with sandpaper. Make the notches to the rafters, as shown in the plans. Mark the lines before doing the cuts.
Birdsmouth cuts serve as the backbone of roof stability, anchoring rafters securely to the walls of your structure. By creating a snug fit between the rafter and the wall plate, these cuts distribute weight evenly, fortifying the roof’s framework against the forces of nature.
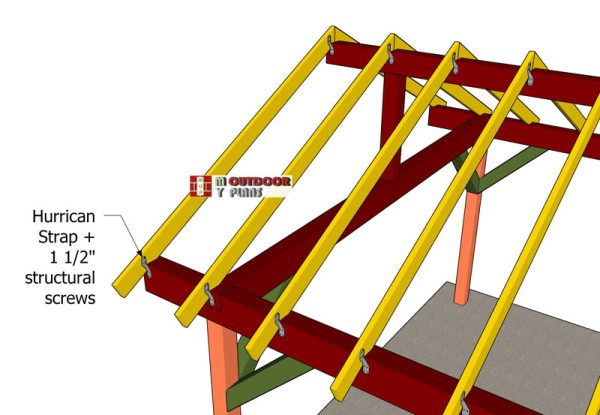
Rafter—detail
Rafter ties, much like gravitational forces in the cosmos, play a crucial role in maintaining stability. By connecting opposing rafters at their base, they counteract the tendency of the roof to spread under load, akin to how gravity keeps celestial bodies in orbit. Thus, rafter ties ensure the roof remains steadfast against the forces of nature.
Rafter—detail
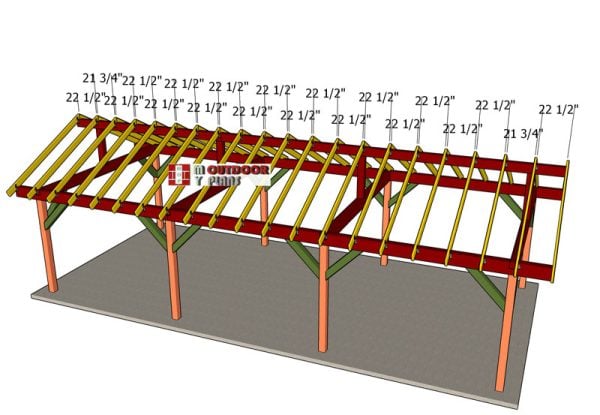
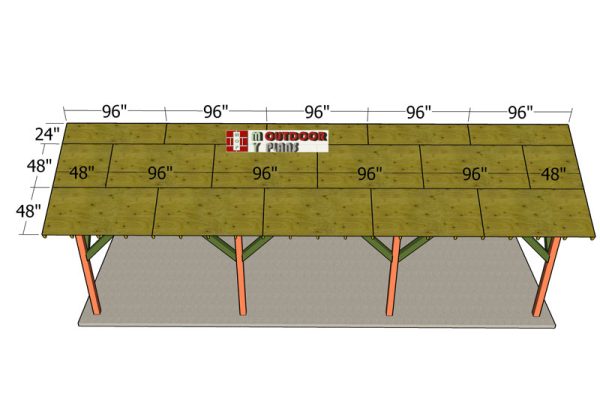
Spacing rafters every 24 inches on center is crucial for a sturdy roof, much like how precise measurements are key in woodworking. Just as each piece of wood needs to fit snugly in a project, every rafter must be spaced evenly to distribute weight properly and prevent sagging.
It’s all about attention to detail and setting a solid foundation for a roof that can weather any storm.
Roof-rafters
Use 3/4″ plywood for the roof of the pavilion. Cut the sheets at the right dimensions and then lay them to the top of the pavilion. Leave no gaps between the sheets and then insert 1 5/8″ / 2 1/2″ screws, every 8″ along the rafters, so you can secure them into place tightly.
Side-roof-trims
Gable-end-trims
Fit 1×8 trims to the sides of the pavilion. Align the edges with attention and insert 2″ nails to lock them to the ends of the rafters.
Fit the 1×8 trims to the front and back of the pavilion. Make sure you make a 24.5 degree cut to one end of the gable end trims. Lock them into place with 2″ nails.
Fitting-the-roofing
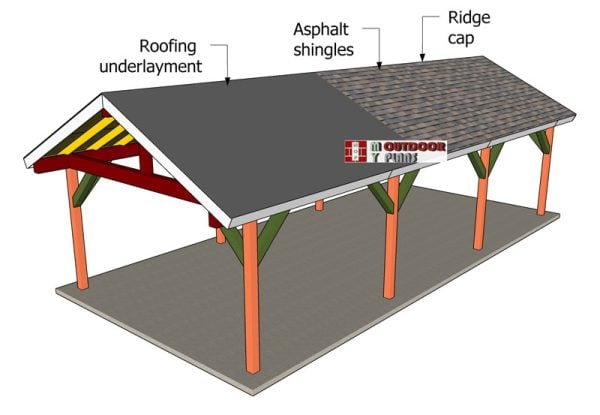
Cover the roof with tar paper and then install the asphalt shingles. Then, lay down a starter strip along the eaves to provide a secure base for the shingles. Begin installing the first row of shingles along the bottom edge of the roof, ensuring they overhang the edge slightly.
Work your way up the roof, staggering the shingle joints and using roofing nails to secure them in place. At the peak of the roof, trim the shingles to fit neatly and install a ridge cap to provide a finished look and extra weather protection.
Finally, inspect your work to ensure all shingles are properly aligned and secured, creating a durable and attractive roof for your gable pavilion.
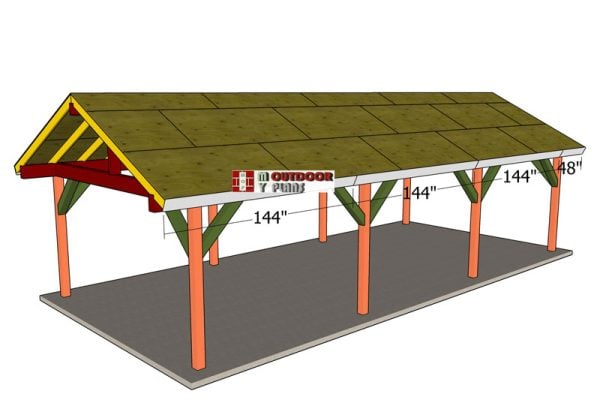
Front view – 16×36
Don’t forget to take a look over PART 1 of the project, so you learn how to build the frame of the large pavilion.
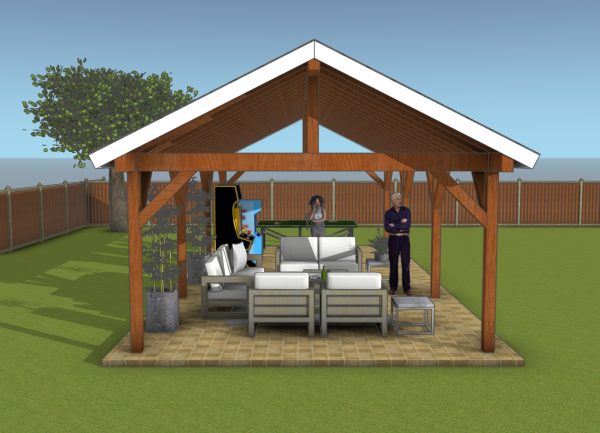
A 16×36 gable pavilion isn’t just a structure; it’s an opportunity waiting to be seized! You can turn it into your ultimate outdoor hangout spot, hosting epic BBQs and parties that’ll have your friends talking for weeks.
Or, transform it into your personal outdoor gym, where you can crush your workouts while soaking up some Vitamin D. And hey, why not use it as a cozy retreat for some quiet meditation or reading time? The possibilities are endless, my friends—go out there and make it happen!

Top view – pavilion
Elevate the pavilion’s woodworking aspects with meticulous sanding and staining to bring out the natural beauty of the wood. Consider adding decorative trim or molding for an extra touch of elegance. Then, apply weather-resistant paint or sealant to protect the wood from the elements and ensure longevity. Finally, install custom-built features like built-in benches or shelves to maximize functionality and enhance the overall aesthetic appeal of the pavilion.
This woodworking project was about 16×36 gable pavilion roof plans. If you want to see more outdoor plans, check out the rest of our step by step projects and follow the instructions to obtain a professional result.

EXPLORE MORE IDEAS FOR:
 |
 |
 |
 |