This step by step diy woodworking project is about a 16×36 large gable pavilion plans. Today, we embark on a journey to create something truly special: a 16×36 gable pavilion. These plans will provide you with clear and detailed guidance to build a structure that combines both elegance and practicality. Together, let’s turn this vision into a reality, showcasing the power of determination and craftsmanship.
The dimensions for this project refer to the base, outside post to outside post. As we look at our 16×36 gable pavilion project, it’s essential to have a clear estimation in terms of both time and financial investment. Based on similar projects, you can expect this endeavor to take approximately 1 month from start to finish, accounting for planning, procurement, and construction phases. In terms of budget, depending on the materials and labor costs in your area, you should prepare to invest anywhere from $15,000 to $25,000 to bring this vision to life. Let’s roll up our sleeves and make this dream a reality. Take a look over the rest of our woodworking plans, if you want to get more building inspiration. Check out the Shop, as well, for full list of Premium Plans.
When buying the lumber, you should select the planks with great care, making sure they are straight and without any visible flaws (cracks, knots, twists, decay). Investing in cedar or other weather resistant lumber is a good idea, as it will pay off on the long run. Use a spirit level to plumb and align the components, before inserting the galvanized screws, otherwise the project won’t have a symmetrical look. If you have all the materials and tools required for the project, you could get the job done in about a day. See all my Premium Plans HERE.
Projects made from these plans
16×36 Pavilion Plans – Large Gable Gazebo
Building-a-16×36-pavilion—gable-roof
Cut + Shopping Lists
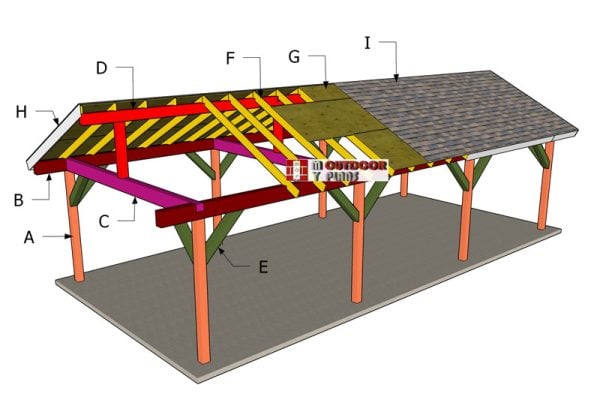
A – Posts – 6×6 lumber 8′ long – 8 pieces
B – Top Beams – 6×10 lumber 142 1/8″ long – 2 pieces
B – Top Beams – 6×10 lumber 168 7/8″ long – 4 pieces
C – Crossbeams – 6×10 lumber 16′ long – 4 pieces
D – Supports – 6×6 lumber 39 3/8″ long – 4 pieces
D – Ridge Beams – 6×8 lumber 171 5/8″ long – 2 pieces
D – Ridge Beams – 6×8 lumber 147 5/8″ long – 1 piece
E – Braces – 6×6 lumber 42″ long – 22 pieces
F – Rafters – 2×6 lumber 10′ long – 42 pieces
G – Roof Sheets – 3/4″ plywood – 4’x8′ – 18 pieces
G – Roof Sheets – 3/4″ plywood – 4’x4′ – 2 pieces
G – Roof Sheets – 3/4″ plywood – 2’x8′ – 10 pieces
H – Trims – 1×8 lumber 121 1/8″ long – 4 pieces
H – Trims – 1×8 lumber 12′ long – 6 pieces
H – Trims – 1×8 lumber 48″ long – 2 pieces
Tools
![]() Hammer, Tape measure, Framing square, Level
Hammer, Tape measure, Framing square, Level
![]() Miter saw, Drill machinery, Screwdriver, Sander
Miter saw, Drill machinery, Screwdriver, Sander
Time
![]() One week
One week
Related
- PART 1: 16×36 Gable Pavilion Plans
- PART 2: 16×36 Gable Pavilion Roof Plans
It’s that easy to build a large gable pavilion!
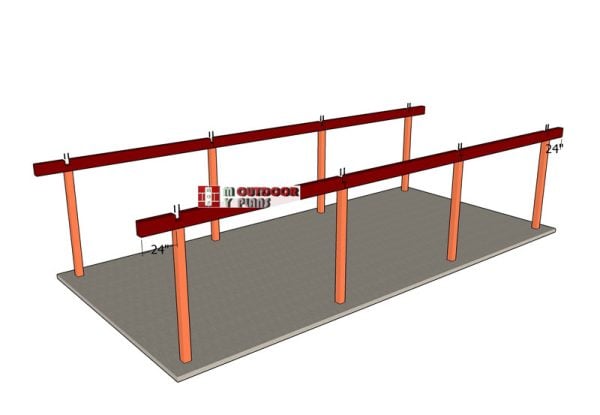
How to build a 16×36 pavilion – laying out
Laying-out-the-posts-for-the-16×36-pavilion
Mark the four corners with stakes and string for a 16×36 rectangle. Dig, align, and make sure the diagonals are equal. Also, apply the 3-4-5 rule on each corner to make sure the angles are square.
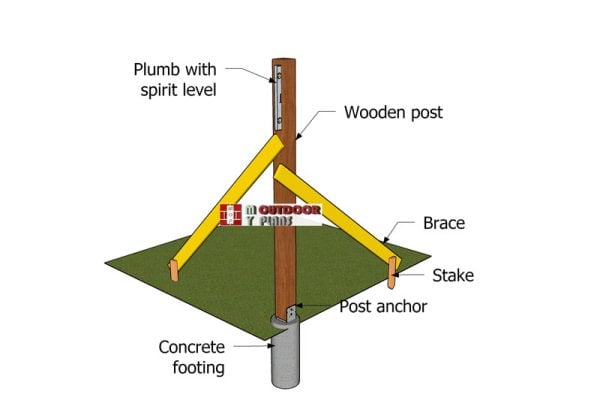
Setting-the-posts
Afterwards, we need to set the posts in place. Dig 3 ft holes into the ground, making sure they have about 14″ in diameter. Fit the tubes then the posts into the ground and plumb them with a spirit level. Use temporarily braces to make sure the posts are locked into placed while filling the holes with concrete. Let the concrete dry out for several days. Read the local codes for more details on how to secure the posts.
Use lag screws to secure the posts to the anchors. Before pouring the concrete you need to make sure the top of the posts are horizontal one to another. Use a laser to mark the level to the top of the posts and use a circular saw, if you need to make cuts.
Building the frame of the large pavilion
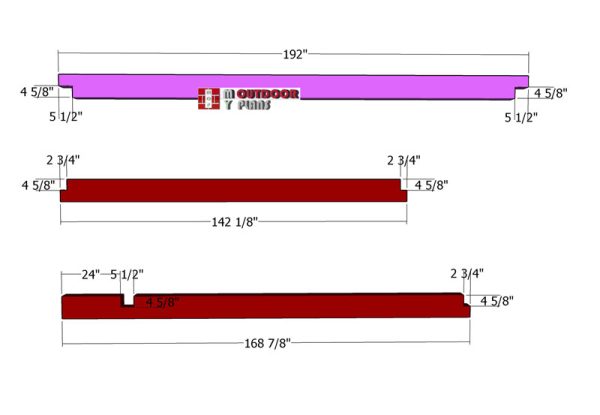
Top-plates
Use 6×10 lumber for the top plates. Mark the cut lines on the beams and then make the cut outs with a circular saw and a chisel. Smooth the surface with sandpaper.
Set the circular saw at 4 5/8″ and then make parallel cuts inside the marked areas. Clean the recess with a chisel, a hammer and sandpaper. We need to use 6×10 lumber because of the large opening on all sides of the pavilion.
Attaching-the-side-top-plates
Fit the crossbeams to the top of the side posts. Drill pilot holes through the plates and insert 10″ screws to lock them to the posts. Use 2 screws for each joint. Make sure the corners are square and plumb the posts vertically. Use a spirit level to check if the beams are horizontal.
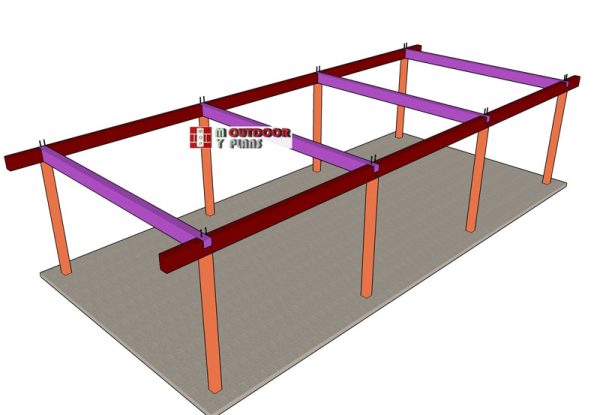
Installing-the-crossbeams
Cut and pre-drill your crossbeams for precise alignment. Carefully lift and position them on top of the posts, ensuring everything is level. Secure the crossbeams firmly with heavy-duty 10″ screws.

Diagonal-braces—detail
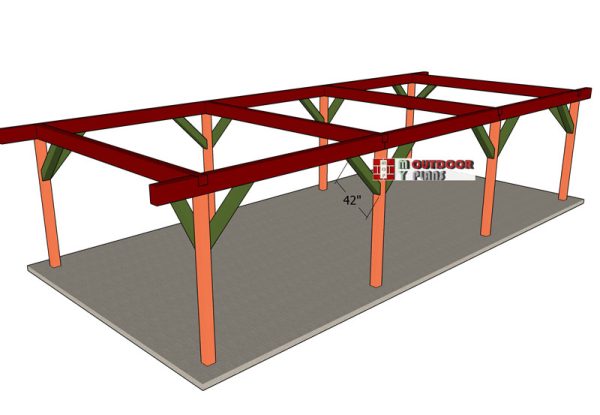
Attaching-the-braces
Next, cut the diagonal braces to the desired length with ends angled at 45 degrees. Position the braces between the posts and crossbeams, ensuring a snug fit. Secure the braces with heavy-duty 5 1/2″ screws or bolts for added stability.
Diagonal braces enhance the structure’s stability by distributing weight and stress more evenly. They prevent lateral movement and sway, reinforcing the pavilion against strong winds and shifting forces. This added support ensures the longevity and durability of your construction.
Building the roof of the pavilion
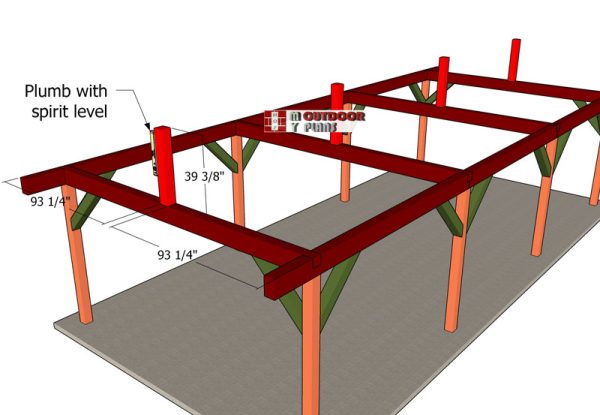
Fitting-the-top-supports
Position the 6×6 supports on top of the crossbeams, ensuring they align with the layout of the pavilion. Secure the supports to the crossbeams using post-to-beam connectors, ensuring they are firmly attached. Double-check for alignment and stability before proceeding with further construction. Use 2 1/2″ structural screws for the connectors.
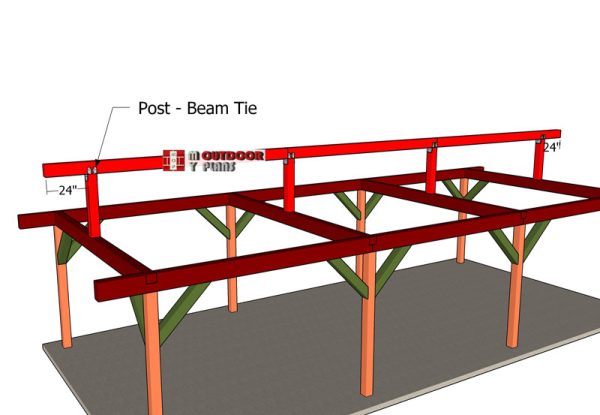
Post-beam-ties
To install the ridge beams, position it atop the 6×6 supports, ensuring it aligns centrally with the pavilion’s layout. Notice the 24″ overhangs to the front and back of the structure.
Use temporary bracing to hold the ridge beam in place while you secure it to the supports with post to beam connectors and screws. Finally, remove the temporary bracing and double-check the alignment and stability of the ridge beam before proceeding with further construction.
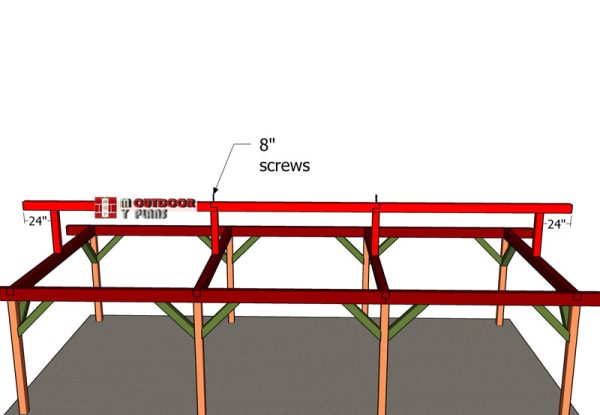
Attaching-the-ridge-beams
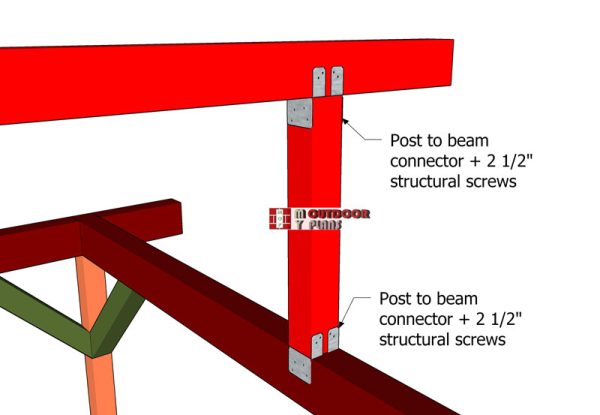
Joints—detail—large-pavilion
Use 2 1/2″ structural screws to lock the connectors into place. Drive 8″ screws through the beams to lock them together tightly.
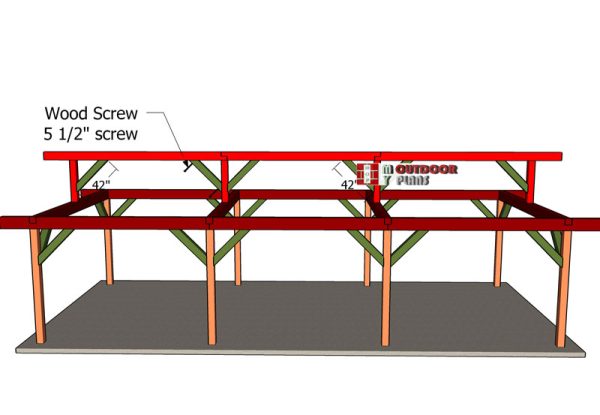
Top-braces—gable-roof
Use 6×6 lumber for the top braces. Make 45 degree cuts at both ends of the braces. Secure the braces into place with 5 1/2″ screws. Drill pilot holes before inserting the screws. As usual, use 2 screws for each joint.
Finishing touches
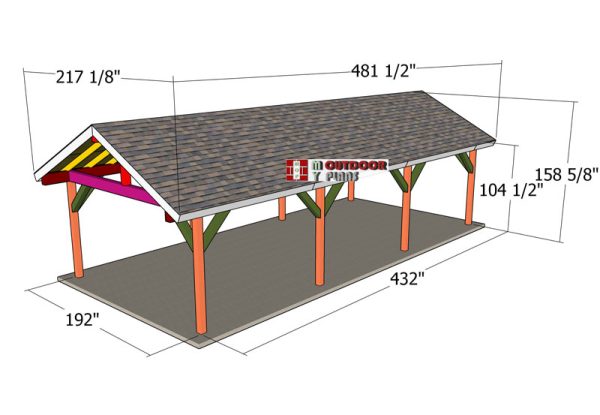
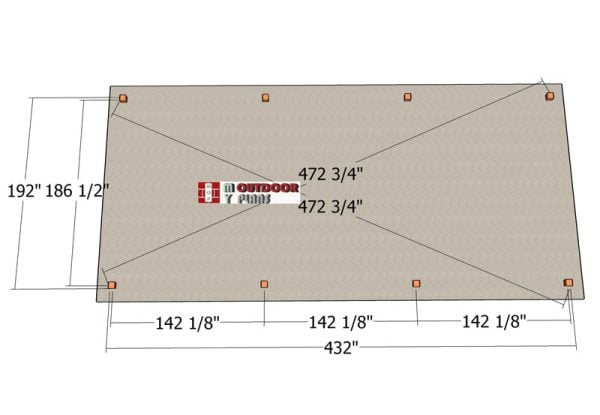
16×36-pavilion—dimensions
Check out PART 2 of the project to learn how to build the gable roof. The diagram illustrates its towering height, providing ample headroom for gatherings and activities beneath its sheltering roof.
Its depth and length extend generously, offering space for relaxation, entertainment, or whatever purpose you envision. Each dimension meticulously planned to ensure a structure that not only impresses but also serves its intended function with grace and elegance.
How to build a 16×36 pavilion

Top view – 16×36 gable pavilion
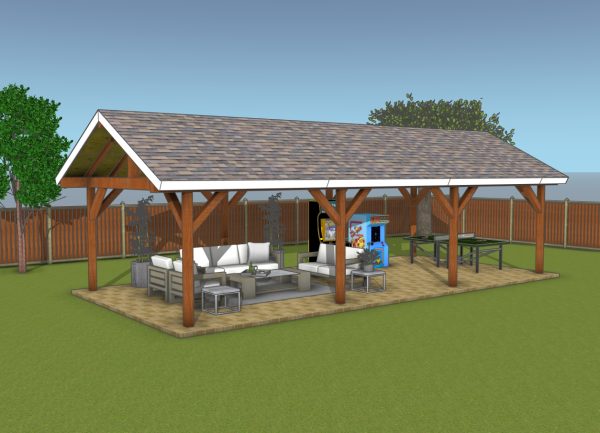
Complete the space with outdoor furniture and decor that reflects your style and enhances comfort. Choose durable and weather-resistant seating options such as benches, lounge chairs, or a dining set, and add decorative elements like throw pillows, rugs, and outdoor artwork to personalize the space and make it truly your own.
Elevate the allure of the pavilion’s surroundings with thoughtful landscaping, harmonizing its design with the natural environment. Add flower beds, verdant shrubs, or majestic trees, and weave pathways or stone pavers to seamlessly link the pavilion to the other areas of your property.
Top Tip: Check out the Shop, as well, for full list of Premium Plans. Press the GET PDF PLANS button bellow, if you want to get the Premium Plans with the full Cut and Shopping lists included, as well as with the cut layout diagram.

This woodworking project was about 16×36 gable pavilion plans. I encourage you to explore the wealth of projects awaiting you on my blog. Share these projects with your friends, and together, let’s continue to build a community fueled by creativity and passion.

EXPLORE MORE IDEAS FOR:
 |
 |
 |
 |