This step by step woodworking project is about free porch swing plans. A wooden swing offers comfort when you want to relax after a day of hard work. Taking into account is an easy project, you should consider making one for the loved ones. Your friends and family will enjoy this space, as it has a beautiful appearance and adds value to your property. In addition, this spring project can be done in just an weekend, using common tools and materials. Don’t forget to take a look over my list of woodworking projects, as you might get more awesome ideas for your home. This project should only be the beginning of your DIY experience. Premium Plans available for this project in the Shop (not identical, improved version).
You should remember that all my woodworking plans come with 3D diagrams, step by step instructions and complete Cut and Shopping lists. Inn addition, you can Print or PDF download the plans for free, so you can take the plans with you in the shop. I did my job, now it is your turn to build amazing pieces of furniture!
After you design the wooden swing, you have to buy the materials required for the project, from your local diy store. Cedar, redwood or pine are good choices as they are resistant to rot and have an exquisite look. Work with good judgement and with attention, making sure you measure the components several times, before performing the cuts. Secure all the joints with wood screws or bolts, making sure you also increase their rigidity will wood glue. Sand the wooden surfaces with sandpaper of different granulation. See all my Premium Plans HERE.
Projects made from these plans
Cut + Shopping List
- A – 2 pieces of 2×4 lumber 20” long, one end cut at 15º SEAT SUPPORT
- B – 2 pieces of 2×4 lumber 23” long, one end cut at 15º BACK SUPPORT
- C – 3 pieces of 2×4 lumber 55 1/2” long BRACES
- D – 4 pieces of 1×2 lumber 11”, 4 pieces of 1×2 lumber 10 1/4”, 2 pieces of 1×3 lumber 19” ARM RESTS
- E – 10 pieces of 2 1/2” galvanized wood screws EYE SCREWS
- F – 24 pieces of 1×2 lumber 60” long SLATS
- 3 pieces of 2×3 lumber – 8′
- 1 piece of 1×3 lumber – 8′
- 23 pieces of 1×2 lumber – 8′
- 100 pieces of 2 1/2″ screws
- 50 pieces of 1 5/8″ screws
- 4 eye screws
- hangers
Tools
![]() Hammer, Tape measure, Framing square
Hammer, Tape measure, Framing square
![]() Miter saw, Drill machinery, Screwdriver, Sander
Miter saw, Drill machinery, Screwdriver, Sander
Time
Related
Wooden Porch Swing Plans – Free Porch Swing Plans

Porch-swing-plans-free
Building a wooden swing for your porch is a straight forward project if you use the right plans for your needs, as well as proper tools and carpentry techniques. In order to get the job done properly, you should follow the step by step instructions and take accurate measurements.
Top Tip: Align all the component at both ends, before locking them with screws. Use a spirit level to level the seat and to plumb the sides of the porch swing. Make sure the corners of the seat frame are right-angled. If you want to build a swing bench with center console, I’ve got you covered with these free plans.
Step 1: Building the side frames
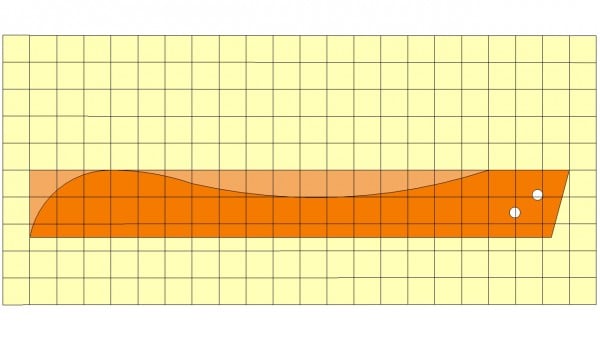
Side frame plans
First of all you need to build the seat supports, out of 2×3 or 2×4 lumber. As you can see in the image you could make a curved seat and cut it out with a jigsaw, using the pattern in the image. On the other hand, if you want to get the job done quickly, you could just cut one end of the support at 15º and round the opposite end.
Smart Tip: Round the exposed edges with a router or a sand-block.
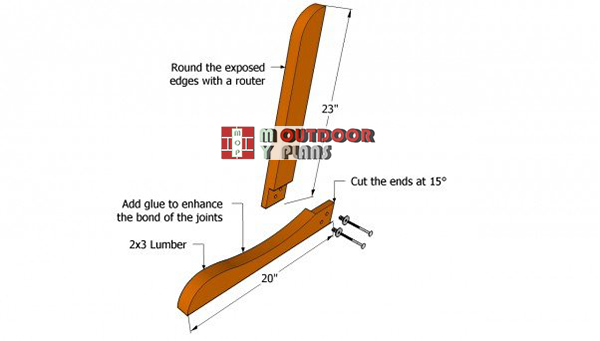
Building-the-sides-of-the-porch-swing
Afterwards, you build the back support from 2×3 or 2×4 lumber, making sure you round one end and cut the opposite at 15º. Afterwards, notch the components, in order to lock together easily. Use a circular saw to make multiple cuts and clean teh recess with a chisel.
Add glue to enhance the bond of the joints, drill pilot holes and insert the carriage bolts. Countersink the head of the bolts, in order to obtain a neat look.
Step 2: Assembling the frame

Assembling-the-frame-of-the-porch-swing
Assemble the frame of the wooden swing. Therefore, cut three braces out of 2×3 or 2×4 lumber at the right size. Next, place the braces between the side components and align them thoroughly. Additionally, make sure the corners are right-angled, using a carpentry square.
Also, drill pilot holes trough the side components and insert the 3” wood screws in the braces. Work on a level surface, in order to get consistent results.
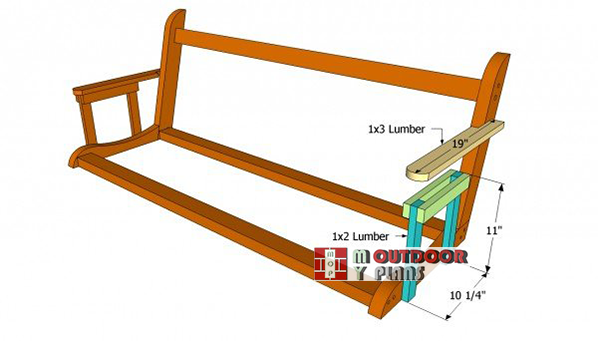
Installing-the-armrests
After assembling the frame of the porch swing, you should build the armrests and install them into place. As you should notice in the image, you have to build several components and secure them to the seat and back supports.
Next, build the frame of the armrests from 1×2 lumber and secure them to the supports. Drill pilot holes and insert the 3” wood screws. Add glue to enhance the bond of the joints.
Step 3: Attaching the seat slats
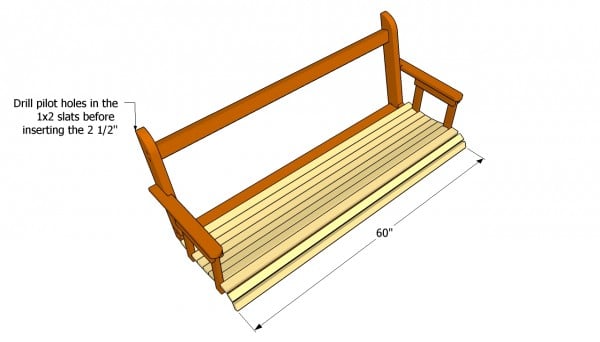
Attaching the seat slats
Build the slats from 1×2 lumber and install them into place. Next, drill pilot holes and countersink them, before inserting the decking screws (2 1/2” screws). Align the slats making sure they overhang about 3/4” on both sides of the frame.
Top Tip: Notch the slats to fit around the armrest supports. Work with great care, making sure you place a nail between the slats. In this manner, you would get consistent gaps between the slats.
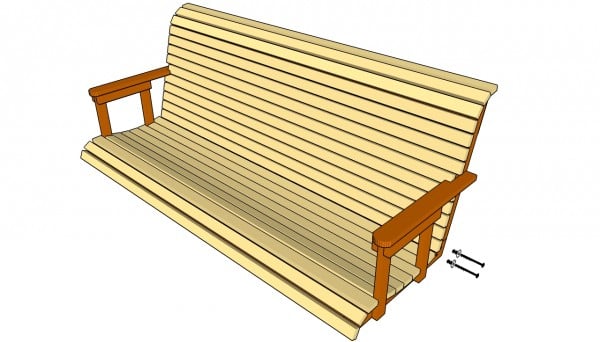
Installing the back rest slats
Continue the project by installing the slats to the backrest, in the same manner described above. Cut the 1×2 slats to the right size and fit them into place. Notch the slats to fit around the armrest, as you should notice in the plans.
Top Tip: Round the exposed edges of the slats using a router and a 1/4” bit, if you want to enhance the look of your wooden swing. Don’t forget to countersink the head of the screws.
Step 4: Attaching the armrests
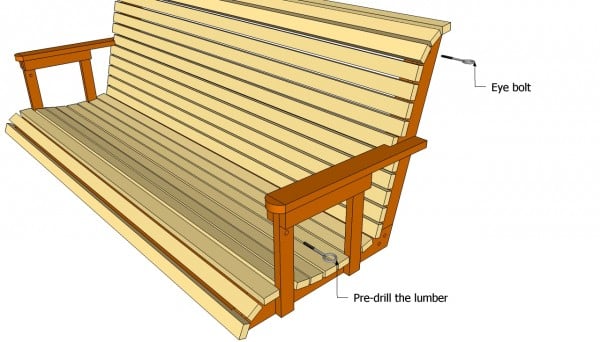
Installing the eye screws
One of the last steps of the project is install the eye screws to the frame of the armrest and to the backrest support. Repeat the procedure on the opposite side of the swing.
However, you need to use thick rope or chain to hang the swing to the porch ceiling. Leave about 16″ off the ground to the seat. The swing should be secured properly to support the weight of the swing as well as the people that would occupy it.
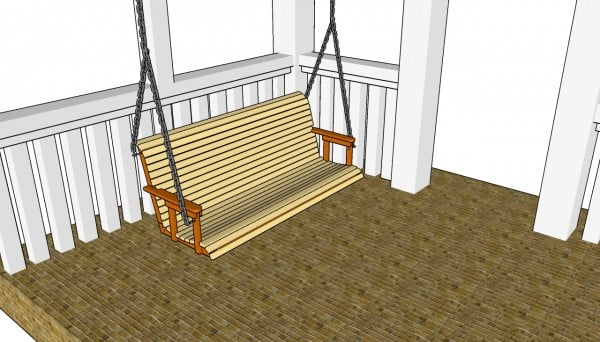
Porch Swing Plans Free
The last step of this project is to take care of the finishing touches. Therefore, fill the holes with wood filler and let the compound dry out for several hours. Sand the wooden components with medium-grit sandpaper and remove the residues with a vacuum. I recommend these hangers for securing the swing to your porch ceiling. Premium Plans available for this project in the Shop.
Top Tip: In order to protect the wood from rot, apply several coats of stain, according to manufacturer’s instructions. Make sure the swing is level and secured properly, before using it. Make sure you take a look over the matching swing stand project, if you want more flexibility, so you can move it anywhere in your garden.
This woodworking project was about free porch swing plans. If you want to see more outdoor plans, check out the rest of our step by step projects and follow the instructions to obtain a professional result. See a lot more outdoor furniture plans and ideas!

32 comments
Wont the seat slats 1×2 break easily since the is no support in the middle. They feel very wobbly when I sit on them
With little modifications you can add a middle support. It all depends on the size of the swing, as well as on how much weight you add to it.
I forget to add same with the back middle I will add 3 to 4 too
This is great! Thanks for helping us make a porch swing for a friend’s porch (they are having a hard time and the mother just wanted a porch swing so she could sit with whomever and enjoy some semblance of peace and quiet)…and your free plans and details on line were a gift so we could make it happen!! Let us know when/how we can return the courtesy. And again, many thanks.
Congrats for the project and thank you for the appreciation. I would love to see a few pictures with the project: http://myoutdoorplans.com/contact/
Thank you ! I love swings and hope to try making one over the winter. What kind of wood do you use. Not sure what is best to use
If money is not a problem, I’d go for cedar. Otherwise you can use pine, but treat the components properly.
I used this project for my woodshop class, all of the plans are great and the shape used for the side frames is very comfortable… my only complaint is that the slats were far to weak (I used Cedar), I ended up having to input 2 more extra supports in the middle, but other than that the plans are great.
Thank you for the feedback! I would love to see how the project came out with your modifications! You can send me a few pics here: http://myoutdoorplans.com/contact/
my wife and have tried for hours to get your free plans for a specific porch swing WITH NO SUCCESS. Why? we get pictures of the swing and stuck in a loop. never have i seen any PLANS, IS THIS A REALLY BAD JOKE
Can you please share the link to the swing you want to build?
I made this swing last week..not bad. I added a center support.I also think the seat could be a little longer? I used pressure treated lumber,it was only about 30.00 thanks for the plans
Good to hear that and congrats for the project! Could you please share a few images with the swing so I can feature it on the blog? I am sure other diy-ers will find that useful! Use this form: http://myoutdoorplans.com/contact/
I’m not sure how you built this swing for $30, I recently built one and it cost way more than that. I had probably close to $200 invested in swing alone and another $150 in the swing frame.
Looking for plans with the porch swing and stand. Cannot find it anywhere.
The plans for the swing stand are here: http://myoutdoorplans.com/furniture/porch-swing-stand-plans/
I would like your plans for the porch swing with the stand. Where do I get them?
Read the FAQs to learn how to print the plans: http://myoutdoorplans.com/faq/ The plans for the stand are here: http://myoutdoorplans.com/furniture/porch-swing-stand-plans/
How do you get the angels right for the side frame plans? Is there a pattern to trace?
You trace the squares and them free hand draw the lines. I have no pattern for that.
Like your site but . . . there is no floating print symbol on the left side of my screen that allows me to print the plans – had to copy and print special (html format) in a word document – not difficult but more involved than saving as a PDF doc – what’s up with that?
The floating widget works (only on desktops and laptops). Maybe you should try disabling the adblockers.
Tried uploading pictures of my project but when I click submit the arrow wheel just keeps spinning. Says I need to fill in all required fields even though they are all filled in.
Sorry to hear that. It might be that your image is too large for the server to handle. You can send the images and your comments to admin@myoutdoorplans.com
Looking forward to seeing your project
Thanks. I’ll send it via email.
I want to make porch swing with cup holders like you show but cant find plans on here
Plans here: http://myoutdoorplans.com/furniture/porch-swing-with-center-console-plans/
I can’t find any specifics on the plans regarding the carriage bolts. Are they short (less than 2″) and serve to hold the seat/back pieces together, or are they longer and continue into the bottom stringer? If they are short, then is the entire frame tied together with the 3″ screws the go through the arm rests into the stringers? Thank you for your time!
What is your problem,
I have tried Chrome, Firefox, Edge and Internet Explorer on my notebook computer and there is no floating widget on the left hand side. Any search of all of these browsers for “Ad Blocker” has no results. I’ve tried several setting changes and when refreshing the page, no floating widget pops up for me to be able to download the pdf and print the plans. Plenty of click-bait for pdf ads though. I can’t even copy the information and paste it into a word document and print it. Can you email these plans to me if the side widget isn’t available? Perhaps it is in your region, but not here in the USA. Thanks.
The widget works
Make sure the page is set to Desktop View. The Widget doesn’t appear in Mobile View. 👌🤙