This step by step woodworking project is about porch swing stand plans. This article features detailed instructions for building a beautiful wooden stand for your porch swing. We have designed the plans to keep the expenditures under control and to involve the least amount of work possible. The simple swing stand can be built by anyone with basic tools and skills. You don’t have to hang the swing bench to the ceiling joists when you can simply build a wooden stand and move it wherever you want. If you are like me you like to spend time daydreaming in the garden. Here, this awesome swing stand will come to your rescues, as it will make it an experience. Check out the related articles to see how to build a porch swing bench.
When buying the lumber, you should select the planks with great care, making sure they are straight and without any visible flaws (cracks, knots, twists, decay). Investing in cedar or other weather resistant lumber is a good idea, as it will pay off on the long run. Use a spirit level to plumb and align the components, before inserting the galvanized screws, otherwise the seesaw won’t have a symmetrical look. If you have all the materials and tools required for the project, you could get the job done in about a day. See all my Premium Plans HERE.
Projects made from these plans
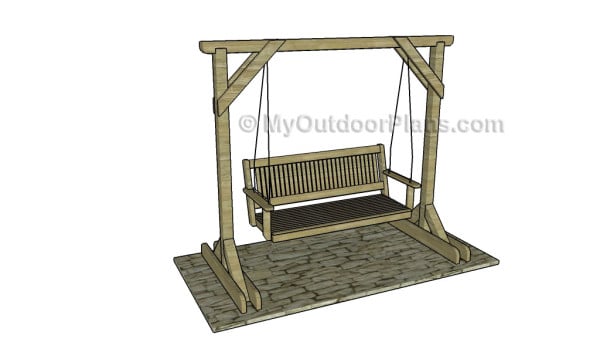
Porch Swing Stand Plans

Building a porch swing stand
Cut & Shopping Lists
- A – 4 pieces of 2×6 lumber – 48″ long BASE
- B – 2 pieces of 4×4 lumber – 80″ long POSTS
- C – 4 pieces of 4×4 lumber – 22 3/4″ long BRACES
- D – 1 piece of 4×4 lumber – 96″ long TOP BEAM
- E – 4 pieces of 2×4 lumber – 32 1/2″ long BRACES
- 2 pieces of 2×6 lumber – 8 ft
- 4 pieces of 4×4 lumber – 8 ft
- 2 pieces of 2×4 lumber – 8 ft
- 3 1/2″ screws
- 2 1/2″ screws
- filler, stain
- glue
- swing hanger
Tools
![]() Hammer, Tape measure, Framing square, Level
Hammer, Tape measure, Framing square, Level
![]() Miter saw, Drill machinery, Screwdriver, Sander
Miter saw, Drill machinery, Screwdriver, Sander
![]() Safety Gloves, Safety Glasses
Safety Gloves, Safety Glasses
Time
![]() One day
One day
How to build a swing stand
Attaching base supports
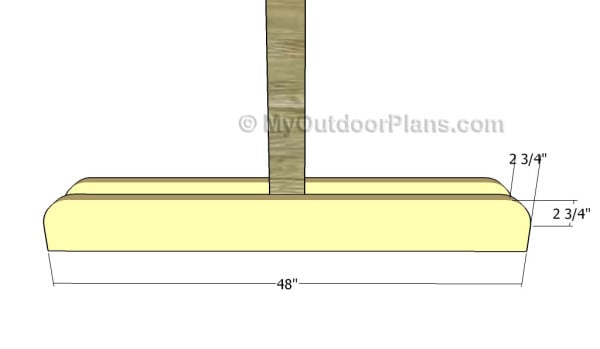
The first step of the project is to build the base of the swing stand out of 2×6 lumber. Round the corners of the beams and smooth them with 120-grit sandpaper. Drill pilot holes and secure the beams to the 4×4 posts with 3 1/2″ galvanized screws. Add waterproof glue to the joints and make sure the corners are square.
Remember that these are just guidelines. You can easily adjust the size of the base components, as well as the height of the posts to suit your very own needs and tastes.
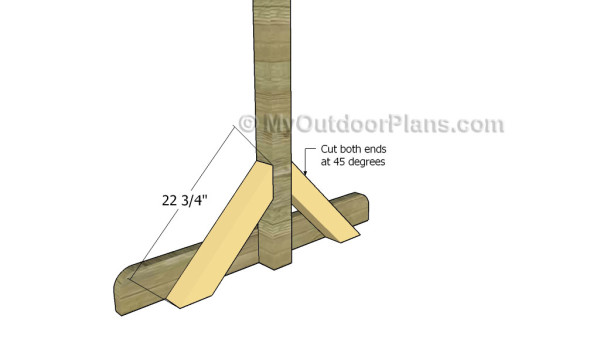
Attaching the base braces
Continue the project by attaching the 4×4 braces to the base of the swing stand. Cut both ends of the braces at 45 degrees and fit them to the stand, as described in the diagram. Drill pilot holes and secure the braces to the structure using 3 1/2″ screws. Add waterproof glue to the joints.

Building the top ridge
Build the top beam out of 4×4 lumber. Make two notches to the beams, as described in the diagram. Smooth the recess with a chisel and with sandpaper.
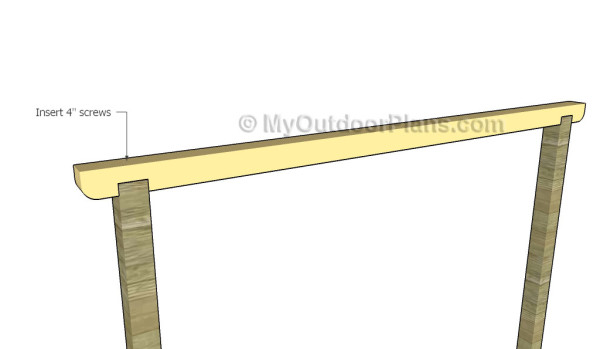
Fitting the top ridge
Attach the top beam to the 4×4 posts, as shown in the diagram. Add waterproof glue to the joints and insert 4″ screws through the top beam into the vertical posts. Double-check if the corners are square, before inserting the screws. Insert at least two screws to each joint and add plenty of waterproof glue to secure them into place.
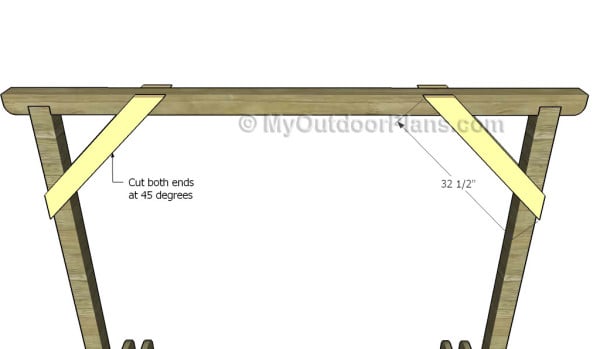
Attaching the braces
In order to add support to the wooden structure, we recommend you to fit 2×4 braces to the swing stand, as shown in the diagram. Cut both ends of the braces at 45 degrees and secure them to the structure using 2 1/2″ screws. Make sure the corners are right-angled before inserting the screws. Pre-drill the components to prevent the wood from splitting.
Porch swing stand plans
One of the last steps of the woodworking project is to take care of the finishing touches. Therefore, fill the pilot holes with wood putty and smooth the surface with 120-grit sandpaper. In addition, don’t forget to check out the step by step plans for building the corresponding swing bench.
Top Tip: If you want to enhance the look of the project and to protect the wooden swing stand from decay, we recommend you to cover the components with paint or stain. This is and ideal project for any backyard, as it gives you a lot of flexibility and it is aesthetically appealing. You can make this swing bench with stand the center focus of your patio with a small investments and with minimal work.
This woodworking project was about how to build a simple porch swing stand plans. If you want to see more outdoor plans, we recommend you to check out the rest of our step by step projects. LIKE us on Facebook and Google + to be the first that gets out latest projects and to hep us keep adding free woodworking plans for you.
- EXPLORE MORE IDEAS FOR -
 |
 |
 |
 |
14 comments
Great Post, I was looking for something to sit on my porch and an A frame was taking up too much space. I built mine from your plans, with a few changes. Works great!
Thanks
I would love to see your project. You can send the pics at: http://myoutdoorplans.com/contact/
Is it stable enough if you had 3 people on a swing and they began swinging really fast would the frame stay on the ground or would it lift up?
No. The stand is not made for that.
If you build it right, 20 people could swing it faster and faster til it comes off the ground. If you want people to get hurt, just make it bad, it will fall apart. “Accident” (no accident I’m single)
As a beginner to building these kind of things. I love the design. It seems pretty straight forward and something I could do over the weekend. But as I read the instructions and prepared my list for the hardware store, I realized the list for screws needed isn’t matching up to what is actually used in building this. Am I missing something? I figure its just a simple mistake. But I really look forward to building this for the wife! I love your site, good stuff!
Thanks for the feedback. I’ve updated the shopping list. Good luck, you can do it, it’s a basic project.
Do you have an estimated cost?
hi, what is the weight limit for this stand?
300-350 lbs
How did you connect the chain to the swing’s arm rest. I don’t see it in the plans.
Are you using pressure treated wood
Yes, that would help with durability
If I wanted to build this swing stand for a 2 foot single person swing. What would the measurement of all the wood pieces be adjusted to.