This step by step diy project is about 4×8 backyard chicken coop plans. I have designed this 4×8 chicken coop with a gable roof, so you can raise chickens for eggs and meat. This is a simplified chicken coop so you can keep the costs down and so you can get the job done by yourself. Take a look over the rest of my woodworking plans, if you want to get more building inspiration.
The free woodworking plans come with step by step 3D diagrams, instructions, a full cut and shopping list and it is print friendly. As well, the plans are PDF download, so you can take the printed plans with you in the workshop.
When buying the lumber, you should select the planks with great care, making sure they are straight and without any visible flaws (cracks, knots, twists, decay). Investing in cedar or other weather resistant lumber is a good idea, as it will pay off on the long run. Use a spirit level to plumb and align the components, before inserting the galvanized screws, otherwise the project won’t have a symmetrical look. If you have all the materials and tools required for the project, you could get the job done in about a day. See all my Premium Plans HERE.
Projects made from these plans
4×8 Backyard Chicken Coop Plans
Building-a-4×8-backyard-chicken-coop
Cut + Shopping Lists
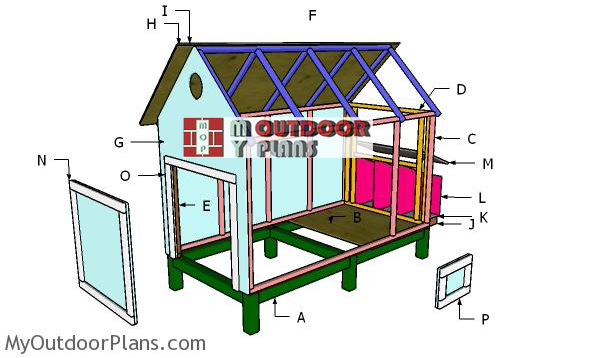
- A – 6 pieces of 4×4 lumber – 13″ long, 4 pieces – 42 3/4″ long, 3 pieces – 41″ long BASE
- B – 1 piece of 3/4″ plywood – 48″x96″ long FLOOR
- C – 2 pieces of 2×2 lumber – 96″ long, 5 pieces – 45″ long 2xSIDE WALL
- D – 6 pieces of 2×2 lumber – 45″ long, 1 piece – 34 1/2″ long BACK WALL
- E – 5 pieces of 2×2 lumber – 45″ long, 2 pieces – 5 1/4″ long, 1 piece – 34 1/2″ long FRONT WALL
- F – 10 pieces of 2×2 lumber – 36″ long, 1 piece – 96″ long RAFTERS
- G – 2 pieces of 3/4″ plywood – 48″x96″ long, 2 pieces – 48″x73 3/4″ long WALLS
- H – 4 pieces of 3/4″ plywood – 37 1/2″x54″ long ROOF
- I – 70 sq ft of tar paper, 70 sq ft of asphalt shingles ROOFING
- 9 pieces of 3/4″ plywood – 4’x8′
- 5 pieces of 4×4 lumber – 8′
- 22 pieces of 2×2 lumber – 8′
- 70 sq ft of tar paper, 70 sq ft of asphalt shingles
- 2 1/2″ screws, 3 1/2″ screws, 1 5/8″ screws
- 4d nails, 6d nails,
- wood filler , wood glue, stain/paint
Tools
![]() Hammer, Tape measure, Framing square, Level
Hammer, Tape measure, Framing square, Level
![]() Miter saw, Drill machinery, Screwdriver, Sander
Miter saw, Drill machinery, Screwdriver, Sander
Time
![]() One day
One day
Related
- PART 1: 4×8 Backyard Chicken Coop Plans
- PART 2: 4×8 Backyard Chicken Coop Roof Plans
Backyard Chicken Coop – Video
Step 1: How to build a 4×8 backyard chicken coop floor
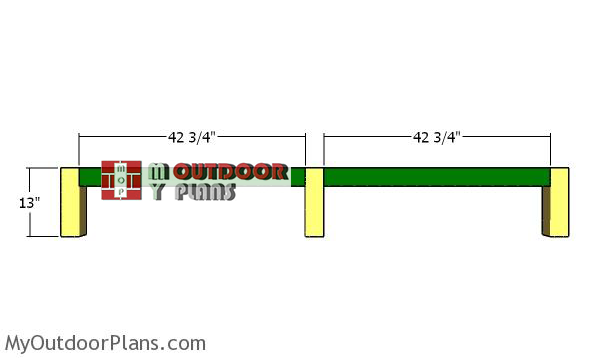
Sides-of-floor-frame
The first step of the project is to build the floor frame for the chicken coop. As you can easily notice in the plans, cut the components from 4×4 lumber. Use a miter saw to cut the components and then drill pocket holes at both ends of the green components. Align the edges and make sure the corners are square. Insert 2 1/2″ screws to lock the components together tightly.
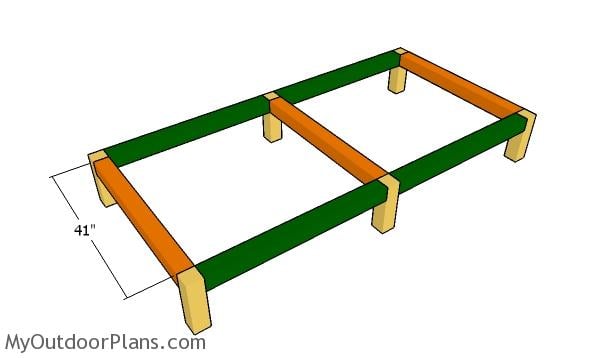
Assembling the floor frame
Next, you need to assemble the frame for the chicken coop floor. Use 4×4 lumber for the supports and drill pocket holes at both ends, on both sides. Insert 2 1/2″ screws to secure the supports to the side frames.
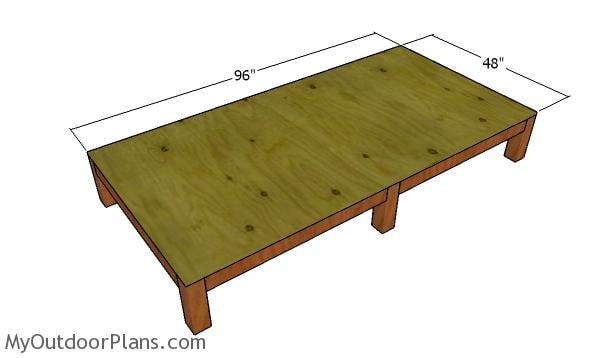
Fitting the floor to the chicken coop
Fit the 3/4″ plywood sheet to the floor frame. Align the edges flush, drill pilot holes and insert 1 5/8″ screws. Insert the screws every 8″ along the frame of the floor.
Step 2: Building the wall frames
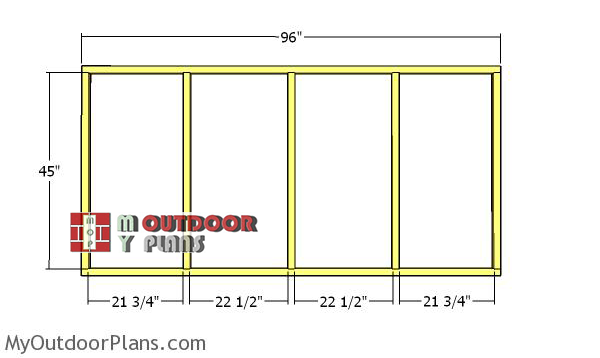
Side-wall-frame-1
Build the side wall frames from 2×2 lumber. Cut all the components at the dimensions shown in the diagram and then lay them on a level surface. Drill pilot holes through the plates and insert 2 1/2″ screws into the studs. Place the studs every 24″ on center. Align the edges and make sure the corners are square.
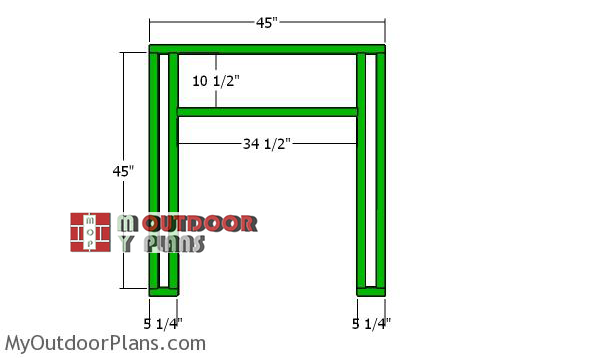
Front-wall-frame-backyard-chicken-coop
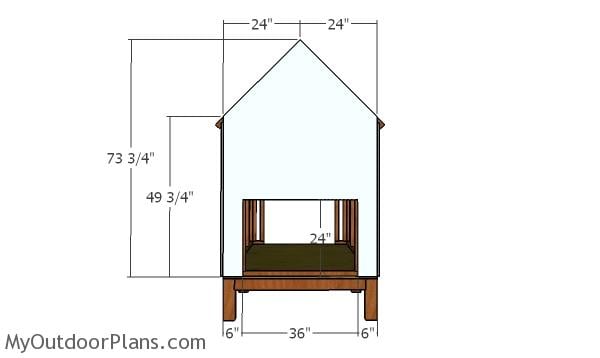
The next step is to build the front wall frame. Cut the components at the right dimensions and then lay everything on a level surface. Drill pilot holes through the plates and insert 2 1/2″ screws into the studs.
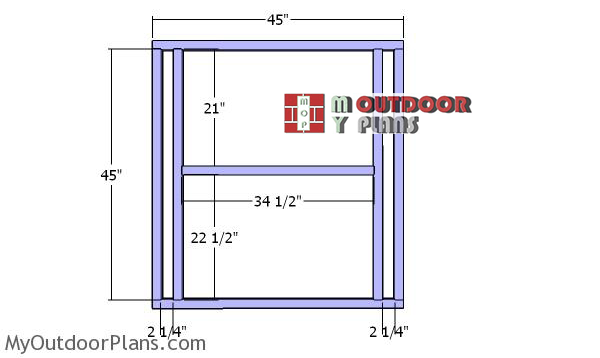
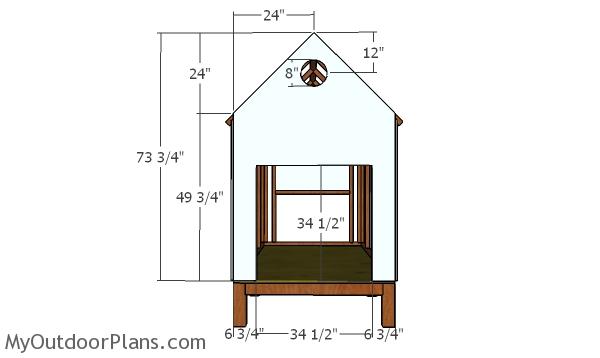
Back-wall-frame-chicken-house
Build the back wall frame using the same techniques described above.
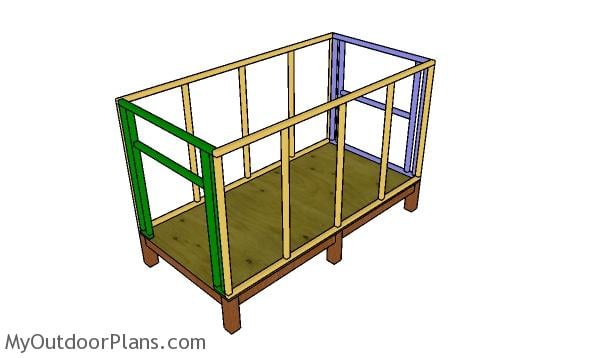
Assembling the frame of the chicken coop
Fit the wall frames to the floor of the chicken coop and align the edges flush. Plumb the walls with a spirit level and then drill pilot holes through the bottom plates. Insert 3 1/2″ screws to lock the wall tightly to the floor.
Step 3: Attaching the wall panels
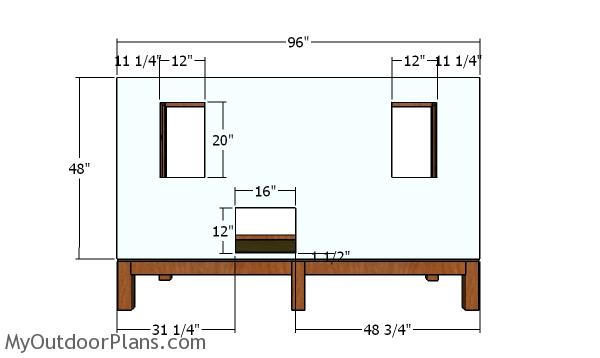
Side wall with windows
Use 3/4″ plywood for the side walls. Mark the cut lines on the side wall sheet and use a circular saw to make the cut outs. Align the edges with attention and insert 2″ nails to secure the sheet to the wall frame, every 8″.
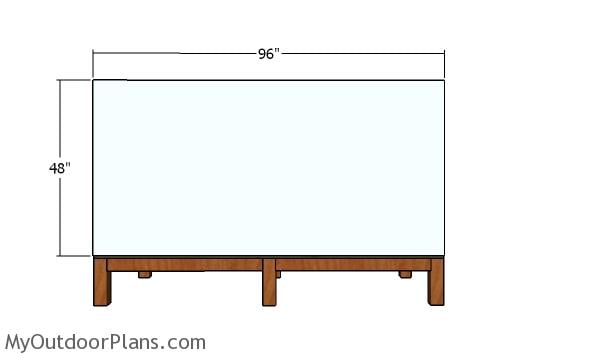
Plain side wall
Fit the plywood sheet to the opposite side of the backyard chicken coop. Use 2″ nails every 8″ along the framing, to secure the sheet into place tightly.
Step 4: Building the gable roof
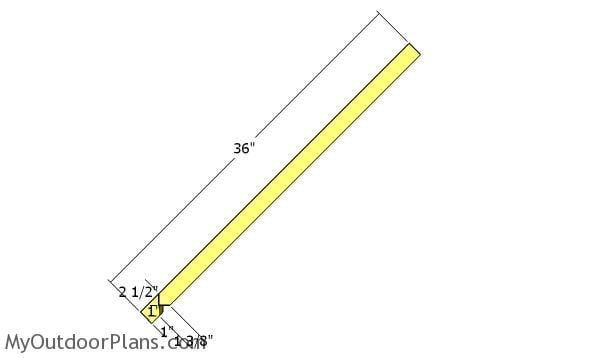
Building the rafters
Use 2×2 lumber for the rafters. Mark the cut lines on the rafters and then get the job done with a circular saw.
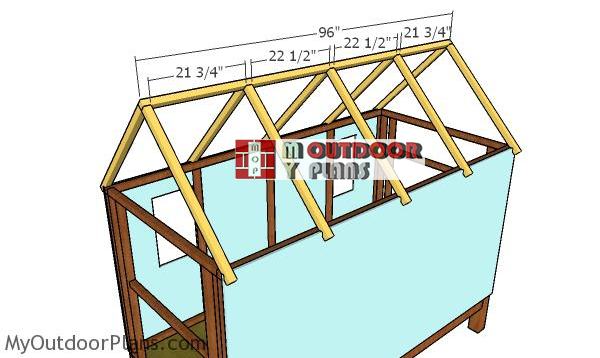
Assembling-the-roof-structure
Fit the rafters to the top of the chicken coop, every 24″ on center. Drill pilot holes through the components and insert 2 1/2″ screws to lock everything together tightly.
Back wall – 4×8 chicken coop plans
Cut the back wall from 3/4″ plywood and then secure it to the coop with 2″ nails.
Front wall – 4×8 backyard chicken coop plans
Fit the front wall to the chicken coop, as well.
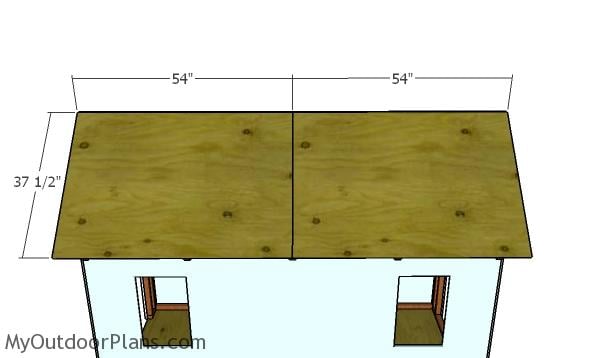
Fitting the roof sheets
Use 3/4″ plywood for the roof sheets. Cut the sheets at 37 1/2″x54″ and then secure them to the top of the chicken coop. Align the edges with attention, drill pilot holes and insert 1 5/8″ screws to secure them into place tightly.
Step 5: Finishing touches
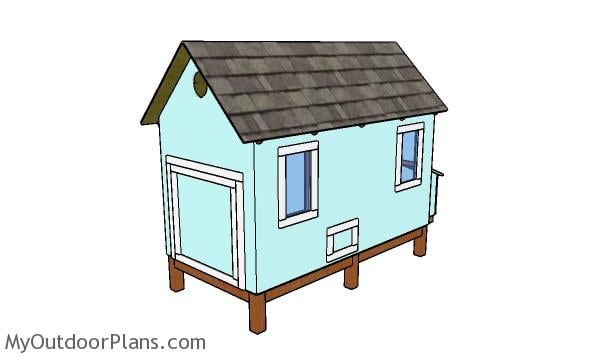
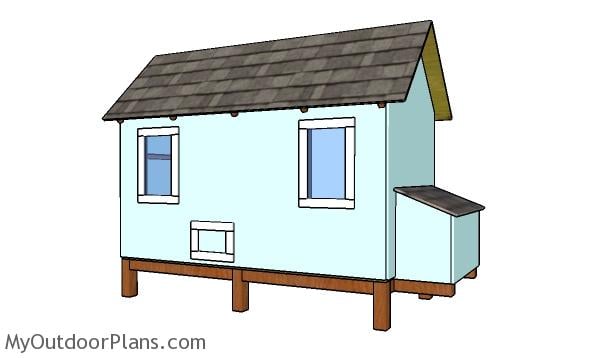
Backyard chicken coop plans
Please take a look over PART 2 of the project, so you learn how to learn how to build the nesting box and the doors. I have lots of other chicken coop projects on the site, so take a look over them HERE.
Outdoor chicken coop plans
This 4×8 chicken coop is easy to build and extremely durable. The coop comes with a large front door so you can clean the inside, a small back door so the chickens can get out and a two windows, for lots of light.
If you want to get PREMIUM PLANS for this project, in a PDF format, please press GET PDF PLANS button bellow. Thank you for the support.

This woodworking project was about 4×8 backyard chicken coop plans free. If you want to see more outdoor plans, check out the rest of our step by step projects and follow the instructions to obtain a professional result.

EXPLORE MORE IDEAS FOR:
 |
 |
 |
 |
19 comments
I have found that even with pocket holes, the floor frame is still quite wobbly. I cut some scrap wood at 45 degrees angles to make diagonal braces to support the frame.
Thanks for the feedback. Let me know how it comes out. I’d love to see your project!
It’s going well! Almost done! Happy to send photos when it’s finished.
I used six 2×4’s (4 on the sides, 2 in the middle) attached to six two-foot 4×4 posts to make the floor frame. Plenty sturdy, easier to work with the 2×4’s, didn’t need to do the pocket hole thing, and a bit cheaper. I’m a novice, but this plan provided a great outline of how to go about getting a coop built. Thanks!!
How many chickens does it hold?
8 at most
Can anyone who built this give a rough estimate of the cost of materials?
About $1000 with all the goodies (trims, roofing, paint, ladder)
Thank you so much for these 4×8 Chicken Coop plans! They worked wonderfully and measurements were spot on. The modifications I made were mostly aesthetic. The main structural tweak I made was raising the whole coop up a little higher with taller 4x4s in the base so that I could make a little outdoor run under the coop (and I added a “trap door” in the floor so the chickens can access the run). I also used steel instead of asphalt shingle roof, and centered the small chicken access door on the front so it was right in the middle of the windows (again – purely a visual choice). We love how it turned out! The whole thing probably cost around $750 (I bought everything new as I didnt have any lumber/drywall from other projects to use, and also substituted 1/2″ plywood for siding and roof). Happy to send along pictures.
Thanks for the useful feedback. I would love to feature your project: https://myoutdoorplans.com/contact/
Thank you for the plans, they were very helpful and easy to follow.
I just finished the rough structure. I read the comments about the wobbly floor and decided to change the design of the base, and it’s very stable, and I believe it will be more durable long-term. I’d be happy to share the changes.
Otherwise, it is built to the design spec, and I’m at roughly $750 in materials. I shaved a sheet of plywood and 2 PT 4×4’s off the materials list, and substituted Lexan for the Plexi windows.
Cheers!
Looking forward to seeing your coop.
I feel stupid, but right off the bat I don’t see how you would connect the 4x4s with 2 1/2″ screws. They wouldn’t even go through one 4×4. What am I missing?
Pocket holes anyone?
These look great! I was just building something similar in SketchUp when I saw this. If this was made in SketchUp, would you be able to share the file so I could make the adjustments I’d like? Great stuff!
I don’t share the model file. Sorry
Where is the pdf file that is mentioned? I’m not finding it.
Read the blog FAQs
I built this coop in February 2023 for my 7 hens. We raised the platform to give more room under the coop for the run. The coop is sturdy and very aesthetically pleasing. We added the cutouts from the windows on hinges into the interior of the coop to be able to “close” the windows as needed. Also, changed the circle vent to a square in order to add a solar fan for summer ventilation. The only criticism is the interior layout. It is difficult to determine where roosting bars should go. We initially went with a high and low bar widthwise (4ft), but that wasn’t enough room for my hens. Now they have a lengthwise (8ft) high bar and a widthwise low bar. However, I worry about drafts in the winter, as now, the roof vents are at head-height of the hens and the windows are below them. Overall, my hens enjoy their coop and I like that it is tall enough in the center that I can stand inside to clean the coop.