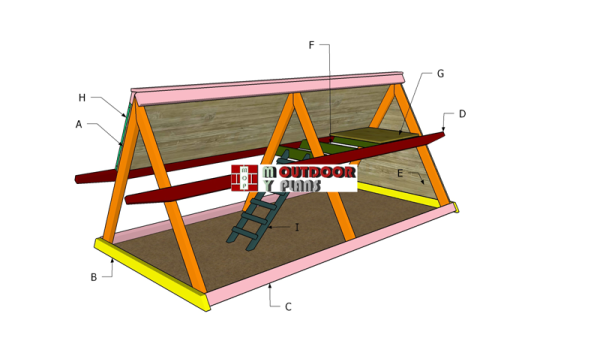
This step by step diy woodworking project is about A frame chicken coop plans. I have designed this small coop so you can grow up to 4 chickens and save money, since this is a simple structure. You only need basic materials for the project and you can build this for under 300 usd. Make sure you check out the rest of plans to see alternatives and more projects for your garden.
When buying the lumber, you should select the planks with great care, making sure they are straight and without any visible flaws (cracks, knots, twists, decay). Investing in cedar or other weather resistant lumber is a good idea, as it will pay off on the long run. Use a spirit level to plumb and align the components, before inserting the galvanized screws, otherwise the project won’t have a symmetrical look. If you have all the materials and tools required for the project, you could get the job done in about a day. See all my Premium Plans HERE.
Projects made from these plans
A Frame Chicken Coop Plans – PDF Download
Building-a-chicken-coop
Cut & Shopping Lists
Tools
![]() Hammer, Tape measure, Framing square, Level
Hammer, Tape measure, Framing square, Level
![]() Miter saw, Drill machinery, Screwdriver, Sander
Miter saw, Drill machinery, Screwdriver, Sander
Time
![]() One weekend
One weekend
It’s that easy to build a chicken coop!
A Frame Chicken Coop Plans – PDF Download
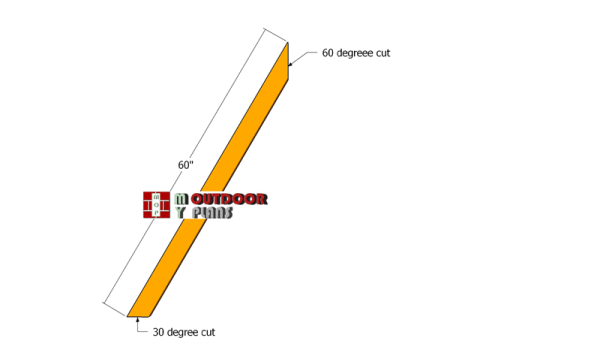
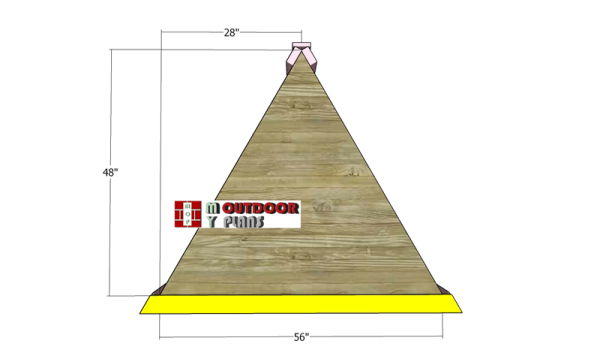
A-frame-component
First of all, you need to build the components for the A frames. Use a miter saw to make the angle cuts to both ends of the components, as shown in the diagram. We need identical 6 pieces.
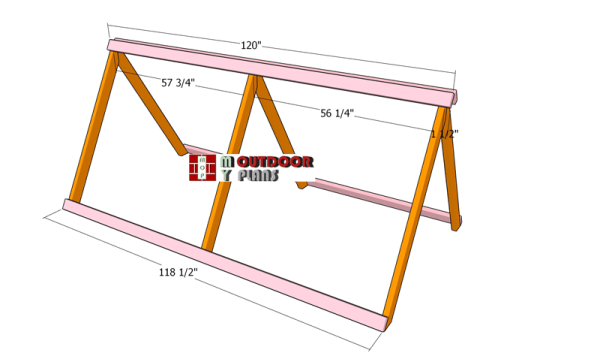
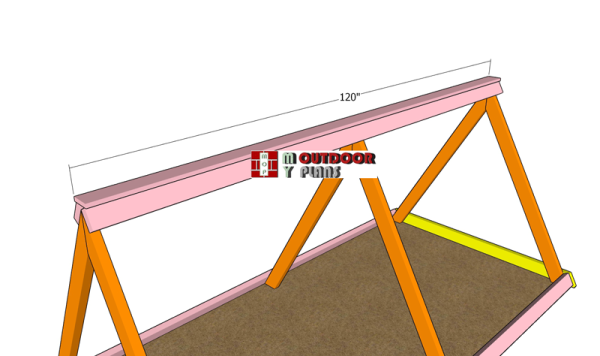
Assembling-the-frame-of-the-coop
Next, we need to assemble the frame for the A-coop. Attach the 2x4s to the A-frames, as shown in the image. Plumb the A frames when attaching the horizontal supports. Notice the 1 1/2″ overhangs to the top boards. Insert 3 1/2″ screws to lock them into place tightly.
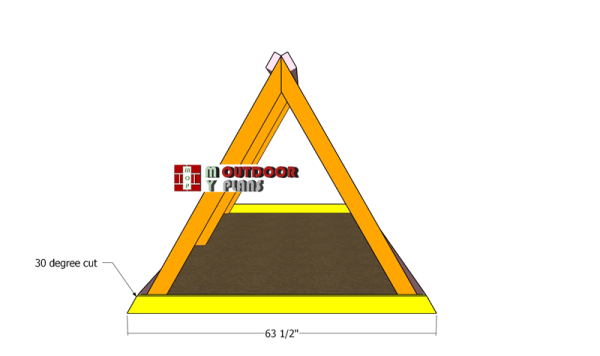
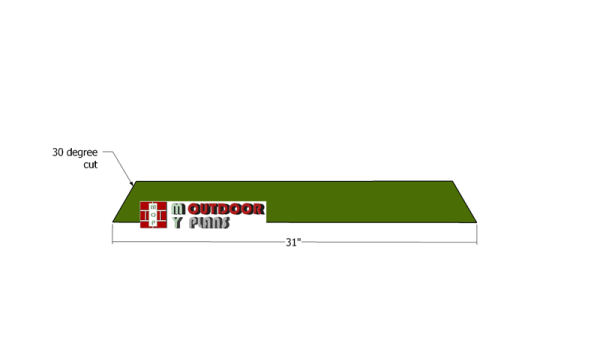
Fitting-the-base-supports-to-the-a-frames
Fit the 2×4 supports to the base of the coop (front and back). Make 30 degree cuts to both ends of the supports. Align the edges, drill pilot holes and insert 2 1/2″ screws to lock them into place.
Fitting-the-cap-slat
Attach the 1×4 cap to the structure. Align the edges and lock it into place with 2 1/2″ screws, after drilling pilot holes.
Attaching the panels
Gable-end-panel
Next, you need to attach the 1/2″ plywood panel to the gable end. Cut the triangle and attach the panel to the end frame using 1 5/8″ screws, every 8″ along the framing.
Align the cleats to the interior edges of the posts.
Fitting–the-handles
Fit the 2×4 handles to the sides of the chicken coop. Drill pocket holes and insert 3 1/2″ screws, as shown in the diagram.
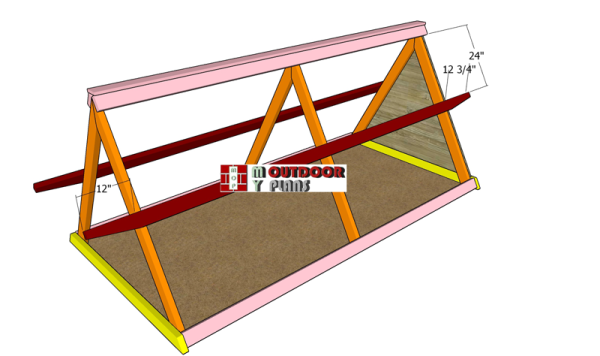
Framing-beam-for-the-nest-area
Use 2×4 lumber for the nest box joists. Make 30 degree cuts to both ends of the joists. Use a miter saw to get the job done accurately.
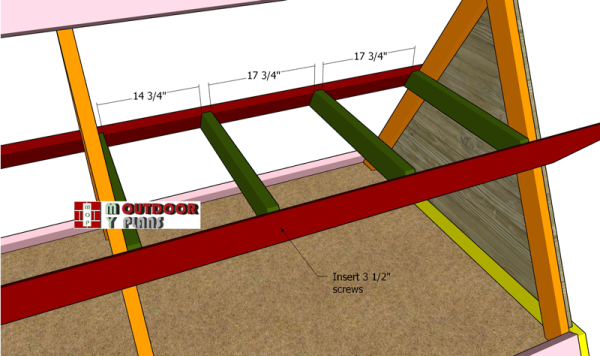
Nest-frame
Next, fit the joists to the frame of the coop. Place the joists as shown in the diagram, drill pilot holes through the 2×4 handles and insert 3 1/2″ screws to lock them into place tightly.
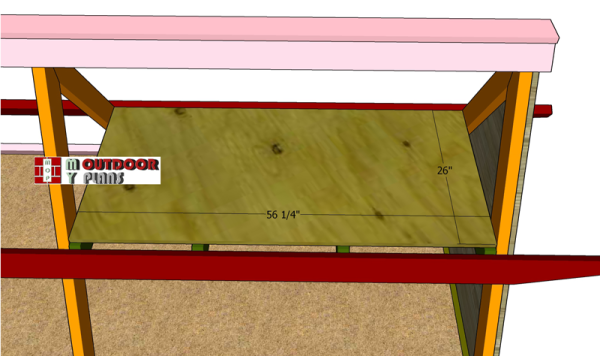
Nest-floor-frame
Next, we need to attach the 1/2″ plywood to the nest floor. Drill pilot holes and insert 1 5/8″ screws to lock the panel into place.
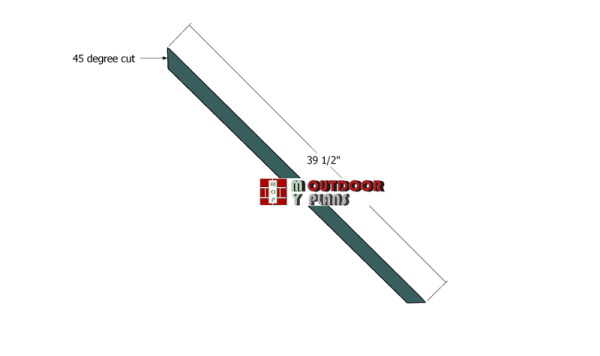
Ladder-stringer
We continue the project by assembling the ladder for the coop. Make 45 degree cuts to the 1×2 stringer boards.
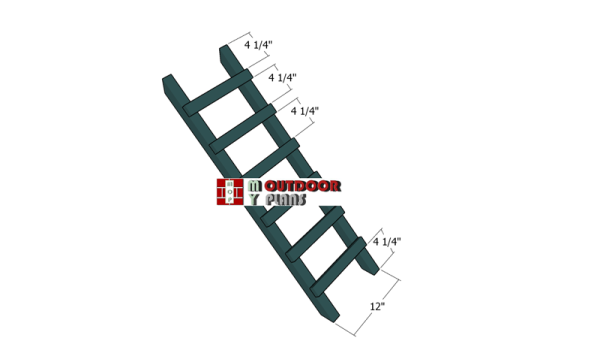
Building-the-chicken-coop-ladder
Attach the 1×2 steps to the ladder, making sure they are equally spaced. Drill pilot hole and insert 1 5/8″ screws to lock them into place and assemble the ladder.
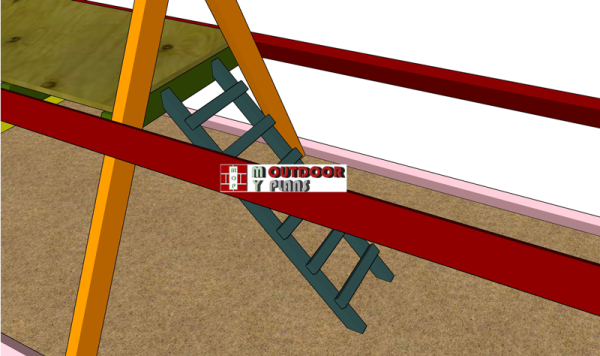
Fitting-the-ladder-to-the-coop
Fit the ladder to the coop, as shown in the diagram. Drill pilot holes and insert 2 1/2″ screws to lock the stringers to the nest joist.
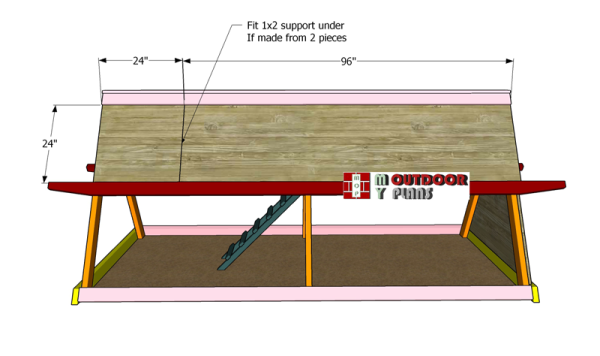
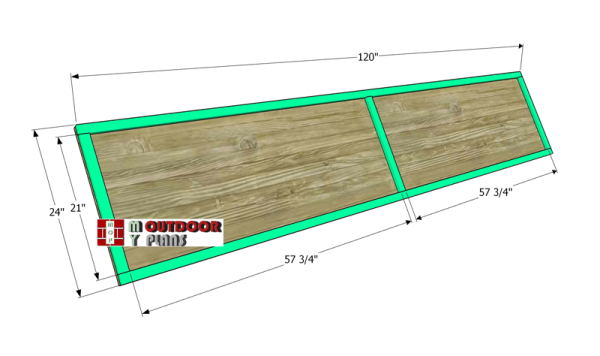
Side-panel
Next, we need to attach the 1/2″ plywood panel to the sides of the coop. On one side, we will have a fixed panel and on the other side we will have a door, for easy access inside.
If you have access to 4’x10′ plywood, just cut it in half and we will be using them on both sides.
If you can only access 4’x8′ plywood, then you have to use 2 pieces for the sides. Attach a 1×2 support under the joint of the two plywood pieces. Use 1 5/8″ screws to lock the plywood panels to the A frames. Place the screws every 8″ on center.
Assembling-the-side-door
Next, we need to assemble the door for the A-coop. As you can notice in the diagram, you need to attach 1×2 trims to the 1/2″ plywood. Align the edges, add glue and insert 1 1/4″ screws to lock the trims into place tightly.
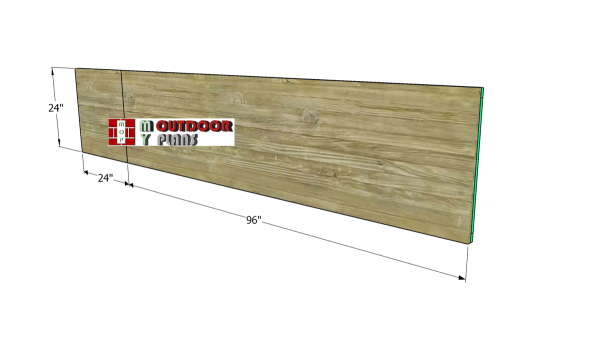
Side-door-panel
Notice how to assemble the door panel, in case you use 4’x8′ plywood.
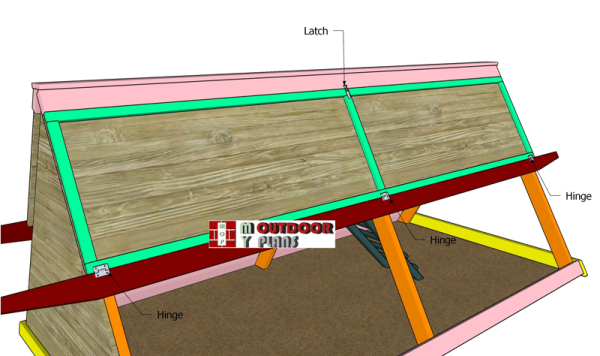
Fitting-the-side-door
Fit the door to the side of the coop. Use 3 hinges and 1 latch to lock the door into place.
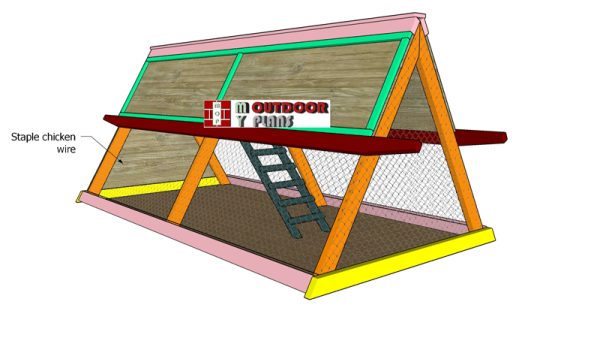
Fitting-the-chicken-wire
Attach the chicken wire to the exterior of the coop and staple it into place tightly.
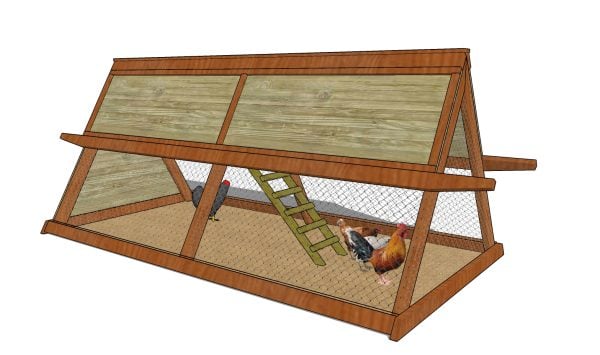
A frame chicken coop – how to
Fill the holes with wood putty and smooth the surface with fine-grit sandpaper for a professional result. Apply a few coats of stain or paint to enhance the look of the shelter and to protect the components from decay.
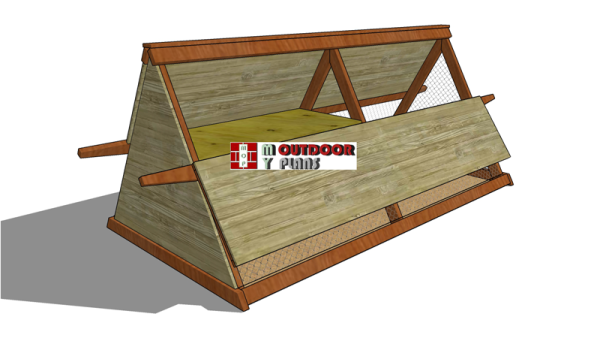
How-to-build-an-A-frame-chicken-coop
As you can easily see in the diagram, once the door folds down you have an easy access to the coop so you can clean it or harvest the eggs.
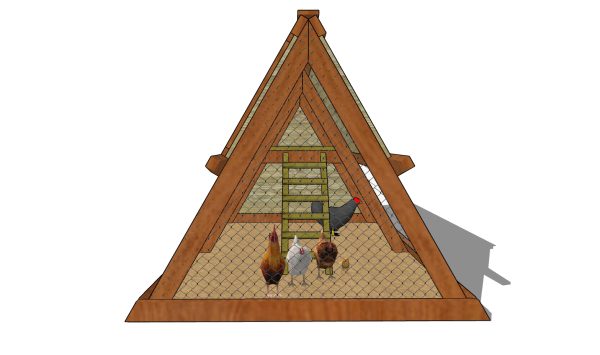
A frame chicken coop – front view
If you want, you can easily adjust the size of the shelter to suit your needs. This lean to shelter will protect the bbq grill from the elements and you can be at peace when it’s raining cats and dogs. This is a basic structure that requires little woodworking skills and resources, so any homeowner can get the job done in a weekend.
Top Tip: Check out the rest of the projects, to see more building plans for your backyard. To get the Premium Plans with full Cut and Shopping lists, check the GET PDF PLANS button bellow.

This woodworking project was about small chicken coop plans. If you want to see more outdoor plans, check out the rest of our step by step projects and follow the instructions to obtain a professional result.

EXPLORE MORE IDEAS FOR:
 |
 |
 |
 |