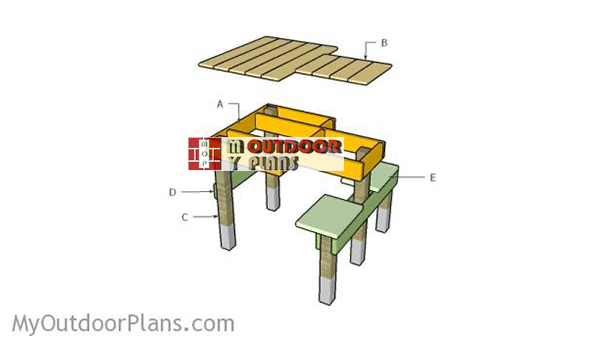
This step by step diy woodworking project is about free shooting bench plans. This article features detailed instructions for building a double shooting bench from basic materials. I designed the bench so that it has two seat on each side. In addition, you should set the posts into concrete for better accuracy when shooting. Take a look over the rest of our woodworking plans, if you want to get more building inspiration.
When buying the lumber, you should select the planks with great care, making sure they are straight and without any visible flaws (cracks, knots, twists, decay). Investing in cedar or other weather resistant lumber is a good idea, as it will pay off on the long run. Use a spirit level to plumb and align the components, before inserting the galvanized screws, otherwise the project won’t have a symmetrical look. If you have all the materials and tools required for the project, you could get the job done in about a day. See all my Premium Plans HERE.
Projects made from these plans
Free Shooting Bench Plans
Building-a-shooting-bench
Cut & Shopping Lists
- A – 2 pieces of 2×6 lumber – 48″ long, 2 pieces – 15″ long, 2 pieces – 27 1/2″ long, 2 pieces – 7 1/2″ long, 1 piece – 33″ long FRAME
- B – 5 pieces of 1×6 lumber – 36″ long, 4 pieces – 18″ long TOP
- C – 3 pieces of 4×4 lumber – 42″ long, 2 pieces – 25″ long LEGS
- D – 2 piece of 2×6 lumber – 48″ long, 1 piece – 32 1/2″ long BRACES
- E – 2 pieces of 2×14 lumber – ” long SEAT
- 4 pieces of 2×6 lumber – 8′
- 2 pieces of 4×4 lumber – 8′
- 3 pieces of 1×6 lumber – 8′
- 1 piece of 2×14 lumber – 4′
- 100 pieces of 2 1/2″ screws
- 50 pieces of 1 1/4″ screws
- wood glue, stain/paint
- riffle stand
Tools
![]() Hammer, Tape measure, Framing square, Level
Hammer, Tape measure, Framing square, Level
![]() Miter saw, Drill machinery, Screwdriver, Sander
Miter saw, Drill machinery, Screwdriver, Sander
![]() Safety Gloves, Safety Glasses
Safety Gloves, Safety Glasses
Time
![]() One day
One day
Related
Building a shooting bench

Top-frame
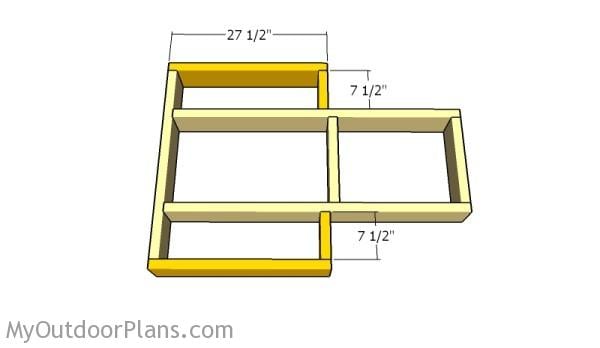
The first step of the project is to build the top frame for the shooting bench. Cut the components from 2×6 lumber at the right dimensions. Drill pilot holes and insert 2 1/2″ screws to lock them together. Add glue to the joints and align the edges with attention. Use a speed square to make sure the corners are right-angled.
Assembling the top frame
Attach the rest of the components to the top frame, as shown in the diagram. Drill pilot holes and insert 2 1/2″ screws.
Fitting the legs
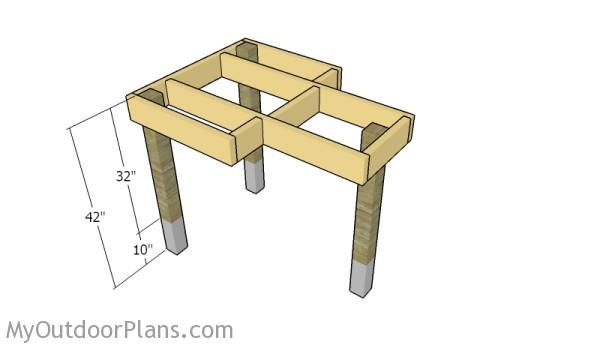
Use 4×4 lumber for the legs of the shooting bench. As you can easily notice in the diagram, you need to set the posts in the ground for at least 10″. Ideally you should set the post in concrete. Drill pilot holes through the top frame and insert 2 1/2″ screws into the posts. Use a spirit level to check if the posts are plumb.
Front support
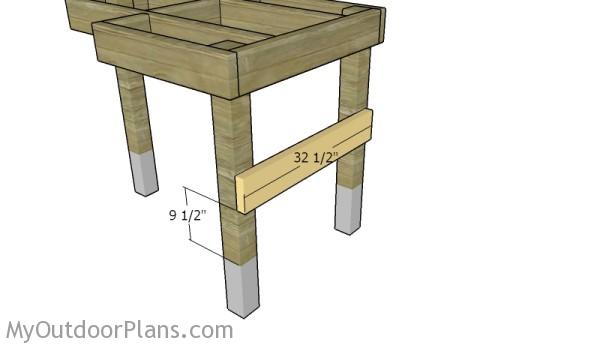
Fit a 2×6 brace to the front legs. Drill pilot holes and insert 2 1/2″ screws into legs.

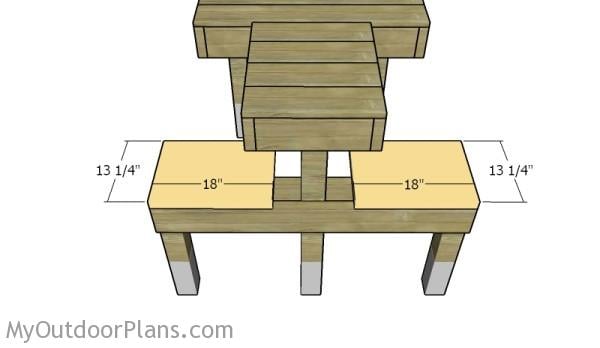
Fitting-the-seat-supports
Attach 4×4 legs for the seats of the shooting bench. Plumb the legs with a spirit level and set them into concrete. Attach 2×6 beams to the shooting bench, as shown in the diagram. Drill pilot holes and insert 2 1/2″ screws.
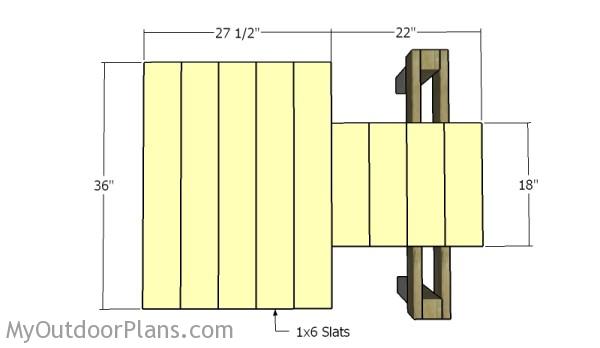
Fitting the top slats
Attach 1×6 slats to the top frame of the shooting bench. Leave no gaps between the slats, align them at both ends, drill pilot holes and insert 1 1/4″ screws.
Fitting the seat slats
Use 2×14 lumber for the seat. Fit the pieces of lumber to the support beams and lock them into place with 2 1/2″ screws. Smooth the edges with sandpaper or with a router. Alternatively, you can glue together two pieces of 3/4″ plywood.
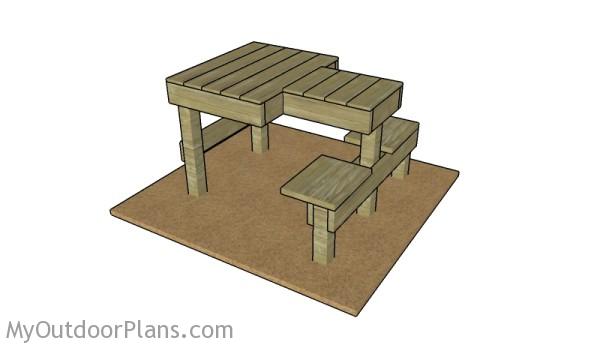
Free shooting bench plans
Take care of the finishing touches before applying the stain.
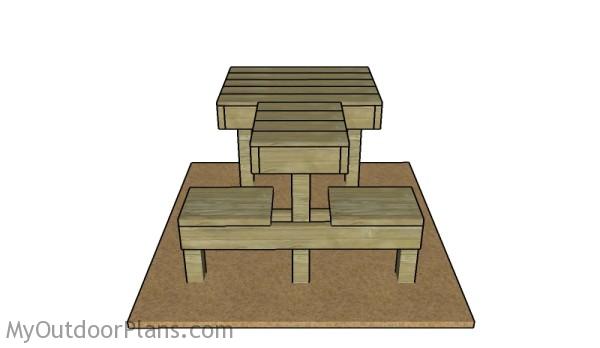
Shooting bench plans
Fill the holes with wood putty and let them dry out for a few hours. Smooth the surface with 100-220 grit sandpaper and remove the residues with a damp cloth.
Top Tip: Apply a few coats of paint or stain to the components, to enhance the look of the project.
This woodworking project was about shooting bench plans free. If you want to see more outdoor plans, check out the rest of our step by step projects and follow the instructions to obtain a professional result.
19 comments
Really enjoyed looking and getting these plans for a shooting bench to use at my hunting lease.
We have been using a 55 gallon drum with sand bags and /or a wobbly table for years to sight our guns in, a pain in the butt.
Glad you like them and I hope you will enjoy the bench once it’s built. Don’t forget to share a few pictures after you are done, as I love to see diy projects!
Great plans. Built and stained mine today in about 2 hours. Looks great!
That sounds great. I would love to see how it came out and that would help other DIY-ers. You can send a few pics using this form: http://myoutdoorplans.com/contact/
Hello,
I cannot find how to start the printing process.
I need to print your awesome Shooting Bench.
Thanks,
RL
Read here how to print the plans: http://myoutdoorplans.com/faq/
If you didn’t set the legs in concrete (simply to move it from farm to farm) would the 4×4 need to shortened in length?
Yes. Cut 10″, as shown in the diagram.
Easy to follow, and very sturdy with no wobble left or right, but there was some for and aft. Found a work around by taking a scrap piece of the 1×6, cutting 1 end at a 35° angle and attaching it to the 4×4 at the seat end. The other with the angle cut fixed to the 15″ cross beam on the frame of the table top.
Thanks for the plans. I built one of these a few years ago but left it behind with hurricane Irma debris. (it survived) I built another today using your specs and it’s turning out as nice or better than the first one.
I’m sorry that you had to go through that. Glad to hear you’re building a new one. I would love to see it!
Built one 2 years ago.its great and I want to build another one but I lost the plans.( I am 83 years old)
Thank You These Plans are Simply yet Beautiful.
Thank you for providing! Even a dummy like me can use your prints to complete the bench! Easy to do.
Good shooting!
You’re welcome. Let me know how it comes out!
LOVE THE PLANS
Great plans a few minor mods and now I’m a happy camper! Thanks
I like this plan very much as it looks to be a good solution to a larger problem I have, to wit: I need a router table, woodworking assembly table and a shooting bench, all combined into one. For routing I have access to electricity at shooting site, 175 meters to targets. My top will be 2 layers of 3/4″ plywood to provide a smooth routing surface, and wider and longer than frame to permit edge clamps. Seat will also be two layers of ply. I will inlet a router plate and either remove the router or lower the router bit when shooting or assembling, and mine will be for right hand shooters only. Also, I’m thinking of using 2×4 stock for frame and doubled 2×4 stock for legs (don’t have saw that can cut 4×4 stock.) What do you think of 2×4 stock for frame and braces? Frame assembly will use dowels, either placed with doweling jig or Miller dowels. A little lighter but certainly just as strong. I’ll send a pic when this multi-use table is complete.
Just finishing my second shooting bench, love the design. I used 6×6 treated for the legs, heavy enough does not move putting the tables at different yardage so do not have to move them,perfect design, thanks.