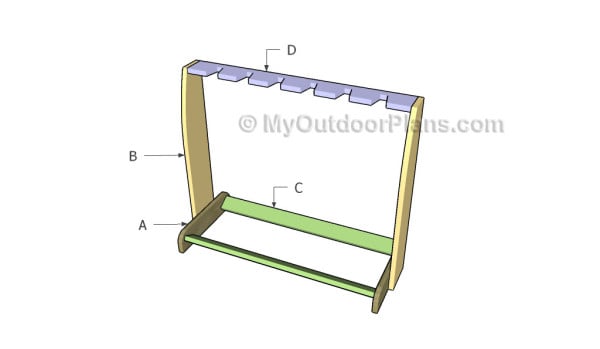
This step by step woodworking project is about multiple guitar stand plans. This article features detailed instructions for building a beautiful wooden stand for your acoustic and electric guitars. I have designed the plans to keep the expenditures under control and to involve the least amount of work possible. The simple wooden guitar stand can be built by anyone with basic tools and skills. Make sure you adjust the dimensions to suit your needs. The wood stand has 6 slots so you can stack all your guitars in one place.
When buying the lumber, you should select the planks with great care, making sure they are straight and without any visible flaws (cracks, knots, twists, decay). Investing in cedar or other weather resistant lumber is a good idea, as it will pay off on the long run. Use a spirit level to plumb and align the components, before inserting the galvanized screws, otherwise the guitar stand won’t have a symmetrical look. If you have all the materials and tools required for the project, you could get the job done in about a day. See all my Premium Plans HERE.
Projects made from these plans
Guitar Stand Plans
Building a guitar stand
Cut & Shopping Lists
- A – 2 pieces of 1×4 lumber – 15″ long BASE
- B – 2 pieces of 1×6 lumber – 28 3/4″ long SIDES
- C – 2 pieces of 1×3 lumber – 32″ long BOTTOM
- D – 1 piece of 1×4 lumber – 33 1/2″ long TOP SUPPORT
- 1 piece of 1×3 lumber – 6 ft
- 1 piece of 1×4 lumber – 6 ft
- 1 piece of 1×6 lumber – 6 ft
- 1 1/4″ screws
- 1 5/8″ screws
- filler, stain
- glue
Tools
![]() Hammer, Tape measure, Framing square, Level
Hammer, Tape measure, Framing square, Level
![]() Miter saw, Drill machinery, Screwdriver, Sander
Miter saw, Drill machinery, Screwdriver, Sander
Time
![]() One day
One day
How to build a multiple guitar stand
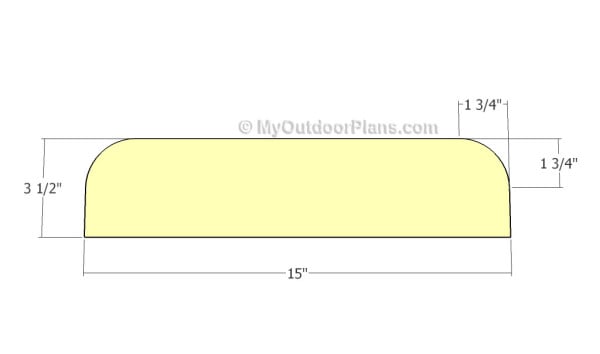
Building the base
The first step of the woodworking project is to build the base for the guitar stand. Therefore, cut the 1×4 slats at 15″ and round the top corners, as shown in the diagram. Use a jigsaw to make the curved cuts and smooth the edges with fine-grit sandpaper.
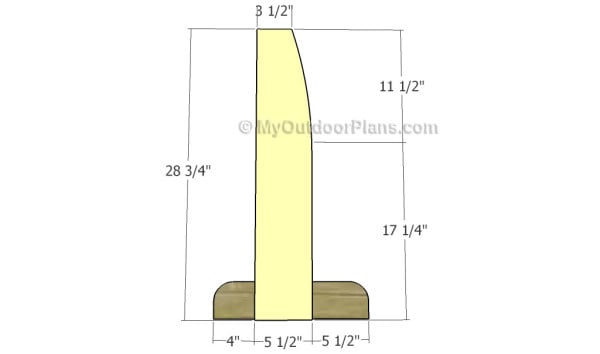
Fitting the vertical supports
Next, you need to build the sides for the guitar stand. You can either use 1×4 slats or build decorative sides out of 1×6 lumber. Mark the cut edges to the slats and get the job done with a jigsaw. Smooth the edges with fine-grit sandpaper and remove the excess with a damp cloth.
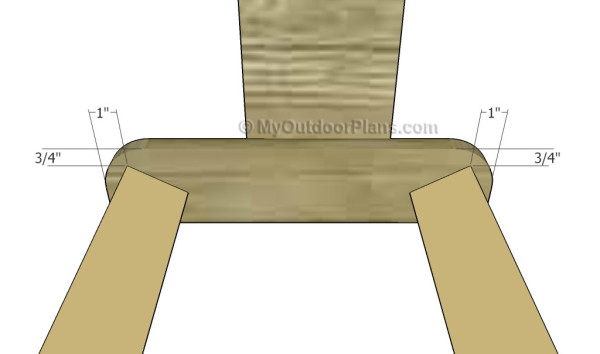
Fitting the base supports
The next step of the project is to attach the bottom supports to the structure. Cut the components at the right dimensions and drill pocket holes at both ends. Insert 1 1/4″ screws and add glue to create rigid joints.
The supports should be lean at 30 degrees. Make sure you angle both supports identically, so the wooden guitar stand has a symmetrical look.
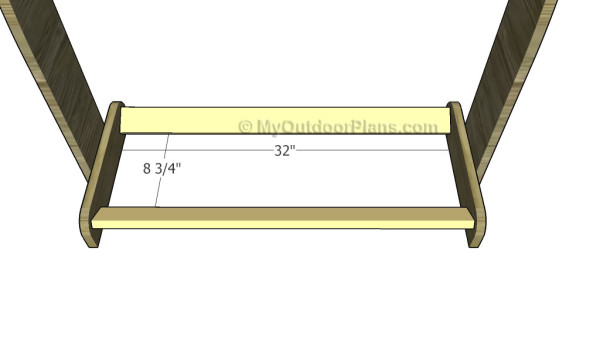
Fitting the bottom supports
Pay attention to the information from the diagram to get a professional result. Align everything with great care and leave no gaps between the components.
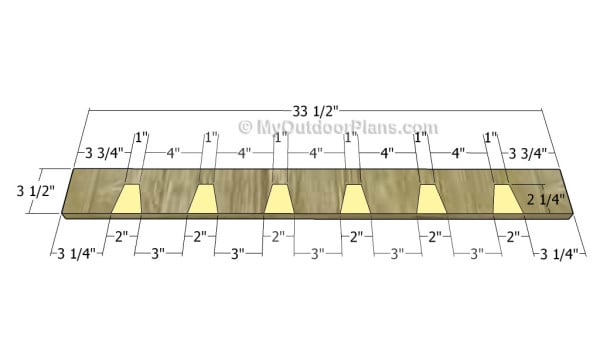
Building the neck support
Build the top support for the guitar necks out of 1×4 lumber. Mark the cut edges to the slats and make the notches with a jigsaw. Smooth the edges with 120-grit sandpaper. Drill pocket holes at both ends of the support, so you can attach it to the sides easily. Drill the pocket holes along the bottom face.
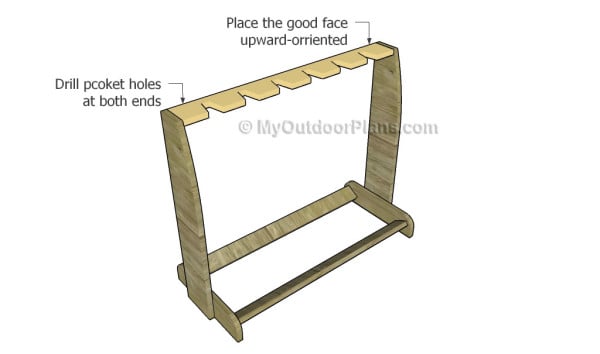
Fitting the neck support into place
Fit the top support to the guitar stand and lock it to the sides using 1 1/4″ screws. Make sure the corners are square and align the edges with attention. Add glue to enhance the bond of the components.
As you can see building a guitar stand is a lot easier than you might imagine. With a little patience and with a small investments for the materials, you can make this wooden stand for your guitars in a few hours.

Guitar Stand Plans
One of the last steps of the woodworking project is to take care of the finishing touches. Therefore, fill the pilot holes with wood putty and smooth the surface with 120-grit sandpaper. Cover the bottom supports with felt, as well as the notches that will holes the guitar necks. The felt will protect your guitars from scratches.
Top Tip: If you want to enhance the look of the project and to protect the wooden guitar stand from decay, I recommend you to cover the components with paint or stain.
This woodworking project was about multiple guitar stand plans. If you want to see more outdoor plans, we recommend you to check out the rest of our step by step projects. LIKE us on Facebook and Google + to be the first that gets out latest projects and to hep us keep adding free woodworking plans for you.
EXPLORE MORE IDEAS FOR:
 |
 |
 |
 |
17 comments
can you possibly add (in brackets), metric measurements as well?
would help the rest of us on the planet 😉
For metric measurements, you should first take a look over this table: http://myoutdoorplans.com/imperial-to-metric-conversion/ Then, you should use a ruler that has both metric and imperial measurements. I don’t create metric versions for my plans, as I only focus on what I know and I don’t like to pretend to be expert in areas I am not.
I just followed these plans (after metric conversion of course, imperial is a tool of the devil ?) and now have a sweet stand that took about 2 hours (felt added, not yet stained) build time and cost approximately AU$35. Gonna play with the design and bang out a couple more I reckon. Cheers for the ideas.
Congrats for you project. I’m looking forward to seeing how the stand comes out after you stain it. You the contact form to send a few pics, so I can feature your work on the site.
Hello there!
Great multiple guitar stand plan!
Is it possible to make a plan for a triple guitar stand of the exact same philosophy and write the dimensions in centimeters?
It would be extremely helpful!!!
Thank you very much in advance!
I don’t do plans in metric.
Are there downloadable PDF Plans for this guitar stand availabe ? If so, I would love to have them so I can make one. Thank you and great work.
Yes. Please read the FAQs: http://myoutdoorplans.com/faq/
Converting to metric measurements isn’t all that tough. 1” = 2.54cm.
Convert any imperial measurement fractions to decimals (33 1/2” for the top peice = 33.5”), and then multiply by 2.54 (33.5 x 2.54 = 85.09cm which would clearly round to 85 cm)
Extremely well written & excellent diagrams! Will be building soon.
Thanks. Looking forward to seeing your project!
I just completed building the stand for 4 guitars. Very well-written and exceptional details. Thanks!
I just finished a full size pattern with some minor changes. As to have it “fold up” (made the back pivot forward to horizontal). I am using a short piece of 1/2” OD stainless tubing with ss flat washers and 3/8” x 1 1/2” stainless bolt near the bottom of each side as not to wear into the white oak wood that I’m using. I’m also using 1” oak dowels for the stops. This is a Christmas present so it will be done before then. I would like to share it with you and thanks for sharing your plans
How can I print this out?
Read the blog FAQs, in the menu
Exactly what I had in mind! I think I’ll make one this weekend.
Thanks!
You’re welcome. Let me know how it comes out!