This step by step diy project is about 6 ft farmhouse table plans. This is a simple table with a farmhouse design, that you can build in one weekend. This dining table is sturdy and it comes with that distinctive rustic look. As always, my woodworking plans come with step by step diagrams and full Cut / Shopping lists, so you can build this project in a few hours with basic tools and materials you can find at most DIY stores.
It is essential to choose the right materials before starting the construction and the assembly of the bed. As you will see in the project, you need to choose durable lumber with a nice appearance, such as pine, cedar or redwood. Make sure the components are in a good visual condition and choose professional tools when adjusting their size. Take accurate measurements and join the components with glue and screws.
Projects made from these plans
6 ft Farmhouse Table Plans – PDF Download
Building-a-6-ft-farmhouse-table
Cut + Materials List
Tools
![]() Hammer, Tape measure, Framing square, Pocket Hole Jig
Hammer, Tape measure, Framing square, Pocket Hole Jig
![]() Miter saw, Drill machinery, Screwdriver, Sander
Miter saw, Drill machinery, Screwdriver, Sander
Time
![]() One weekend
One weekend
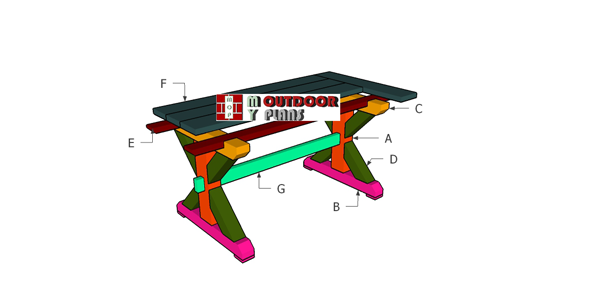
Building a 6 ft farmhouse table
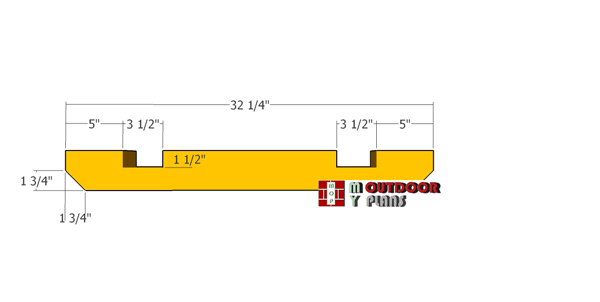
Top-supports
The first step of the table project is to build the tabletop supports. Use a circular saw and set the depth of the blade at 1 1/2″, to make the parallel cuts inside the marked areas. Use a chisel to remove the excess and smooth the surface with sandpaper.
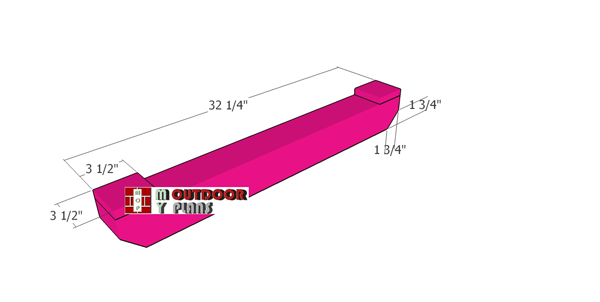
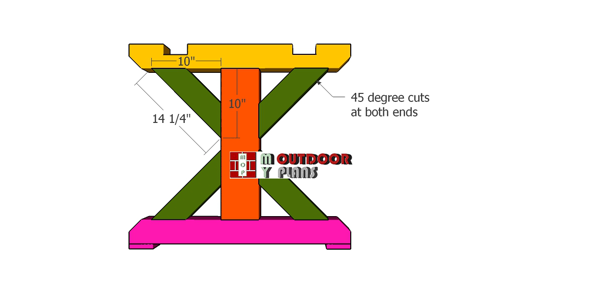
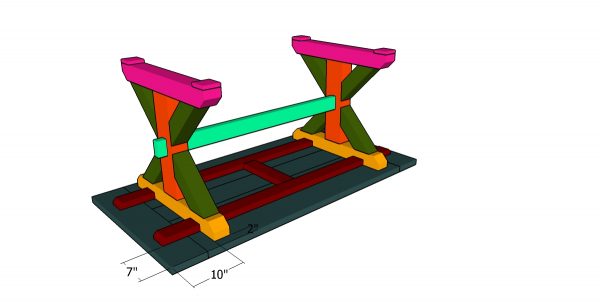
Base-components
Use 4×4 lumber for the base. Make decorative cuts to both ends of the base. Attach the 1×4 pieces with glue and 2″ nails.
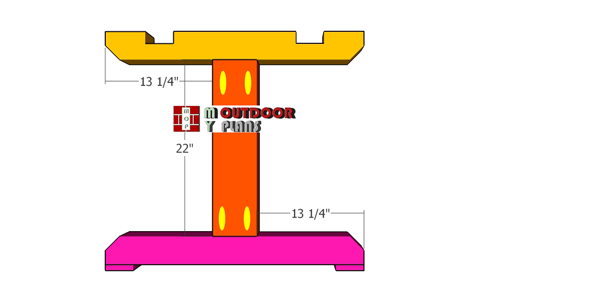
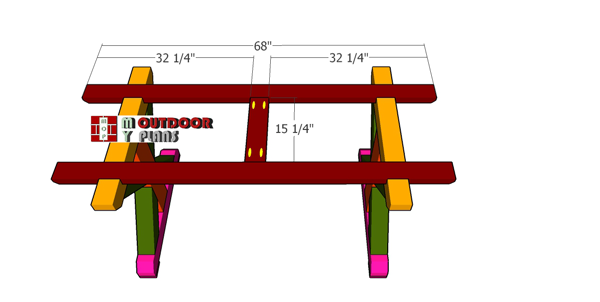
Assembling-the-side-frames
Continue the project by assembling the side frames for the bench. Therefore, use 4×6 lumber for the middle component. Drill pocket holes at both ends of the middle components and center it into place. Insert 2 1/2″ screws to assemble the frames, making sure the corners are square and the edges perfectly aligned. Ideally, you need to use pocket holes on both sides of the middle components.
Fitting-the-braces
Next, we need to attach the diagonals to the frames. Use a miter saw to make 45 degree bevel cuts to both ends of the braces and then secure them into place with 2 1/2″ screws, after drilling pilot holes.
Fitting-the-tabletop-supports
Use 2×4 lumber for the seat boards. Cut the slats at the dimensions shown in the diagram. Drill pocket holes through the boards and lay them on a level surface. Leave no gaps between the boards and insert 2 1/2″ screws to lock everything together tightly. Add glue to the joints.

Assembling-the-tabletop
Next, you need to assemble the tabletop for the farmhouse project. Therefore, use 2×8 lumber for the boards. Drill pocket holes through the boards and lay them on a level surface. Align the edges flush. Leave no gaps between the boards and insert 2 1/2″ screws to assemble the tabletop.
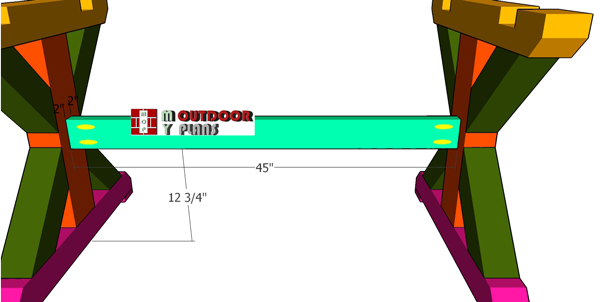
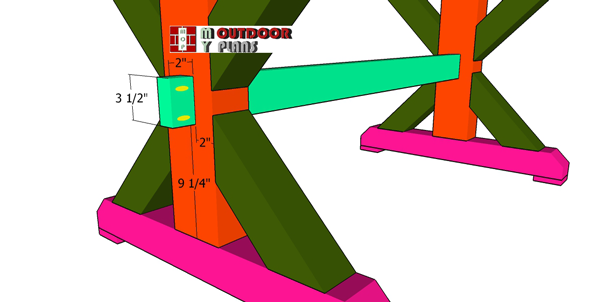
Fitting-the-stretcher
Use 2×4 lumber for the stretcher. This component will add strength to the bench and help it support extra weight. Therefore. Drill pocket holes and secure it into place with 2 1/2″ screws. Make sure you center the stretcher to the vertical supports.
Fitting-the-trims
Use 2×4 lumber for the trims. Drill pocket holes through the trims and then attach them to the exterior of the side legs, using glue and 2 1/2″ screws.
Assembling the table
Next, attach the frame of the table to the tabletop. Align the edges with attention, drill pilot holes through the supports and insert 2 1/2″ screws into the tabletop.
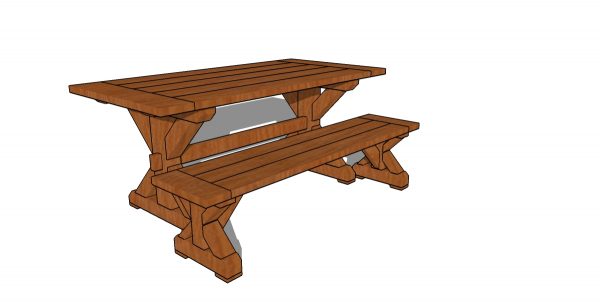
6ft Farmhouse Bench Plans
This bench is sturdy and it features an elegant design. Fill the holes with wood plugs and fill the dents with wood putty. After a few hours, smooth the surfaces with 120-220 grit sandpaper. Apply a few coats of paint/ stain to enhance the look of the bench. See plans for a farmhouse table HERE.
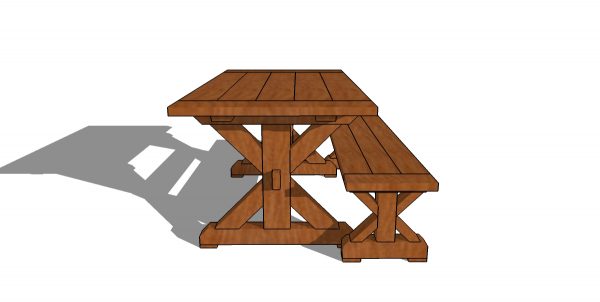
6ft Farmhouse Bench Plans – side view
I also have Premium Plans for this table, a full PDF file that also comes with a cut layout diagram (shows you how to cut the components from the materials, so you get minimum waste). See all my Premium Plans HERE.
If you want to get PREMIUM PLANS for this project, in a PDF format, please press GET PDF PLANS button bellow. Thank you for the support.

This woodworking project was about 6 ft farmhouse table plans. If you want to see more outdoor plans, we recommend you to check out the rest of our step by step projects. LIKE us on Facebook to be the first that gets our latest plans. Send us pictures with your plans.
EXPLORE MORE IDEAS FOR:
 |
 |
 |
 |