This step by step diy woodworking project is about kids picnic table plans. Building a wooden picnic table for your kids can be done in just a day with proper plans and an accurate planning, even if you are a woodworking amateur. Use 2x4s and 2x6s to create a sturdy outdoor table for your kids. If this design isn’t what you are looking for, we suggest you to check out the rest of the projects featured on our site or to adjust it to suit your needs. Premium Plans for this project available in the SHOP.
There are many plans and designs to choose from when building the table for your kids, so make sure you take a close look over the related projects before starting the actual construction project. Moreover, we recommend you to invest in high quality materials, especially if you are going to place the table in your backyard. Involve the kids in the project and try to take their suggestions into account, when it comes to the design and color of the table. See all my Premium Plans HERE.
Projects made from these plans
It’s that easy to build a kids table!
Cut & Shopping Lists
- A – 4 pieces of 2×4 lumber – 29″ long LEGS
- B – 2 pieces of 2×4 lumber – 22 3/4″ long, 2 pieces – 42″ long SUPPORTS
- C – 4 pieces of 2×6 – 48″ long, 4 pieces of 2×4 lumber – 48″ long SLATS
- D – 1 pieces of 2×4 – 37″ long, 2 pieces – 21 1/2″ long BRACES
- 6 pieces of 2×4 lumber – 8′
- 2 pieces of 2×6 lumber – 8′
- 100 pieces of 2 1/2″ screws
- 16 pieces of 3 1/2″ carriage bolts
- wood filler, glue
- wood stain
Tools
![]() Hammer, Tape measure, Framing square, Level
Hammer, Tape measure, Framing square, Level
![]() Miter saw, Drill machinery, Screwdriver, Sander
Miter saw, Drill machinery, Screwdriver, Sander
![]() Post hole digger, Concrete mixer
Post hole digger, Concrete mixer
Time
![]() One day
One day
Related
Kids picnic table plans

Building-a-kids-picnic-table
Top Tip: Building a small picnic table for your kids is a fairly easy woodworking project, but any person can get the job done is less than a day if the right plans are used from the very beginning.
Building a kids picnic table
Building-the-tabletop
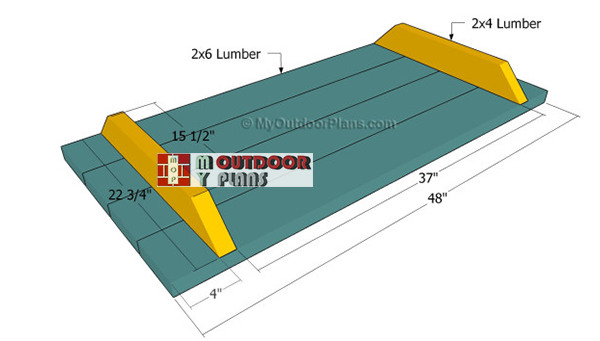
The first step of the project is to make the wooden tabletop, by using the information shown in the plans. As you can easily see in the image, we recommend you to work on a level surface, otherwise the end result might not satisfy your tastes. Cut both ends of the supports at 45 degrees.
Leave 1/4″ between the 2×6 slats and align them at both ends properly. Attach the supports to the slats and toe nail them into place with 2 1/2″ galvanized screws (alternatively you can drill pocket holes through the supports). Pre-drill holes to prevent the wood from splitting. Insert at least 2″ screws in each slat for each support.
Attaching-the-legs
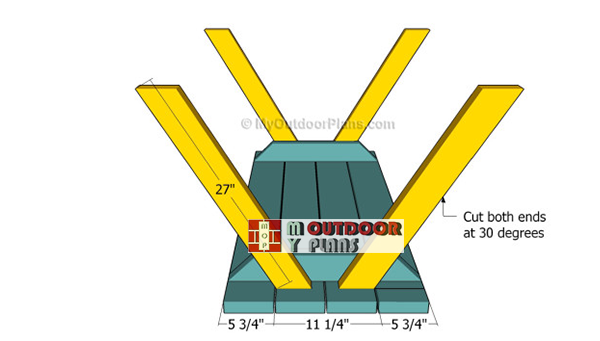
The next step of the project is to attach the 2×4 legs to the frame of the tabletop. Cut both ends of the legs at 30 degrees by using a good circular or miter saw. Attach the legs to the supports and lock them into place with 2 1/2″ galvanized screws. Alternatively, you can drill pilot holes through both the legs and the supports and use 3 1/2″ bolts. Use 2 screws/bolts for each joint.
Top Tip: Aligning the legs into place before inserting the screws is essential for the end result, so make sure you pay attention to this step. Add waterproof glue to the joints in order to enhance the rigidity of the structure.

Building-the-legs-for-picnic-table
Build the legs from 2×4 lumber by making 30 degree cuts to both ends.

Attaching the seat supports
Next, you should attach the seat supports to the legs, as it can be noticed in the image. Make sure you cut both ends of the supports at 45 degrees before attaching them to the legs, in order to enhance the look of the picnic table.
Place a good spirit level on top of the supports before inserting the screws, in order to make sure they are perfectly horizontal. Drill pilot holes both through the legs and supports and insert 3 1/2″ carriage bolts. 2 bolts for each joint will create a strong bond between the components.

Attaching the tabletop
Attach 2×4 or 2×6 slats to the seat supports, making sure you leave about 1/4″ between them to enhance the water drainage. Align the slats at both ends before inserting the 2 1/2″ screws. Use 2 screws for each slat, at both ends.
Braces
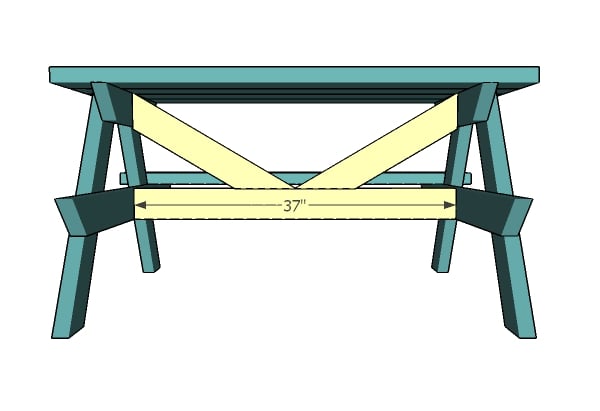
If you really want to build a sturdy and durable picnic table, we recommend you to pay attention to the details shown in the image. First of all, you need to install the support between the two sides of the picnic table and lock them into place with 2 1/2″ galvanized screws. Center the support, drill pilot holes through the seat supports and insert the screws.

Diagonal braces
Build the braces and lock them into place with 2 1/2″ screws. Align the braces at both ends and lock them to the frame with screws, after making sure the sides of the picnic table are plumb.

Kids picnic table plans
After assembling the table, double check all the joints. In addition, smooth the sharp edges with sandpaper or with a router.

Simple kids picnic table
One of the last steps of the woodworking project is to take care of the finishing touches. Therefore, fill the pilot holes with wood putty and smooth the surface with 120-grit sandpaper.
Top Tip: In order to protect the lumber from water damage, we recommend you to cover the components with several coats of paint. Place the wooden kids picnic table in a proper location and move it whenever necessary. Premium Plans for this project available in the SHOP.
This woodworking project was about kids picnic table plans. If you want to see more outdoor plans, we recommend you to check out the rest of our step by step projects. LIKE us on Facebook and Google + to be the first that gets out latest projects.
19 comments
Plans for the Kids Picnic Table should include quantity and size of bolts and screws. Also, placement points and number of screws/bolts needed for each joint. I plan to use 2 per joint for better stability.
Thank you. LZ
Thank you for your valuable feedback. Use at least 2 screws for each joint. I am looking forward to seeing your projects.
Nice, I like:)
Clear instructions on how to cut the four 2x4s into pieces A,B, & D would make this project 10x more obvious.
Thanks for the feedback. I’ve updated the project with more diagrams, except for B. I don’t see where is the problem with the B component. It is a 42″ long 2×4 slat with both ends cut at 45 degrees.
Thank you for such useful, clear and concise AND well illustrated plans for all kinds of woodworking. As a bit of a Jack-of-all-trades, but Master of None, I’m always wanting and needing to learn things; clear and concise is my best learning pill.
That being said, I took a look at your 6-ft picnic table and at the kids picnic table. I notices the rounded table and bench corners on the 6-ft, but noticed that the kids has square corners. My opinion is that the one which Needs the rounded corner is the kids table, and though it might seem logical to you and me, it might not be so to at least one DYSer out there.
So I ask you, for the kids’ sake, to please publish this table with rounded table and bench corners, as well as sanded-down/beveled edges.
Thank you so much for considering my suggestion, and again for your very, very informative site. Sharing information is a wonderful thing… just wish more people would as you do. I teach Math and English, and I do so privately for free when someone has less money than I do.
Cheers to you.
Where do the screws and bolts go? I’am New at woodworking need more detail on this.
The bolts are for the legs and for the seat supports. The screws are for the rest of the joints.
Just built it today. I used scrap lumber from construction of homes around us and had to make a few modification due to the lumber I had. It was easy to build and the final piece is nice. My wife and kids are impressed so I gues I got it right.
That’s awesome. Congrats for the build! You can share a few pics here: http://myoutdoorplans.com/contact/ I would be more than happy to see your picnic table.
I really aplreciate the quality and detail of your plans. Tge best a ailable for free. I suggest to clarifications:
1. In the components list you prescribe 20 pieces for bolts. You meant 10 bolts and 10 nuts (plus washers) I assume. I read it as 20 bolts and nuts.
2. You don’t specify hkw many 2 1/2 inch screws per seat slat. I used 2 each.
Thanks, Bob
You actually need 16 bolts, 2 for each joint. 2 screws per slat is food. Thank you for the feedback. I would love to see your projects!
Ovidiu
I would like to say thank you for all of your hard work in the illustrations and details on this project.
It is sad to see all of the nit picking from others, free doesn’t mean that you not going to have to learn the finishing and assembly techniques performed by tradespeople over the many years of their craft. It is ok people to make a mistake or find a better way, you learn from it.
Thank you for the support. Dale. I have many project ideas, so for me it’s hard to make every one newbie friendly, because I feel the need to create new designs.
Really well instructed plan. I thought all the instructions were easy to follow and was not too costly. My 9 year old son and I have enjoyed doing this project together. Thanks for putting it together!
Thank you for the feedback. Glad to hear it went well. I would love to see a pic of your project. You can always send one here: https://myoutdoorplans.com/contact/
What a neat table I used deck boards for the table top an seats they work perfect with your plans am made the seat braces 441/2 long since deck boards are wider than 2x4s thank you my grand kids love it
Turned out decent. Thank you
Congrats for the project. I would love to see your project!