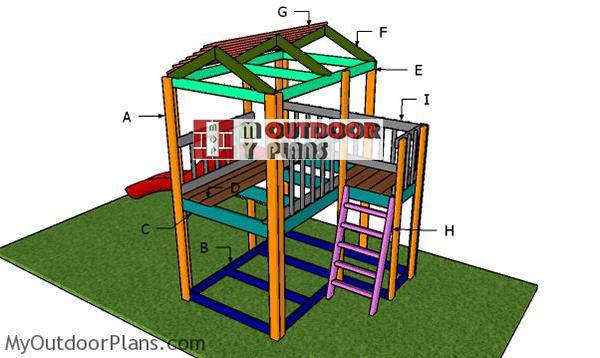
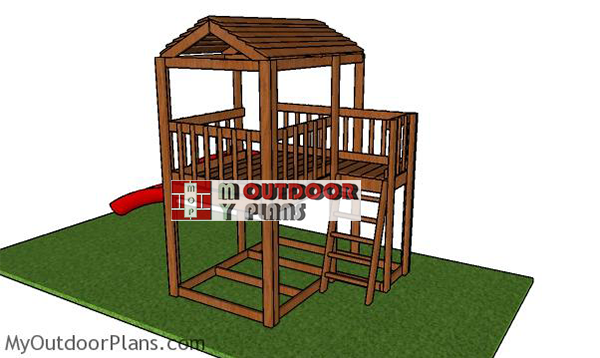
This step by step diy woodworking project is about outdoor fort plans. I have designed this super simple fort so you can build one in the weekend, using basic materials and tools. My fort plans feature a ladder and a nice slide, so the kids will be entertained and have multiple choices to play. Make sure you smooth the exposed sharp edges by using a router or a sander.
There are many fort plans you can choose from, so make sure you take a look over the alternatives before starting the actual construction project. Invest in high quality and weather resistant lumber, such as cedar, pine or redwood. Always take accurate measurements and use a professional saw when building the components, in order to get the job done properly from the very beginning. See all my Premium Plans HERE.
Projects made from these plans
Building a kids fort
Building-an-outdoor-fort
Cut & Shopping Lists
- A – 9 pieces of 2×4 lumber – 96″ long, 3 pieces – 72″ long POSTS
- B – 2 pieces of 2×4 lumber – 45″ long, 2 pieces – 69″ long, 1 piece – 24″ long, 1 piece – 48″ long, 1 piece – 72″ long BASE FRAME
- C – 2 pieces of 2×6 lumber – 45″ long, 2 pieces – 69″ long, 1 piece – 24″ long, 1 piece – 48″ long, 1 piece – 72″ long FLOOR FRAME
- D – 8 pieces of 1×6 lumber – 72 ” long, 4 pieces – 24″ long FLOOR
- E – 2 pieces of 2×4 lumber – 72″ long, 3 pieces – 45″ long TOP FRAME
- F – 6 pieces of 2×4 lumber – 28 1/8″ long RAFTERS
- G – 14 pieces 0f 1×6 lumber – 72″ long ROOF
- H – 2 pieces of 2×4 lumber – 50 1/8″ lumber, 5 pieces – 19 1/2″ long LADDER
- I – 2 pieces of 2×4 lumber – 72″ long,8 2 pieces – 48″ long, 2 pieces – 22 1/2″ long, 4 pieces – 46 1/2″ long, 27 pieces – 23 1/4″ long RAILINGS
- 28 pieces of 2×4 lumber – 8′
- 5 pieces of 2×6 lumber – 8′
- 12 pieces of 1×6 lumber – 12′
- 7 pieces of 1×2 lumber – 8′
- 2 1/2″ screws
- 1 5/8″ screws
- wood filler, exterior paint
- slide
Tools
![]() Hammer, Tape measure, Framing square, Level
Hammer, Tape measure, Framing square, Level
![]() Miter saw, Drill machinery, Screwdriver, Sander
Miter saw, Drill machinery, Screwdriver, Sander
![]() Post hole digger, Concrete mixer
Post hole digger, Concrete mixer
Time
![]() One day
One day
Related
Tree Fort Plans
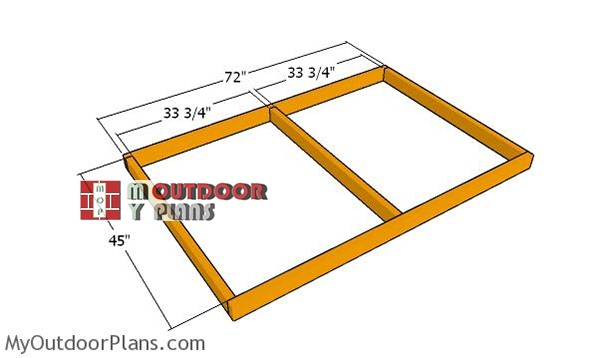
Base-frame-diy-fort
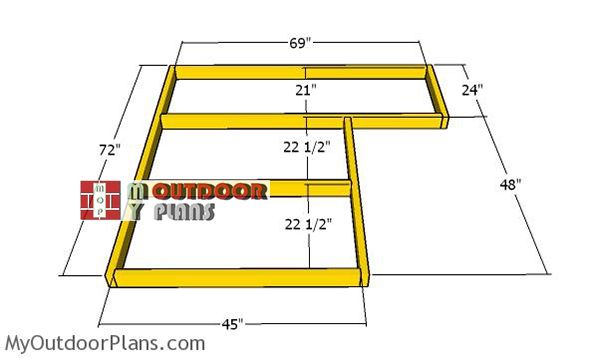
The first step of the project is to build the base frame for the outdoor fort. Cut the components as shown in the plans, using 2×4 lumber. Lay the components on a level surface and align the edges flush. Make sure the corners are square, drill pilot holes and insert 2 1/2″ screws.
Floor-frame
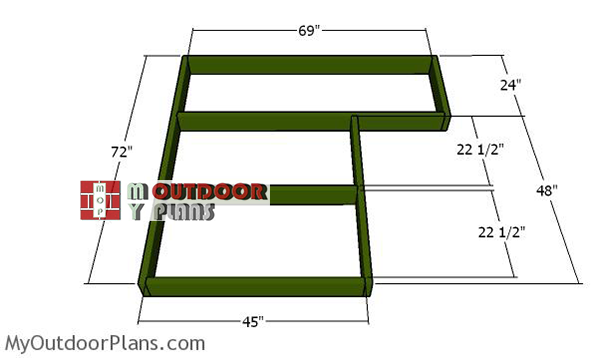
The next step of the project is to build the floor frame. Use the same techniques described above, but use 2×6 boards.
Assembling the frame of the backyard fort
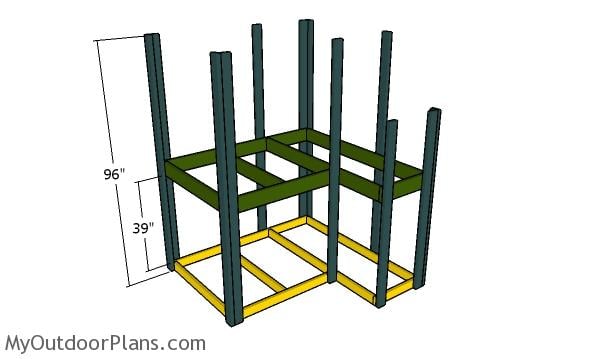
Cut the legs for the outdoor fort from 2x4s. Attach the legs to the frames. Plumb the legs with a spirit level and make sure the frames are perfectly horizontal. Drill pilot holes through the legs and insert 2 1/2″ screws. Use 2 screws for each joint.
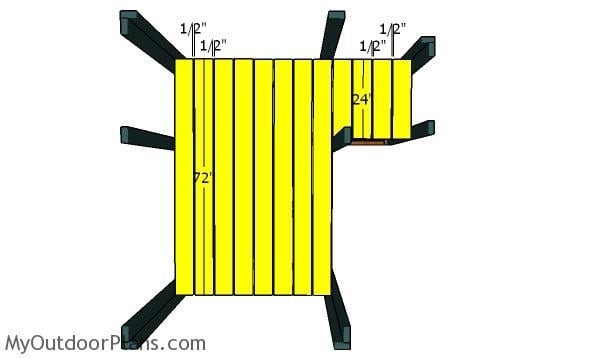
Fitting the floor sheets
Use 1×6 boards for the floor of the fort. Cut the boards at 24″ and at 72″. Use a piece of 1/2″ plywood to create even gaps. Drill pilot holes and insert 1 5/8″ screws to lock the boards to the frame of the floor.
Top-frame-for-the-backyard-fort
Use 2×4 lumber for the top frame. Drill pilot holes and insert 2 1/2″ screws to assemble the frame.
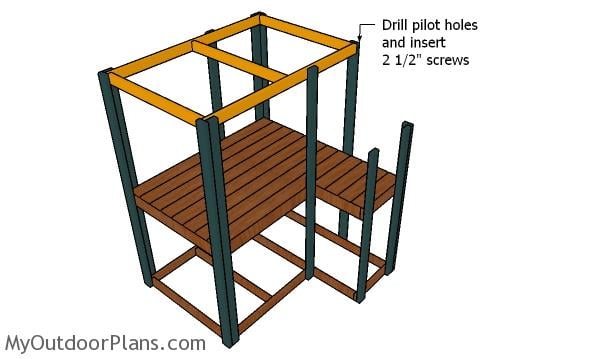
Fitting the top frame
Fit the top frame to the outdoor fort and align the edges. Drill pilot holes through the legs and insert 2 1/2″ screws to lock the frame into place tightly.
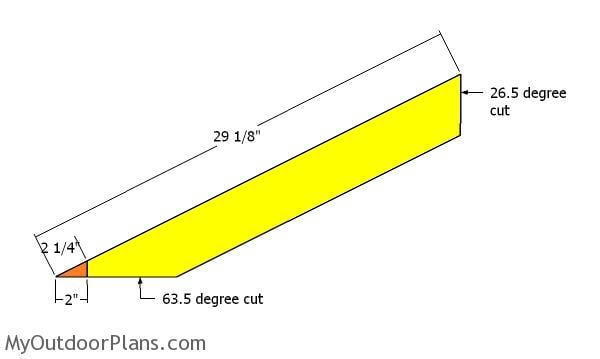
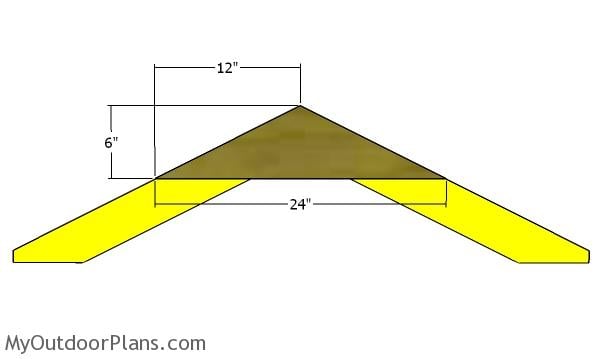
Rafter – Kids Fort
Use 2×4 lumber for the rafters. Make the angle cuts at both ends, as shown in the diagram.
Fitting the gussets – Kids Fort
Lay the rafters on a level surface and fit the 1/2″ plywood gussets. Align the edges and insert 1 5/8″ screws to assemble the trusses.
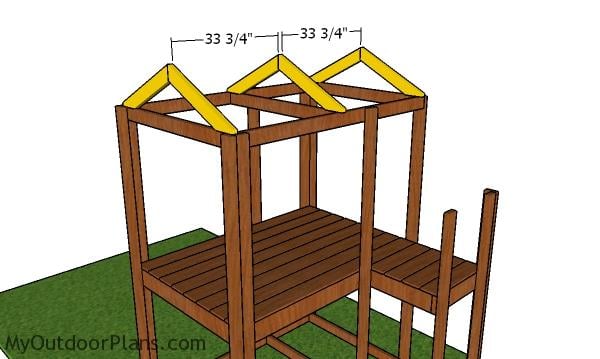
Fitting the trusses
Fit the trusses to the top of the outdoor fort and place them equally spaced. Use rafter ties to lock the trusses into place tightly. Plumb the trusses before attaching the trusses.
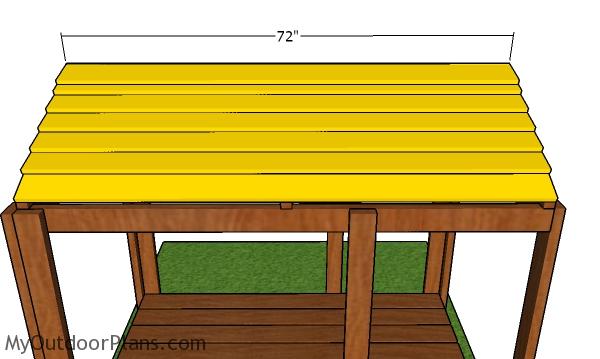
Fitting the roof slats
Use 1×6 boards for the roofing. Start attaching the boards from the bottom up to the top, making sure they overlap for at least 1/2″. Use 1 5/8″ screws to secure the boards to the trusses.
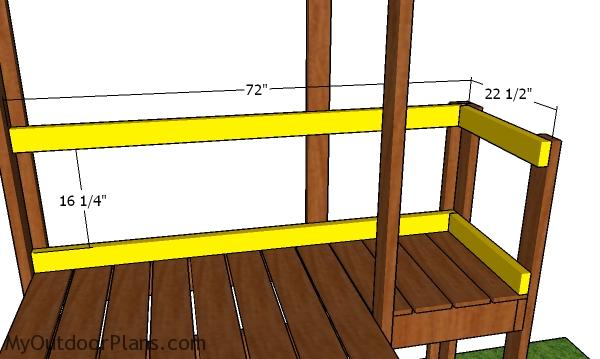
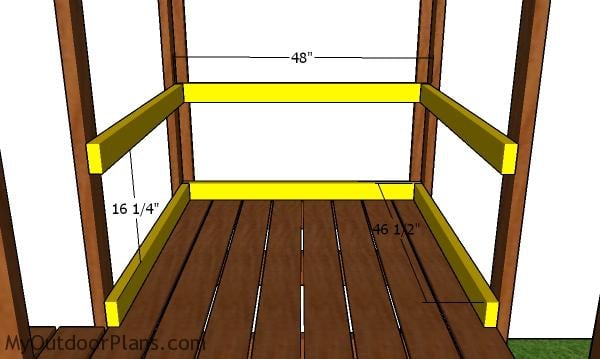
Railing supports to the outdoor fort
Use 2×4 lumber for the railings supports. Drill pilot holes and insert 2 1/2″ screws to lock them to the vertical posts. You can adjust the size of the railings to suit your needs.
Fitting the baluster supports to the kids fort
Fit the rail supports to the other sides of the fort.
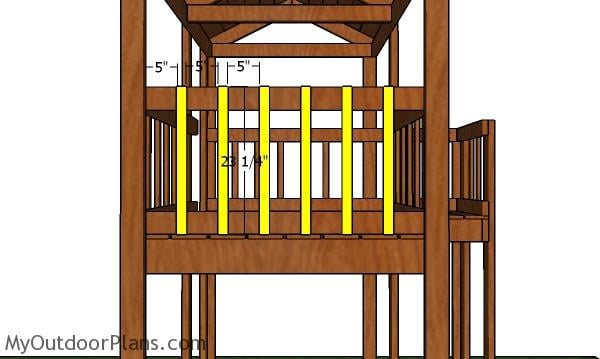
Fitting the balusters – Outdoor fort
Use 1x2s for the balusters. You can adjust the space between the balusters. Drill pilot holes and insert 1 5/8″ screws to lock them to the supports.

Outdoor fort balusters
Fit the balusters to the other side of the bort.
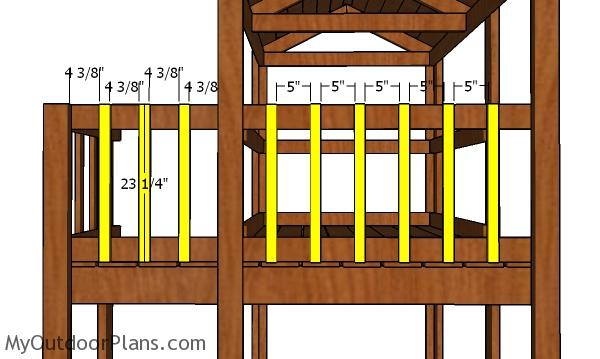
Fitting the balusters – Fort for kids
Balusters for kids fort
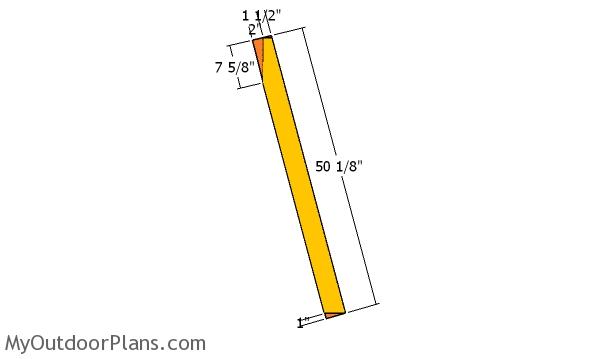
Building the ladder supports
Now it’s time to build the ladder for the fort. Use 2×4 lumber for the supports. Use a miter saw to make the angle cuts, as shown in the plans.

assembling-the-ladder
Assemble the ladder by fitting the horizontal steps. Drill pilot holes through the supports and insert 2 1/2″ screws into the steps.
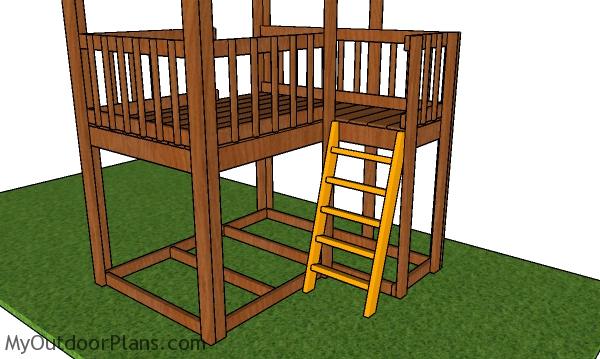
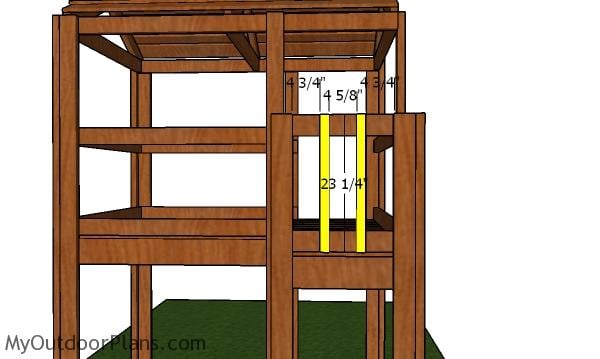
Fitting the ladder
Fit the ladder to the fort, as shown in the diagram. Drill pilot holes and insert 2 1/2″ screws to secure it into place.
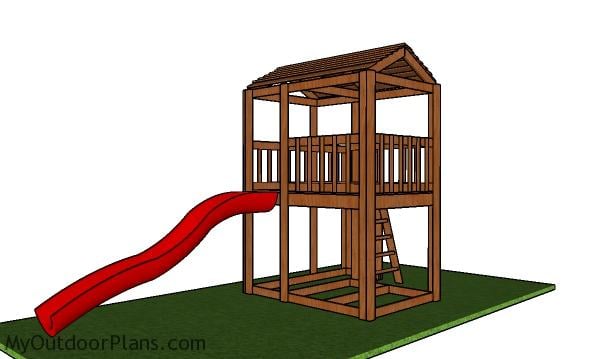
How to build an outdoor fort
Attach the slide to the outdoor fort, as shown in the diagram.
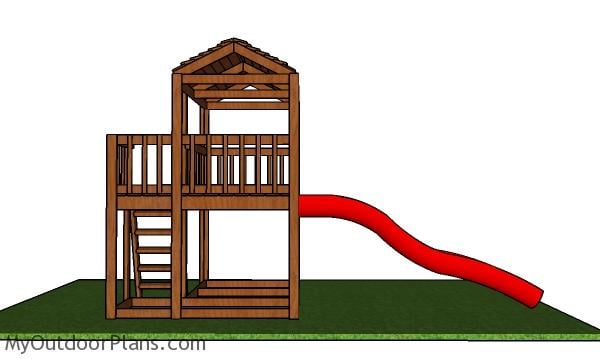
Outdoor Fort Plans – side view
Last but not least, you need to take care of the finishing touches. Fill the holes with wood putty and smooth the surface with 120-220 grit sandpaper.
Outdoor-fort-plans
Top Tip: Apply several coats of stain or paint to the components, in order to protect them from decay. Choose vivid colors in order to create a nice appearance. Lots of project plans for kids HERE.
If you want to get PREMIUM PLANS for this project, in a PDF format, please press GET PDF PLANS button bellow. Thank you for the support.

This woodworking project was about outdoor fort plans. If you want to see more outdoor plans, we recommend you to check out the rest of our step by step projects.
EXPLORE MORE IDEAS FOR:
 |
 |
 |
 |
13 comments
Hi. I was going to secure posts into the ground when I made the fort. Is your design intended to sit on the ground?
Yes, but you can secure the posts into the ground if you want to. This will make it permanent, but add more strength.
May i know how much it cost you on building this fort? I just wanted to compare whether its worth building it or just buying one. Thank you.
I don’t have a cost estimate. You have the materials list so you can make one using the local prices.
Great plan. Thankyou
Correction to lengths for POSTS in materials. There are 3 at 72”
Also meaning you need one extra 8 ft 2×4 when you buy lumber. Our count may have been off, but we needed to buy two extra 8ft 2x4s. Total of 28 not 26.
This was pretty easy to follow. So far we are at 6 hours of labor, and we need to complete the rails, roof, and connecting the ladder. We’re opting out of a slide and plan on maybe adding wood and a rock wall where the slide would go. We are also modifying the roof to plywood and roofing material to match our house. We purchased materials at Home Depot in California and spent about $275. We were able to rent a miter saw for $44 for one day of use. We haven’t purchased paint yet. Grand total should end up around $400. I would say definitely not more than $500 for this project. And worth it if you’re handy with tools and diy projects.
Thank you for the feedback. I would love to feature your project on the blog. I would love if you send a few pics here: https://myoutdoorplans.com/contact/
Thanks for the plans and ideas, you have a pretty neat website! One large area of concern for me is on these raised playhouses, nearly all safety guides say to never have an opening between 3.5″ to 9″ (i.e. balusters on railing need to be 3.5″ or less). If you’re within these dimensions, a child’s body could go through the gap, but their head would get stuck… and on a raised platform, the consequences could be serious injury or death.
Always respect the local codes. It’s not that difficult to add more balusters and close the gaps.
Great plans! Is it necessary to level the ground for the base if not securing via cement? I have a slight slope in my yard.
You can go by without leveling the surface, but I’m not sure how to set the 2x4s to the cement. It doesn’t uses 4x4s, so it’s more complicated.
I love your plans! Loads of help! I need help though I have a bunch of 4×4 and want to use them instead of the 2×4 uprights. How would I do that? I’m struggling to figure it out probably over thinking? Hope you can give me some guidance
Did you end up getting an answer? I will use 4×4 regardless but curious if the author has that alternative or if you have a finished project and could give me any advise. I think 4×4 is better if I want to add on more stuff to the structure. Thank you in advance