Step by step wood working article about patio pergola plans. Building a backyard pergola is the best way to enhance the look of your garden and to create a perfect area for recreation or to take dinner with your family and friends. Choose the location for the pergola with attention and good judgement, as it could turn it in an attraction point of your garden, or on the contrary a poor location could affect the landscaping. On the other hand, you should use durable materials, designed for outdoor use, otherwise you would have to invest large amount of money in order to replace certain components.
All my woodworking plans come with 3D diagrams and step by step instructions. In addition, the plans include full Cut and Shopping lists. Remember that you need to read the local codes before starting the project. It is your responsibility to make adjustments and suit the legal requirements.
A diy garden pergola could come in many shapes and designs, therefore you have to assess the options and choose the plans that best fit your budget, needs and tastes. In this article, we show you a 12×12′ pergola with a simple design, that can be built by anyone that has basic woodworking techniques. In addition, you only need tools common to any household (circular saw, drill machinery, screwdriver), therefore you don’t have to buy expensive power tools, just for this project. See all my Premium Plans HERE.
Projects made from these plans
Cut + Shopping Lists
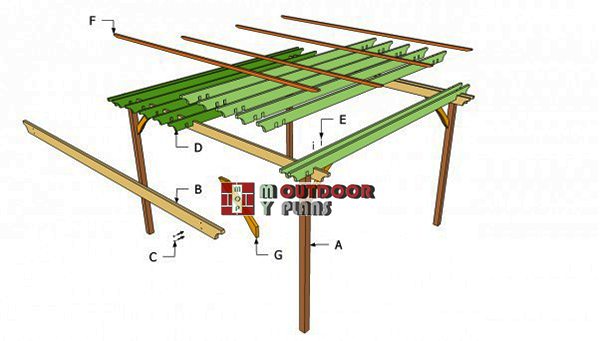
- A – 4 pieces of 4×4 lumber 96” long WOODEN POSTS
- B – 4 pieces of 2×6 lumber 164” long SUPPORT BEAMS
- C – 8 pieces of 7” carriage bolts CARRIAGE BOLTS
- D – 13 pieces of 2×6 lumber 167” long SHADING ELEMENTS
- E – 100 pieces of 4” long SCREWS
- F – 4 pieces of 2×2 lumber 155” long SLATS
- G – 8 pieces of 2×6 lumber 32” long, cut at 45° at both ends BRACES
- sand, gravel, cement, post anchors, 3” lag screws FOOTINGS
- 4 pieces of 4×4 lumber – 8 ft
- 17 pieces of 2×6 lumber – 14 ft
- 4 pieces of 2×2 lumber – 14 ft
- 2 pieces of 2×6 lumber – 12 ft (braces)
- 2 1/2″ screws
- 4×4 post anchors
- 1 5/8″ screws
- 7″ carriage bolts
Tools
![]() Hammer, Tape measure, Framing square, Level
Hammer, Tape measure, Framing square, Level
![]() Miter saw, Drill machinery, Screwdriver, Sander
Miter saw, Drill machinery, Screwdriver, Sander
Time
![]() One weekend
One weekend
Diy Pergola Plans
Patio-pergola-components—diy-project
An outdoor pergola would enhance the look of your backyard, especially if you plan everything from the very beginning. A pergola can take many shapes and designs, therefore you have to take them all into account and select the plans that fit your needs perfectly.
Top Tip: If you live in a windy area, you have to secure the pergola properly, either by fitting the posts in concrete, or by locking the whole structure with braces. This aspect is essential for this project, especially if you want to build a durable pergola.
12×12 Patio Pergola Plans – Laying out

Anchoring the post into concrete
First, decide the anchoring system of the posts. There are many options, starting with fitting the posts directly into concrete, up to pouring concrete footings and placing a post anchors, or securing metal braces to a concrete slab.
If you want a pergola, that can be move to other location, using metal hardware is the best option. Nevertheless, if you live in a windy area, you should consider installing the posts in concrete.
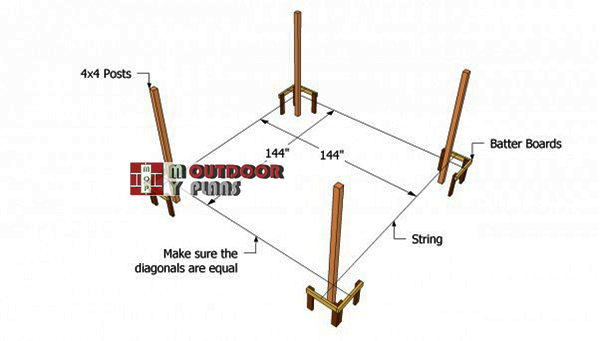
Laying-out-the-pergola
Next, lay the pergola accurately, using several batter boards and string. Measure the diagonals and adjust the position of the posts, till they are equal. Check the corners for squareness, by using a framing square or by applying the 3-4-5 rule.
Top Tip: Plumb the posts with a spirit level and lock them into place with two braces. Next, drive in lag screws trough the anchors in the wooden posts, after pre-drilling several holes.
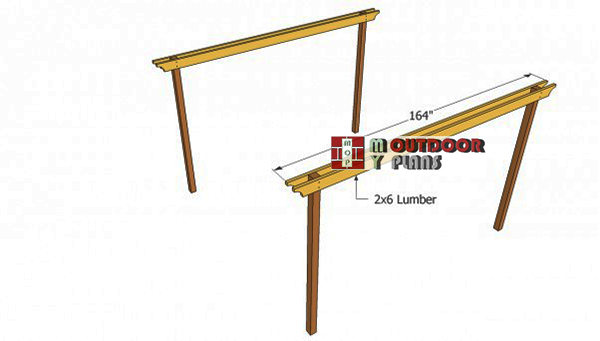
Fitting the support beams

Installing the support beams
After you have installed the four posts into place, you should attach the support beams, as in the diy plans. Level the beams with a spirit level, lock them into position with several C-clamps, drill pilot holes and insert the carriage bolts.
Top Tip: If you want to build a patio pergola that stands out, cut decorative ends for the support beams. Use a round object to mark the cut lines and get the job done with a jigsaw.
Fitting-the-crossbeam-plans
Continue the project by installing the rest of the 2×6 support beams, on the opposite side of the pergola. Work with great care and good judgement, making sure the crossbeams are perfectly level and aligned.
Top Tip: Countersink the heads of the carriage bolts, if you want to obtain a neat look. You could hide the head of the screws by installing caps or by filling the holes with wood putty.
Fitting the pergola rafters

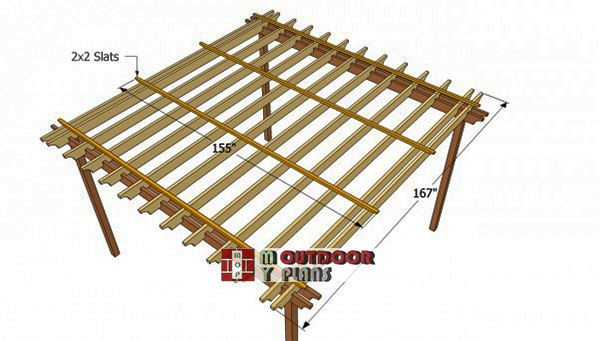
Installing the shade elements
Afterwards, you should fit the shading elements into place, as you should notice in the diy plans. Cut the ends of the 2×6 components in the same manner, as the support beams. Smooth the cut edges with medium-grit sandpaper.
Top Tip: Cut two notches at the end of the shade elements, in order to fit properly into place. Drill pilot holes, before inserting the screws trough the elements in the support beams.
Installing-the-slats-to-square-pergola
Next, place the shade elements equally spaced, in order to get a symmetrical look. You could adjust the gaps between the shade elements, as to fit your needs and tastes. The more space between the beams, the more light will get trough the pergola.
Also, attach 2×2 slats on top of the shade elements. Drill several pilot holes trough the slats and secure them to the shade elements with screws. Make sure the 2×2 slats are equally spaced and cut their ends to fit with the rest of the elements.
Fitting the braces

Installing the braces
If you live in a windy area or you want to add character to your backyard pergola, you should build 2×6 braces and fit them into place, between the support beams. Cut the ends of the braces at 45° and round their exterior sides, in order to match the design of the rest of the components.
In addition, drill pilot holes in the wooden braces and lock them into place with decking screws. Countersink the head of the screws, in order to get a proper result.

Patio pergola plans
Afterwards, you have to fill the gaps and the holes with a good wood putty. Let the compound to dry out properly, before sanding the whole wooden components, along the wood grain, with 120-grit sandpaper. You might want to take a look over these 12×16 pergola plans, if you want to build a rectangular shade structure.
Top Tip: Apply several coats of wood stain, in order to enhance the look of the diy pergola plans and to protect the lumber from water damage. Build a small patio using traditional materials and set a table with several chairs.
This woodworking project is about patio pergola plans. If you want to see more outdoor plans, we recommend you to check out the rest of our step by step projects. LIKE us on Facebook to be the first that gets our latest updates and submit pictures with your DIY projects.
EXPLORE MORE IDEAS FOR:
 |
 |
 |
 |
13 comments
I’m curious how the 3″ screws used to secure the 2×6 shading elements to the support beams through the notched areas are sufficient. After the notch, you still have to go through 3″ of the 2×6 shade elements. Using 3″ screws doesn’t seem right. You need at least 3.5″ or even 4″ screws. Also are you using #10, #12, or #14 screws?
Thanks.
You countersink the holes about 1/2″ – 1″ before inserting the screws. However, you would be indeed better off using 4″ screws. Any of those would work.
We’re having a hard time locating 2″x 2″x 14′ lumber for the long slats. Did you find it off the shelf or did you have to special order it?
Also, do the carriage bolts you used come in two pieces like the picture shows? Is the second part a nut? but it doesn’t look like that.
For the 2×2 slats you can easily use two pieces, just make sure they meet on the middle of the crossbeam. The carriage bolts need a washer and a nut.
We’re having a hard time locating 2″x 2″x 14′ lumber for the long slats. Did you find it off the shelf or did you have to special order it?
I’m a designer, I don’t build all my models. If you don’t find 2x2s that long, you can join two pieces in one.
Note that in the bill of material you have (4) G but you need (4) more similar but longer. I recommend G1 and G2 for numbers for the edit. BTW – very nice design and so sweet web page with info.
All the 8 braces have the same size: 32″
Based on the direction that the sun hits the covered space does it matter which direction the sun shade slates are laid?
Sun hits our patio east to west from the south. Should we have the slots go north south or east west!
Can I reduce plan to fit our space 8 x12 w?
Thanks
You can adjust the size of the pergola to suit your needs. Regarding the other question, I’m not sure. I think the rafters should go on the same direction as the sun moves.
no mention where the braces mount onto. Do they just float in the air?
Have you at least looked at the diagram and read the instructions?
Great answer – so helpful!