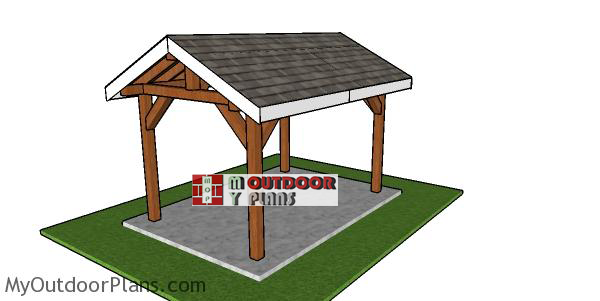
This step by step diy woodworking project is about a 8×12 outdoor pavilion plans. This is a small pavilion that anyone can build in a few days and save tons of money, as compared to buying a retail one. This pavilion is built on a sturdy 6×6 framing and it features 2×6 rafters. My plans come with a complete cut / shopping list and they are PDF dowmload and Print friendly. Take a look over the rest of our woodworking plans, if you want to get more building inspiration. Premium Plans for this project available in the Shop.
When buying the lumber, you should select the planks with great care, making sure they are straight and without any visible flaws (cracks, knots, twists, decay). Investing in cedar or other weather resistant lumber is a good idea, as it will pay off on the long run. Use a spirit level to plumb and align the components, before inserting the galvanized screws, otherwise the project won’t have a symmetrical look. If you have all the materials and tools required for the project, you could get the job done in about a day. See all my Premium Plans HERE.
Projects made from these plans
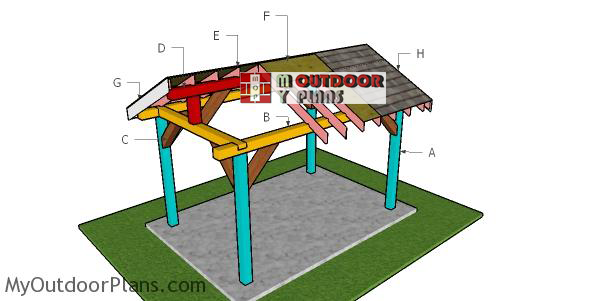
8×12 Outdoor Pavilion – Free DIY Plans
Building-a-8×12-pavilion
Cut & Shopping Lists
- A – 4 pieces of 6×6 lumber – 84″ long POSTS
- B – 2 pieces of 6×6 lumber – 96″ long, 2 pieces – 168″ long TOP PLATES
- C – 10 pieces of 6×6 lumber – 32″ long BRACES
- D – 2 pieces of 6×6 lumber – 17 1/4″ long, 1 piece – 168″ long RIDGE BEAM SUPPORTS
- E – 24 pieces of 2×6 lumber – 72″ long RAFTERS
- F – 2 pieces of 1/2″ plywood – 48″x96″ long, 2 pieces – 48″x72″ long, 2 pieces – 21 1/4″x80″ long, 2 pieces – 21 1/4″x88″ long ROOF SHEETS
- G – 2 pieces of 1×8 lumber – 88″ long, 2 pieces – 80″ long, 4 pieces – 73 3/4″ long TRIMS
- H – 180 sq of tar paper, 180 sq ft of asphalt shingles ROOFING
- 11 pieces of 6×6 lumber – 8′
- 3 pieces of 6×6 lumber – 14′
- 12 pieces of 2×6 lumber – 12′
- 8 pieces of 1×8 lumber – 8′
- 6 pieces of 1/2″ plywood – 4’x8′
- 180 sq of tar paper, 180 sq ft of asphalt shingles
- 5″ screws, 8″ screws
- 1 5/8″ screws
- wood glue, stain/paint
- post hole digger
- post anchors
- beam to post connectors
- structural screws for connectors
- strong tie T
Tools
![]() Chalk line, tape measure, spirit level, carpentry pencil
Chalk line, tape measure, spirit level, carpentry pencil
Time
![]() One day
One day
Related
It’s that simple to build your own pavilion!
How to build a 8×12 pavilion
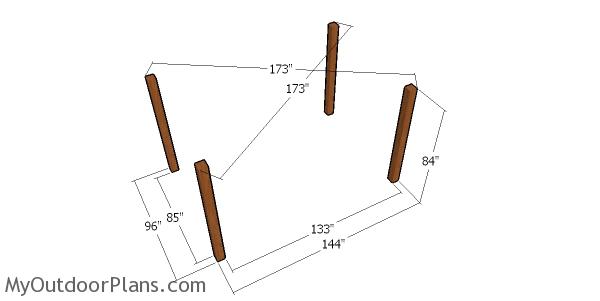
Laying out the posts for the backyard pavilion
Determining the location for the pavilion is essential, as you have to comply with the local building codes. Make sure the surface is level and remove the vegetation layer. You can build this pavilion to an already existing concrete slab, or you can start from scratch.
Layout the posts for the 8×12 pavilion. Use batter boards and string to determine the location of the posts. Apply the 3-4-5 rule to every corner of the pavilion, so you make sure they are right angled. Moreover measure the diagonals and make sure they are equal.
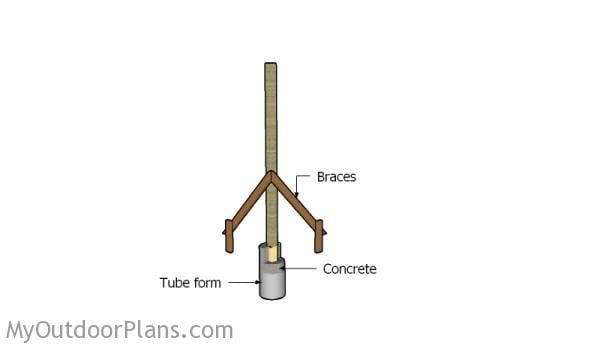
Setting the posts in concrete
You can set the posts in concrete or you can pour footings and attach the wooden posts into place with an anchor. Dig 2-3′ deep in the ground and 12″ in diameter and pour the footings. Set the anchors and then attach the posts with temporarily braces. Insert the screws through the anchors into the post.
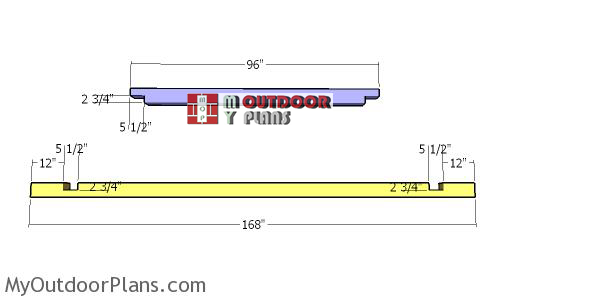
Top-plates-pavilion
Use 6×6 lumber for the side top plates. Use a circular saw to make the notches to the beams. Make parallel cuts and then use a hammer to remove the excess. Smooth the recess with a chisel and sandpaper.
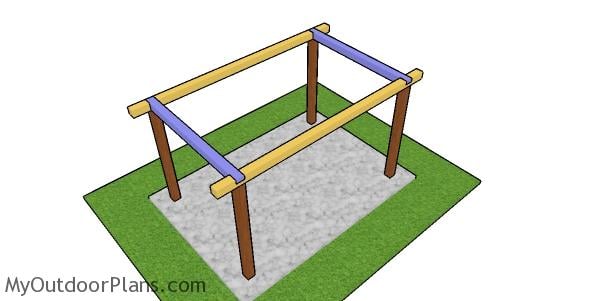
Fitting the top plates
Fit the plate beams to the pavilion, as shown in the diagram. Make sure the joint falls to the middle of the center post. Align the edges with attention, drill pilot holes and insert 8″ screws to lock the beams into place.
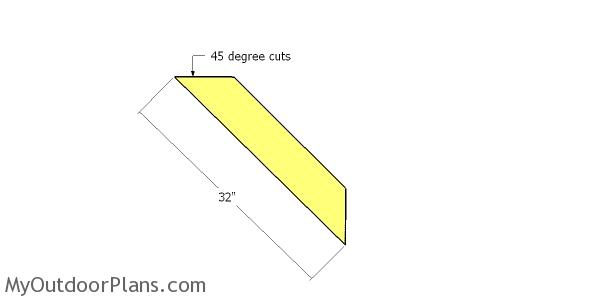
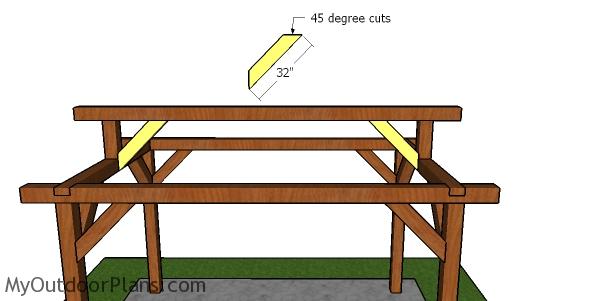
Braces for the pavilion frame
Use 6×6 lumber for the braces. Make 45 degree cuts to both ends of the braces.
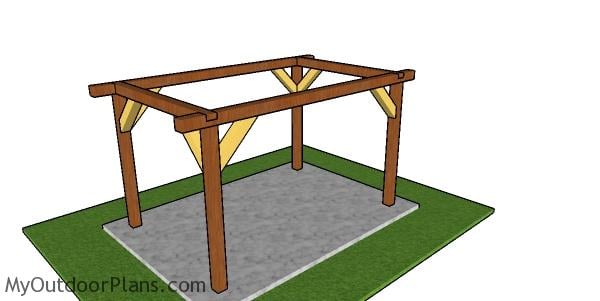
Fitting the braces to the frame of the pavilion
Double check if the posts are plumb and if the corners are square. Secure the braces into place with 5″ screws, after drilling pilot holes. These braces will really enhance the rigidity of the pavilion, so make sure you don’t take shortcuts and install them properly. In addition, the braces have a design purpose as they add to the overall masculine look of the pavilion.
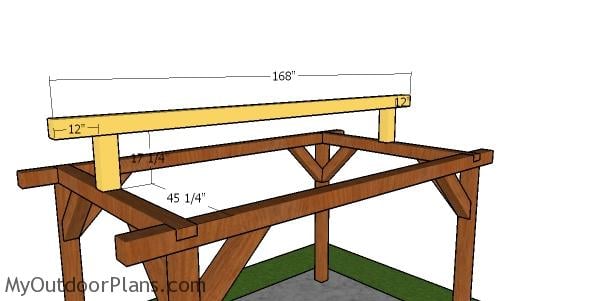
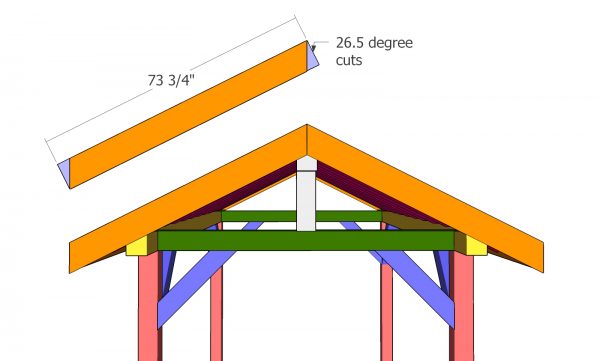
Fitting the ridge beam to the small pavilion
Use 6×6 lumber for the ridge beam. Use a spirit level to plumb the supports and secure them into place with corner brackets. Center the supports to the front and to the back of the pavilion plates. Fit the top ridge into place and use corner brackets to lock them into place, as well. Check if the corners are square and align the edges with attention. Use 8″ screws to reinforce the joists. The ridge beam should have 12″ overhang on both sides.
Braces for the ridge beam
Last but not least, you need to attach the 6×6 braces to the structure of the pavilion, so you can enhance the rigidity. Cut both both ends of the braces at 45 degrees and then secure them into place tightly, with 5″ screws.
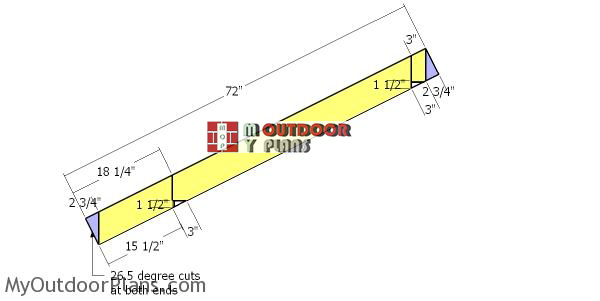
Rafters-for-8×12-gable-pavilion
Use 2×6 lumber for the rafters. Use a miter saw to make 26.5 degree cuts at both ends of the beams. In addition, mark the cut lines on the rafters and make the birdmouth cuts with a circular saw.

Fitting the rafters to the 8×12 pavilion
Fit the rafters to the top of the pavilion, every 16″ on center. Use the rafter ties to lock the rafters to the framing of the pavilion.

Roof-sheets-for-8×12-pavilion
Use 1/2″ plywood for the roof of the gable pavilion. Cut the sheets at the right dimensions and lay them over the roof structure, following the pattern described in the shed diagram. Leave no gaps between the sheets and insert 1 5/8″ screws, every 8″ along the framing.

Side roof trims – 8×12 pavilion
Use 1×8 lumber for the roof trims. First, attach the trims to the sides of the backyard pavilion. Use 2″ nails to secure the trims into place.
Fitting the end roof trims
Use 1×8 lumber for the front and back roof trims. Make the angle cuts to the trims and then secure them into place tightly with 2″ nails.

Fitting the roofing – 8×12 pavilion
Cover the roof of the pavilion with tar paper and then install the asphalt shingles. Use drip edges to make sure the roof is waterproof.
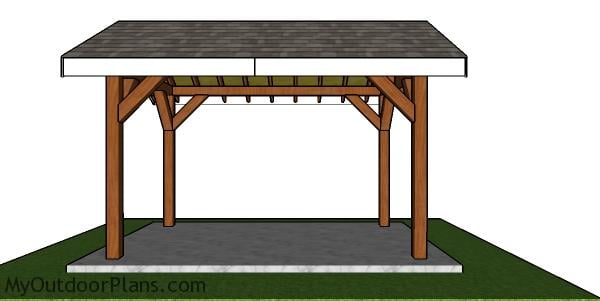
8×12 Pavilion Plans – side view
Make sure you read the local building codes and make modifications to suit your local meteorological conditions (strong winds, snow load).
8×12-gable-pavilion–plans
Fill the holes with wood putty and let them dry out for a few hours. Smooth the surface with 100-220 grit sandpaper and remove the residues with a damp cloth.
Top Tip: Apply a few coats of paint or stain to the components, to enhance the look of the project. Make sure you take a look over the rest of my pergola/gazebo/pavilion plans HERE. See all my free woodworking plans (over 1000) HERE. Premium Plans for this project available in the Shop.
If you want to get PREMIUM PLANS for this project, in a PDF format, please press GET PDF PLANS button bellow. Thank you for the support.

This woodworking project was about 8×12 backyard pavilion plans free. If you want to see more outdoor plans, check out the rest of our step by step projects and follow the instructions to obtain a professional result. Feel free to SHARE my plans with your friends.
EXPLORE MORE IDEAS FOR:
 |
 |
 |
 |
9 comments
Thanks…for the pavilion..can I download this?
Yes. Please read the FAQs: http://myoutdoorplans.com/faq/
Looking to modify this to make a 11X8 (so wider versus long) pool hut, with corrugated metal roofing and a couple side and back walls. Would I be ok using 4×4’s instead of the 6×6? I just don’t need the bulky look since it will be covered to a degree.
Yes, for this size you can go with 4x4s.
Would like to build the 10 X 12 outdoor Pavilion, would appriciate your Plans to build, include the sizes and free plans to do so.Also please include any instructions you may recommend I use. I,m not a carpenter but can muddle through a project with some instructions.
Larry Gullett
Thank You
We love this 12 x 8 gazebo shear as we want to put my Traeger smoker and outdoor sink in there, I want the roof to go the other direction not the long way. How can you design my stead to be 12 foot wide, and 8 foot deep, but with the roofing going the other direction than in your drawing, as I will put against my home and want the rain to shear right and left not back and front!
Kevin
I don’t have the time to design custom plans, but I give you an idea. Build the base and then check one of my 12×12 12×16 pavilions to use the roof section for your project. Not hard at all.
I love this site and the work you’ve done!
If I was to put a hip roof on this size base , can I adapt the plans from the 10×16 Hip Roof Gazebo plans?
Also could I use 4×4 timber, or does it have to be 6×6?
4×4 lumber cannot span 12 ft.