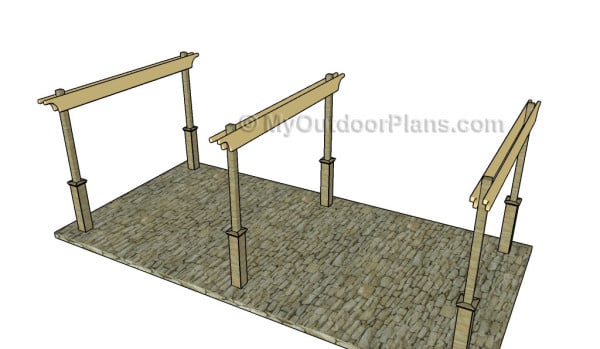
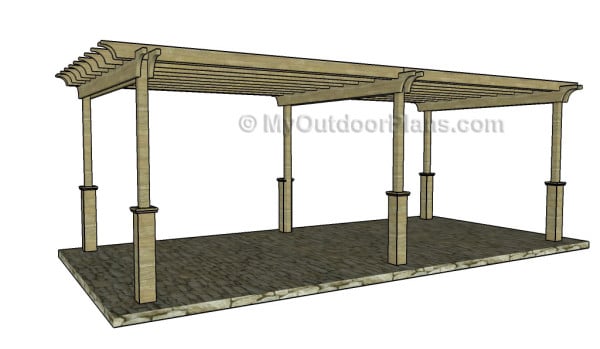
This step by step diy woodworking project is about 12×24 free pergola plans. If you want to learn more about building a large patio pergola, we recommend you to take a look over the instructions described in the article. If you want to build a large shaded area in your backyard, we recommend you to check out these free pergola plans.
Work with good judgement and don’t forget to take a look over the rest of the related plans, as there are many designs and woodworking projects to select from. Work with attention and don’t forget that a good planning will save you from many issues and it will keep the costs within the total budget. Invest in high quality materials, such as pine, redwood or cedar. Drill pocket holes before inserting the galvanized screws, to prevent the wood from splitting. See all my Premium Plans HERE.
Projects made from these plans
It’s that simple to build a 12×24 pergola!
12×24 Free Pergola Plans
Building-the-balusters
Cut & Shopping Lists
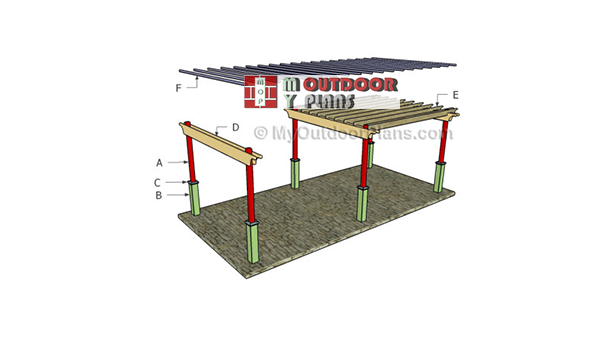
- A – 6 pieces of 4×4 lumber – 144″ long POSTS
- B – 24 pieces of 2×8 lumber – 36″ long TRIMS
- C – 24 piece of 1×3 lumber – 8 1/2″ long TRIMS
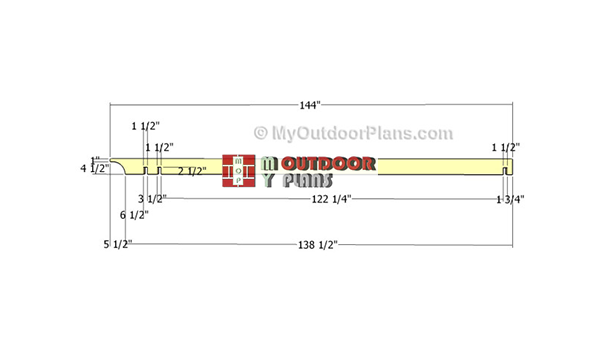
- D – 6 pieces of 2×10 lumber – 144″ long SUPPORT BEAMS
- E – 22 pieces of 2×6 lumber – 144″ long RAFTERS
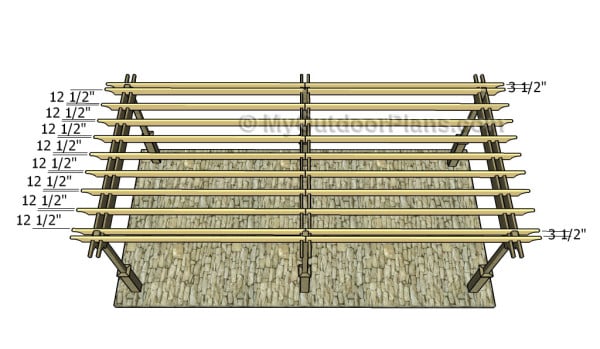
- F – 20 pieces of 2×2 lumber – 123″ long SLATS
- 6 pieces of 4×4 lumber – 10′
- 6 pieces of 2×8 lumber – 12′
- 3 pieces of 1×3 lumber – 8′
- 6 pieces of 2×10 lumber – 12′
- 22 pieces of 2×6 lumber – 12′
- 20 pieces of 2×2 lumber – 14′
- 12 pieces of 7″ long carriage bolts
- 100 pieces of 4 1/2″ screws
- 200 pieces of 2 1/2″ screws
- 200 pieces of 2 1/2″ nails
Tools
![]() Hammer, Tape measure, Framing square, Level
Hammer, Tape measure, Framing square, Level
![]() Miter saw, Drill machinery, Screwdriver, Sander
Miter saw, Drill machinery, Screwdriver, Sander
Time
![]() One day
One day
Related
How to build a large pergola
Laying-out-the-pergola
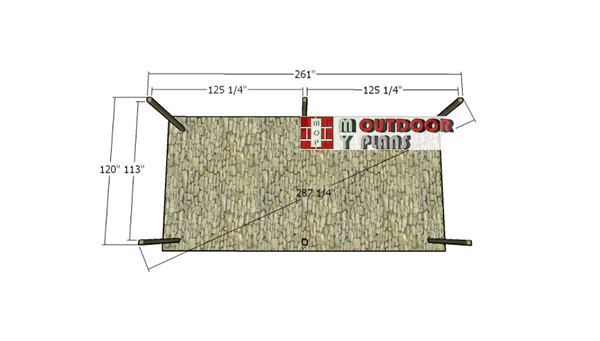
The first step of the project is to lay out the pergola in a professional manner. Use batter boards and string to make sure the posts will be placed properly. Make sure the diagonals of the pergola are perfectly equal. In addition, use the 3-4-5 rule to each corner of the pergola, in order to make sure they are right-angled.
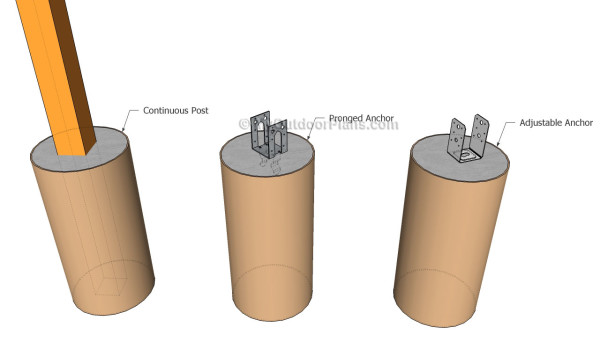
Anchoring the post into concrete
There are several ways to lock the posts into place. Therefore, you could dig holes in the ground and set the posts into concrete, or you could use post anchors. Nevertheless, taking into account the complexity of the construction, we recommend you to lock the posts into concrete.
Your local building codes should specify a recommended depth for post holes in your area. For a structure like this one, plan on about two-feet in depth, as depth of your hole should be about 1/4 of the height of the wooden post. The holes should have about 10″ in diagram.
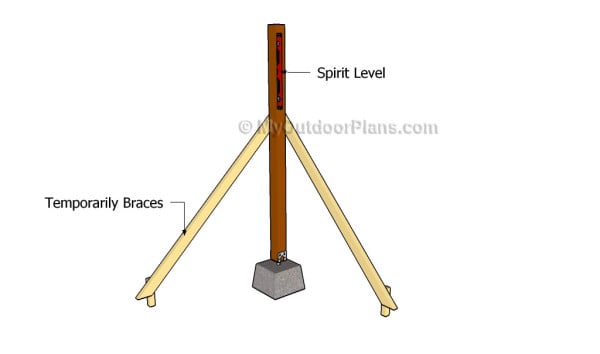
Plumbing the post
Plumb the posts with a spirit level and lock them into place with temporarily braces, as shown in the diagram.
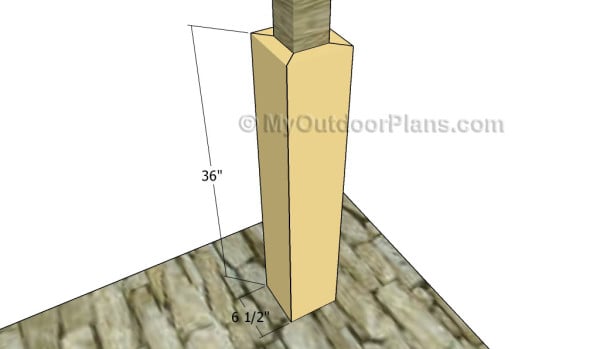
Fitting the base trims
In order to enhance the look of the posts, we recommend you to fit trims to their base. Build the trims out of 2×8 lumber. Adjust the width of the trims to 6 1/2″. Use a circular saw to bevel cut both sides at 45 degrees. Fit the trims to the posts and secure them into place using 2 1/2″ finishing nails and glue.
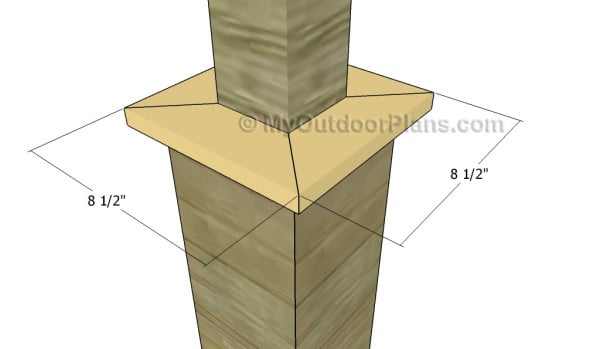
Fitting the top trims
Next, you need to attach the 1×3 trims to the top of the trims. Cut both sides of the trims at 45 degrees and secure them into place using 1 1/4″ brad nails. Leave no gaps between the components and add glue for a better bond.
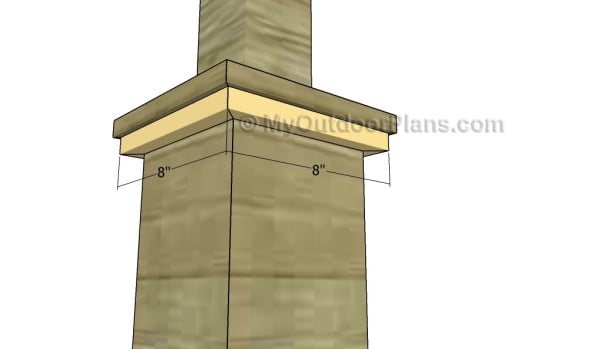
Fitting the 1×1 trims
If you really want to enhance the look of the pergola, you could add 1×1 trims to the base of the posts. Cut both ends of the trims at 45 degrees and secure them into place using finishing nails and glue.
Build the support beams out of 2×10 lumber. Make sure you cut the ends of the support beams in a decorative manner. Smooth the cut edges with attention using fine-grit sandpaper.
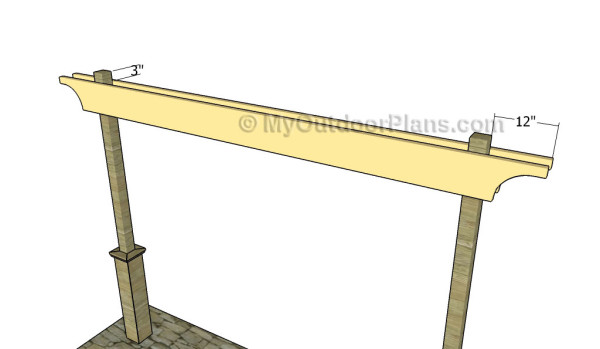
Attaching the support beams
After building the six support beams, you need to attach them to the posts. Clamp the beams to the top of the posts, after making sure they are perfectly horizontal. Leave 12″ on both sides of the pergola, so that the beams could be centered to the structure. Drill pilot holes through the beams and through the posts. Afterwards, insert 7″ carriage bolts to lock the components together tightly.
Fitting the support beams
Continue the project by attaching the rest of the beams to the 4×4 posts. Make sure your structure looks similar to the one in the diagram.
Building-the-rafters
Build the shade elements out of 2×6 lumber. Cut one end in a decorative manner and make a few notches to the component, as described in the diagram. Make paralel cuts inside the notches and remove the excess with a damp cloth.

Installing the shade elements
Attach the shade elements to the support beams, as described in the diagram. Drill pilot holes through the beams and insert 4 1/2″ screws into the support beams.
Fitting the shade elements
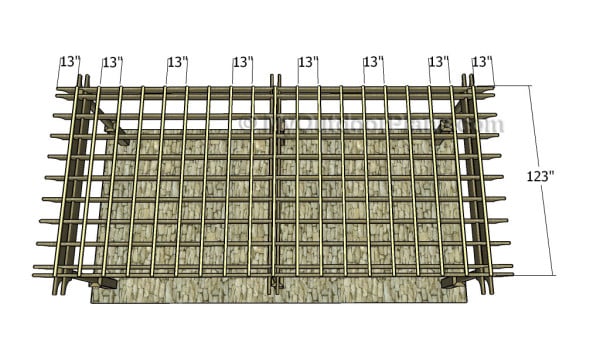
Repeat the process for the other side of the 12×24 pergola. Place the rafters equally-spaced and leave no gaps between the components. Lock everything together tightly.
Fitting the top slats
In order to keep the shade elements equally-spaced, we recommend you to attach 2×2 slats to the top of the pergola. Place the slats equally-spaced, drill pilot holes and secure them to the rafters using 2 1/2″ screws.
12×24 Free Pergola Plans
One of the last steps of the woodworking project is to take care of the finishing touches. Therefore, fill the pilot holes with wood putty and smooth the surface with 120-grit sandpaper.
Top Tip: If you want to enhance the look of the project and to protect the stand from decay, we recommend you to cover the components with paint or stain.
This woodworking project was about 12×24 large pergola plans. If you want to see more outdoor plans, we recommend you to check out the rest of our step by step projects. LIKE us on Facebook and Google + to be the first that gets out latest projects and to hep us keep adding free woodworking plans for you.
EXPLORE MORE IDEAS FOR:
 |
 |
 |
 |
21 comments
what depth do you anchor the 6 posts? i dont see anything in the plans stating what height and the depth of the posts into the ground
Thank you for the feedback. I will add the info to the plans.
Hi Julian,
I was wondering how to print the 12×24 pergola plans.
thank you,
Rachel
See the FAQ: http://myoutdoorplans.com/faq/
Foresee any issues using 4×6 or 4×6 posts for this instead of 4×4? I want it to be a bit more “beefy” looking.
It should work, but make sure you lay out the posts properly.
How high is this?
The posts are 12′, so if you set them 3′ in concrete, the pergola will be 9′ high. You can adjust the height to suit your needs.
What would you have to change if you made it 16′ x 24′? Would the 2′ x 10’s be ok for the 16′ span?
You have to change the layout of the postst, first. Then it would require braces for all the posts. The 2×10 would work, but would be safe to check the local codes.
Is this Sketchup model available for download?
No, I don’t share the model files.
I like the simplicity of your design. I will follow it and build mine this spring.
I would like to try a different decor for the arch cut at the ends of the support beams and rafters, do you recommend a site where I can find ideas?
Arturo
Do you make custom plans? We are needing a pergola 30 feet long with an angle roof.
Sorry, but I don’t design custom plans.
Can this 12 x 24 Pergola be built on an existing deck?
Yes, but make sure you lock the posts to the deck framing at least.
What’s the length of 2×2 Slat on the top? Also, where can I download full plan
123″, you can see in the cut list. Please the FAQs: https://myoutdoorplans.com/faq/
Hi – how tall is the pergola, please? Great design! Thank you.
You can adjust the height by cutting the posts to the desired length.