This step by step diy woodworking project is about a 14×14 outdoor pavilion plans. I have designed this square pavilion with a gable roof so you can create some nice shade in your garden. Make sure you take a look over the local building codes, so you comply with the regulations. Take a look over the rest of our woodworking plans, if you want to get more building inspiration. Premium Plans for this project available in the Shop.
When buying the lumber, you should select the planks with great care, making sure they are straight and without any visible flaws (cracks, knots, twists, decay). Investing in cedar or other weather resistant lumber is a good idea, as it will pay off on the long run. Use a spirit level to plumb and align the components, before inserting the galvanized screws, otherwise the project won’t have a symmetrical look. If you have all the materials and tools required for the project, you could get the job done in about a day. See all my Premium Plans HERE.
Projects made from these plans
14×14 Pavilion – Free DIY Plans
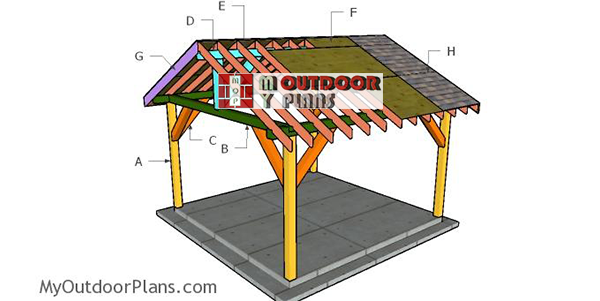
Building-14×14-pavilion
Cut & Shopping Lists
- A – 4 pieces of 6×6 lumber – 132″ long POSTS
- B – 2 pieces of 6×6 lumber – 168″ long, 2 pieces – 192″ long TOP PLATES
- C – 8 pieces of 6×6 lumber – 48″ long BRACES
- D – 2 pieces of 6×6 lumber – 36″ long, 1 piece – 192″ long, 2 pieces – 48″ long TOP RIDGE
- 4 pieces of 6×6 lumber – 12′
- 3 pieces of 6×6 lumber – 16′
- 2 pieces of 6×6 lumber – 14′
- 6 pieces of 6×6 lumber – 8′
- 5 1/2″ screws, 6 1/2″ screws
- wood glue, stain/paint
- post hole digger
- post anchors
- beam to post connectors
- structural screws for connectors
- strong tie T
Tools
![]() Hammer, Tape measure, Framing square, Level
Hammer, Tape measure, Framing square, Level
![]() Miter saw, Drill machinery, Screwdriver, Sander
Miter saw, Drill machinery, Screwdriver, Sander
Time
![]() One day
One day
Related
- PART 1: 14×14 Pavilion Plans
- PART 2: 14x14 Pavilion Roof Plans
It’s that easy to build a pavilion – Video!
How to build a 14×14 pavilion
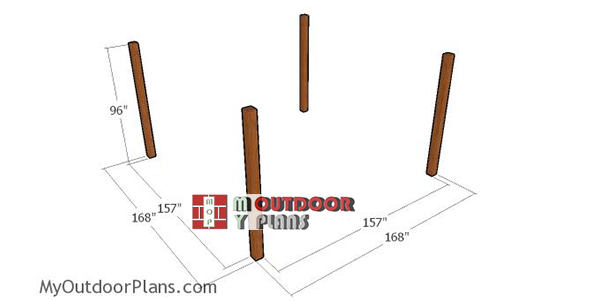
Laying-out-the-posts-for-14×14-pavilion
The first step of the project is to layout the posts for the 14×14 pavilion. Use batter boards and string to determine the location of the posts. Apply the 3-4-5 rule to every corner of the pavilion, so you make sure they are right angled. Moreover measure the diagonals and make sure they are equal. Determining the location for the pavilion is essential, as you have to comply with the local building codes. Make sure the surface is level and remove the vegetation layer.
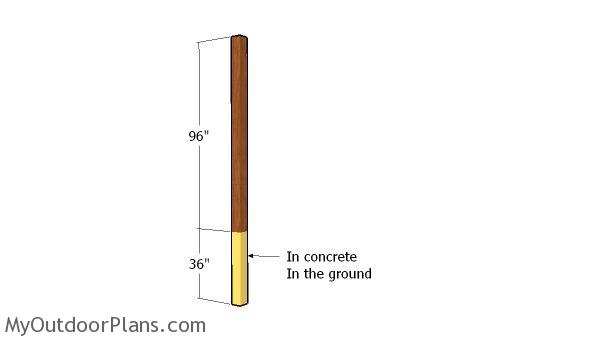
Posts
Dig 3′ deep holes into the ground with a post hole digger. Align the holes with attention and then fit form tubes. Fit the 6×6 posts with attention and align them using string. Use a spirit level to plumb the posts and then lock them into place with temporarily braces. Fill the tube forms with concrete and let it dry out for a few days.
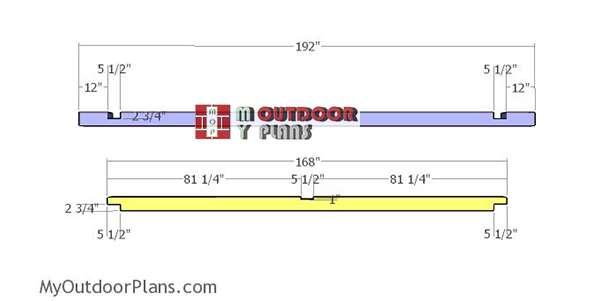
Top-rails
Use 6×6 lumber for the rails. Mark the cut lines on the beams and then make the cut outs with a circular saw and a chisel. Smooth the surface with sandpaper. Use 6×6 lumber for the other rails. Set the circular saw at 2 3/4″ and then make parallel cuts inside the marked areas. Clean the recess with a chisel and sandpaper.
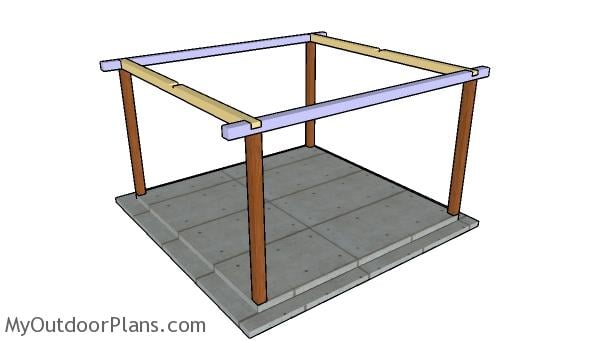
Fitting the top rails
Fit the top rails to the sides, to the front and to the back of the pavilion. Align the edges flush, making sure the corners are square, drill pilot holes and insert 6 1/2″ screws.
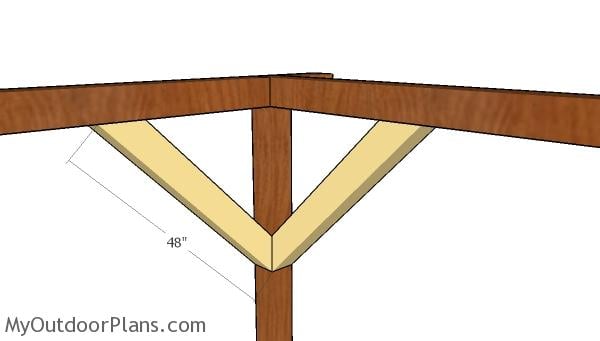
Fitting the braces
Build the braces for the front and back of the pavilion from 6×6 lumber. Use a miter saw to make 45 degree cuts to both ends of the braces. Fit the braces to the posts, after you plumb them vertically. Drill pilot holes and insert 5 1/2″ screws to secure the braces into place tightly.
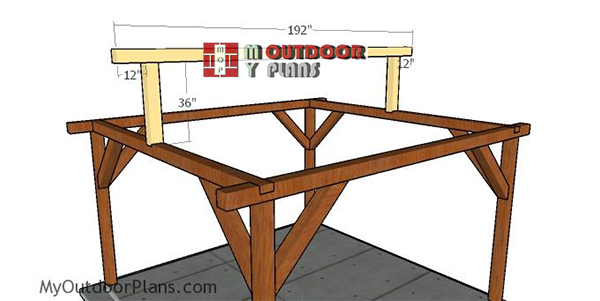
Fitting-the-ridge-beam
Fit the 6×6 supports to the top of the plates. Plumb the supports with a spirit level and then attach the top ridge. Make sure the corners are square and then insert 6 1/2″ screws.
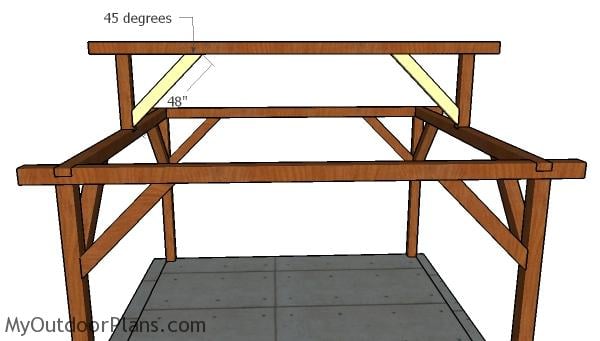
Ridge beam braces
Fit the braces to the top ridge. Cut both ends of the braces at 45 degrees and then secure them into place with 5 1/2″ screws.
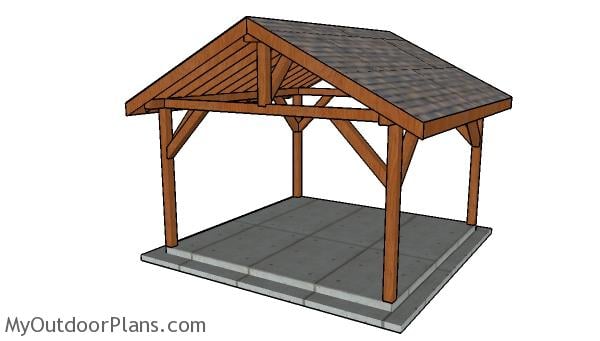
14×14 Pavilion Plans
Check out PART 2 of the project to learn how to build the gable roof.
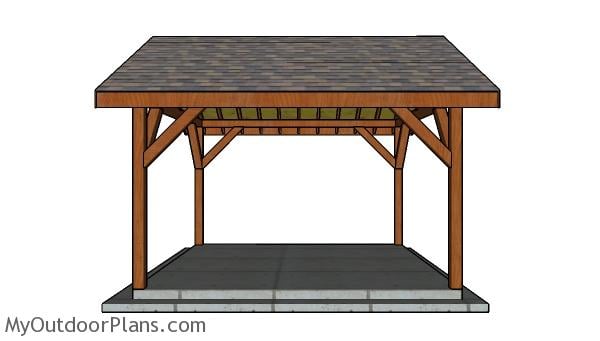
14×14 Pavilion Plans – side view
Fill the holes with wood putty and let them dry out for a few hours. Smooth the surface with 100-220 grit sandpaper and remove the residues with a damp cloth.
Top Tip: Apply a few coats of paint or stain to the components, to enhance the look of the project. If you want to get the Premium Plans version of this project (plans are re-engineered and differ from the free ones), check out the GET PDF PLANS button bellow.

This woodworking project was about 14×14 outdoor pavilion plans free. If you want to see more outdoor plans, check out the rest of our step by step projects and follow the instructions to obtain a professional result.

35 comments
I am just about ready to order materials and start this project. My only question is the attachment of the 6×6 top beams and 6×6 cross beams to the 6×6 posts. If I notch them as shown in the plans will they be stronger than laying the top beams on top of the posts and using hangers for the cross beams? I have searched google and can’t find an answer to this question.
I consider this method better.
My inside dimensions is 14ft(yours 13ft) and outside dimensions is 15ft(yours is 14ft). Do I just increase the size of wood by 1ft? except for 48” braces and 36” support?
Can you provide more info on how you fastened the beams to posts? You mentioned the size of the screw, but are they coming in at an angle, straight into the posts, etc? Also can you provide more info on how you suggest connecting rafters to beams and ridge beams.
Thanks.
They come straight in the posts. You install the side beams first, then front and back.
is there a possibility to use 4×4 instead of 6×6? or is it structurally designed to use the 6×6? Thanks.
It is designed for 6x6s.
You list 6 1/2″ screws but the link goes to 6″ screws. I’m thinking of using 8″ lag bolts. How deep are you countersinking to put these through? I’m guessing you want at least 3″ out the other side? Also, are you using one or two screws/bolts per joint?
6″ screws work as well. 2 screws per joint. I don’t recommend the lag bolts.
In the materials listed, post anchors, beam to post connectors and a tie T are all mentioned, but not how many or where to put them?
The Premium Plan covers all those details and comes with a cut layout diagram, as well: https://gum.co/ejPCi
Great design and pavilion but if you can show me how you cut the rafters and how long they are it doesn’t show both cuts which join on the beams thank you in advance
See NEXT button at the bottom of the article for Part 2 of the project
Love these plans, looks like a great design. I need an 18×12 for my space and was hoping to modify this a bit to fit. If I added 6×6’s for principle rafters and 6×6 struts for support of the 18’ wide tie beam would that work? Thanks!
You should use these plans: https://myoutdoorplans.com/pergola/12×20-pavilion-free-diy-plans/ Closer for the dimensions you are using. I cannot give you a short answer, because designing a pavilion requires complex work.
I purchased your premium plan and it says I need rafter ties. I’m looking at many different shapes and types of rafter ties. Not sure which ones I need.
These ones: https://amzn.to/2Cvddyd
The premium plans for this build state to use 8-1/2″ screws to secure the beams to the posts but the free versions states to use 6-1/2″ screws. Which is correct?
Both are correct since the Free and Premium Plans are not identical. Therefore, if you have the Premium Plans follow the instructions. If you want to use the free plans, follow the free plans.
How does the 14′ 6×6 ridge beam hold up? I worried it wont be strong enough.
It holds well with the braces. Read the local codes to make sure it works with your local conditions.
Can I substitute the top plates with 2″x10″ instead of 6″x6″…. my local lumber shops don’t carry 6×6 of 16 feet
Hello, I’d like to build a 13×13 outdoor pavilion from your 14×14 plan/roof plan.
These plans are exactly what I’m looking for.
How can I do to get the right dimensions?
I’ll pay for adjustment required.
Thank you very much 😉
You need a new plan. Unfortunately, I don’t do custom plans atm
Could this be built with 6×8 beams on the 6×6 posts?
With the wood shortage due to covid-19 will 4×4 lumber work for your design the cost of the 6×6 is astronomical or will 4×6 work I’m building on a budget so any reduction in price would help with the project
That will not work for these spans. You can use 4×6 beams for a 10×10
Exact plans I am looking for with one caveat, my HOA requires this to be attached to the home. Have you seen this done with this set of plans before? I would have the rails and top beam from ledger boards using hangers. If I do it that way, do you think the one pair of legs at the far end would be enough to hold the weight?
Any plans for a 14×14 pavilion with a metal hip roof…
You don’t mention the diameter of the fit tubes for the 3’ deep holes for the four 6×6 posts. What is the diameter?
14″ in diameter for 6×6 posts
Looking to make it 12′ for dim A. If I run support from beam to beam on 3 sides about 4′ up will this work? And would I need to go deeper then 3′ for my hole?
Would you have this 14 x 14 pavilion plan with a hip roof available?
Hi, I’m looking at these plans and am curious about the 6×6 top plates on this but the lean-to 14×14 plan and even the smaller 13×13 pavilion plan says “This pavilion requires at least 6x8s, due to the large spans on all sides.” Is there any concern here with using 6×6 top plates for this where similar spans indicate the need for 6×8?
The 14×14 premium plan uses 6x8s. This is a version for areas with no snow and for people who don’t have access to 6×8 beams.