This step by step diy woodworking project is about deck box plans. Building a deck storage box is easy and it will enhance the look of your property, so make sure you plan everything form the very beginning. Use quality materials and always take accurate measurement before cutting the components at the right size. Fill the holes with putty and attach trims to the box, in order to get a professional result.
There are several designs you could choose when building the deck box, so take a look over the alternatives before starting the construction project. Invest in high quality lumber, such as redwood, pine or cedar, especially if the components will be exposed to bad weather. Smooth the wooden surface with fine-grit sandpaper, if you want to enhance the appearance of the project. See all my Premium Plans HERE.
Projects made from these plans
Cut & Shopping Lists
- A – 4 pieces of 2×2 lumber – 21″ long LEGS
- B – 4 pieces of 1×4″ lumber – 21″ long, 4 pieces – 45″ long FRAME
- C – 13 pieces of 1×4 lumber – 22 1/2” long FLOOR
- D – 12 pieces of 1×4 lumber – 21″ long, 12 pieces – 45″ long WALLS
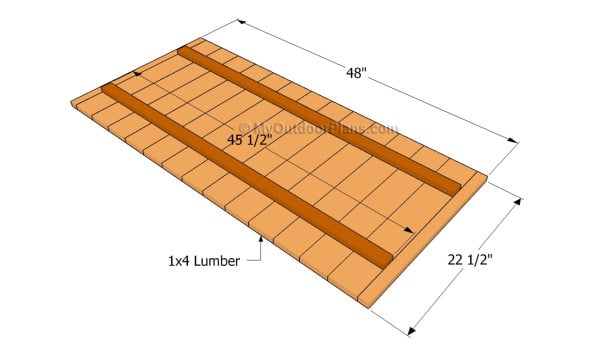
- E – 13 pieces of 1×4 lumber – 22 1/2″ long, 2 pieces of 1×2 lumber – 45 1/2″ LID
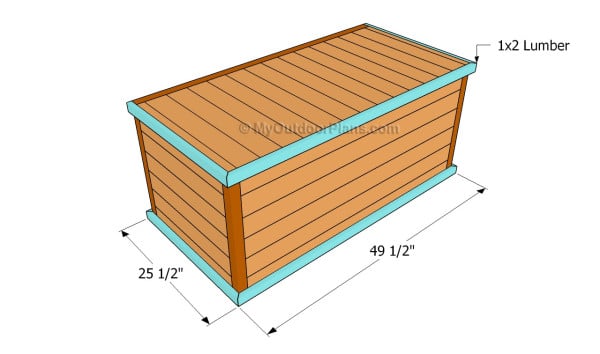
- F – 4 pieces of 1×2 lumber – 25 1/2″ long, 3 pieces – 49 1/2″ long TRIMS
- 100 pieces of 2 1/2″ screws
- 100 pieces of 1 1/4″ screws
- 2″ brad nails
- wood glue, stain/paint
- wood filler
Tools
![]() Hammer, Tape measure, Framing square, Level
Hammer, Tape measure, Framing square, Level
![]() Miter saw, Drill machinery, Screwdriver, Sander
Miter saw, Drill machinery, Screwdriver, Sander
Time
Related
Building a deck box
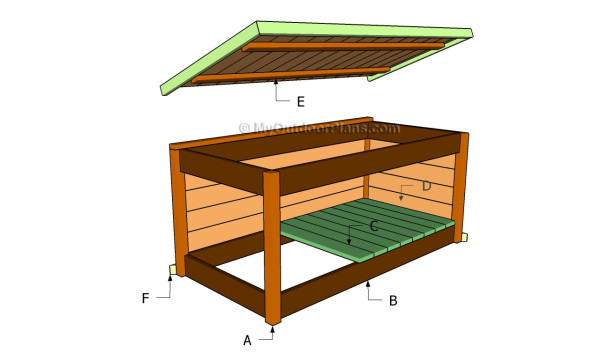
Building a deck box
Top Tip: A deck storage box is a straight-forward project even for beginners. If you need additional storage space to your backyard, building a deck box is a good idea.
Deck Box Plans
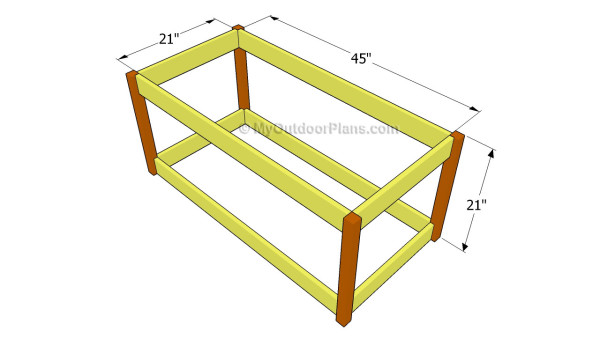
Building the frame of the box
The first step of your woodworking project is to make the frame of the deck box. As you can see in the image, we recommend you to use 2×2 and 1×4 lumber for the frame of the box. Dill pocket holes at both ends of the slats and insert the screws into the legs.
Plumb the legs with a spirit level and check if the corners are right-angled before inserting the screws. Adjust the size of the frame to your needs.
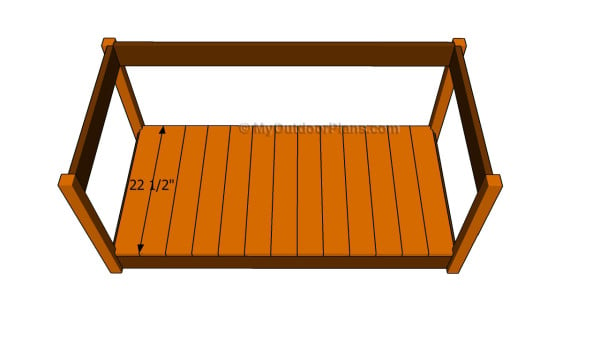
Installing the floor slats
The next step of the project is to install the flooring of the deck box. As you can see in the image, we recommend you to attach 1×4 slats over the support. Drill pilot holes trough the slats and insert galvanized screws into the supports.
Top Tip: Add waterproof glue between the slats, if you want to get a nice appearance. Cut small notches in the slats, as to fit them around the legs. Make sure the diagonals are equal and the corners right-angled.
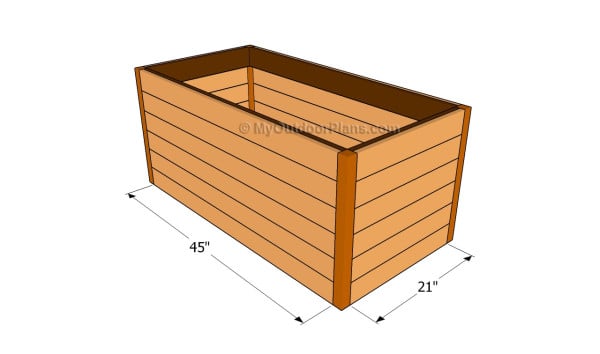
Installing the side slats
After building the frame of the deck box, we recommend you to attach the side walls between the wooden posts. Drill pilot holes at both ends of the slats and lock them to the legs, as in the image.
Add waterproof glue between the slats, in order to enhance the rigidity of the structure. Make sure the components are aligned at all ends before inserting the 1 1/4″ screws into the pocket holes.
Building the lid of the box
Afterwards, build the lid of the deck box, using the information from the plans. As you can notice in the image, we recommend you to cut the slats at the right size and lock them together to the frame with galvanized screws.
Top Tip: Make sure the corners are square and insert the screws through the supports into the slats. Work with attention, otherwise the lid might not fit into place.
Attaching the lid
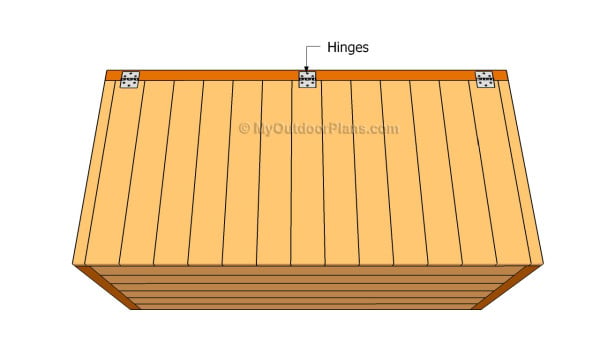
Place the lid over the box and lock it into place with hinges. Make sure the lid opens easily before taking care of the finishing touches.
Installing the trims
One of the last steps of the project is to attach the trims to the exterior of the deck box. Therefore, you need to cut both ends of the 1×2 trim at 45 degrees and lock them to the wooden structure with finishing nails and waterproof glue.
Align the trims with great care before locking them into place, if you aim for a professional result. Smooth the edges with sandpaper, in order to enhance the look of the project.
Deck box plans
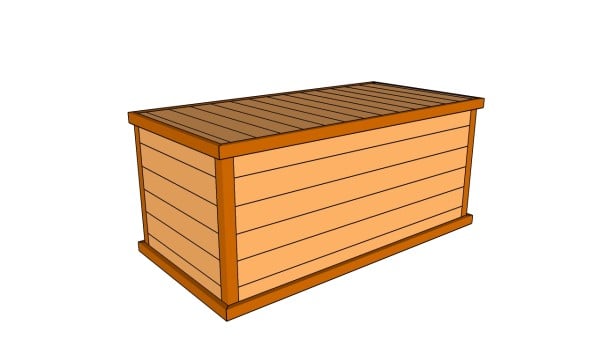
After getting the job done, you need to take care of the final touches. First of all, we recommend you to check if all components are locked into place properly. Round the exposed edges with a router and a 1/4″ bit.
Top Tip: Fill the holes with putty and smooth the surface after it has dried out. Apply several coats of stain or paint to the components, in order to protect them from decay.
This woodworking project was about deck box plans. If you want to see more outdoor plans, we recommend you to check out the rest of our step by step projects.

16 comments
Part D must be a typo. It says 2×4. Shouldn’t it say 1×4?
Yes. I updated the cut list. Thanks for letting me know.
Hi there,
In attaching the side panels, are the pilot holes again recommended to be pocket holes in the slats or are you coming from the outside posts into the slats? Thanks! About to start my deck box.
Pocket holes through both ends of the slats and you drive the screws through the slats into the posts.
In your drawing for the lid, there are thirteen 1×4 slats held together by glue and the two 1×2 pieces screwed in. But what are the two pieces of wood shown on the outside of the 13? Even the materials list for the lid does not mention those two pieces of wood. They dont appear to be 1x4s. Thanks fort the clarification.
Those pieces are strips of 1×4 lumber needed to complete the 48″ wide lid.
Thank you so much for your response. I am building this currently and looking really good! One other question I have please, is regarding the hinges on the lid. Are you putting the hinges outside? I think that’s how it is looking in your illustration but I am not sure. If indeed they are on the outside, is there any reason they can not be on the inside? Thanks again for a great plan!
It all depends on the type of hinges you have. If you can attach them so they are no visible, go for it.
How am I supposed to download the .pdf??? I already have the Chrome extension installed…. This is frustrating
Just read the Faqs: https://myoutdoorplans.com/faq/
Would you happen to know a weight limit/capacity for sitting on this deck box?
should the straps on the lid fit inside the side walls when closed or rest on top of the walls
If inside the walls should they be 45 not 45.5
The lid shows the 1×4 slats to be screwed into the frame. The two 1×2 slats at each end of the lid are outside the 45 1/2″ frame length. How to you attach the two 1×2 end slats to the lid?
Pocket holes
My son and father want to build this box. Where can I find the directions in paper form. Is the only option to print these off my own printer?
Yes. Read the blog FAQS