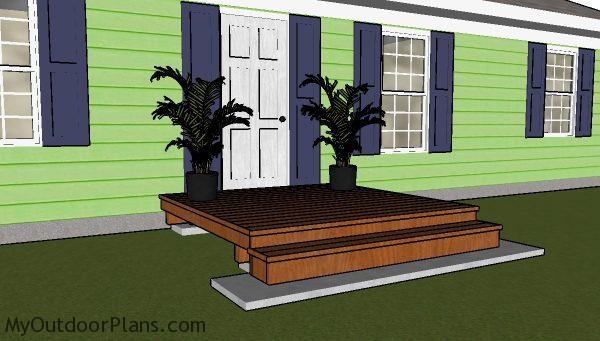
This step by step diy project is about 8×8 deck plans. I have designed this simple deck so you can build a nice platform for your entrance. You can adjust the size of the deck to suit your needs. As you will see in this project, this light construction doesn’t require complex tools or carpentry techniques, so any person with basic skills can get the job done in just a weekend.
Before starting the actual construction you should study attentively the local building codes, to find out whether you need a building permit and if there are some restrictions for your project. Choosing the right location for your deck is essential, so make sure you check if there will get enough light or if it will add character to your property. Using weather-resistant materials is also important, so buy at least pressure-treated lumber. See all my Premium Plans HERE.
Projects made from these plans
It’s that simple to build a 8×8 deck!
8×8 Deck Plans
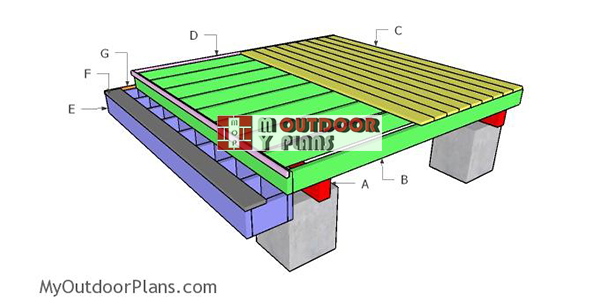
Building-a-8×8-deck
Cut & Shopping Lists
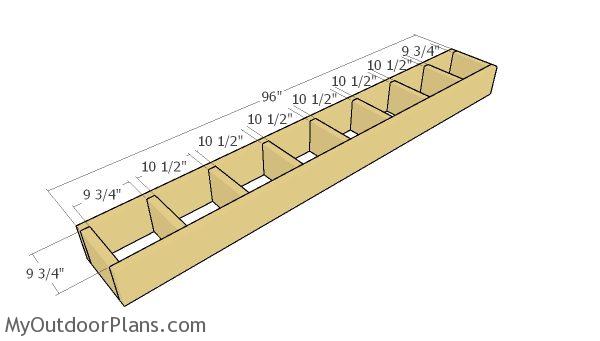
- A – 2 pieces of 4×6 lumber – 96″ long BEAMS
- B – 2 pieces of 2×6 lumber – 96” long, 9 pieces – 96” long JOISTS
- C – 17 pieces of 5/4×6 lumber – 96” long DECKING
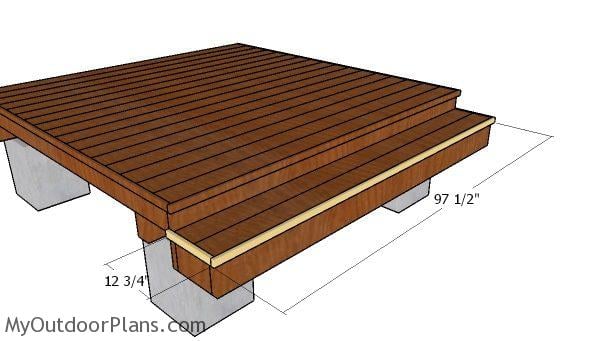
- D – 3 pieces of 1×2 decking – 97 1/2” long TRIMS
- E – 2 pieces of 2×6 lumber – 96″ long, 9 pieces – 9 3/4″ long STEP
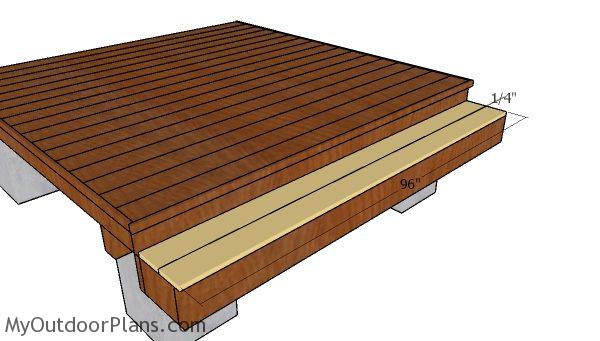
- F – 2 pieces of 5/4×6 decking – 96″ long DECKING
- G – 2 pieces of 1×2 lumber – 12 3/4″ long, 1 piece – 97 1/2″ long TRIMS
- 2 pieces of 4×6 lumber – 8′
- 14 pieces of 2×6 lumber – 8′
- 19 pieces of 5/4×6 decking – 8′
- 4 pieces of 1×2 lumber – 10′
- 2 1/2″ screws
- 2″ nails
- deck joist hanger
- deck screws, deck stain
- anchors – 4 pieces
- joist hangers
- joist hanger nails
Tools
![]() Hammer, Tape measure, Framing square
Hammer, Tape measure, Framing square
![]() Miter saw, Drill machinery, Screwdriver, Sander
Miter saw, Drill machinery, Screwdriver, Sander
Time
![]() One day
One day
Related
Entrance deck plans
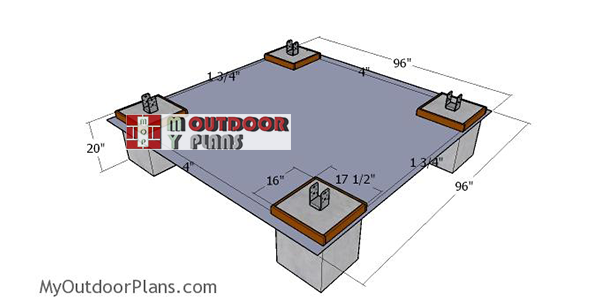
Footings
The first step of the project is to lay out the concrete footings. In order to get a professional and accurate result, we recommend you to use batter boards and string. Check if the corners are right angles by applying the 3-4-5 rule and make sure the diagonals are equal. Use 1x4s for the forms. Next, pour concrete and fit the metal anchors as in the plans. Use a spirit level to check if the footings are horizontal.
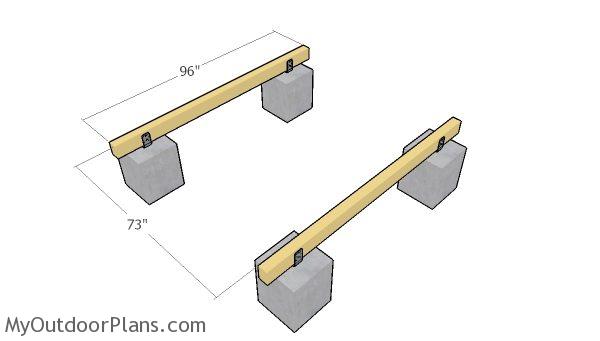
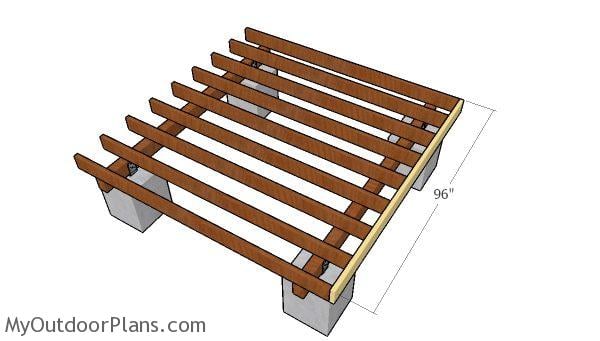
Fitting the 2×4 beams
Continue the woodworking project by installing the 4×6 beams. Secure the beams to the metal anchors with appropriate screws, after aligning them at both ends.
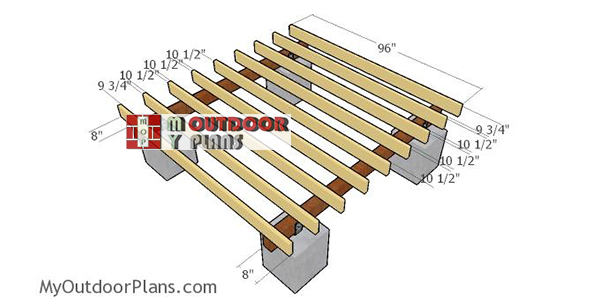
Fitting-the-joists
The next step of the project is to fit the joists. As you can notice in the plans, you should leave 12″ OC between the joists, in order to enhance the rigidity of the frame. Use joist hangers to secure the joists to the support beams.
End joist
Next, attach the end joist to the deck frame. Align the edges with attention, drill pilot holes and insert 3 1/2″ screws to lock them into place.
Fitting-the-deck-boards
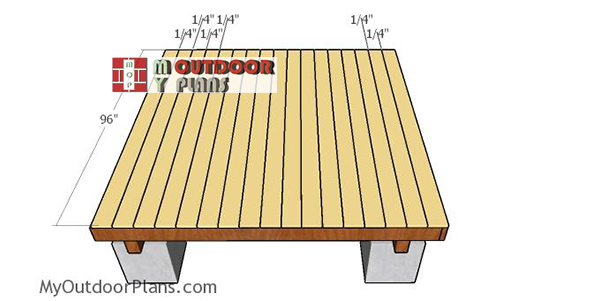
Installing the decking is a straight forward job is the support surface is rigid and perfectly level. Align the boards at both ends before drilling pilot holes and driving in the 2 1/2″ galvanized screws.
Place a nails between the slats to get consistent gaps. Snap a chalk line before adjusting the boards at the proper size, using a circular saw.
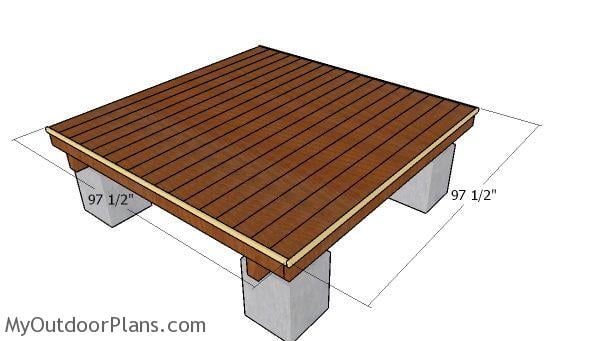
Fitting the deck trims
Fitting 1×2 trims to the end of the slats is not compulsory, but it will definitely enhance the look of your deck and hide the cut edges. Add wood glue to the edges and secure them into place. Insert 2 1/2” finishing nails to enhance the bind of the joints.
One step stair frame
Build the frame for the step from 2×6 lumber. Cut the components at the right dimensions and then lock them together with screws. Drill pilot holes through the long joists and insert 3 1/2″ screws into the blockings.
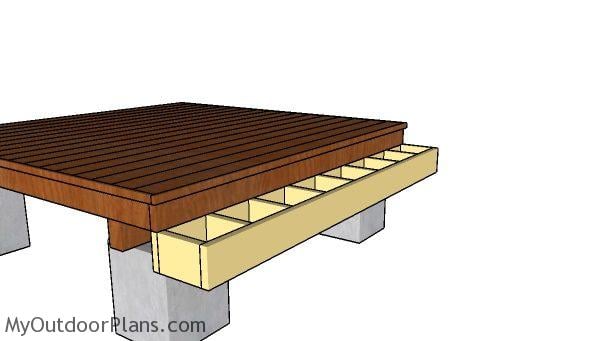
Fitting the one step stair
Fit the frame to the deck, as shown in the plans. Fit the step frame to a concrete slab. Use metal plate hardware to secure the step to the deck frame.
Step slats
Fit the deck boards to the step frame. Use 2 1/2″ deck screws to secure the boards, after drilling pilot holes.
Fitting the step trims
Fit the 1×2 trims to the deck step.

8×8 deck plans – front view
Fill the holes with wood putty and then smooth the surface with 120-220 grit sandpaper. Apply a few coats of stain to protect the components from the elements.
8×8 deck plans
You can adjust the size of the deck to suit your needs. You can add railings, deck planters or other elements. You can add more steps or no step at all, according to the specification of your yard.
This project was about 8×8 deck plans. If you want to see more outdoor plans, we recommend you to check out the rest of the projects. Don’t forget to share our projects with your friends, by using the social media widgets.
EXPLORE MORE IDEAS FOR:
 |
 |
 |
 |