This step by step woodworking project is about diy carport plans. A simple carport with a gambrel roof can be built in just an weekend, even by an inexperienced do-it-yourselfer, if the right plans and tools and materials are used. Align all the components at both ends, before inserting the screws and make sure you pre-drill the lumber, to prevent wood from splitting. Build the trusses on the ground, before fitting them into place, if you want to obtain consistent results. If you want to combine the advantages of having a carport with the utility of a shed, check out my carport with storage plans.
In order to get the job done like a pro, you should pay attention to several aspects. Firstly, choose lumber designed for outdoor use, such as cedar, redwood or pressure-treated. These varieties of lumber have a nice appearance and are resistant to water damage and wood decay. On the other hand, all the boards should be straight and in perfect condition (pay attention to knots, decays, twists, wanes). If you use anchors to secure the posts into place, make sure you reinforce the frame with wooden braces. See all my Premium Plans HERE.
Projects made from these plans
It’s that easy to build a carport!
Cut & Shopping Lists
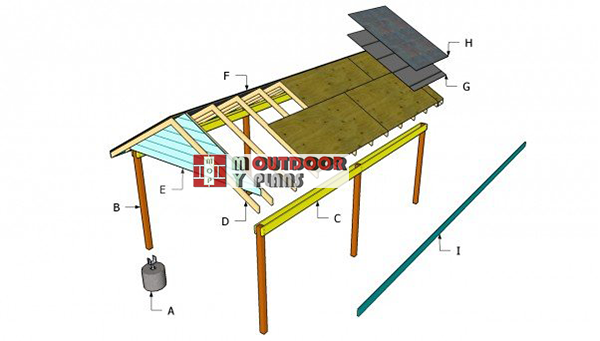
- A – 6 tube forms, concrete, 6 post anchors FOOTINGS
- B – 6 pieces of 4×4 lumber 84” long POSTS
- C – 4 pieces of 2×4 lumber 240” long SUPPORT BEAMS
- D – 30 pieces of 2×4 lumber 80” long, cut at 30º at both ends RAFTERS
- D – 15 pieces of 2×4 lumber 123” long, cut at 60º, 1/2” plywood gussets TRUSSES
- E – 2 panels of 5/8” plywood 123 x 39 1/2” FRONT AND BACK FACES
- F – 300 sq ft of 3/4” tongue and groove plywood ROOFING
- G – 300 sq ft of tar paper TAR PAPER
- H – 300 sq ft of asphalt shingles ASPHALT SHINGLES
- I – 2 pieces of 240 ft of 1×4 plywood TRIMS
Tools
![]() Hammer, Tape measure, Framing square, Level
Hammer, Tape measure, Framing square, Level
![]() Miter saw, Drill machinery, Screwdriver, Sander
Miter saw, Drill machinery, Screwdriver, Sander
![]() Post hole digger, Concrete mixer
Post hole digger, Concrete mixer
Time
![]() One day
One day
How to build a simple carport
Single-carport-plans
Building a carport by yourself is possible, if you use the right plans and carpentry techniques. On one hand, you could build a carport attached to an existing building, while on the other hand, you could make a free-standing construction. If you choose the second option, a gambrel roof would add character to the project.
Top Tip: After choosing the right plans for your needs, you should lay out the carport in a professional manner. Buy quality lumber and make sure all the slats are perfectly straight and in perfect condition.
Diy Carport Plans
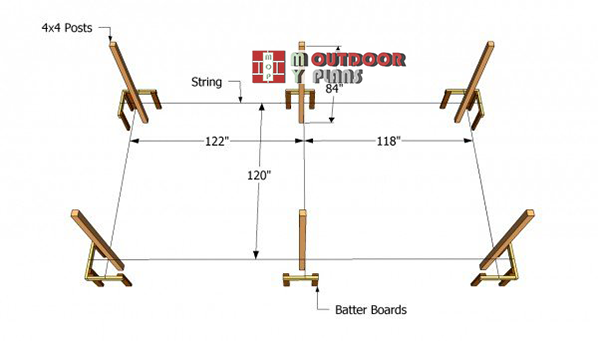
Laying-out-the-posts-for-the-carport
The first step of the project is to lay out the carport properly, using batter boards and string. As you can see in the plans, you should build the batter boards from 2×4 lumber and 2 1/2” screws. Set the batter boards in the ground and use string to mark the outline of the carport.
Make sure the corners are right-angled, by using a carpentry square. In addition, adjust the strings until the diagonals are perfectly equal.

Anchoring the post into concrete
There many ways in you could secure the wooden posts into place. On one hand you could set them in concrete, after pouring 2′ deep footings. Secondly, you could dig holes, at least 3” under the frost line, install tube forms and pour concrete. Level the surface and fit metal anchors. Nevertheless, you could also secure bolt-down anchors to a concrete slab.
Align the posts properly, using string. Plumb the posts, using a hand level, before driving in the bolts.
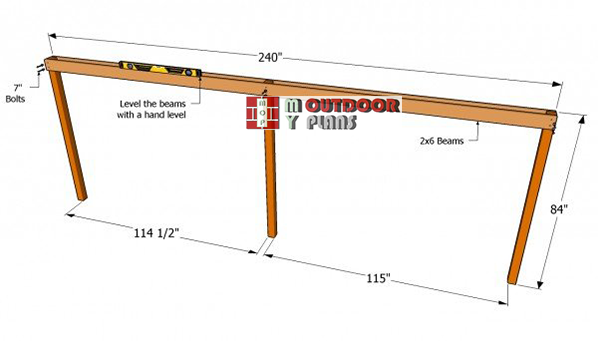
Installing-the-cross-beams
After securing the wooden posts into place, you should attach the support beams. Therefore, build the components from 2×6 lumber. Check if the support beams are horizontal, using a hand level. Next, drill pilot holes trough the beams and trough the posts, to prevent the wood from splitting.
Top Tip: Drive in the 7” carriage bolts and tighten the nuts, to lock the beams into place, on both sides of the carport.
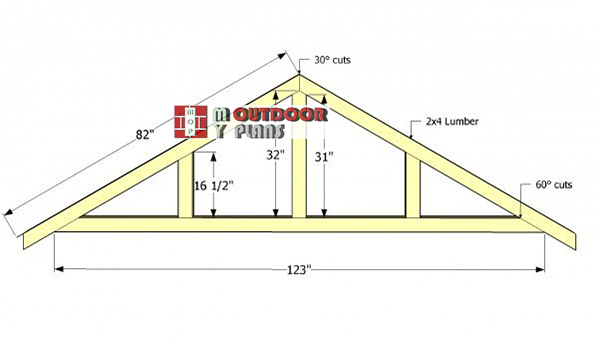
Carport-trusses-plans
Afterwards, you should build the trusses, on the ground, out of 2×4 lumber. In order to drain the water properly, we recommend you to set the roof pitch at about 30º. Cut the ends of the rafters at 30º, using a good miter saw. Moreover, the bottom rafter should have both ends cut at 60º.
Install intermediate rafters for the trusses placed at both ends of the carport. The rest of the trusses has to be exactly the same, otherwise the carport won’t have a symmetrical look.

Installing the gussets
In order to make the joints rigid, we recommend you to fit plywood gussets. Cut the components from 1/2” plywood and secure them into place with 1 1/2” screws. Measure the trusses to make sure they all have the same shape and size.
Use a circular saw with a fine blade to cut the gussets. Place them over the joints and drive in 1 1/2”, to make the trusses rigid. Work with attention, to make sure you obtain a professional result.

Installing the trusses
Fit the trusses into place and and lock them with 4” screws. Drill pilot holes in the rafters, in order to prevent the wood from splitting. Use a hand level to plumb the trusses, before inserting the wood screws. Ask a friend to hold the rafters into place, while you drive in the screws.
Top Tip: As you can see in the plans, you should place the components every 24” O.C. Toe-nail the trusses to lock them into place properly.

Attaching the roofing sheets
Afterwards, install the roofing sheets. In order to get the job done as a professional, use tongue and groove 3/4” plywood, as the sheets connect together easily. Start with the left bottom of the roof and continue until you cover all the surface.
You have to adjust several plywood sheets to fit into place. Therefore, use a circular saw with a fine blade, to perform the cuts. Insert 2” nails trough the plywood sheets in the rafters, every 8”.

Attaching the front end of the carport
Continue the project by attaching 5/8” grooved siding to the front and back faces of the carport. Measure the plywood sheets attentively, making sure they will fit into place easily. Use 1 1/4” nails to secure the panels into place tightly.
Top Tip: If you want to keep the expenditure at the lowest level, you could skip this step. Nevertheless, the front and back panels would enhance the look of the gambrel carport.

Installing the front overhang
Build the front and the back overhangs from 2×4 lumber, as in the plans. Basically the components should be similar to the trusses, except for the bottom rafters. You could adjust the width of the overhang, according to your needs. Drive 3” screws to secure the components to the end trusses.
Top Tip: Install 2×4 blockings to secure the wooden components together. Attach 3/4” plywood strips to the rafters, as in the image.

Fitting the trims and drip edge
Continue the project by installing the 1×4 trims to both sides of the carport. Align the components properly and secure them into place with finish nails. Afterwards, we recommend you to fit the drip edges to the sides of the carport, as in the image. The front and the back drip edges should be placed over the roofing felt.
Top Tip: It is essential to install the bottom drip edges under the tar paper and asphalt shingles, in order to protect the components from water damage.

Installing the asphalt shingles
Install the roofing felt, starting from the bottom left of the roof. Secure the paper to the roofing, using a stapler. Make sure the tar paper overlaps at least 2”. Don’t forget to cover the top ridge with a 14” strip of paper .
Start the first course of shingles with a full tab, the second with 2 1/2 tabs, the third with 2 tabs, the forth with 1 1/2 tabs, the fifth with 1 tab, the sixth with half tab and the seventh with a 3 tabs.

Diy carport plans
Last but not least, you should take care of the finishing touches. Fill the gaps with wood putty and let the compound dry out for several hours, before sanding the surface with 120-grit sandpaper. Clean the surface with a cloth and apply several coats of wood stain, to protect the wood from rot.
Top Tip: Attach lattice panels between the posts, if you want to enhance the look of the diy carport or you want to protect your car.
This woodworking project was about diy carport plans. If you want to see more outdoor plans, we recommend you to check out the rest of our step by step projects.
2 comments
Send all free plans
All my plans are free. Please read the FAQs to learn how to print or save them: http://myoutdoorplans.com/faq/