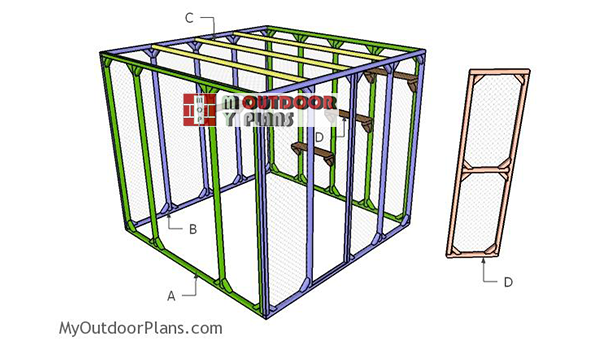
This step by step diy woodworking project is about a catio plans. If you love your furry pets and you are afraid that they can be attacked by predators or they can get hit by a car, building a catio is a great way to help them spend time outside and bath in the sun. I have designed this catio so you can save money, time and you can get the job done super easily with basic tools. Take a look over the rest of our woodworking plans, if you want to get more building inspiration.
All my woodworking plans come with 3D diagrams and step by step instructions. In addition, the plans include full Cut and Shopping lists. Remember that you need to read the local codes before starting the project. It is your responsibility to make adjustments and suit the legal requirements.
When buying the lumber, you should select the planks with great care, making sure they are straight and without any visible flaws (cracks, knots, twists, decay). Investing in cedar or other weather resistant lumber is a good idea, as it will pay off on the long run. Use a spirit level to plumb and align the components, before inserting the galvanized screws, otherwise the project won’t have a symmetrical look. If you have all the materials and tools required for the project, you could get the job done in about a day. See all my Premium Plans HERE.
Projects made from these plans
Free Catio Plans – PDF Download
Building-a-catio
Cut + Shopping Lists
- A – 2 pieces of 2×2 lumber – 93″ long, 4 pieces – 81″ long, 12 pieces – 6″ long BACK WALL
- A – 2 pieces of 2×2 lumber – 93″ long, 4 pieces – 81″ long, 16 pieces – 6″ long FRONT WALL
- B – 2 pieces of 2×2 lumber – 96″ long, 5 pieces – 81″ long, 16 pieces – 6″ long 2xSIDE WALL
- C – 3 pieces of 2×2 lumber – 93″ long, 6 pieces – 6″ long RAFTERS
- D – 2 pieces of 2×2 lumber – 22 1/4″ long, 2 pieces – 78″ long, 1 piece – 19 1/4″ long, 6 pieces – 6″ long DOOR
- E – 1 piece of 2×2 lumber – 4 1/2″ long, 1 piece – 5 1/2″ long, 1 piece – 6″ long, 1 piece of 1×6 lumber – 24 1/2″ long 4xSHELF
- 40 pieces of 2×2 lumber – 8′
- 300 pieces of 3 1/2″ screws
- 50 pieces of 2 1/2″ screws
- hinges, latch
- hardware cloth
- wood glue, stain/paint
Tools
![]() Hammer, Tape measure, Framing square, Level
Hammer, Tape measure, Framing square, Level
![]() Miter saw, Drill machinery, Screwdriver, Sander
Miter saw, Drill machinery, Screwdriver, Sander
Time
![]() One weekend
One weekend
Related
How to build the 8×8 catio wall frames
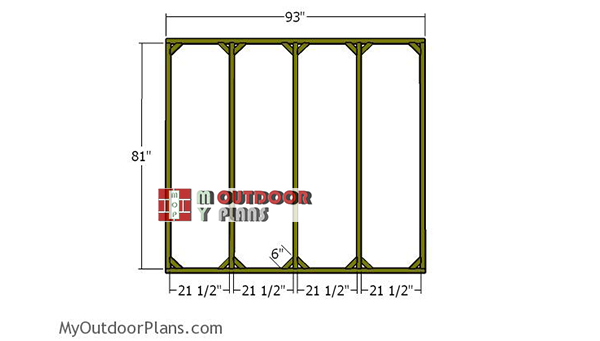
Front-wall-frame
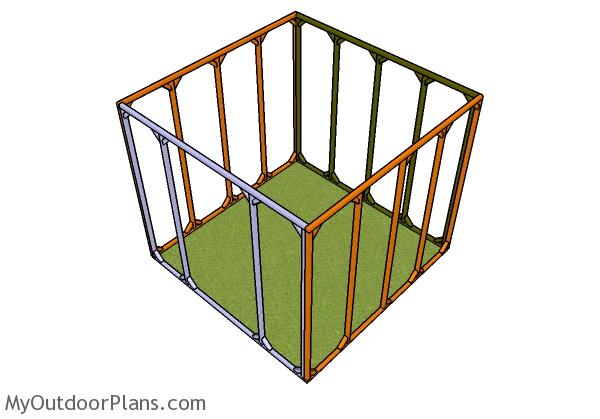
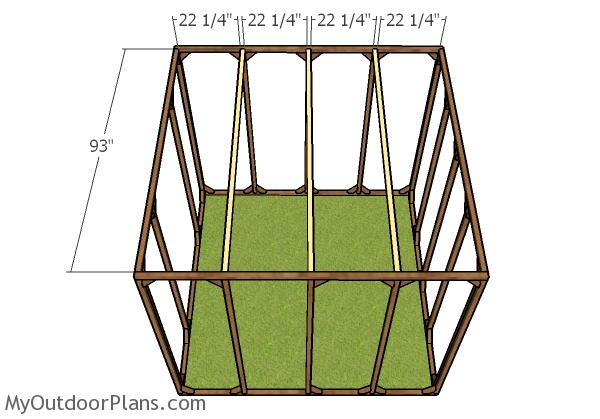
The first step of the project is to build the front wall for the catio. Cut the components from 2×2 lumber at the right dimensions. Drill pilot holes through the plates and insert 3 1/2″ screws into the studs.
Place the studs equally spaced and then make sure the corners are square. Align the edges flush for a professional result. Fit the diagonal braces to the corners. Make 45 degree cuts to the braces and secure them into place with 2 1/2″ screws.
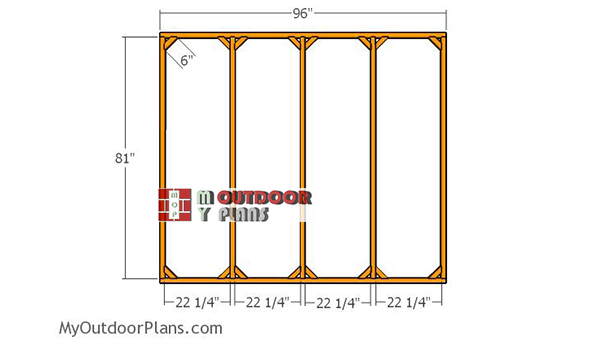
Side-wall-frame
The next step of the project is to build the sides walls for the catio. Cut the components from 2×2 lumber.
Drill pilot holes through the plates and insert 3 1/2″ screws into the studs. Place the studs equally spaced. Fit the diagonal braces to the corners, so you enhance the rigidity of the frame.
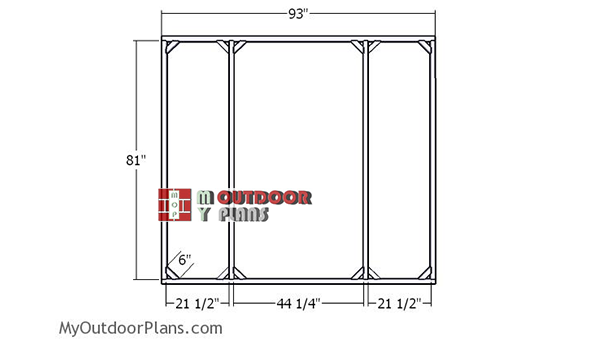
Back-wall-frame
In addition, for the back wall of the catio, that goes against the wall, you need to frame an opening. I really recommend you to adjust the size of the opening to suit your needs.
Assembling the catio frame
Assembling the catio frame
The next step of the project is to assemble the frame of the catio. Join the walls together tightly. Align the edges flush, drill pilot holes and insert 2 1/2″ screws to lock them together tightly. Make sure the corners are square for a professional result.
Fitting the top supports
Fit the 2×2 rafters to the top of the catio. Drill pocket holes at both ends of the rafters and secure them into place with 2 1/2″ screws. Make sure the corners are square and align the edges flush.
Fitting the braces

Fitting the bracing
Fit the 2×2 braces to the top of the catio. Cut both ends of the braces at 45 degrees and then secure them into place with 2 1/2″ screws.
Building-the-shelves
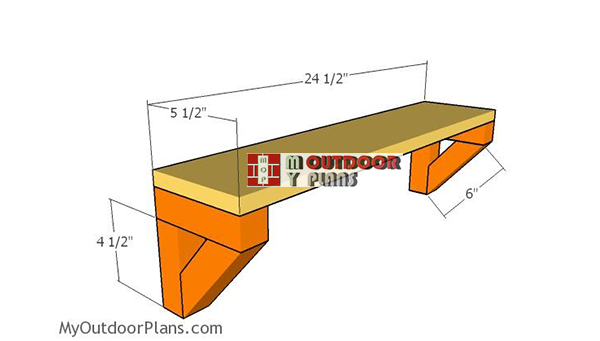
Furthermore, build the shelves for the catio, so the cats can have some fun. Use 2×2 lumber for the supports and 1×6 lumber for the shelves. Assemble the shelf supports and then secure the shelf into place with 1 5/8″ screws.
Building the shelves

Fitting the shelves
Fit the shelves to the interior of the catio, using the pattern shown in the diagram or using your own. The possibilities are endless so you should research this for a neat result.
Fitting the mesh
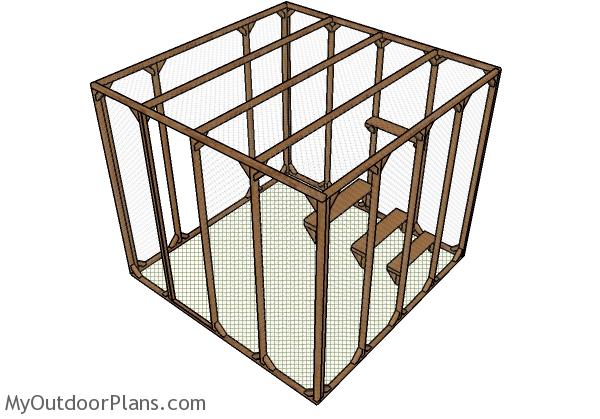
Continue the project by fitting the hardware cloth to the exterior of the catio. Use staples to lock the mesh into place tightly. Align the edges with attention and make sure, so you can adjust it to fit into place.
Building the catio door
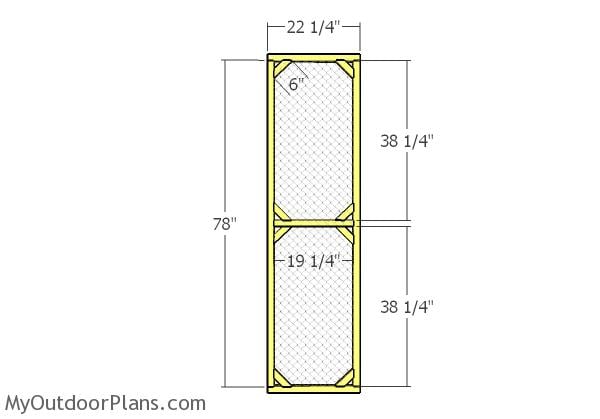
Building the door
Next, build the door frame from 2×2 lumber. Drill pilot holes and insert 2 1/2″ screws to lock the frame together tightly. Moreover, you need to use 2×2 lumber for the 6×6 braces. Drill pilot holes and insert 2 1/2″ screws to reinforce the frame of the door.
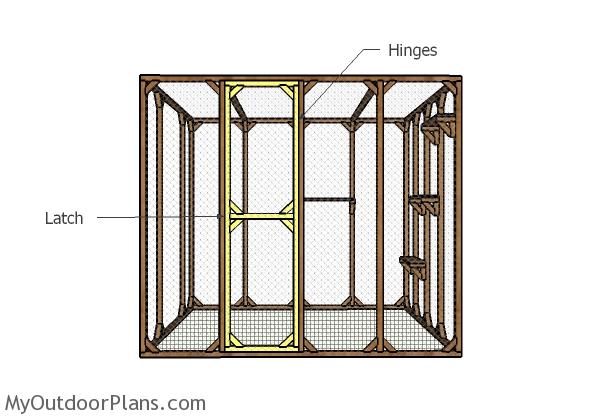
Fitting the door
Also, fit the door into place and then secure it to the frame with hinges. Make sure the door opens and closes properly and install a latch, so you can lock it into place tightly.
Finishing touches
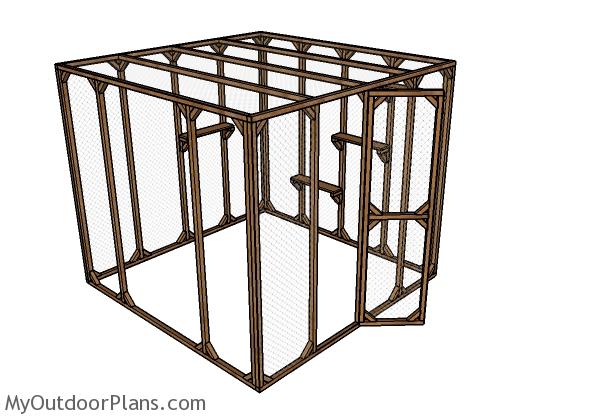
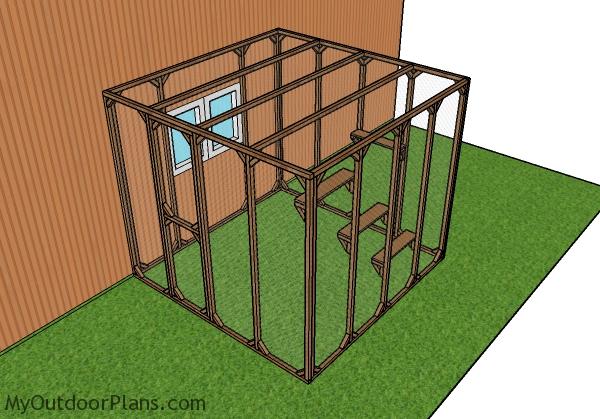
How to build a catio
This catio is large enough to accommodate a few cats, being ideal for any home. You should just attach the catio to your house, so the cats can enter and then anchor it into place using 2×2 stakes. You can also take a look over these simple window catio plans, since it’s a complementary project for your house.
Catio plans
Once you are don building the catio, you need to take care of the finishing touches. Smooth the edges and make sure there are no protruding corners, wires or nails. Apply a few coats of paint to the frame of the catio, if you didn’t use cedar or other weather resistant lumber.
This woodworking project was about catio plans free. If you want to see more outdoor plans, check out the rest of our step by step projects and follow the instructions to obtain a professional result.
EXPLORE MORE IDEAS FOR:
 |
 |
 |
 |
35 comments
could you build me a catio and send it to hollywood florida as i just rescued a bunch of cats from hurricane irma
I am many, many miles away to be able to do that. However, my plans are free and downloadable. I’m sure the local community is willing to help you with your project, using my plans.
Patti,
You could hire a handyman to build this catio. If you have the Nextdoor app (nextdoor.com), you could ask if any of your neighbors with carpentry skills to help. Good luck!
about how much does this catio cost to be built as stated just a rough estimate will do
I don’t have a cost estimate. However, you can add the cost for all the materials in the list.
I am in Saint Louis MO and Home Depot around $178 for the 40 2×2 cedar #1 pressure treated. $50 each for the wire mesh not sure if i need one or two or even 3. and of course the misc stuff, before tax
I modified your plans to fit on a covered patio and it is perfect. Any way I can post pictures?
That’s awesome. You can send pics here: http://myoutdoorplans.com/contact/ Looking forward to seeing and posting them 🙂
Can I use heavy duty camping hooks into a grassed area, as I don’t have a outside wall too secure it too,?
Do you think this will be secure enough?
That will probably work. It depends on the winds in your area and on your cats 🙂
Have you experimented with putting on a roof? I would like my cat to have access during inclement weather… Also, I’m assuming you have to cut the wire mesh each time it’s placed over the vertical support? So would they just overlap at each support? Where on the base do you anchor it? These seem like great plans, thanks, and I look forward to building it!
To put a roof, you would need a lean to. I already have “a covered catio” on my to do list, so the plans should be live on the blog in the following weeks. Yes, you have to cover the excess mesh and they should meet on the studs. Doesn’t matter where on the base you anchor it to the ground, as long as you do it. I would anchor it on all sides.
Any chance you have plans for a window box catio? We are on the 2nd floor.
I have that on by to do list. Do you have any dimensions in mind?
I would like to attempt to make this myself, however I would like to include a entrance door and then another door into enclosure. How would I modify this plan to make it work. My cats can be very tricky in trying to escape.
You make the second door in the same manner as the door that is shown in the plans. Use 2×2 lumber for the door frame, and fit it inside the wall framing.
I find no pdf printing widget on the free catio plans.
i’m about 1/2 way through building our Catio based off these plans
That’s awesome. Cannot wait to see it completed.
WIP shot – making an 8 x 3 version with slanted roof:
https://i.imgur.com/ZWO6xoj.jpg
Looks awesome. Let me know how it goes. I will feature the project once you are done.
Ovidiu,
Have you posted plans for a covered catio yet? If so, how do I get to those?
Yes, here: http://myoutdoorplans.com/category/cat/ To download the plans, please read this: http://myoutdoorplans.com/faq/
Outstanding and just what I needed. I’ve seen other plans on the internet that are ridiculously expensive.
Thank and I’m saving this excellent website.
I appreciate it. Let me know how it comes out!
Is everything measured in inches or cm???
Inches
I know this seems like a weird question. But how many or what size boxes of screws did you purchase? I don’t want to purchase a box of 300 screws and have a ton left. or get a box of 50 and not have enough of different sizes.
In woodworking projects you can’t tell how many screws you will need. You can either start small and buy more if you need, or just get a good deal on a larger quantity.
I used these plans as a template to construct a 18’ Catio for our cats , great to use as a template as it’s Huge and worth doing as it frees up the house. We both had great sense of achievement and are pleased with our work.
Cheers guys.
Gareth and Karen
Congratulation for your project! A catio is brilliant especially now that summer is around the corner. I would love to see and feature your catio. You can send a few pics here: https://myoutdoorplans.com/contact/
Hello if i wanted to make this but instead of 8X10…it would be16X10 so it was 16 feet wide and 10 feet deep.. what would I do differently so its secure? make two and attach them or some other type of adjustment? And then if i was going to attach it to the wall of my house, would I still add the wire to the back or no? (what’s the best way to attach it to the house?)
I just want to say thank you for these plans. I love my cats and need to build an enclosure to keep them safe. Unfortunately I do now have air it’s extra call to but plans but you provided a way that I could do it myself. I’m grateful for your help in getting this project completed.
This is your classic Bait & Switch. Free Catio Plans PDF download. Where is the free PDF download?
Read the blog Faqs. You can apologize afterwards. Cheers.