This step by step diy project is about easy chicken coop plans. Building a small backyard chicken coop is a complex project, but the construction will be durable. However, there are many plans that you can choose from when building the backyard chicken coop, so you should really pay attention to the related projects on this site before starting the actual construction of the shelter. Premium Plans for this project available in the Shop.
You should notice this woodworking plans comes with 3D diagrams, step by step instructions and a full Cut / Shopping list. The plans are also Print friendly and you can even download them as a PDF file. However, you should know all my plans are for personal use only!
It is essential to use weather-resistant lumber when building the chicken coop, so make sure you select the components with attention. Moreover, take accurate measurements before making the cuts, otherwise the components might not fit together. Adjust the size of the chicken coop according to your needs, but make sure you follow the instructions described in this article. See all my Premium Plans HERE.
Projects made from these plans
It’s that simple to build a chicken coop!
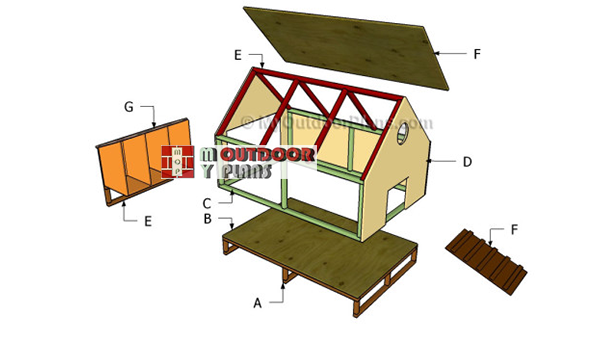
Easy Chicken Coop Plans
Building-an-easy-chicken-coop
Cut + Shopping List
- A – 2 pieces of 2×2 lumber – 72″ long, 3 pieces – 45″ long, 9 pieces – 6″ long, 3 pieces – 48″ long BASE
- B – 1 pieces of 3/4″ plywood – 48″x72″ long FLOORING
- C – 6 pieces of 2×2 lumber – 21” long, 4 pieces – 72″ long, 2 pieces – 45″ long STUDS
- D – 2 pieces of 3/4″ plywood – 24″x73 1/2″ long, 2 pieces – 48″x48″ long WALLS
- E – 1 pieces of 2×2 lumber – 72″ long, 8 pieces – 32 1/2″ long RAFTERS
- F – 2 pieces of 3/4″ plywood – 81 1/2″x38″ long ROOF
- 13 pieces of 2×2 lumber – 8 ft
- 3 pieces of 2×2 lumber – 10 ft
- 6 pieces of 3/4″ plywood – 4’x8′
- hinges
- 100 pieces of 2 1/2″ screws
- 100 pieces of 1 1/4″ screws
- 2″ brad nails
- chicken wire
- tar paper, asphalt shingles
- wood glue, stain/paint
- wood filler
Tools
![]() Hammer, Tape measure, Framing square, Level
Hammer, Tape measure, Framing square, Level
![]() Miter saw, Drill machinery, Screwdriver, Sander
Miter saw, Drill machinery, Screwdriver, Sander
![]() Safety Gloves, Safety Glasses
Safety Gloves, Safety Glasses
Time
![]() One day
One day
Related
- Part 1: Easy Chicken Coop Plans
- Part 2: How to Build a Chicken Coop Nest
- Full Sheet 4×8 Easy Chicken Coop Plans
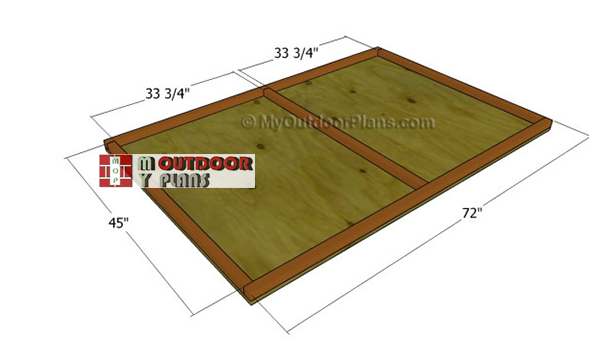
Step 1: Building the floor for easy chicken coop
Building-the-floor-frame-for-coop
The first step of the woodworking project is to build the base of the chicken coop. Therefore, we recommend you to build the floor out of 3/4′ plywood and the frame out of 2×2 lumber. Cut the 2×2 components at the right size and lock them together with 2 1/2″ pocket screws.
Additionally, center the frame to the plywood sheet and drill pilot holes. Next, insert 1 1/4″ screws into the frame and add glue to create a rigid structure.

Fitting the legs
Continue the woodworking project by attaching the 2×2 legs to the base of the chicken coop. Cut the components out of 2×2 lumber after taking accurate measurements.
Next, drill pocket holes at both ends of the vertical supports and insert 2 1/2″ screws into the horizontal supports. Make sure the corners are square and leave no gaps between the components. Work with attention and add glue to the joints.
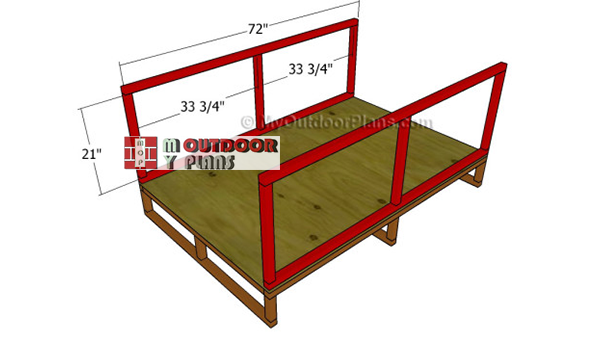
Step 2: Building the wall frames
Building-the-side-wall-frames
Continue the project by attaching the side walls to the chicken coop. As you can easily notice in the plans, we recommend you to assemble the walls out of 2×2 lumber on a level surface.
However, you have to drill pilot holes through the top and bottom plates and insert 2 1/2″ screws into the studs. Make sure the corners are square ad drill pilot holes through the bottom plates before inserting 2 1/2″ screws into the floor.

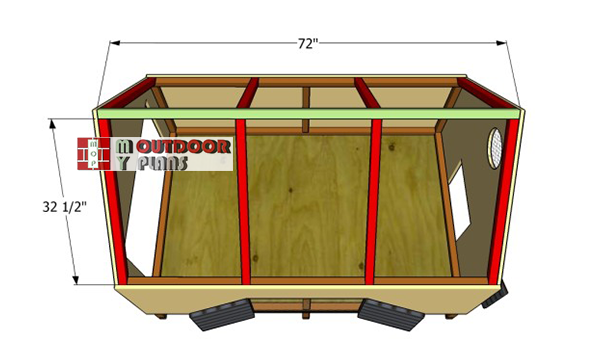
Fitting the supports
Continue the assembly by attaching the horizontal supports to the structure. Drill pocket holes at both ends of the 2×2 components and fit them between the sides of the chicken coop.
Step 3: Fitting the exterior wall panels

Building the exterior walls
It is essential to mark the cut lines to the 3/4″ plywood sheets before making the cuts with a circular saw. Also, make sure you create the door and window openings properly, before attaching them to the frame. Smooth the cut edges with sandpaper thoroughly.

Attaching the exterior walls
Next, attach the plywood walls to the wooden structure and secure them into place by using 1 1/4″ galvanized screws. In addition, use metal hinges to lock the door and the window shutters into place. Align everything with attention and secure the walls to the frame tightly.
Step 4: Building the chicken coop roof
Fitting-the-rafters
Build the top ridge out of 2×2 lumber and secure it to the top of the roof using galvanized screws. Similarly, place a spirit level on top of the slat to to make sure it is perfectly horizontal.
Top Tip: In addition, build the rafters out of 2×2 lumber, making sure you cut one end at 45 degrees. Fit the rafters into place and secure them to the structure with 2 1/2′ screws, after drilling pilot holes.

Fitting the roofing sheets
Afterwards, attach the 3/4″ plywood roof to the chicken coop. Cut the components out of 3/4″ plywood and secure them to the rafters with 1 1/4″ screws. Leave no gaps between the components and make sure the front and the back overhangs are equal.

Attaching the shingles
One of the last steps of the project is to attach the roofing to the plywood sheets. Therefore, we recommend you to cover the roof with tar paper. Staple the tart paper to the plywood roof and afterwards attach the asphalt shingles. Take accurate measurements and secure the shingles to the roof using appropriate nails.

Easy chicken coop plans
After building the frame of the chicken coop we recommend you to take care of the finishing touches. Therefore, check if all the components are locked together tightly and aligned properly. Premium Plans for this project available in the Shop.

Easy chicken coop plans – dimensions

Easy chicken coop – free plans

How to build a simple chicken coop
Top Tip: Don’t forget to take a look over the rest of the project, if you want to learn how to build the nesting box for the chickens. In addition, in the next parts of the project we show you how to fit the trims.
This woodworking project was about easy chicken coop plans. If you want to see more outdoor plans, we recommend you to check out the rest of our step by step projects. LIKE us on Facebook to be the first that gets our latest updates and submit pictures with your DIY projects.

67 comments
in the beginning when it says to put 1 1]/4 ‘ screws in 2×2 how is that possivble??
It is possible, as it says to drill pocket holes and use 2 1/2″ pocket screws.
You are not reading correctly. It says that you are screwing the plywood to the frame with 1 1/4″ screws!
What’s the measurements for G and E ?
See that in the part 2 of the project. You should click the NEXT button at the end of the article or use this link: http://myoutdoorplans.com/animals/how-to-build-chicken-nesting-boxes/
how many chickens will this coop be good for?
6-8 chickens
I am about to build this coop this weekend. I am hoping to modify the desing with a hinged roof. I have the logistic down of how to do this but does anyone have any ideas on how to prevent water from getting through the hinge? I was thinking of adding a piano style hinge to the nest box lid and could probably use a piano hinge for the roof as well. Any advice is appreciated.
Could this be made with taller side walls and maybe 7 or 8 ft long?
No reason to do that. You have these plans for such a tall coop: http://myoutdoorplans.com/animals/small-chicken-coop-plans/
We are almost done building ours. We made our frame with posts & 2×4’s so it’s higher from the ground. We also used 4’x8′ sheets of plywood for the longer walls to eliminate cutting & make it bigger. Also, we put the chickens door on a long side where the window is suppose to be and we put a large clean out door on a short side opposite of the nesting box. I’ll post a picture as soon as we finish the trim & paint.
That sounds really good. Looking forward to seeing your coop
Hi Kim! I like your ideas and am thinking I’ll do the same. You said you’d post a photo– that would be great, if you don’t mind. Thank you for sharing the modification. -NH, Portland, OR
If you want to build a taller coop, so might as well check these plans out: https://myoutdoorplans.com/animals/4×8-backyard-chicken-coop-plans/
Hello there, I am thinking of building a chicken coop using the Easy chicken coop plans. I really want to make this a bit taller by adding 10″ to the bottom legs and 10″ to the exterior walls. Does this sound feasible?
Yes, that is feasible.
Hi- I have the roof left to put on- how do I build the tops pieces. My 38 1/2 woods don’t reach all the way to the top. Did I do something wrong? And how can I fix this? Also should I screw in the wood to the side or built the top frame first?
Are you talking about the plywood panels? Not sure what are you referring to
Hi there! I had a question about these plans if you don’t mind. How are you supposed to work in the coop? Is one side of the roof liftable? Thanks!
Yes, you can install hinges so you can open up one side of the roof.
Where would you attach the hinges to make one side of the roof open?
How would you clean this coop? I see the comments posted above and I’d like to put the roof on a hinge but don’t see a way to do so without letting water in. Any ideas? Thank you.
You cover the hinges with tar paper and shingles. In this manner, the water won’t leak inside.
Thank you!
I like the simplicity of this design, but where do the chickens roost? Would dowels added at the top of the walls work?
That should work.
Are there plans for the shutters and doors?
The doors and the shutters are the pieces you cut out from the walls.
Would there be a way to make it so that you can slide out the bottom floor or put something in to slide out so it would be easy to clean?
You could add hinges to the roof. That would be a lot easier to implement.
Almost had it all assembled before we notice no way to clean the coop. Wish I had read the comments. Putting a hinge on the roof didn’t seem feasible as that piece of plywood is really heavy and the structure of the house is 2x2s. Curious to hear back from others how that went for them. We made half of the long side (the one without the “window”) a side opening hinge for cleaning.
How far from the end of the vertical support do you start your pocket holes?
You use a pocket hole jig and that distance will be set automatically. See my recommendations for the jig: http://myoutdoorplans.com/support-us/
How do I access the full plans?
Please read the FAQs. Also, see the PREVIOUS / NEXT buttons at the bottom of the articles.
Any chance there would be a list available of the full size lumber needed (before cuts are made)? I am trying to figure out the cost of the materials in total.
I would like to build this with insulation, can you help me with that? Thanks
Fit insulation between the frame and then attach 1/2″ plywood to the interior. Nothing too complicated.
Can you put a roost in there?
This will be the first coop I’ve built, just wondering round about total cost?
how do you clean it out and get your eggs. you have to crawl through that little opening? Doesn’t seem like it makes sense. wouldn’t it make sense to allow the top of the nesting box to open up? just wondering.
The nesting box has a lid that is hinged to the coop, so you open it up and harvest the eggs.
is there a pdf for this plans?
There is a PDF for each plan on the blog. Please read the FAQs: https://myoutdoorplans.com/faq/
Is there plans for a run to attach to the coop as well?
What are the brad nails for? Your plan doesn’t explain what they are for or what to use them for
The nails are for attaching the panels, in case you don’t want screw heads to be visible.
I cannot find 2×2 lumber – 10 ft anywhere.
Then you can buy 8 ft, you’ll just need more.
I used treated plywood and it is extremely heavy. Was this a mistake? Working with the plywood was a major hassle due to its weight. Was it a mistake to use treated plywood?
It’s useful for the floor. It is overdo for the wall panels.
Can the base be made from 2×4’s as I have quite a few left over from other projects?
Yeah, you can do that easily.
This is a super cute chicken house, I can’t wait to start building! I just got day old chicks a few weeks ago and I need to start moving them out of my garage and outside. This coop will be the perfect fit for them, thanks so much for the design/plans.
how many chickens its good for? i am planning on 7 chickens. i like this simple design but dont know how big i should make measurements for 7 chickens?
Hello I really like your plans, however I live in a very cold climate. Is there any way to retrofit this for subzero weather with 6 chickens? Also a foot or 2 of snow is not unheard of. Do I need to worry about weight on the roof collapsing it?
1, 2 ft of snow is a lot. I recommend you to take a look over my shed chicken coop designs: https://myoutdoorplans.com/category/chicken-coop/
I live in eastern Idaho. This will Be my first winter with chickens. i have the run under a huge pine tree wich has been wonderful. Now that i think about it, the tree will block most of the snow so what i need to worry about is the cold and wind. How cold is to cold for chickens?
I have been looking at coop plans for a while now and feel I have finally found one that I love. The only question I am left with is how do you muck out your coop with thia design? Is the only door the main chicken door? Amy suggestions on how I could design this to make ot easier to get inside for cleaning/stray eggs?
We are building this and adding a swing door where the windows are to use for cleaning. Then putting a window on other walls
In der Anleitung fehlen Sitzstange und Kotbrett. Wie baut man diese
What is there average cost of the materials for this coop?
You claim that these free plans are downloadable as a pdf. You provide no method for doing so. Care to enlighten me?
There’s no reason to enlighten you since you already called me a liar. without giving me the benefit of doubt.
Hi! Where are the premium plans for this short 4×8 coup and the nest box? I only saw the tall 4×8 in the premium. I would like to order both. Thanks!
Hi. I didn’t make Premium Plans for the short version.
Hello, I saw several comments about hinges for one roof side. I am trying to envision this in my head but can’t quite picture how the hinges would attach to keep one panel mobile. Can you please help my poor brain out please?