This step by step outdoor project is about gazebo roof framing. Building a roof for an octagonal gazebo is a complex project that requires professional plans and tools. Nevertheless, we consider that these instructions will give you a better perspective on the construction processes and steps. Therefore, work with attention and plan every aspect as detailed as possible, to prevent potential mistakes.
Before starting the actual construction project, we recommend you to take a look over the rest of the project, as to learn how to install the posts and how to build the floor of the octagonal gazebo. This woodworking venture requires many carpentry skills, so we recommend you to ask a skilled friend to assist you, if you don’t have an extensive expertise in this field.
Projects made from these plans
Cut & Shopping Lists
- A – 8 pieces of 2×4 lumber – 57 1/2″ long TOP RAILS
- B – 8 pieces of 2×6 lumber – 102″ long RAFTERS
- C – 1 pieces of 6×6 lumber – 10” long KING POST
- D – 2×6 lumber SLATS
- E – 200 sq ft of tar paper ROOF UNDELAYMENT
- F – 2oo sq ft of asphalt shingles ROOFING
Tools
![]() Hammer, Tape measure, Framing square, Level
Hammer, Tape measure, Framing square, Level
![]() Miter saw, Drill machinery, Screwdriver, Sander
Miter saw, Drill machinery, Screwdriver, Sander
![]() Post hole digger, Concrete mixer
Post hole digger, Concrete mixer
![]() Safety Gloves, Safety Glasses
Safety Gloves, Safety Glasses
Time
![]() One day
One day
Related
- Part 1: Free gazebo plans
- Part 2: Gazebo roof framing
- Part 3: How to build gazebo railing
Build an octagon gazebo roof

Building an octagon gazebo roof
Top Tip: Framing a roof for an octagonal gazebo is a complex job, but any person with average woodworking skills can get it done in several days. Make sure you use professional tools and quality materials, if you want to obtain a neat result.
Gazebo Roof Framing

Building the rafters
Framing a roof for an octagon gazebo is not a difficult process, although it might look very complex at first glance. As you can notice in the image, you need to start with building the rafters from 2×6 lumber. Cut their both ends at 63.5 degrees, by using a miter saw.
One end of the rafters should be secured to the posts, while the opposite one should be locked to a king post. Make sure you perfectly align everything, otherwise the gazebo roof won’t be symmetrical.

Securing the rafters to the king post
As you can easily notice in the plans, you need to lock one end of the rafters to an octagonal king posts, made out of 6×6 lumber. After building the king post, you need to lock it into place with a 4×4 post (138″ long).
Plumb the post and center it to the flooring surface. Make sure the king post is aligned properly, as each rafter should be perpendicular to its faces. Drill pilot holes trough the rafters and insert 3 1/2″ screws into the king post.
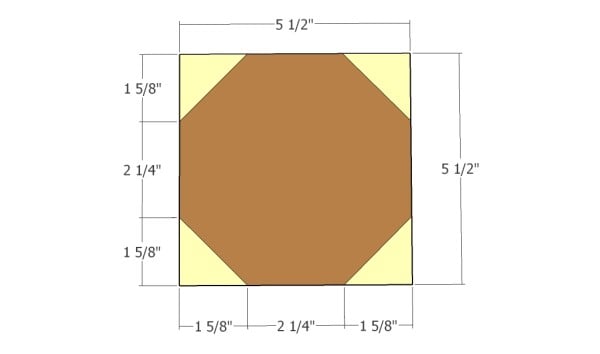
Building the king post
Make the cuts to a piece of 10″ long 6×6 beam. Use a saw to make the cuts to the beam, as shown in the diagram.

Securing the rafters
At the opposite ends of the rafters, you have to lock them to the posts. Fit the rafters into the notches, drill pilot holes and insert 4″ carriage bolts. Make sure sure the rafters are secure properly, otherwise the whole structure won’t be rigid enough.

Attaching the roofing slats
The next step of the project is to install the roofing slats. As you can see in the image, one option is to attach 2×6 slats to the rafters and to secure them with 2 1/2″ galvanized screws.
Top Tip: Alternatively, you could cut triangles from 3/4″ plywood and secure them into place with 1 1/2″ nails. Irrespective of your choice, we recommend you to take accurate measurements and to make proper cuts with circular saw.

Installing the tar paper
Cover the whole surface of the gazebo roof with tar paper, starting with the bottom up to the top. Make sure the strips of tar paper overlap at least 2″, as to create a waterproof cover for the roof framing.
After covering the whole surface, we recommend you to cover the edges with strips of tar paper and lock them into place with staples. Work with attention and with great care, in order to get a professional manner.

Gazebo roof framing
One of the last steps of the project is to install the asphalt shingles. Therefore, fit the starting row with the tabs upward-oriented. Continue the installation by attaching the 3-tab shingles in a professional manner.
Top Tip: We strongly recommend you to take a look over the manufacturer’s instructions, if you don’t have expertise in the field. Lock the shingles into place with galvanized nails, making sure the next row covers them.
This woodworking project was about free gazebo plans. If you want to see more outdoor plans, we recommend you to check out the rest of our step by step projects. LIKE us on Facebook to be the first that gets our latest updates and submit pictures with your DIY projects.
 |
 |
EXPLORE MORE IDEAS FOR:
 |
 |
 |
 |
5 comments
How would you cut the Kingpost precisely to fit? is there a tip you can give? I really enjoy your site by the way.
Thank you
Richie
Hello Richie! I have updated the article and posted a detailed diagram. If you have other questions I would gladly answer them. I am looking forward to seeing your projects!
Cannot access the downloading. Very disappointed that I cannot continue
You can download any plan. Please read the FAQs: http://myoutdoorplans.com/faq/
Vague instructions for notching 4×4 for rafters such as how deep and at what angle due to slope of roof