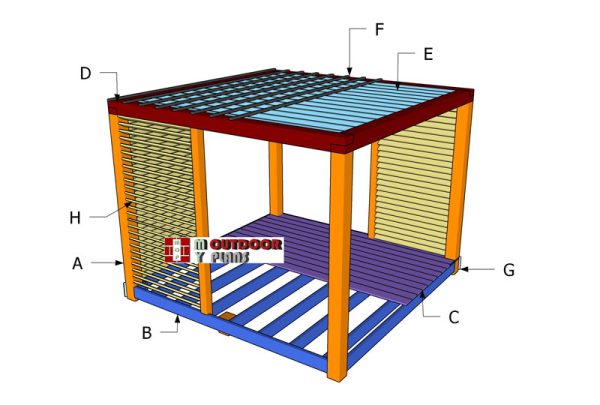
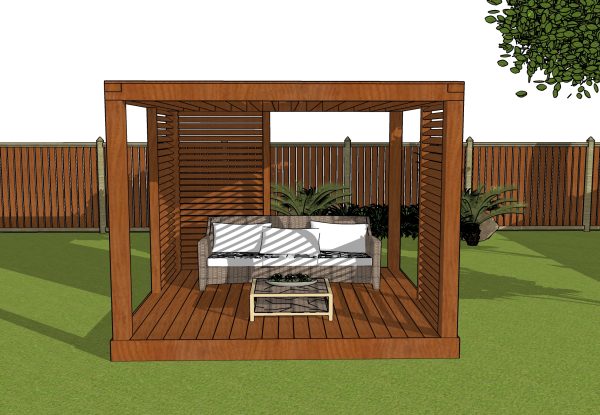
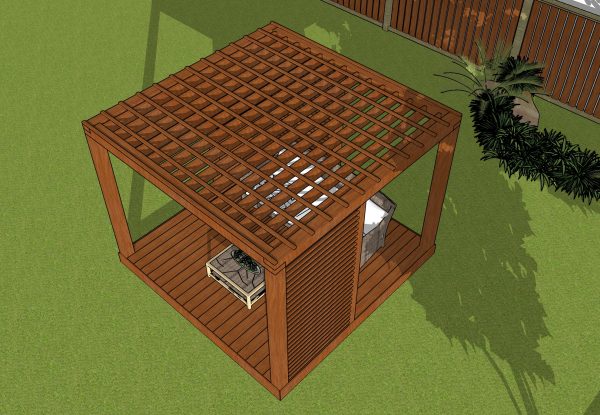
This step by step diy woodworking project is about a 10×10 wooden modern pergola plans. This square pergola has a floor and side blinds, as distinct elements compared to a basic pergola. The simple lines combines with the shade elements make it a perfect choice if you look for a cost efficient project that still has the quality to stand out and become a conversation piece. Take a look over the rest of our woodworking plans, if you want to get more building inspiration. Check out the Shop, as well, for full list of Premium Plans.
When buying the lumber, you should select the planks with great care, making sure they are straight and without any visible flaws (cracks, knots, twists, decay). Investing in cedar or other weather resistant lumber is a good idea, as it will pay off on the long run. Use a spirit level to plumb and align the components, before inserting the galvanized screws, otherwise the project won’t have a symmetrical look. If you have all the materials and tools required for the project, you could get the job done in about a day. See all my Premium Plans HERE.
Projects made from these plans
10×10 Modern Pergola Plans
Building-a-10×10-modern-pergola
Cut + Shopping Lists
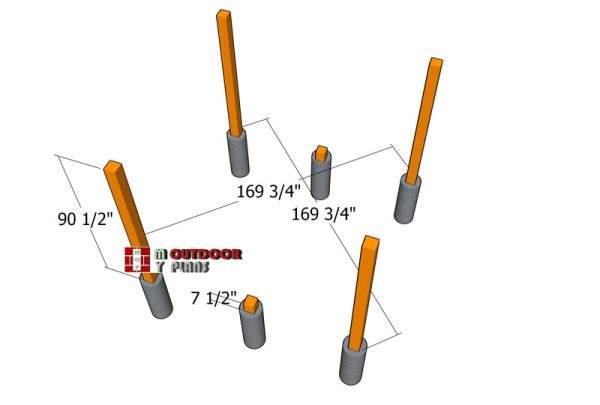
A – Posts – 6×6 lumber 90 1/2 long – 4 pieces
A – Posts – 6×6 lumber 7 1/2″ long – 2 pieces
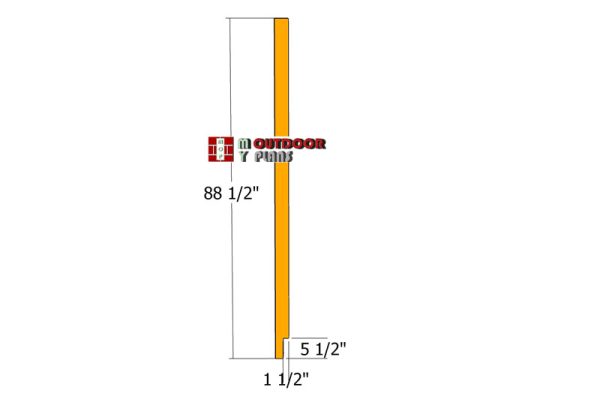
A – Posts – 4×4 lumber 88 1/2″ long – 3 pieces
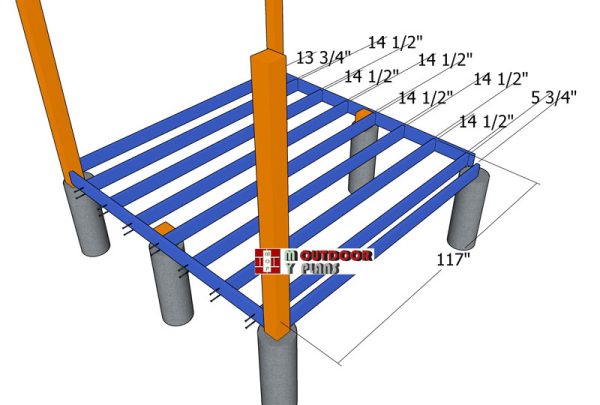
B – Floor frame – 2×6 lumber 117″ long – 7 pieces
B – Floor frame – 2×6 lumber 109″ long – 4 pieces
C – Flooring – 1×6 lumber 10′ long – 21 pieces
D – Support beams – 6×6 lumber 10′ long – 4 pieces
E – Rafters – 2×6 lumber 109″ long – 14 pieces
F – Top Slats – 1×2 lumber 10′ long – 13 pieces
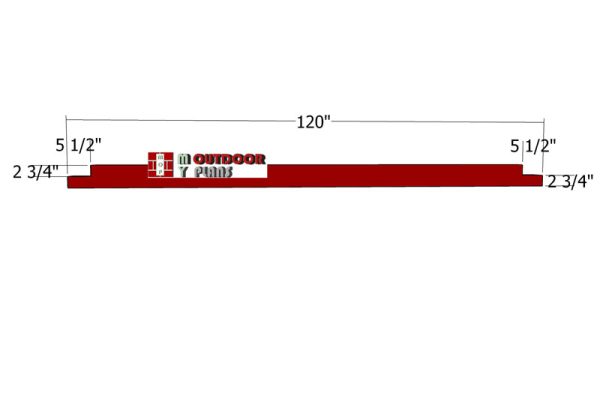
G – Trims – 1×8 lumber 121 1/2″ long – 4 pieces
H – Blinds – 1×4 lumber 43 1/4″ long – 78 pieces
Tools
![]() Hammer, Tape measure, Framing square, Level
Hammer, Tape measure, Framing square, Level
![]() Miter saw, Drill machinery, Screwdriver, Sander
Miter saw, Drill machinery, Screwdriver, Sander
Time
![]() One week
One week
It’s that easy to build a pergola!
How to build a 10×0 pergola – Posts and Floor
Layout-pergola-10×10
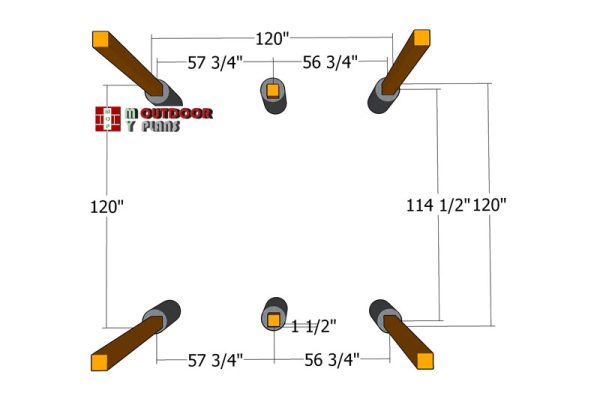
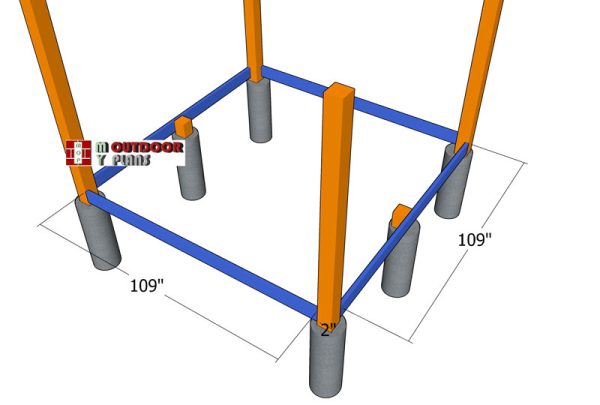
First, you need to layout the posts for the pergola. Use batter boards and string to mark the location for the posts. Dig 3 ft deep holes and 12″ in diameter. Set the concrete tubes and then fill them with concrete. Set the post anchors into place and line them one to another.
Layout-detail
Determining the location for the pavilion is essential, as you have to comply with the local building codes. Make sure the surface is level and remove the vegetation layer.
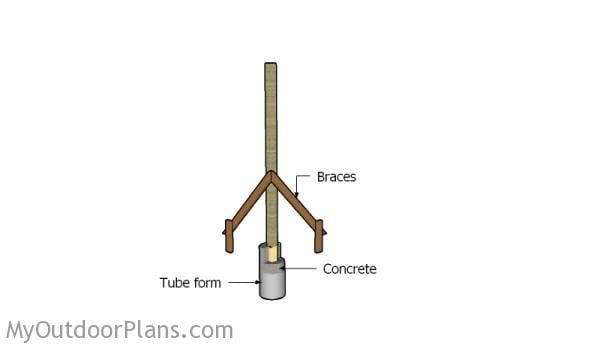
Setting the posts in concrete
Dig 3 ft holes into the ground, making sure they have about 12″ in diameter. Fit the tubes then the posts into the ground and plumb them with a spirit level. Use temporarily braces to make sure the posts are locked into placed while filling the holes with concrete. Let the concrete dry out for several days. Read the local codes for more details on how to secure the posts.
Use lag screws to secure the posts to the anchors. Before pouring the concrete you need to make sure the top of the posts are horizontal one to another. Use a laser to mark the level to the top of the posts and use a circular saw, if you need to make cuts.
Rim-joists
Next, attach the 2×6 joists to the posts of the pergola. Align everything with attention and make sure they are horizontal, by using a spirit level.
Fitting-the-joists
Place the joists every 16″ center and measure the diagonals to make sure the corners are square. As you can notice in the diagram, you need to insert 3 1/2″ screws to secure the rim joists to the regular joists.
Fitting-the-middle-posts
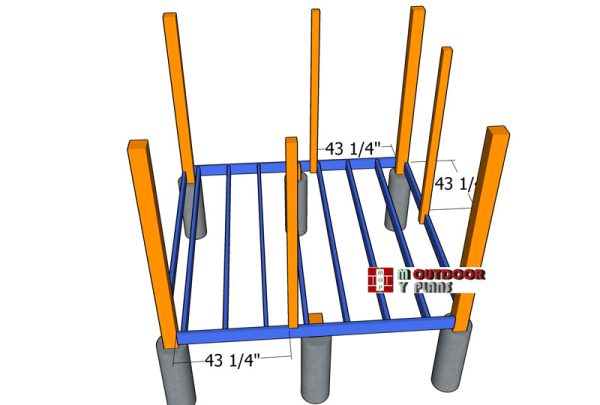
Set the posts to the floor frame, as shown in the diagram. Plumb them with a spirit level, drill pilot holes and insert 3″ lag screws to lock them to the floor frame.
Posts
Use 4×4 lumber for the middle posts. We need to set these posts to the floor frame, so we can install the blinds that will create privacy and shade to the pergola.
Use a circular saw, set at 1 1/2″ depth, to make parallel cuts inside the notches. Use a hammer and a chisel to remove the excess and to clean the recess. Smooth the surface with sandpaper.
Fitting-the-floor-boards
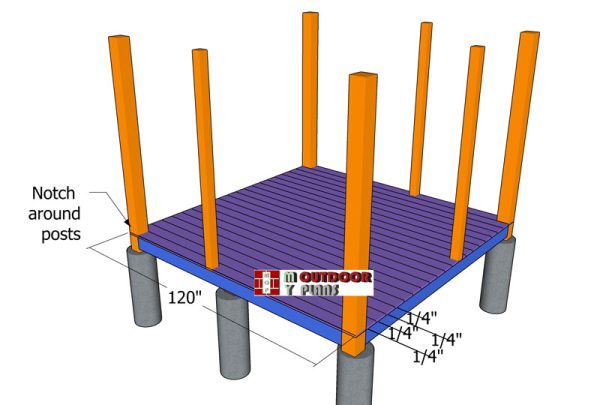
Attach the 1×6 boards to the floor of the pergola. Place pieces of 1/4″ plywood between the boards to create even gaps. Make cut-outs around the posts. Drill pilot holes and insert 1 5/8″ screws to lock the boards into place. Countersink the head of the screws.
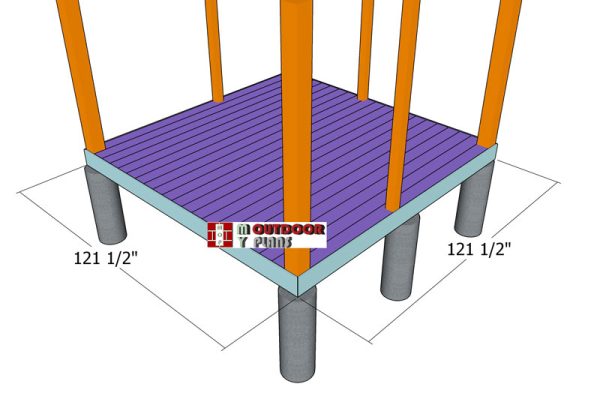
Fitting-the-floor-trims
Use 1×8 trims to enhance the look of the deck. Make 45 degree cuts to join the boards around the corners. Leave no gaps between the trims and use 2″ nails to secure the boards into place.
Building the frame of the large pavilion
Top-beams
Next, we will cut the beams for the top frame of the pergola. Use 6×6 lumber and make notches to both ends. Make parallel cuts inside the marked areas and then remove the excess with a hammer, a chisel and sandpaper. Build four pieces like the ones shown in the diagram.
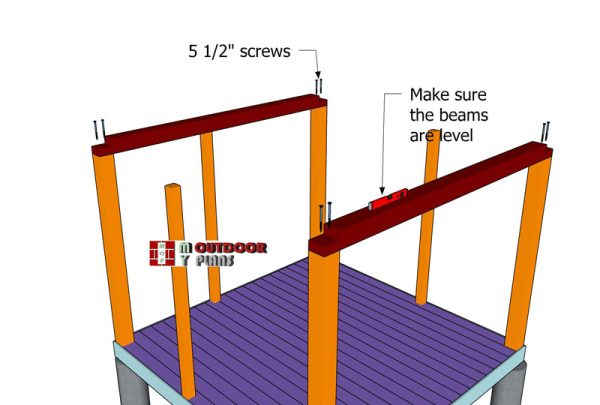
Fitting-the-top-plates
Fit the beams to the top of the posts. Make sure they are perfectly horizontal. If not, adjust the height of the posts. Align the beams at both ends, drill pilot holes and insert 5 1/2″ screws to lock them into place tightly.
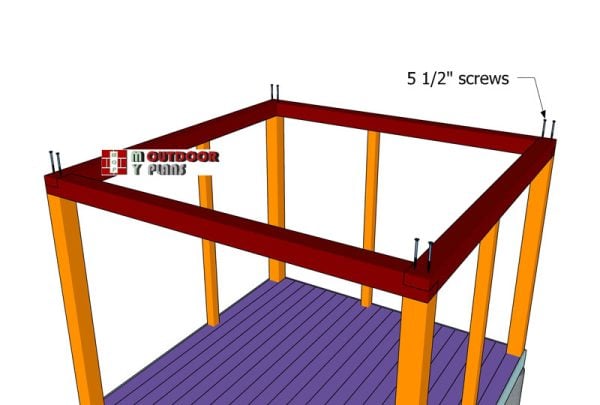
Fitting-the-top-beams
Attach the perpendicular components, as shown in the diagram. Align the components, drill pilot holes and insert 5 1/2″ screws. Measure the diagonals and adjust until equal.
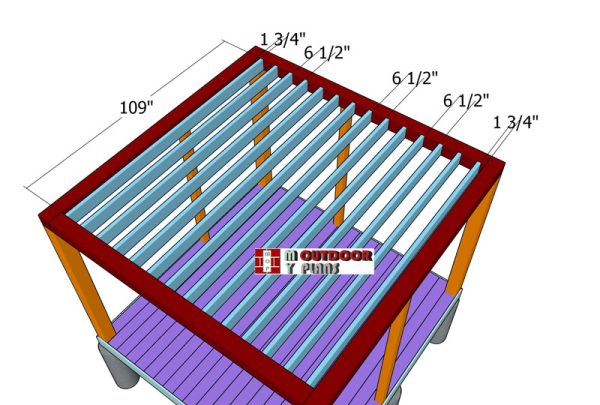
Installing-the-rafters
Next, we have to attach the top 2×6 slats, to add a layer of shade to the pergola. You can adjust the distance between the rafters to suit your needs. The more space between the rafters, the more shade you will get under the pergola roof. The rafters in the plans are placed every 8″ on center.
Fitting-the-top-slats
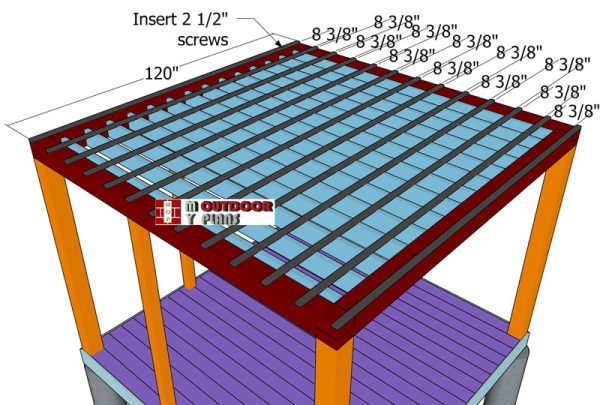
Next, we have to attach the top 1×2 slats, to add another layer of shade to the pergola, and to keep the rafters equally spaced. Drill pilot holes and insert 2 1/2″ screws to lock the slats into place. You can adjust the distance between the slats, as well.
Finishing touches
Attaching-the-blinders
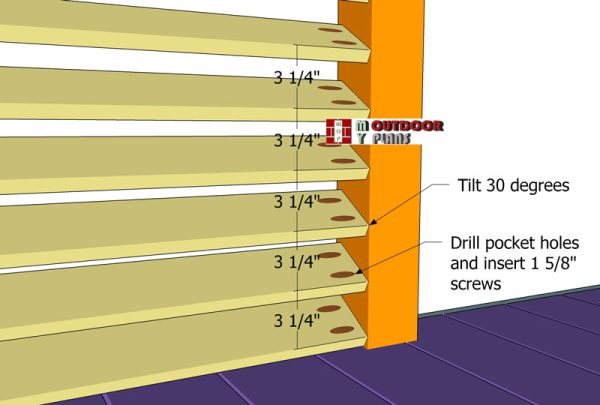
To add more privacy to the pergola, I designed these simple 1×4 blinds. Drill pocket holes at both ends of the boards and secure them to the posts with 1 5/8″ screws. The boards are angled at 30 degrees, but you can adjust it to suit your needs.
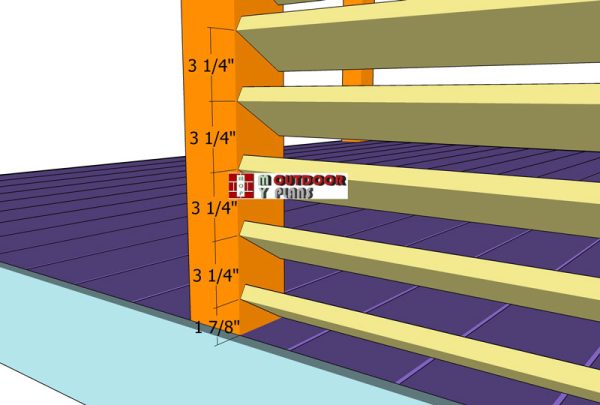
Blinders—back-view
Fill the holes with wood plugs and then smooth the surface with wood putty. That will hide the end of the screws and create a seamless look for your project.
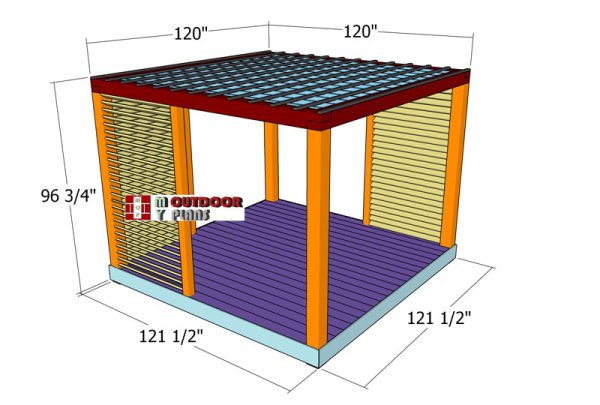
10×10-modern-pergola—dimensions
To add curtains to your outdoor pergola, begin by measuring the dimensions of the space and selecting weather-resistant curtains made from materials like polyester or outdoor canvas. Install curtain rods or wires securely onto the pergola structure using a drill, ensuring they are level and well-anchored.
Attach stainless steel or weather-resistant hooks or clips to the curtain rods, evenly spaced for proper support. Hang the curtains, adjusting them to the desired height, and consider using tiebacks or weights for added stability, especially in windy conditions. This simple and stylish addition not only enhances the aesthetic appeal of your pergola but also provides shade and privacy to create a more comfortable outdoor space.
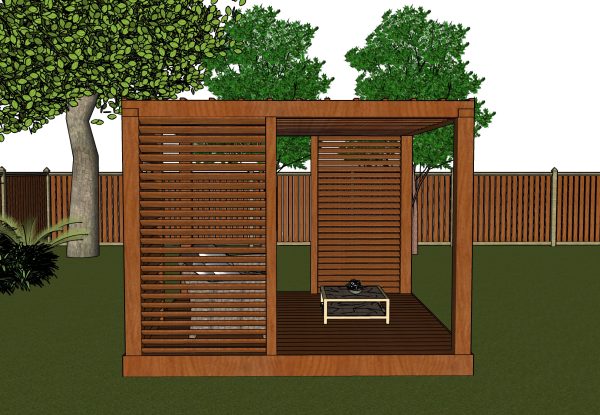
10×10 modern pergola – front view
Fill the holes with wood putty and let them dry out for a few hours. Smooth the surface with 100-220 grit sandpaper and remove the residues with a damp cloth.
10×10 modern pergola plans – top view
10×10 modern pergola plans – side view
Top Tip: Apply a few coats of paint or stain to the components, to enhance the look of the project. Check out the Shop, as well, for full list of Premium Plans. Press the GET PDF PLANS button bellow, if you want to get the Premium Plans with the full Cut and Shopping lists included, as well as with the cut layout diagram.

This woodworking project was about 10×10 modern pergola plans. If you want to see more outdoor plans, check out the rest of our step by step projects and follow the instructions to obtain a professional result.
EXPLORE MORE IDEAS FOR:
 |
 |
 |
 |