This step by step diy woodworking project is about barn wedding arch plans. If you want a cozy and rustic atmosphere to your wedding, this simple wood gambrel arch is the perfect decor. I designed this plans so it’s easy to build and sturdy. This project requires basic tools and materials, so that any person with basic skills can get the job done in less than a week. See here all my Premium Plans.
Work with good judgement and don’t forget to take a look over the rest of the related plans, as there are many designs and woodworking projects to select from. Work with attention and don’t forget that a good planning will save you from many issues and it will keep the costs within the total budget. Invest in high quality materials, such as pine, redwood or cedar. Drill pocket holes before inserting the galvanized screws, to prevent the wood from splitting. See all my Premium Plans HERE.
Projects made from these plans
Barn Wedding Arch Plans – PDF Download
Building-a-barn-arch
Cut and Shopping Lists
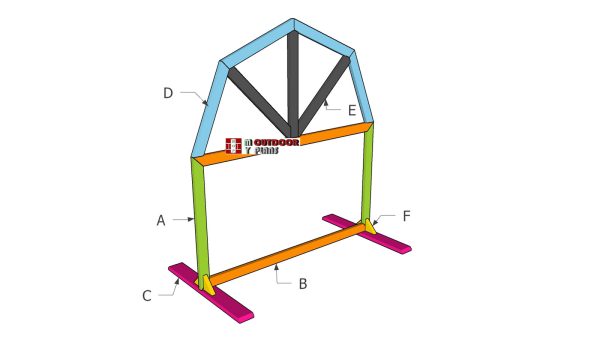
A – 2 pieces of 2×4 lumber – 48” FRAME
B – 2 pieces of 2×4 lumber – 84” FRAME
C – 2 pieces of 2×6 lumber – 48” BASE
D – 4 pieces of 2×4 lumber – 32 1/8” RAFTERS
E – 2 pieces of 2×4 lumber – 37”, 1 piece – 38 ¼” TRIMS
F – 4 pieces of 2×6 lumber – 5 1/2” RAFTERS
Tools
![]() Hammer, Tape measure, Framing square, Level
Hammer, Tape measure, Framing square, Level
![]() Miter saw, Drill machinery, Screwdriver, Sander
Miter saw, Drill machinery, Screwdriver, Sander
Time
![]() One weekend
One weekend
Related
How to build a gambrel wedding arbor
Arch-frame-components
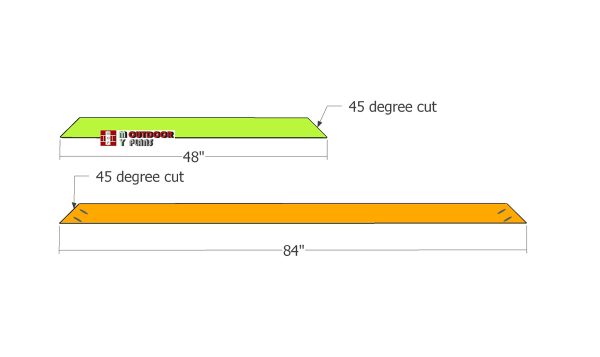
The first step of the project is to build the components for the wedding arch frame. Make 45 degree cuts to both ends of the 2×4 components. Drill pocket holes at both ends of the long slats, as well.
Assembling-the-frame
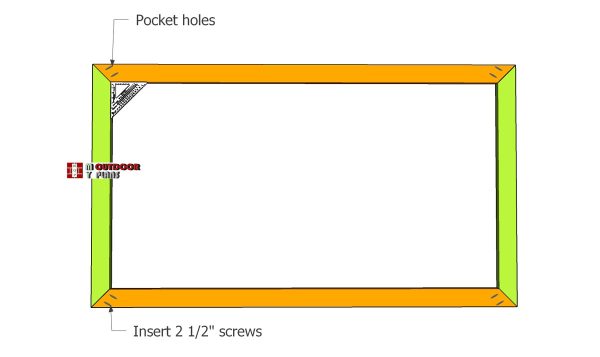
Next, lay the components on a level surface and align all edges flush. Use a carpentry square to the four corners. Insert 2 1/2″ screws to assemble the main frame of the barn arch.
Fitting-the-base-to-the-arch
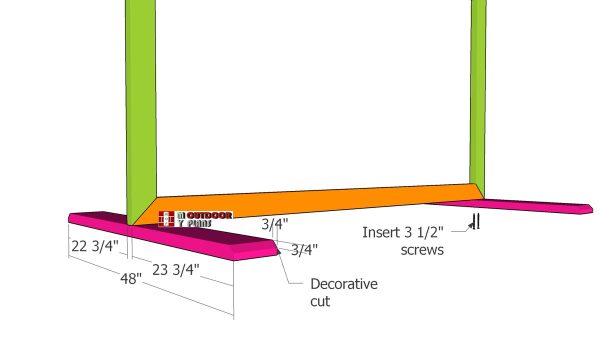
Continue the project by attaching the frame to the base slats. Center the frame to the 2×6 base boards. Drill pilot holes through the base board and insert 3 1/2″ screws into the arch.
Make 45 degree decorative bevel cuts to both ends of the boards. Check if the corners are square.
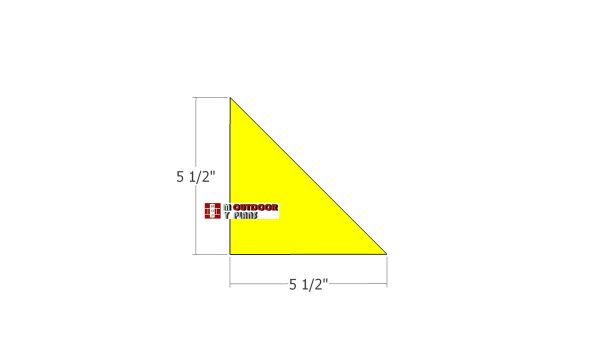
Brace
Next, we need to build the braces for the frame. Use 2×6 boards to make these small braces. Use a miter saw to make the 45 degree cuts.
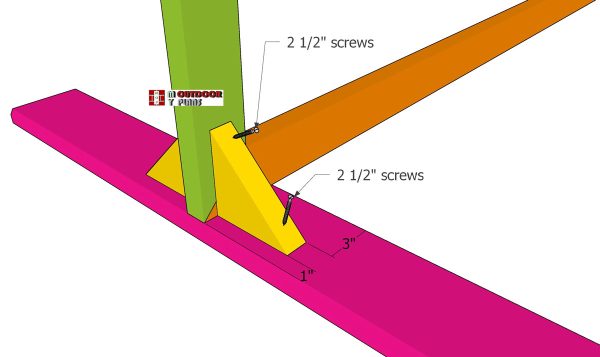
Fitting-the-support-braces
Plumb the frame with a spirit level. Fit the braces to the frame of the wedding arch. Drill pilot holes through the braces and insert 2 1/2″ screws to lock them to the frame and to the base boards.

Rafters
Next, we need to build the gambrel shape for the barn arch. Make 22.5 degree cuts to both ends of the 2×4 boards. Droll pocket holes so you can assemble the roof together.
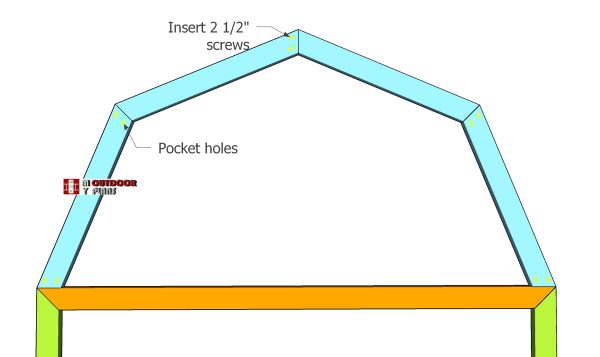
Gambrel-frame
Align the edges flush and leave no gaps between the components. Insert 2 1/2″ screws to assemble the gambrel roof frame.
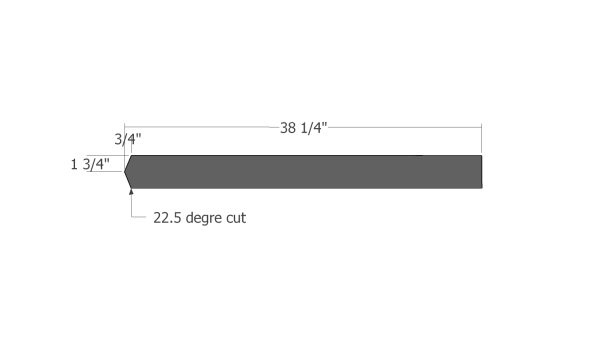
Middle trim
Build the middle trim using 2×4 lumber. Make the angle cuts to the top of the trim.
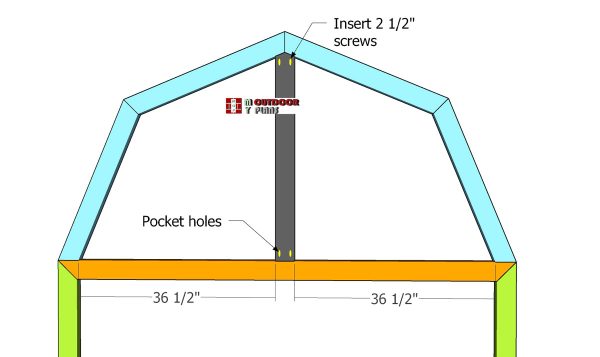
Middle-trim-installation
Drill pocket holes at both ends of the trim and fit them to the gambrel roof. Insert 2 1/2″ screws to lock the trim into place tightly.
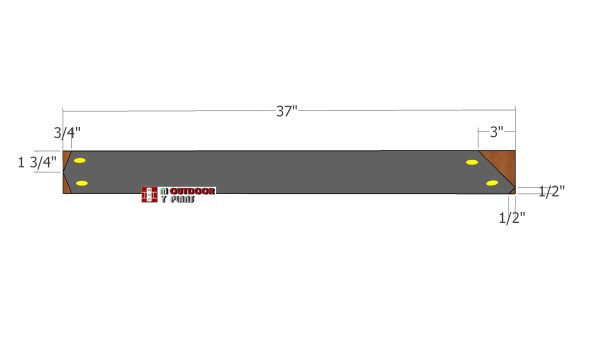
Diagonal-braces
Build the diagonal roof trims, using the info in the diagram. Drill pocket holes at both ends, as shown in the diagram.
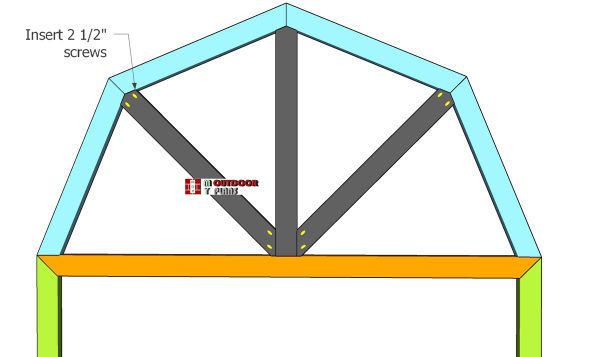
Fitting-the-diagonal-trims
Fit the diagonal trims to the arch, as shown in the image. Align the edges flush and insert 2 1/2″ screws.
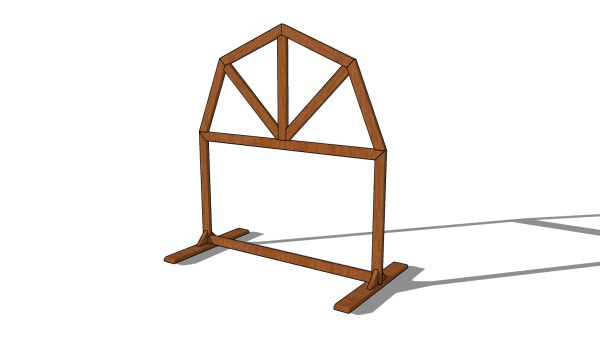
DIY Wedding arch plans
Once assembling the wedding arch, you have to take care of the finishing touches. Fill the pocket holes with plugs and then fill all the gaps with filler. Smooth the surface with 120-220 grit sandpaper and then apply a few coats of stain / paint to enhance the look of the arch and protect the elements from decay

How to build a barn wedding house
This is a free standing arch that is made out of lumber. If it’s windy, you should consider locking the 2×6 base boards to the ground with a few stakes / long screws.

This woodworking project was about triangle wedding arch plans. If you want to see more outdoor plans, we recommend you to check out the rest of our step by step projects. LIKE us on Facebook, follow on Youtube and Instagram to be the first that gets out latest projects and to hep us keep adding free woodworking plans for you.
EXPLORE MORE IDEAS FOR:
 |
 |
 |
 |