This step by step project is about outdoor playset plans. Building a wooden playset for your backyard is an easy and fun woodworking projects that can be done in a weekend. Moreover, you kids will be able to play for hours under your supervision. Nevertheless, you should pay attention to the safety side of the project. Round the sharp edges and corners, as well as make sure there are no protruding screws.
There are several things that you should take into account when building a backyard playset. As you will see during the project, we recommend you to use quality lumber and to make accurate cuts, using professional tools. In order to keep the costs under control, you could use pressure-treated lumber and decking screws. Align the components at both ends before inserting the screws and always use a spirit level to plumb them or to check if there are horizontal. See all my Premium Plans HERE.
Projects made from these plans
Cut & Shopping Lists
- A – 4 pieces of 4×4 lumber – 110”, 1 piece – 48 1/2″, 1 piece – 106 1/2″ POSTS
- B – 4 pieces of 2×8 lumber – 60” FRAME
- C – 5 pieces of 2×6 lumber – 60″, 12 pieces – 63″ long FLOOR
- D – 4 pieces of 2×4 lumber – 60″, 36 pieces of 1×4 lumber – 46 1/2″ BALUSTERS
- E – 2 pieces of 4×4 lumber – 110″, 1 piece of 2×6 – 13 1/2″, 1 piece – 53″ A-FRAME
- F – 1 piece of 4×4 lumber – 111 1/2″, 2 pieces 2×4 lumber – 60″, 2 pieces – 57″ BEAM
- G – plastic slide SLIDE
- H – 2 pieces of 1×4 lumber – 24″, 1 piece – 60″, 1 piece of fabric ROOF
- I – 9 pieces of 2×2 lumber – 31 3/4″ long LADDER
- 9 pieces of 4×4 lumber – 10′
- 2 pieces of 2×8 lumber – 10′
- 18 pieces of 2×6 lumber – 8′
- 8 pieces of 2×4 lumber – 8′
- 20 pieces of 1×4 lumber – 8′
- 3 pieces of 2×2 lumber – 8′
- 100 pieces of 1 1/4″ screws
- 500 pieces of 2 1/2″ screws
- glue, stain
- slide
- swing, hangers
Tools
![]() Hammer, Tape measure, Framing square
Hammer, Tape measure, Framing square
![]() Power mixer, Miter saw, Drill machinery, Screwdriver, Sander
Power mixer, Miter saw, Drill machinery, Screwdriver, Sander
Time
![]() One weekend
One weekend
Check out this video tutorial! It’s that simple to build an outdoor playset!
[youtube id=”mzYsOnnYgoo” width=”600″ height=”350″]
Building a backyard playset

Building an outdoor playset
Top Tip: Building a backyard playset is one of those woodworking projects that will add value to your property, but it will also put a big smile on the faces of your kids. If you choose the right design for your needs and budget, you can get the job done even by yourself.
Outdoor Playset Plans

Building the posts
The first step of the project is to build the main frame of the playset. As you can see in the image, you need to cut the 4×4 posts at several sizes, as in the image. Use a circular saw to get the job done and and the cut edges with medium-grit sandpaper.
Top Tip: You can adjust the width and the height of the playset according to your needs, but you need to plan everything form the very beginning. Work on a level surface when attaching the supports to the posts.

Building the frames
Continue the woodworking project by attaching the frames to the wooden posts. As you can notice in the image, you need to attach 2×8 lumber to the base of the posts, and create a small sandbox.
You can build the floor joists using 2×4 lumber and attach them to the legs, as in the image. Drill pilot holes trough the wooden components before inserting the galvanized screws, to prevent the wood from splitting.

Attaching the floor decking
Attach the 2×4 or 2×6 decking to the frame, after making sure the joists are horizontal. Cut small notches in the wooden slats, as to fit them around the posts. Drill pilot holes trough the slats and countersink the head of the screws, before inserting the 2 1/2″ galvanized screws into the joists.
Place the slats equally spaced, making sure you least at most 1/4″ between the slats. Smooth the cut edges with medium-grit sandpaper, before locking them into place.

Building the stairs
The next step of the project is to build the stairs, on one side of the tower. As you can see in the plans, we recommend you to use 1×2 lumber when attaching the components to the 4×4 posts. Drill pilot holes trough the pieces of lumber and insert 2 1/2″ screws into the posts.
Top Tip: Place the steps equally spaced, leaving about 3″ between them. Use a spirit level to make sure the steps are perfectly horizontal.

Attaching the balusters
Continue the woodworking project by attaching 1×4 slats to the sides of the fort. As you can see in the image, you need to align the slats at both ends and to place them equally-spaced.
Top Tip: Place a wood block between the wooden slats, in order to get consistent gaps. Make sure you don’t leave more than 2-3″ between the slats, otherwise the kids could get stuck between the balusters.

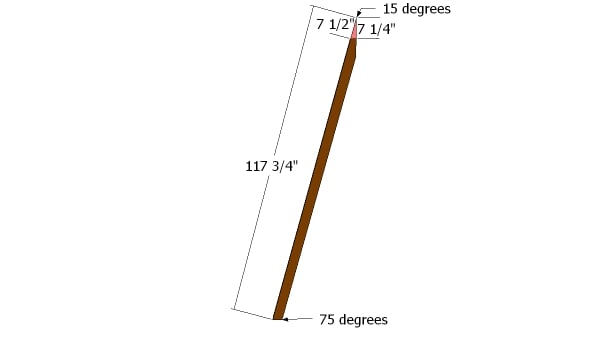
Building the a frame
The next step of the project is to build the A-frame for the swing. As you can see in the image, you need to use 4×4 lumber for the legs and 2×6 lumber for the braces. Cut the ends of the posts at 15º and 75º, if you want to get the job done in a professional manner.
Make sure you work on a level surface and you join the components in a professional manner. Double check the joints and add waterproof glue in order to get rigid joints.
A frame detail
More details regarding the A posts.

Attaching the swing
Attach the A-frame into place by securing a 4×4 post to its top and to tower. As you can notice in the image, you need to place a spirit level on top of the beam and lock it to the A-frame and to fort with 5″ galvanized screws.
Top Tip: Work with attention and with great care, making sure you plumb the A-frame with a spirit level.

Building the roof
Continue the woodworking project by attaching the components to the top of the fort, as in the image. Use a spirit level to check if the components are plumb and horizontal. Drill pilot holes trough the components and insert 2 1/2″ screws into the to rails.
Cover the structure with a small piece of fabric, in order to protect the fort from bad weather and extreme sunlight. Choose a color that matches the design of the wooden playset.

Installing the slide
One of the last steps of the projects is to attach the swing bench and the plastic slide. Make sure the construction is rigid and there are no sharp edges that could injure your kids.

Outdoor playset plans
Afterwards, you have to fill the gaps and the holes with a good wood putty. Let the compound to dry out properly, before sanding the whole wooden components, along the wood grain, with 120-grit sandpaper.
Top Tip: Apply several coats of wood stain, in order to enhance the look of the diy playset and to protect the lumber from water damage. Build a small patio using traditional materials and set a table with several chairs.
This woodworking project is about outdoor playset plans. If you want to see more outdoor plans, we recommend you to check out the rest of our step by step projects. SHARE our projects and follow us on the social networks to help us keep adding free woodworking plans. LIKE us on Facebook to be the first that gets our latest updates and submit pictures with your DIY projects.
35 comments
Any idea what all the supplies for this project cost?
The prices differ so the easiest way to know that would be to print the materials list and go to a local lumberyard.
Could you tell me the final size of this
The final size of what? Please be more explicit so I can help you.
Do you have plans to make a wooden plank type bridge between towers?
No. But I have a few garden bridge plans: http://myoutdoorplans.com/category/bridge/
I’m very confused as to what the 40 1x4x8s are for? Am I correct in assuming the list is broken up into total wood needed (the bottom list), and then the wood divided into what is needed for each section to be built (the top)? So total I need to order nine 4x4x10s, two 2x8x10s, etc.? Please explain what the fourty 1x4x8s are for. Thank you!!
There was a mistake in the list, you need 20 pieces of 1x4x8 (needed for the rails). The top section of the list is the cut list (how to cut the materials). The bottom section of the list is the materials list (what to buy for the project).
Most pre-packaged swing sets and swing set plans that I’ve seen call for assembling with a combination of lag screws and carriage bolts, but yours uses only screws. Do you feel the set will be strong enough without assembling the main components with carriage bolts?
You should use your common sense. If you feel the structure is too weak, then feel free to use lag screws, carriage bolts, braces or metal plates. My plans are a starting point and it all depends on who and how it will use the playset.
I am in the process of building this, wanting to know the dimensions of the roof tarp
60″x74″ Good luck and let me know how it comes out.
I cannot figure out how to cut the A-Frame. do you have more measurements? How far the braces are from the base, or how to cut the angles?
I’ve added one more picture.
I’m looking to make something based off of your plans. Do the the main beams / posts need to be buried for adequate support? Thanks
Yes, they do need to be buried for optimal support.
I plan on making this with a couple of slight variations, this weekend or next. I will try to update with pictures if I can figure out how to do that. Thank you for sharing these plans!
How did your set turn out? What did you do differently?
Greetings,
Great plans, thanks so much for sharing!
I’m looking to tackle this project, but have one question about the stairs you mention 2×2’s in the upper part of the description but don’t have 2×2’s in the materials list….if I add 3 8 ft 2×2’s that should complete the lumber list right? I’ll look into adding brackets but as you mention that is all about firming it up. 🙂
Thanks,
Dustin
Like your plans for the kids playset. I just need to know where I can purchase a plastic slide. Do you have any idea where I can pick one up?
Thanks,
Don
I have a link in the materials list. This: https://amzn.to/2RBRaby
Does this project require the 4×4 posts ti be cemented into the ground?
No, but you could use post anchors and pour footings.
Is there an easy way to add monkey bars to this design?
Why is there so much wasted wood? Why not adjust lengths to get the most out of every piece?
The email link didn’t work for me which was a significant bummer.
What email link?
Did I miss something with the A-Frame? I cut the A frame so each of the sides is 110″ long after squaring the top, with a 15 degree cut at the top and 30 degree at the bottom. I ended up with an A-frame that’s way too short. That makes sense to me when I look at the total height required of the A-frame.
Did I miss something?
Yes, you made a few mistakes. Make a 15 degree cut to the bottom of the posts. Make a 75 degree cut to the top (the tip will be 15 degrees after you make the cuts). This will solve the issue.
Hi I’ve bought detailed picnic bench plans before, do you do the same for this playset?
No premium plans for this yet
Would you have detailed plans for any other playset?
Here: https://myoutdoorplans.com/category/fort/
How can I print these plans? The site won’t let me print.
Read the blog FAQs