This step by step woodworking project is about square gazebo plans. Building a simple gazebo for you garden is a great way to create a relaxation corner. In addition, if you build it next to an outdoor kitchen, the gazebo can turn to a perfect place for taking dinner. Plan everything from the very beginning, otherwise you could be taken aback by many potential issues, during the construction process.
Before starting the actual project, we strongly recommend you to study the local building codes, as there are cases in which a building permit is required. Generally speaking, the building requirements vary according to the local requirements, as they are developed according to the soil structure and weather conditions specific to your location. In addition, buy quality materials, such as cedar, redwood or pine. The lumber should be in good condition and without any visible flaws. See all my Premium Plans HERE.
Projects made from these plans
[tabs tab1=”Materials” tab2=”Tools” tab3=”Time” tab4=”Related”]
[tab id=1]
- A – 9 pieces of 8” tube forms, concrete FOOTINGS
- B – 2 piece of 2×6 lumber – 144″ long, 2 pieces of 2×6 lumber – 141″ long RIM JOISTS
- B – 2 piece of 2×6 – 134″ long, 2 pieces of 2×6 – 66 1/4″ long, 2 pieces of 2×6 – 65 1/2” long RIM JOISTS
- C – 8 pieces of 2×6 lumber – 69” long, 8 pieces of 2×6 lumber – 69 3/4′” long JOISTS
- D – 80 pieces of 2×4 lumber – 72” long FLOORING
- E – 8 pieces of 4×4” lumber – 120” long POSTS
- F – 2 piece of 2×6 lumber – 144” long, 2 pieces of 2×6 lumber – 141 TOP PLATES
- 4 pieces tube form
- 8 pieces of post anchor
- 500 pieces of 2 1/2″ screws
- 500 pieces of 1 1/4″ screws
- wood glue, stain/paint
[/tab]
[tab id=2]
![]() Hammer, Tape measure, Framing square
Hammer, Tape measure, Framing square
![]() Miter saw, Drill machinery, Screwdriver, Sander
Miter saw, Drill machinery, Screwdriver, Sander
[/tab]
[tab id=3]
[/tab][tab id=4]
- Part 1: Square Gazebo Plans
- Part 2: Square Gazebo Roof Plans
- Part 3: Gazebo Railing Plans
[/tab][/tabs]
Outdoor gazebo plans
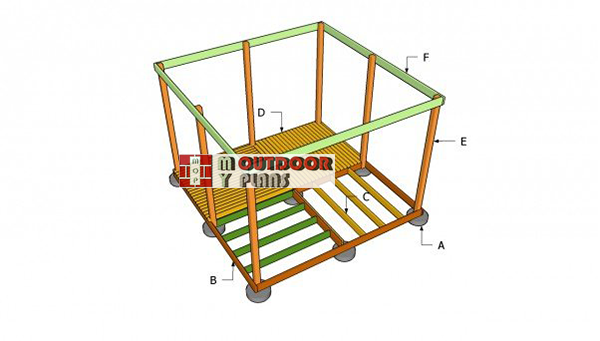
Square-gazebo-building-plans
Building a square gazebo is a complex woodworking project, so you should plans everything thoroughly. Due to the large amount of information, we will split this project in three parts. Therefore, make sure you take a look on the related articles, to see the rest of the steps.
Top Tip: If you live in a windy area or you just want to build a durable gazebo, you should create a dense network of joists, as in the plans.
Square Gazebo Plans
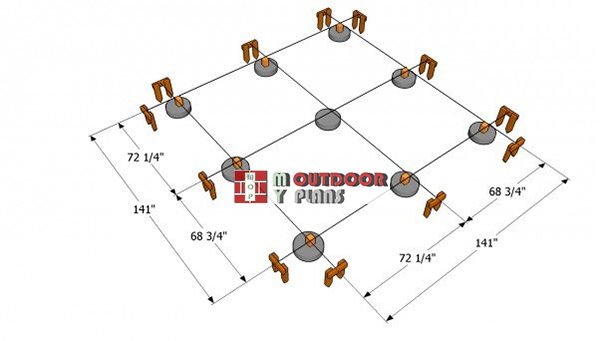
Laying-out-the-posts-for-the-gazebo
The first step of the project is to lay out the gazebo square in a professional manner. As you can see in the image, you need to use batter boards and string. Check the corners for squareness, by using a large L-square or by applying the well known 3-4-5 rule.
Digg 2-3′ deep holes, about 6-8” in diameter. Fit tube forms, install the posts and pour concrete. Secure them temporarily with 2×4 braces.
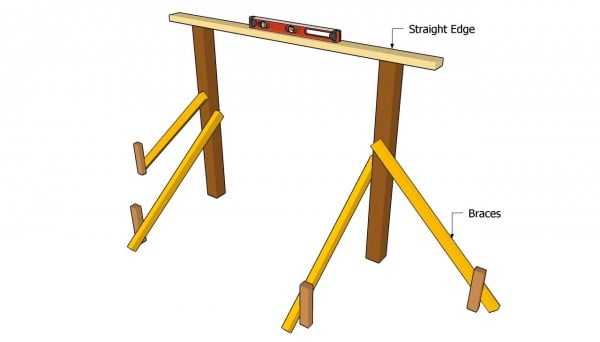
Installing the posts
Plumb the posts with a spirit level and secure them temporarily with 2×4 braces. In addition, the posts should 103″ above the surface of the footings.
Top Tip: Place a straight edge on top of the posts and use a spirit level to make sure the posts are horizontal.
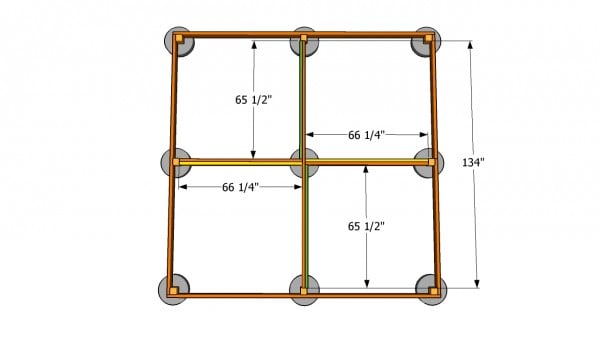
Installing the rim joists
Attach the 2×6 joists to the posts and secure them into place with 3” wood screws. Nevertheless, you should level the joists first and lock them into place with several C-clamps. Drill pilot holes at both ends of the joists and insert the screws.
Next, attach the intermediate joists into place, as in the free plans. Framing the floor using these techniques would provide support to the whole structure of the gazebo.
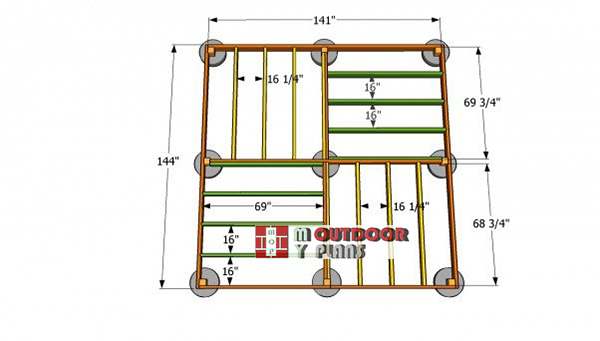
Gazebo-floor-plans
Continue the project by installing the rest of the 2×6 joists. Use a good miter or circular saw to get the job done accurately, using the information you can see in the image. Before attaching the joists into place, we strongly recommend you to make sure they are perfectly level.
Top Tip: Place the joists equally spaced (as in the plans), otherwise they won’t support your weight properly.
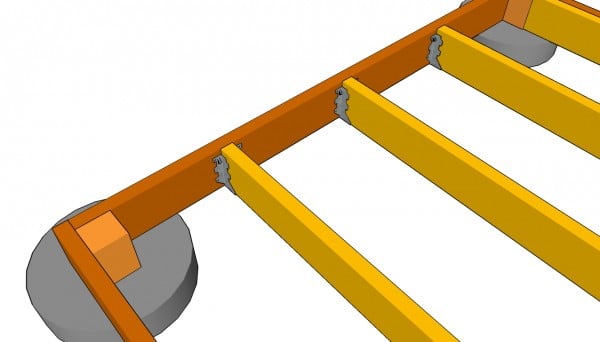
Installing the joists
As you can see in the image, you should secure the regular joists to the rim joists, using metal hangers. Alternatively, you could drill pilot holes trough the rim joists and insert 3” screws. From our own experience, we can assert that using joist hangers provides extra-support to the gazebo floor and is a stylish solution.
Top Tip: Align the components thoroughly, before driving in the galvanized screws into place.
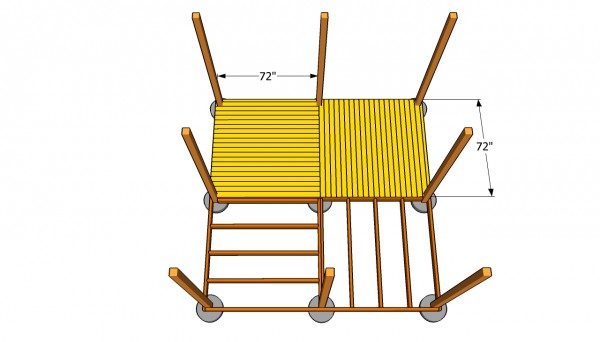
Installing the flooring
Continue the project by installing the decking boards. Generally speaking, there are many patterns you could choose from, but the most appropriate one for this type of floor frame would be parquet pattern.
Top Tip: Place a nail between the 2×4 boards, to get consistent gaps. Drill pilot holes at both ends of the boards and insert 1 1/2” wood screws with an electric screwdriver.
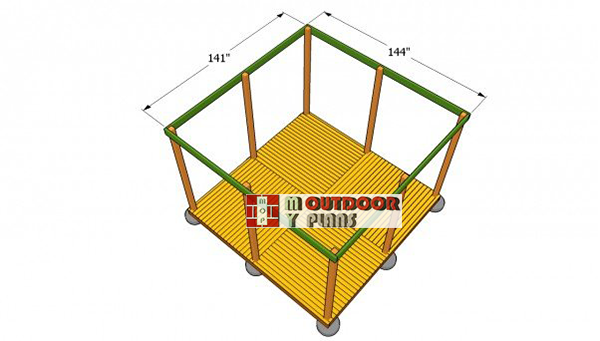
Installing-the-top-plates
After fitting the decking boards, you have to install the top plates. In this manner, you will increase the rigidity of the frame and prepare the gazebo for installing the roof.
Top Tip: In order to get the job done quickly and accurately, you could use 2×6 lumber. Cut the plates at the right size (use the information from the material list) and secure them to the posts with 3” wood screws.
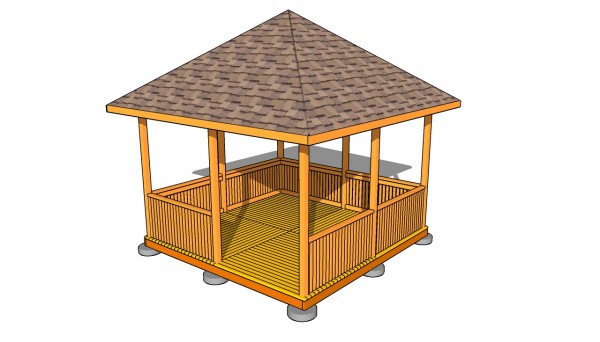
Square gazebo plans
Last but not least, you should take care of the finishing touches. Therefore, check if the screws are inserted properly and if their heads are level with the wooden surface. In addition, use a spirit level to check if the components are properly aligned.
Top Tip: Don’t forget to check out the rest of the project, if you want to learn how to build the roof of the gazebo and how to make the wooden railings.
This diy project was about square gazebo plans. If you want to see more outdoor projects, we recommend you to check out the rest of the free plans. LIKE us on Facebook to be the first that gets our latest updates and submit pictures with your DIY projects.
EXPLORE MORE IDEAS FOR:
 |
 |
 |
 |


7 comments
Do you have an estimate for the cost material for the entire project, base, roof and rails ?
I live zip code 95014.
The easiest way to get an estimate is to print the materials list and to take it to the local lumber yard.
Looking for plans to DIY gazebo of 12×12, I already have the base built I simply need the construction plans
These are plans for a 12×12 gazebo. Don’t you like them? Do you prefer another design? You can also check these plans: http://myoutdoorplans.com/pergola/screened-gazebo-plans/ This is also a 12×12 gazebo.
What size concrete tube form do I need and for the post anchors how do i know they are centered?
12″ tube forms. Use string and batter boards to align everything.
I have a 8×8 square base, can these plans be modified to that.