This woodworking project is about pergola plans free. If you want to create a nice and cozy place in your backyard, you should consider building a free standing pergola. If you want to get the job done in a professional manner, we recommend you to plan everything with attention and to invest in high quality materials. Ask a friend to assist you, as you need someone to hold the components into place, while you insert the screws.
Before starting the actual construction of the wooden pergola, we recommend you to choose the right design and proper plans for your needs. If you want to make a bold statement, then you should consider using 6×6 posts. In addition, invest in quality materials such as cedar, pine or redwood, as regular pressure-treated lumber might look a little too dull, although it is the most affordable choice. See all my Premium Plans HERE.
Projects made from these plans
Pergola Plans Free
Building-the-pergola
Cut & Shopping Lists
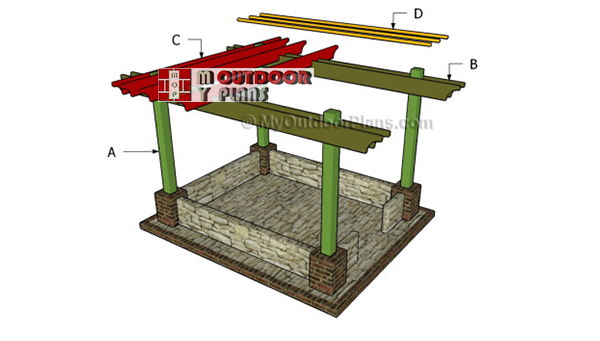
- A – 4 pieces of 6×6 lumber – 118” long POSTS
- B – 4 pieces of 2×8 lumber – 168″ long SUPPORT BEAMS
- C – 8 pieces of 2×6 lumber – 144″ long CROSSBEAMS
- D – 11 pieces of 2×1 lumber – 135″ SLATS
- 4 pieces of 6×6 lumber – 10 ft
- 4 pieces of 2×8 lumber – 14 ft
- 8 pieces of 2×6 lumber – 12 ft
- 11 pieces of 1×2 lumber – 12 ft
- 2 1/2″ screws
- 1 5/8″ screws
- 1 1/4″ screws
- wood filler
- wood glue
- stain/paint
- 6×6 post anchor 4 pieces
- post to beam connector 8 pieces
Tools
![]() Hammer, Tape measure, Framing square
Hammer, Tape measure, Framing square
![]() Miter saw, Drill machinery, Screwdriver, Sander, Post-hole digger
Miter saw, Drill machinery, Screwdriver, Sander, Post-hole digger
Time
![]() One weekend
One weekend
Related
Building a backyard pergola
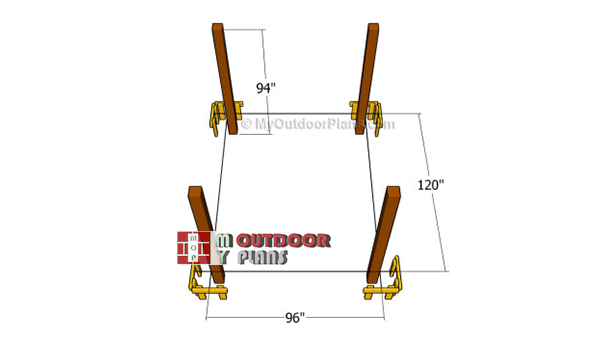
Laying-out-the-pergola-posts
The first step of the garden woodworking project is to lay out the pergola in an accurate and professional manner. As you can easily notice in the diagram, we recommend you to use batter boards and string.
Make sure the corners are right-angled and apply the 3-4-5 rule to every post. It is essential to lay out the pergola properly, otherwise it won’t have a neat appearance.

Building the support beams
Continue the woodworking project by building the support beams. Therefore, cut the 2×6 lumber at 168″ and make sure the components are perfectly-straight and in a very good condition. In order to add value to your backyard project, we recommend you to cut both ends of the beams in a decorative manner. Smooth the cuts with sandpaper.
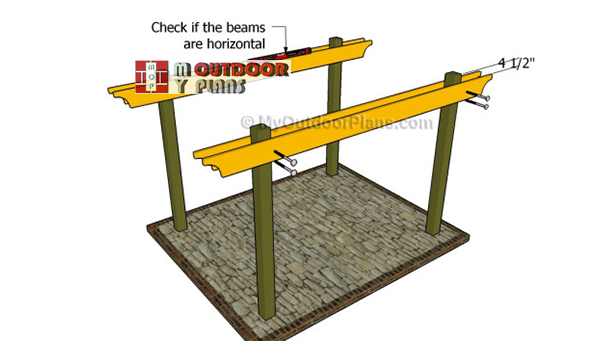
Attaching-the-pergola-support-beams
Next, clamp the beams to the top of the posts, after making sure the beams are perfectly horizontal. Use a spirit level and temporarily secure the beams to the posts using C-clamps. Drill pilot holes through the beams and through the posts and insert 7″ carriage bolts to lock everything together properly.

Building-the-cross-beams
The next step of the free-standing pergola project is to build the crossbeams. As you can easily notice in the plans, we recommend you to use 2×6 lumber for the beams.
Cut both ends of the beams in a decorative manner and smooth the edges with sandpaper. In addition, you need to create several notches in the crossbeams. Make several parallel cuts with a circular saw inside the marked areas and remove the excess with a chisel.

Fitting the crossbeams
Fit the crossbeams into place and make sure you pay attention to the instructions described in the pergola plans free. It is essential to place the crossbeams properly spaced, otherwise your project won’t look professionally.

Installing the shade elements
In order to lock the crossbeams into place tightly, we recommend you to drill pilot holes through the crossbeams and to secure them to the support beams using 5 1/2″ screws. You need to leave no gaps between the components and to drill pilot holes, to prevent the wood from splitting.

Fitting the top slats
If you want to enhance the look of the pergola, we strongly recommend you to attach the 2×2 slats on top of the crossbeams, as described in the diagram. In order to get a professional result, we recommend you to cut the slats at the right size.
Top Tip: Place the slats over the crossbeams equally-spaced and drill pilot holes, before attaching them into place with 2 1/2″ galvanized screws.

Pergola Plans Free
Last but not least, you have to take care of the finishing touches. Therefore, fill the holes and the cracks with wood filler and let it dry out for several hours, before sanding the surface with 120-grit sandpaper.
Top Tip: Protect the wooden components from rot by applying several coats of paint. Create the brick and stone walls, if you really want to make your pergola stand out.
This woodworking project was about pergola plans free. If you want to see more outdoor plans, we recommend you to check out the rest of our step by step projects.
EXPLORE MORE IDEAS FOR:
 |
 |
 |
 |