Step by step woodworking project about arbor bench plans. An arbor with a bench will enhance the appearance of your garden and will add a romantic effect to your property. If you are looking for ways to create a beautiful relaxation area, building a arbor bench is one of the bench solutions, as it is easy to build and doesn’t require a significant investment. Select the plans with great care and buy proper materials for the job, such as redwood, cedar, pine or pressure treated lumber. Any amateur handyman could get the job done, as the tools required for the job are common.
Measure the components with great attention, and use proper tools to cut them at the right size. In addition, drill the holes when necessary and join them together properly with decking screws. If you live in a windy area, we recommend you to anchor the arbor bench into place, by attaching metal brackets to a concrete slab. Work with great care and with good judgement. in order to build a neat construction. See all my Premium Plans HERE.
Projects made from these plans
[tabs tab1=”Materials” tab2=”Tools” tab3=”Time”]
[tab id=1]
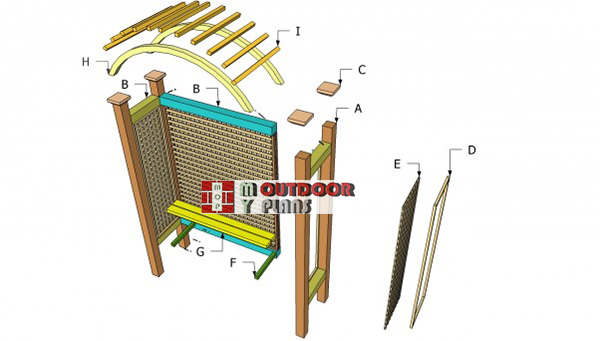
- A – 4 pieces of 4×4 lumber 86” long WOODEN POSTS
- B – 4 pieces of 4×4 lumber 16” long, 2 pieces of 4×4 lumber 48 1/2” BRACES
- C – 4 pieces of 6×6” lumber 2” long CAPS
- D – 1×1 lumber 50′ long TRIMS
- E – 50 sq ft of lattice LATTICE
- F – 2 pieces of 2×2 lumber 16” long SUPPORTS
- G – 4 pieces of 2×4 lumber 48 1/2” long SLATS
- H – 2 pieces of 2×2 lumber – cut from 2×6 boards ARCHED SUPPORTS
- I – 15 pieces of 2×2 lumber 25” long SLATS
[/tab]
[tab id=2]
![]() Hammer, Tape measure, Framing square
Hammer, Tape measure, Framing square
![]() Miter saw, Drill machinery, Screwdriver, Sander
Miter saw, Drill machinery, Screwdriver, Sander
![]() Safety Gloves, Safety Glasses
Safety Gloves, Safety Glasses
[/tab]
[tab id=3]
![]() One weekend
One weekend
[/tab]
[/tabs]
Garden arbor with bench components
Building-an-arbor-bench
Building an arbor bench is a straight forward project, if you use the right plans for your needs and budget. Although there are many options you can choose from, in terms of design, shape or size, you should use your creativity and customize the arbor with bench.
Top Tip: If you want to make your arbor unique, or you just want to add character to your project, you should build an attached top, as in our plans. In order to build the arched supports, you could join together several segments, or you could buy them from your local diy store.
Arbor Bench Plans

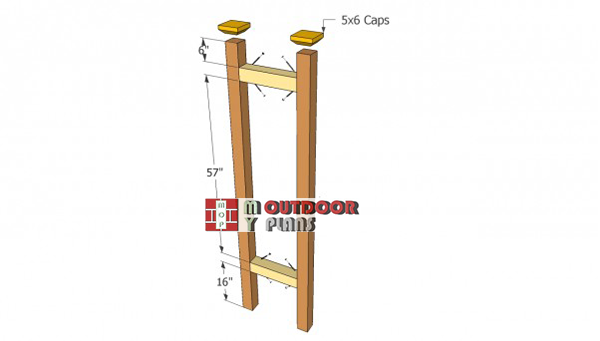
Arbor with bench posts
The first step of your project is to build the sides of the arbor bench. Therefore, you have to cut four 4×4 posts at the appropriate size, as in the image. The width of the arbor can vary, according to needs, but you should remember it will also influence the width of the bench seat.
If you need a permanent construction, anchor the arbor to a concrete slab, using metal brackets. Otherwise, you could move the arbor, as you like.
Building-the-side-frames-for-arbor
Continue the project by joining the two posts with 4×4 supports, as in the free plans. Use a spirit level to align the supports properly and lock them into place with screws, as in the plans. Drill several pilot holes in the components, before inserting the screws, in order to prevent the wood from splitting.
Top Tip: In order to get the job done in a professional manner, attach wooden caps on top of the posts.
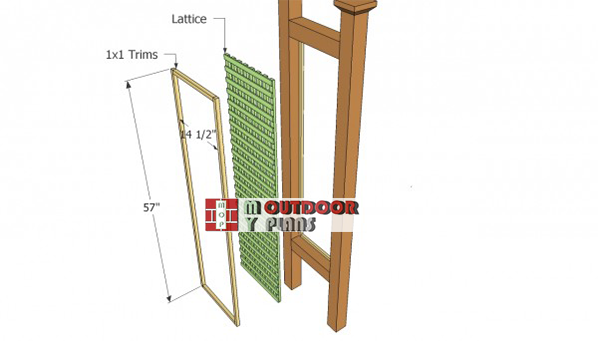
Installing-the-side-trims
Afterwards, cut lattice panels to the appropriate size and lock them into place, using 1×1 trims. As you can see in the image, you have to build two frames, that will lock the lattice thoroughly, like in a sandwich.
Top Tip: In order to lock the frames properly, drive in 1 1/2” nails in the wooden posts. Nevertheless, the side panels have to be perfectly plumb, otherwise the arbor won’t have a nice appearance.

Arbor back plans
The next step is to build the back of the bench arbor. Therefore, you should install 4×4 supports between the sides of the construction, as in the free plans. Work with great care and with good judgement, if you want to obtain a professional result.
Top Tip: Afterwards, install the lattice panels, in the same manner as described above. Plumb the lattice panels into place, before inserting the nails into place.

Attaching the bench slats
Next, you have to build the bench of the arbor. First of all, you need to install the 3×3 supports to the sides of the arbor, using 4” screws. Use a spirit level to align the support properly, before locking them into place.
Cut the slats and attach them into place. Drill pilot holes at both ends of the 2×4 slats and insert decking screws. Leave about 1/2” between the slats, making sure the boards are equally spaced.
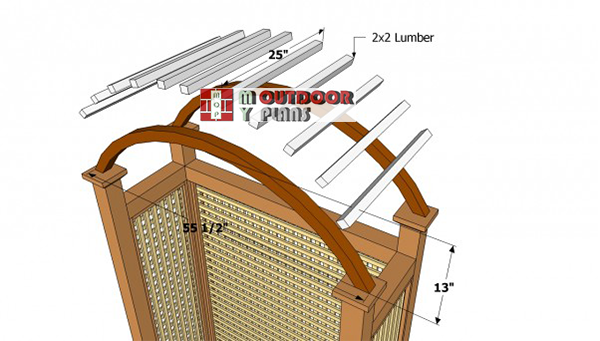
Attaching-the-top-slats-of-garden-arbor
Afterwards, you should attach the top of the arbor. If you want to enhance the look of your garden, you could attach a romantic arched top, as in the free plans. Drill pilot holes in the arched supports and insert 3” screws in the wooden caps.
Top Tip: In order to build the arched supports, you could joint together several segments (two adjacent layers) and lock them with a good wood glue and C-clamps.

Arbor bench plans
Last but not least, you should fill the holes and the cracks with wood putty. Let the compound to dry properly, for several hours, before sanding the surface with medium grit sandpaper. Work with great care and judgement, if you want to get a professional result.
Top Tip: If you want to protect the wood from water damage and decay, clean the surface with a cloth and apply several coats of wood stain.
This woodworking project is about free arbor plans. If you need more outdoor plans, we recommend you to check out the rest of our step by step projects.
EXPLORE MORE IDEAS FOR:
 |
 |
 |
 |