This woodworking project is about free pergola plans. Building a free standing wooden pergola is one of those things that shouldn’t miss from your garden. Nevertheless, if you want to get a professional result, we recommend you to plan every aspect of the project from the very beginning and to buy proper materials. Adjust the size of the pergola to your needs, making sure the total cost of the materials is in your budget.
Before starting the actual construction of the wooden pergola, we recommend you to choose the right design and proper plans for your needs. If you want to make a bold statement, then you should consider using 6×6 posts. In addition, invest in quality materials such as cedar, pine or redwood, as regular pressure-treated lumber might look a little too dull, although it is the most affordable choice. See all my Premium Plans HERE.
Projects made from these plans
Cut & Shopping Lists
- A – 4 pieces of 6×6 lumber – 118” long POSTS
- B – 4 pieces of 2×8 lumber – 168″ long SUPPORT BEAMS
- C – 8 pieces of 2×6 – 144″ long SHADE ELEMENTS
- D – 6 pieces of 2×4 lumber – 156″ SLATS
- 4 pieces of 6×6 lumber – 10′
- 4 pieces of 2×8 lumber – 16′
- 8 pieces of 2×6 lumber – 12′
- 6 pieces of 2×4 lumber – 14′
- 8 pieces of 9″ carriage bolts
- 2 pieces concrete form tube
- 4 post anchors
- 50 pieces of 5″ screws
- 50 pieces of 3 1/2″ screws
- 50 pieces of 2 1/2″ screws
- stain
Tools
![]() Hammer, Tape measure, Framing square
Hammer, Tape measure, Framing square
![]() Miter saw, Drill machinery, Screwdriver, Sander, Post-hole digger
Miter saw, Drill machinery, Screwdriver, Sander, Post-hole digger
Time
![]() One weekend
One weekend
Related
Building a free-standing pergola

Building a wooden pergola
Top Tip: Building a small pergola in the backyard is not a costly project, but it will most likely enhance the look of your property. In this project we show you a basic design that doesn’t require extensive skills, but it still have a neat appearance.
Free pergola plans

Laying out the pergola
The first step of the garden project is to lay out the pergola in a professional manner, by using batter boards. As you can see in the image, we recommend you to place the batter boards into place and to mark the outline of the pergola with string.
Make sure the diagonals are equal and check if the corners are right-angled. In addition, you should adjust the size of the pergola to your needs.
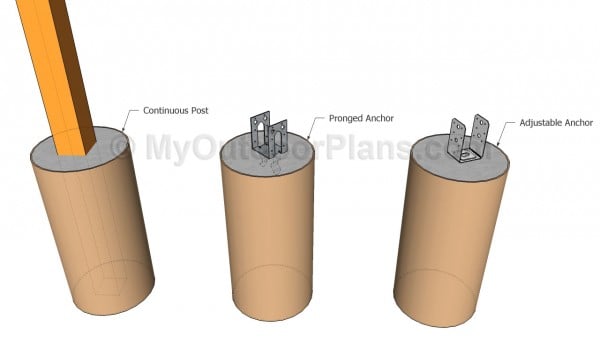
Anchoring the posts of the anchor
Next, you need to dig 24″ deep holes and 15″ in diameter for the 6×6 wooden posts. Fit tube forms inside the holes and choose the alternatives of setting the posts that really suits your needs and budget.
You can set the posts into concrete or use metal post anchors. Irrespective of your choice, we recommend you to plumb the posts and to support them temporarily with wooden braces.

Attaching the support beams
Let the concrete to dry out for several days before continuing the woodworking project with the next steps. Build the support beams from 2×8 or 2×10 lumber and cut their both ends in a decorative manner, by using a jigsaw.
Top Tip: Attach the beams to the posts, level them with a spirit level and clamp them tightly into place. Drill pilot holes trough the components and insert 9″ carriage bolts.

Installing the crossbeams
The next step of the project is to build the crossbeams using 2×6 lumber and to lock them to the support elements with 5″ galvanized screws. As you will see in the next steps of the project, you have to cut several notches into the crossbeams, in order to fit into place easily.
Top Tip: Don’t forget to drill pilot holes before inserting the screws, as to prevent the wood from splitting.

Installing the crossbeams
It is essential to place the shade elements equally spaced, if you want to get a professional result. Use tape measurement when spacing the components at both ends and insert the screws into the support beams.

Installing the crossbeams
One of the last steps of the project is to attach 2×4 slats perpendicular to the crossbeams. Cut small notches in the slats and place them on top of the shade elements.
Top Tip: Use 3 1/2″ galvanized screws to lock the slats into place tightly.

Components plans
As you can see in the plans, you need to cut the support beams, the shade elements and the slats at the right size, before attaching them into place. Cut small notches inside the components, by making several parallel cuts with a circular saw.
Top Tip: Clean the recess with a chisel and smooth the surface with sandpaper. Pay attention to the measurements, if you want to get a professional result.

Components plans
Last but not least, you have to take care of the finishing touches. Therefore, fill the holes and the cracks with wood filler and let it dry out for several hours, before sanding the surface with 120-grit sandpaper.
Top Tip: Protect the wooden components from rot by applying several coats of paint. Choose colors that match the design of the rest of your property, as to enhance the look of the picnic table table.
This woodworking project was about pergola plans free. If you want to see more outdoor plans, we recommend you to check out the rest of our step by step projects.
EXPLORE MORE IDEAS FOR:
 |
 |
 |
 |
1 comment
I’ll post a picture if my dream comes true and I get shade on my patio this summer 🙂 if I start making it myself I’m sure help will come to the rescue. I may be amazing at restoring old wooden furniture and making garden boxes but the guys know just what horrors I am capable of putting together since they allowed me to use the circular saw 😆 lol