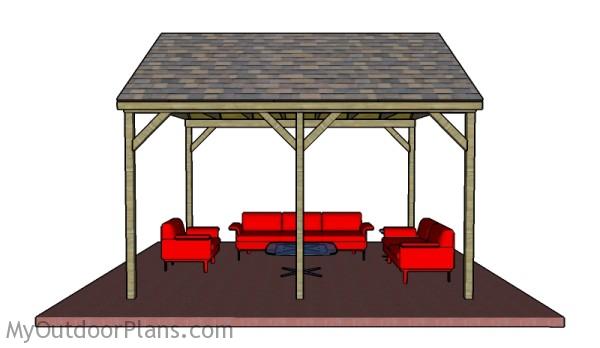
This step by step diy woodworking project is about backyard pavilion plans. The project features instructions for building a 12×14 wooden pavilion. If you want to create a nice recreation area in your backyard, this simple construction with a neat design is a good option to consider. Make sure you check out the rest of plans to see alternatives and more projects for your garden.
When buying the lumber, you should select the planks with great care, making sure they are straight and without any visible flaws (cracks, knots, twists, decay). Investing in cedar or other weather resistant lumber is a good idea, as it will pay off on the long run. Use a spirit level to plumb and align the components, before inserting the galvanized screws, otherwise the project won’t have a symmetrical look. If you have all the materials and tools required for the project, you could get the job done in about a day. See all my Premium Plans HERE.
Projects made from these plans
Backyard Pavilion Plans
Building-a-backyard-pavilion
Cut & Shopping Lists
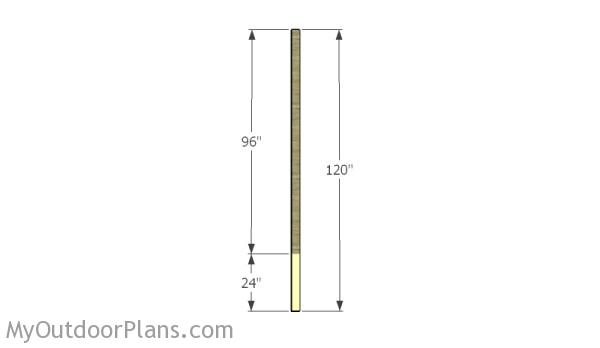
- A – 6 pieces of 4×4 lumber – 120″ long POSTS
- B – 4 pieces of 2×6 lumber – 168″ long BEAMS
- C – 8 pieces of 4×4 lumber – 34″ long BRACES
- D – 8 pieces of 2×6 lumber – 147″ long RAFTERS
- E – 2 pieces of 2×4 lumber – 37″ long, 1 piece of 2×6 lumber – 168″ long TOP RIDGE
- F – 16 pieces of 2×4 lumber – 96″ long RAFTERS
- G – 6 pieces of 3/4″ plywood – 48″x95 1/4″ long, 2 pieces – 24″x95 1/4″ long ROOF
- H – 250 sq ft of tar paper, 250 sq ft of asphalt shingles ROOFING
- I – 2 pieces of 1×4 lumber – 168″ long, 4 pieces of 2×4 lumber – 37″ long TRIMS
- 9 pieces of 4×4 lumber – 12′
- 13 pieces of 2×6 lumber- 14′
- 18 piece of 2×4 lumber – 8′
- 2 pieces of 1×4 lumber – 14′
- 7 pieces of 3/4″ plywood – 4’x8′
- 250 sq ft of tar paper
- 250 sq ft of asphalt shingles
- 1 1/4″ screws
- 1 5/8″ screws
- 2 1/2″ screws
- filler, stain
- glue
- metal connectors
Tools
![]() Hammer, Tape measure, Framing square, Level
Hammer, Tape measure, Framing square, Level
![]() Miter saw, Drill machinery, Screwdriver, Sander
Miter saw, Drill machinery, Screwdriver, Sander
Time
![]() One weekend
One weekend
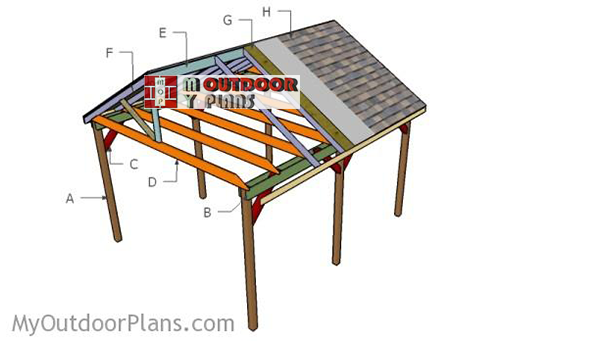
Building a 12×14 backyard pavilion
Laying out the pavilion
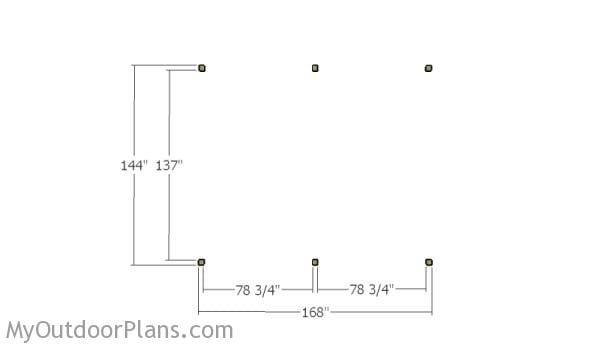
The first step of the project is to layout the posts for the pavilion. Use batter boards and string to layout the posts. Measure the diagonals and adjust them until they are perfectly equal. Apply the 3-4-5 rule to each corner to make sure the corners are right-angled.
Building the posts
Build the posts from 4×4 lumber. As you can notice, you need to set the posts 24″ in concrete.
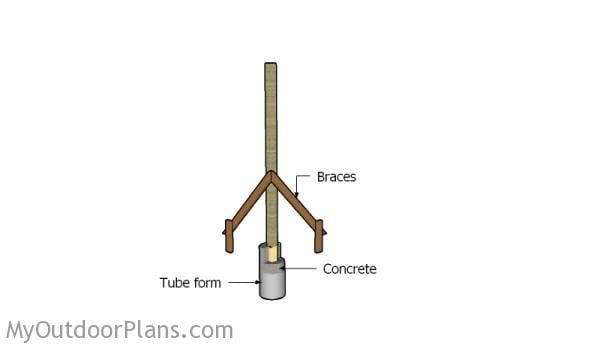
Setting the posts in concrete
Set the posts into concrete for about 2-3′. Use a post hole digger to make the holes. Set tube forms into the holes and fit the posts into place. Use a spirit level to plumb the posts and lock them temporarily into place with braces. Fill the tube forms with concrete and let it dry out for several days.
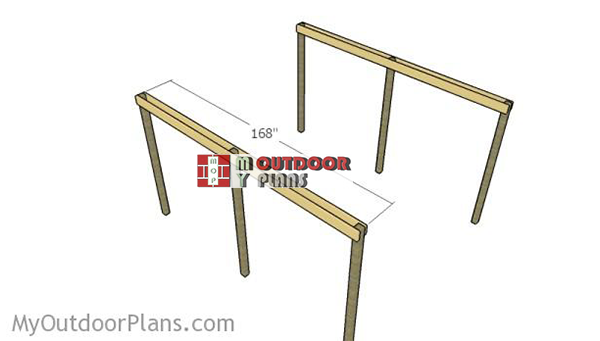
attaching-the-support-beam
Next, attach the 2×6 beams to the top of the posts. Align the edges with attention, make sure the corners are square and check if the beams are perfectly horizontal. Clamp the beams into place tightly.
Securing the support beams to the posts
Drill pilot holes through both the beams and through the posts. Next, insert 7″ carriage bolts to lock the beams to the top of the posts, as shown in the diagram.
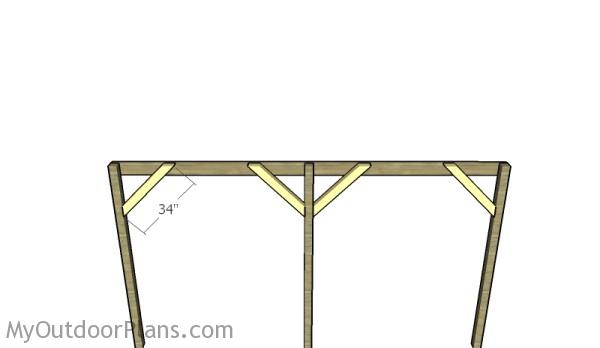
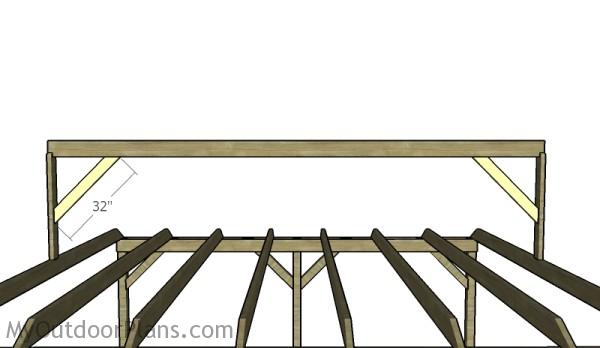
Attaching the braces
If you want to add support to the backyard construction, you should install 4×4 braces to the posts. Cut both ends of the braces at 45 degrees. Smooth the cut edges with sandpaper. Fit the braces to the sides of the pavilion, between the support beams, as shown in the diagram. Align the edges with attention, drill pilot holes and use 3 1/2″ screws to lock them into place.
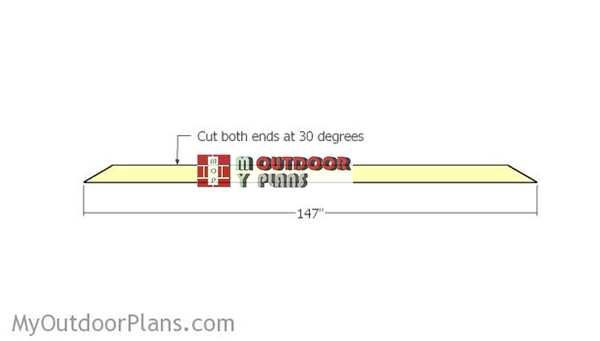
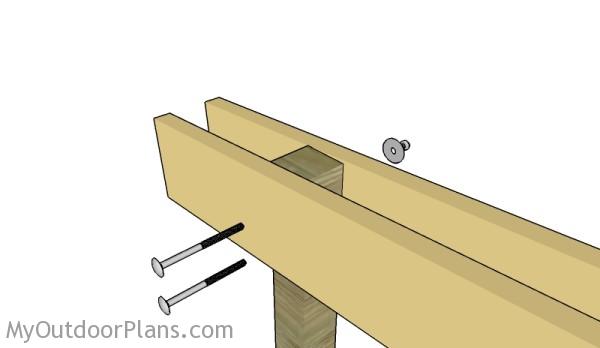
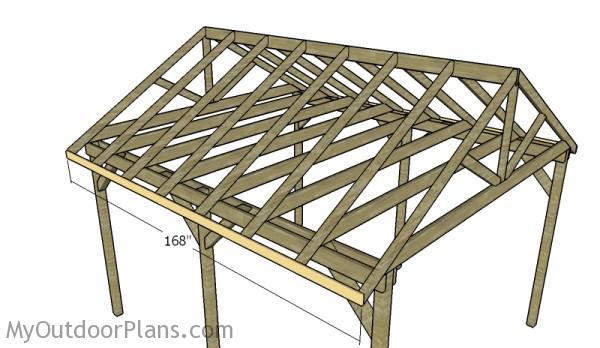
Building-the-bottom-rafters
Build the bottom rafters from 2×6 lumber. Cut both ends of the beams at 30 degrees.
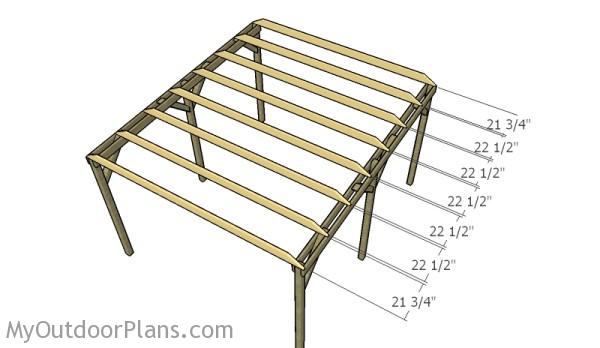
Fitting the bottom rafters
Fit the bottom rafters to the top of the support beams. Place the rafters equally-spaced. Use appropriate metal connectors to lock the rafters to the support beams.
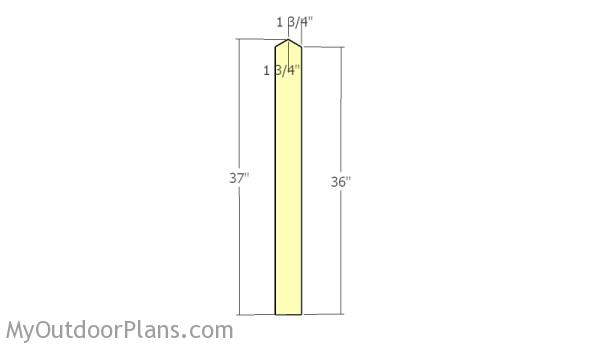
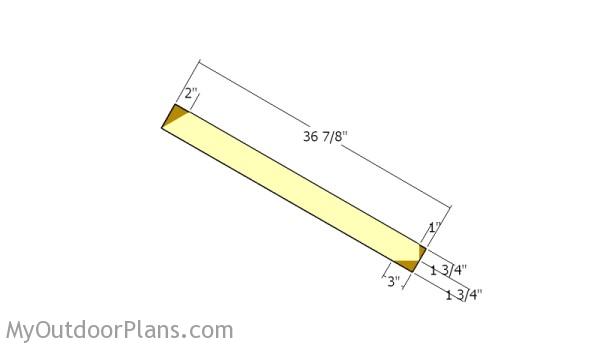
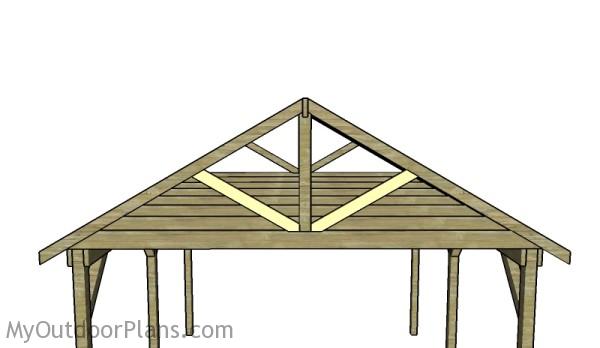
Building the ridge supports
Next, you need to build the supports for the top ridge. Use 2×4 lumber for the supports and make the angle cuts to the top edge.

Making the top notch
Afterwards, you need to make a notch to the top of the supports. Mark the cut lines on the supports and get the job done with a jigsaw. Smooth the edges with sandpaper.
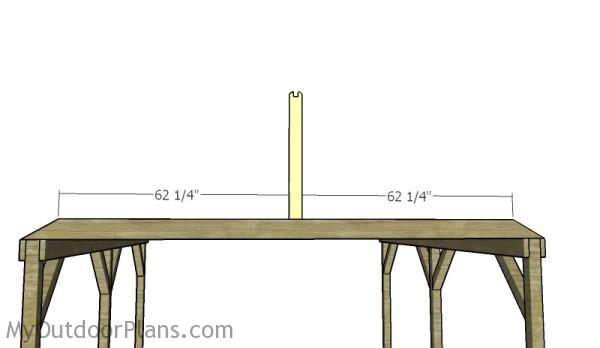
Fitting the ridge supports
Fit the supports to the end bottom rafters. Use a spirit level to check if the supports are plumb. Use plate connectors to lock the supports to the bottom rafters.
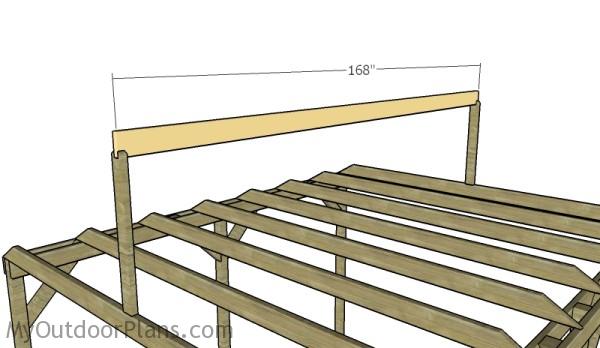
Fitting the top ridge
Build the top ridge from 2×6 lumber. Fit the beams to the top of the supports, as shown in the plans. Drill pilot holes and insert 3 1/2″ screws to lock the beams to the supports. Make sure the corners are right-angled.
Fitting the top ridge braces
Build braces for the top ridge from 2×4 lumber. Cut both ends of the braces at 45 degrees and lock them into place using 3 1/2″ screws. Drill pilot holes before inserting the screws, to prevent the wood from splitting.
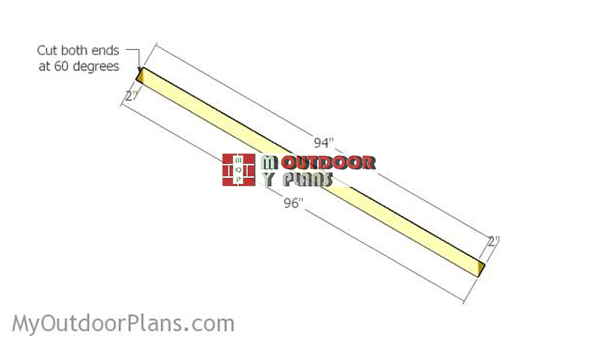
Building-the-rafters-for-the-gable-pavilion
Build the regular rafters for the pavilion from 2×4 lumber. Cut both ends of the rafters at 60 degrees, using a miter saw.
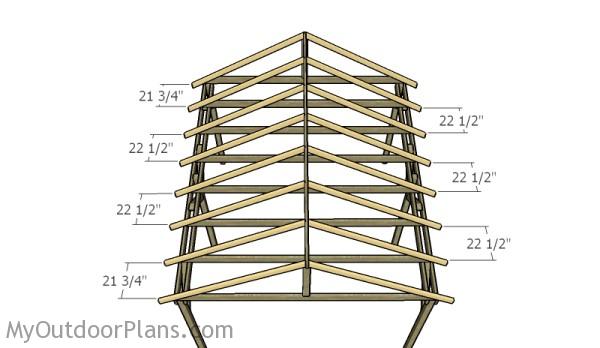
Fitting the rafters
Fit the rafters to the top of the structure. Make sure the rafters are equally-spaced, 24″ on center. Drill pilot holes through the rafters and insert 3 1/2″ screws into the support beams and into the top ridge.
Building the front and back trims
Next, you need to build trims for the front and back gale ends. Mark the cut lines on the 2×4 lumber and get the job done with a circular saw.
Fitting the front and back trims
Fit the trims to the front and back of the pavilion. Drill pilot holes at both ends of the trims and lock them to the structure using 2 1/2″ screws.
Fitting the side trims
Attach 1×4 slats to the ends of the rafters, to enhance the look of the wooden pavilion. Use 1 5/8″ brad nails to lock the trims into place. Align the edges and leave no gaps between the components.
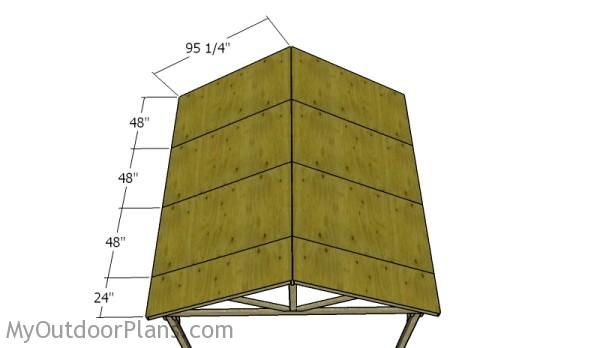
Attaching the roofing sheets
Attach 3/4″ plywood sheets to the rafters. Align the sheets, making sure the edges are flush. Leave no gaps between the sheets and lock them into place with 1 5/8 screws, every 8″ along the rafters.
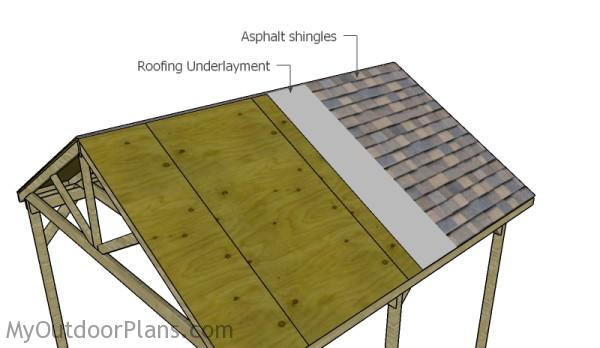
Attaching the roofing
Cover the roof of the shed with roofing felt, making sure the strips overlap at least 2″. Secure the tar paper to the plywood sheets with roofing staples. In addition, cut a 12″ piece for the top ridge. Fit the side drip edges over the roofing felt, while the bottom drip edges should be fit under.
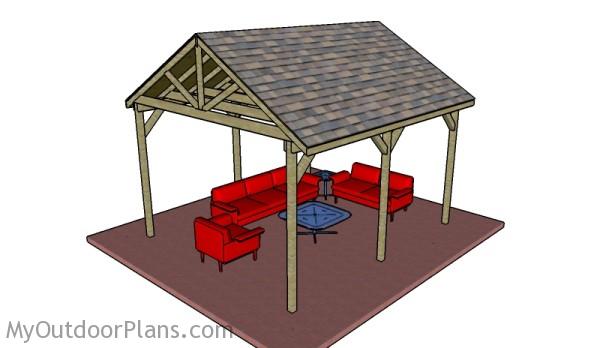
Diy pavilion plans
This simple pavilion has a neat design, making it a good choice for any property.
Backyard Pavilion Plans
If you want, you can easily adjust the size of the pavilion to suit your needs. Fill the holes with wood putty and smooth the surface with sandpaper. Cover the components with paint or stain to protect the components from decay and to enhance the look of the project.
Top Tip: If you live in an area with heavy winters, you should increase the slope of the roof.
This woodworking project was about backyard pavilion plans. If you want to see more outdoor plans, check out the rest of our step by step projects and follow the instructions to obtain a professional result.
15 comments
Hi.
I’m wondering if I would run into any issues if I swapped in 6×6 posts in place of the 4×4 posts.
Would I have to adjust any of the other measurements? At first glance, I think everything would stay the same. The only difference would be that the gap between the bottom 2×6 beams would be 2 inches wider. Am I right about that?
You also must be careful when laying out the posts into the ground. You need to adjust the distance between the posts (the distances will be smaller, as the posts are larger). Other than this, if you keep the footprint of the pavilion at 12×14, you should be okay. Looking forward to seeing how it turns out.
Hi Again,
I’m also wondering if I were to swap the 2×6 beams with 2×10 or 2×12, could I build it without the middle posts?
I’d love to have this design work with only 4 posts.
I don’t recommend it, but you could try with 6×6 posts and 2x10s or engineered beams. If the beams bow you can add the middle posts any time. It all depends on the winds and snows in your area, so make sure you consider everything before setting for the four posts.
I’m needing the 12×14 pavilion plans in a 12×16. Do you have such a plan. Or how would I modify this one to meet those requirements. I placing this on a concrete slab.
I do not have plans for a 12×16 pavilion for the time being. If you want to modify the plans you should start by adjusting the location of the posts for your specific requirements. Then, you should fit more rafters, placing them ever 24″ on center.
How would you modify these plans for an area with very high winds? What would help it withstand 100 to 120mph winds?
Posts in concrete, larger braces, rafters every 16″ on center, rafter ties. But I would start by reading the local codes and asking other people in the area.
I was looking at the plans for the 12×16 pavilion. Do yall have plans for a 14×16 pavilion or would it be safe to extend the 6×6 beam 2 more foot if the braces were in place?
14×16 pavilion plans here: http://myoutdoorplans.com/pergola/14×16-pavilion-free-diy-plans/
Thanks for making the 12×14 plans available online. I used these to build a pavilion at a family camp. I did notice (before I started cutting) a few discrepancies in the instructions. The material list for the posts says get 12’ 4x4s. The instructions show the posts should be 10’. Only (8) 4x4x10 are needed to build the pavilion per the plan. I also noticed the instructions for the (8) 2×6 horizontal joists say to cut at 30° but actually it should be 60°. In addition, the instructions for the (16) 2×4 rafters says cut both ends at 60° but it should be 30°. I made the adjustments and everything fits together perfectly!
We will be starting the rafters section tomorrow. Can we get a verification on the angle?
To be clear. Set the miter for the bottom chords at 60 degrees (the beam will have both ends at 30 degrees). Set the miter for the rafters at 30 degrees (the beams will have the ends at 60 degrees)
Do the post need to be in the ground. Or could I pour a 3 foot deep hole and fill it with concrete and use post anchors with the proper concrete anchors
Yes, you can use 3 ft footings with anchors .