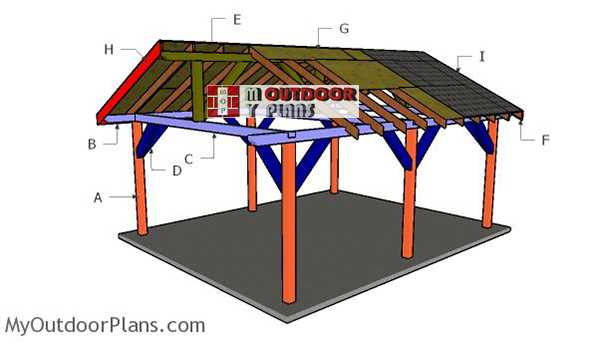
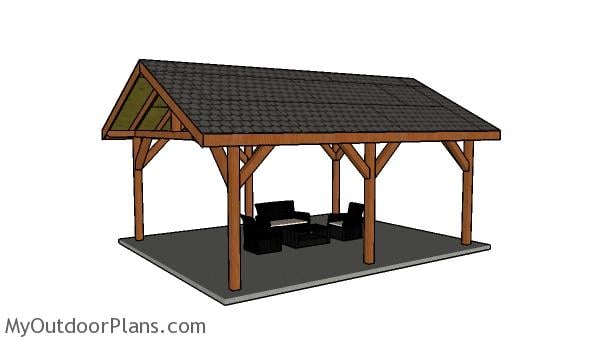
This step by step diy woodworking project is about a 16×24 outdoor pavilion plans. I have designed this large rectangular pavilion made from 6×6 lumber, so it can be sturdy and simple to build as a DIY project. The roof has a 6:12 pitch and it is sheeted with plywood then asphalt shingled are installed. Take a look over the rest of our woodworking plans, if you want to get more building inspiration.
A 16×24 gable pavilion is a fantastic addition to any backyard, offering plenty of space for outdoor gatherings and events. It provides excellent shelter from the elements, making it perfect for year-round use. Plus, building this pavilion is a great way to take on a challenging yet rewarding woodworking project that adds real value to your home.
When buying the lumber, you should select the planks with great care, making sure they are straight and without any visible flaws (cracks, knots, twists, decay). Investing in cedar or other weather resistant lumber is a good idea, as it will pay off on the long run. Use a spirit level to plumb and align the components, before inserting the galvanized screws, otherwise the project won’t have a symmetrical look. If you have all the materials and tools required for the project, you could get the job done in about a day. See all my Premium Plans HERE.
Projects made from these plans
16×24 Backyard Pavilion – Free DIY Plans
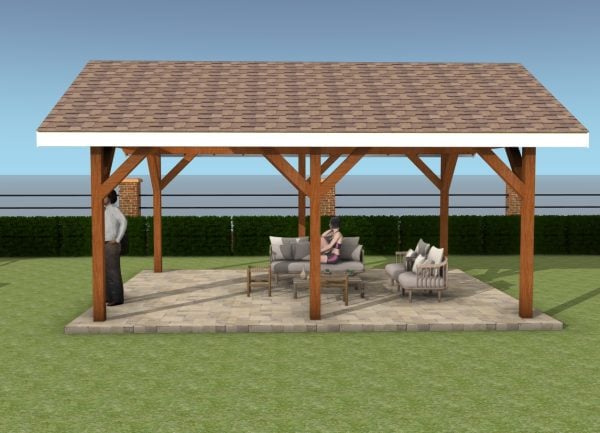
Building-a-16×24-pavilion
Cut & Shopping Lists
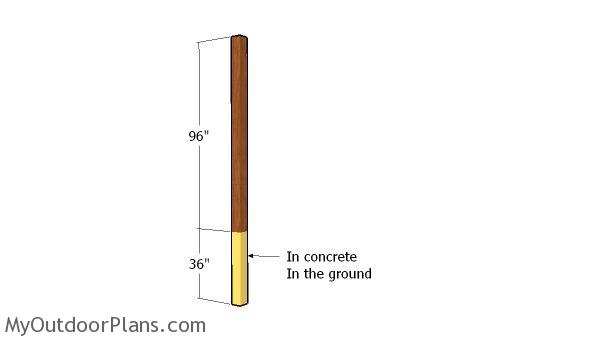
- A – 6 pieces of 6×6 lumber – 132″ long POSTS
- B – 4 pieces of 6×6 lumber – 144″ long, 3 pieces of 6×6 lumber – 192″ long TOP PLATES
- D – 12 pieces of 6×6 lumber – 42 1/2″ long BRACES
- D – 4 pieces of 6×6 lumber – 58 1/4″ long, 2 pieces – 146 3/4″ long, 3 pieces – 44″ long RIDGE BEAM
- 10 pieces of 6×6 lumber – 12′
- 5 pieces of 6×6 lumber – 16′
- 6 pieces of 6×6 lumber – 8′
- 2 pieces of 6×6 lumber – 10′
- 5″ screws, 8″ screws
- wood glue, stain/paint
- post hole digger
- 6 post anchors
- beam to post connectors
- structural screws for connectors
Tools
![]() Hammer, Tape measure, Framing square, Level
Hammer, Tape measure, Framing square, Level
![]() Miter saw, Drill machinery, Screwdriver, Sander
Miter saw, Drill machinery, Screwdriver, Sander
Time
![]() One day
One day
Cut & Shopping Lists
- PART 1: 16×24 Pavilion Plans
- PART 2: 16x24 Pavilion Roof Plans
How to build a 16×24 pavilion
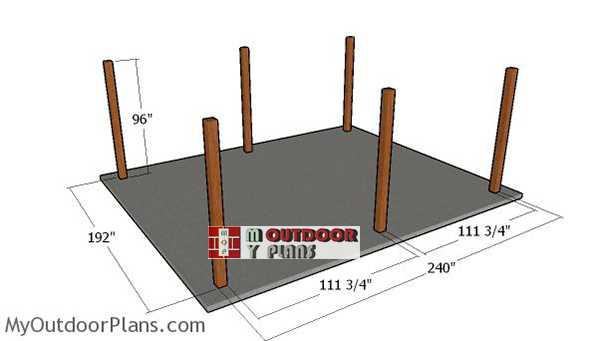
Laying-out-the-posts
The first step of the project is to layout the posts for the 16×24 pavilion. Use batter boards and string to determine the location of the posts. Apply the 3-4-5 rule to every corner of the pavilion, so you make sure they are right angled. Moreover measure the diagonals and make sure they are equal. Determining the location for the pavilion is essential, as you have to comply with the local building codes. Make sure the surface is level and remove the vegetation layer.
Posts
Dig 3′ deep holes into the ground with a post hole digger. Align the holes with attention and then fit form tubes. Fit the 6×6 posts with attention and align them using string. Use a spirit level to plumb the posts and then lock them into place with temporarily braces. Fill the tube forms with concrete and let it dry out for a few days. Setting the pressure treated/cedar posts in concrete is a lot better than using post anchors, as the posts will be locked in the concrete footers.
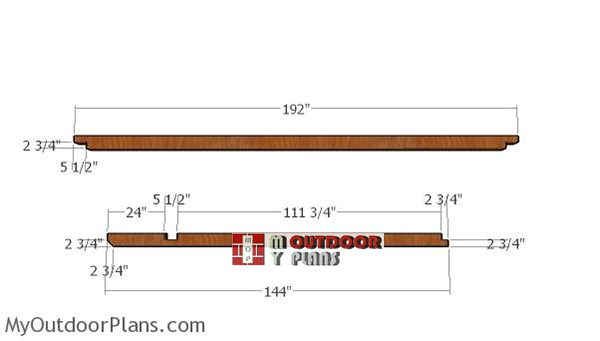
Top-plates—16×24-pavilion
Use 6×6 lumber for the top plates of the pavilion. Use a circular saw to make the notches to beams, as shown in the diagram. Make parallel cuts inside the marked areas and then remove the excess with a chisel. Smooth the surface with sandpaper.
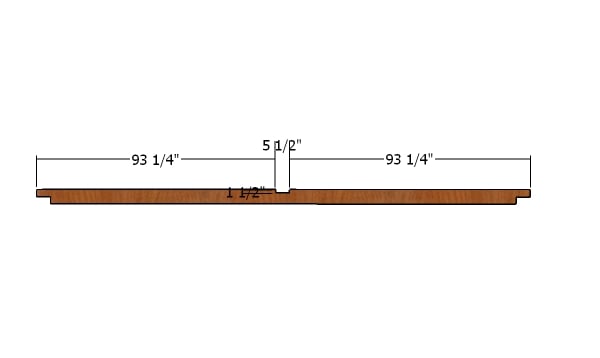
Cross supports
Make the notch to the middle of the cross supports. Use a circular saw set at 1 1/2″ and make parallel cuts inside the marked area. Clean the recess with a chisel and sandpaper.
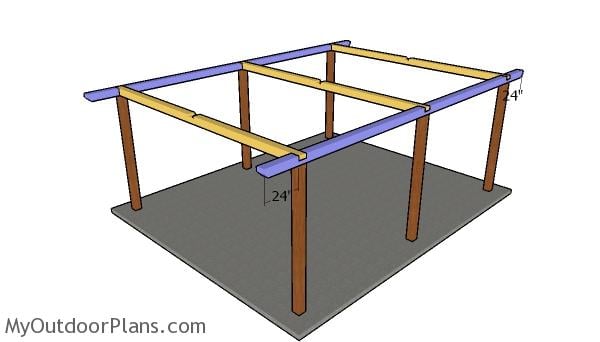
Fitting the top plates
Fit the top plates to the top of the posts. Plumb the posts with a spirit level and make sure the plates are horizontal. Check if the corners are square and align the edges with attention. Drill pilot holes through the plates and insert 8″ screws into the top of the posts.
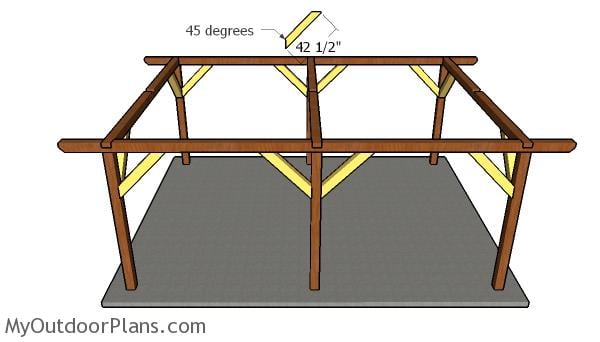
Fitting the braces
Use 6×6 lumber for the braces. Double check if the posts are plumb and if the corners are square. Cut both ends of the braces at 45 degrees and then secure them into place with 5″ screws, after drilling pilot holes. These braces will really enhance the rigidity of the pavilion, so make sure you don’t take shortcuts and install them properly.
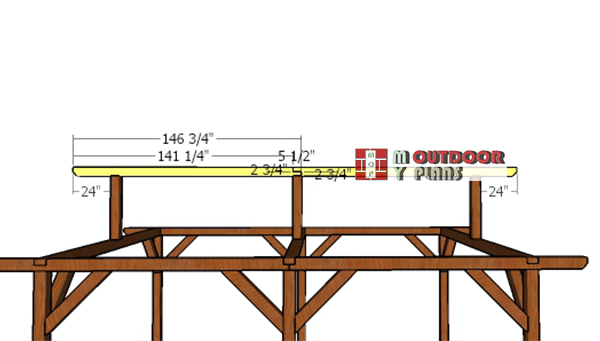
Ridge-beam
Use 6×6 lumber for the ridge beam supports and for the beam itself. Use a spirit level to plumb the supports and secure them into place with corner brackets. Fit the top ridge into place and use corner brackets to lock them into place, as well. Check if the corners are square and align the edges with attention. Use 8″ screws to reinforce the joists. Notice the half lap joint between the two components of the ridge beam.
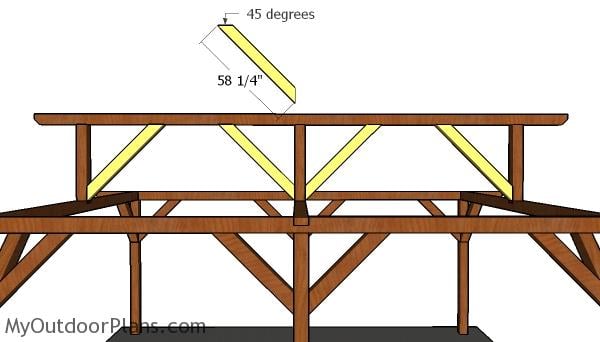
Fitting the top ridge braces
Last but not least, you need to attach the 6×6 braces to the structure of the pavilion, so you can enhance the rigidity. Cut both both ends of the braces at 45 degrees and then secure them into place tightly, with 5″ screws.
16×24 Pavilion Plans
You should check out PART 2 of the 16×24 pavilion plans, so you learn how to build the gable roof.
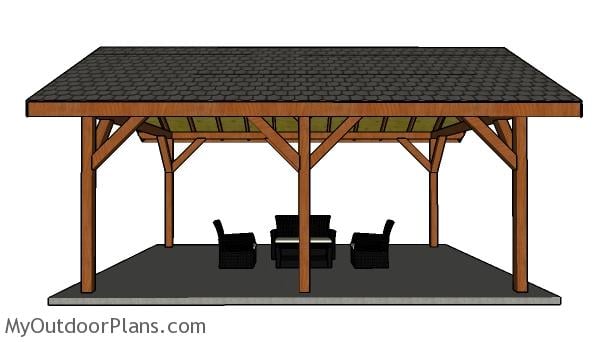
16×24 Pavilion Plans – Side view
Fill the holes with wood putty and let them dry out for a few hours. Smooth the surface with 100-220 grit sandpaper and remove the residues with a damp cloth.
16×24 gable pavilion plans
Top Tip: Apply a few coats of paint or stain to the components, to enhance the look of the project. Make sure you take a look over the rest of my pergola/gazebo/pavilion plans HERE. See all my free woodworking plans (over 1000) HERE.
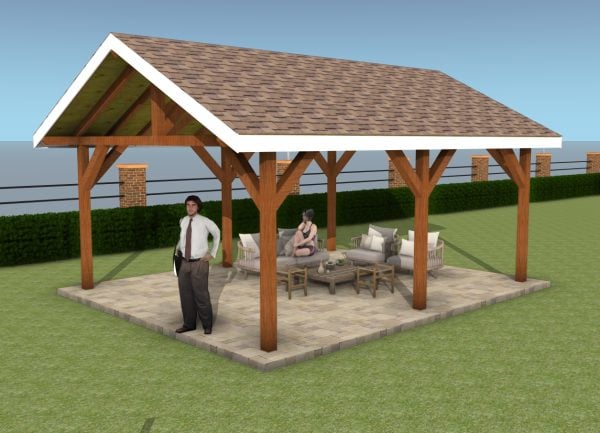
Once you’ve built your 16×24 gable pavilion, the fun really begins with all the add-ons you can create. Consider adding built-in seating, a cozy fire pit, or even an outdoor kitchen to transform your pavilion into the ultimate entertainment space. You can also install lighting and fans to keep things comfortable and stylish, no matter the occasion!
Large pavilion plans – side view
If you want to get PREMIUM PLANS for this project (different design with re-engineered structure), in a PDF format, please press GET PDF PLANS button bellow. Thank you for the support.

This woodworking project was about 16×24 outdoor pavilion plans free. If you want to see more outdoor plans, check out the rest of our step by step projects and follow the instructions to obtain a professional result. Feel free to SHARE my plans with your friends.

EXPLORE MORE IDEAS FOR:
 |
 |
 |
 |
35 comments
some notes is missing from the page, saying using treated lumber in concrete is better than using anchor as????????? Please help, thanks
Project updated.
I noticed you used a center top plate on this 16 x 24 pavilion but you did not on your 20 x 20 pavilion that appears to be built the same way. I’m considering building a 24 x 24 using your design. I was considering a center top plate as well as a center post. Do you think it would be necessary or would it be overkill? Thank you.
Juan Rodriguez
First of all, read the local building codes. Secondly, I would add a center post to a 24×24 pavilion.
Can you please provide a link to the corner brackets you used to secure the ridge beam supports and ridge beam?
Thank you.
Juan Rodriguez
Something like this: https://amzn.to/2GNoCtX
I’m building this Pavilion and I have a question about the 16 Footers that go across. In the first diagram there appears to be a notch in these about halfway across but some diagrams there is no notch and also the diagram for the 16 Footers only say to Notch the ends. Can you please clarify?
You need the middle notch. I added another diagram to clarify that. Sorry for the confusion. Let me know if you need more assistance and I’m looking forward to seeing your project.
About to begin construction, but have one question. Why is each ridge beam piece 1 1/4″ longer than the top plates. It seems that they should be the same length because they will be covered by the 1 x 8 trim.
I have updated the project with a new pic. The top ridge beams are longer because the joint is half lap. For the plates, the beams are shorter because they meet at the half of the post. That explains the 2 3/4″ difference.
What is the cut length for the three ridge beam supports in order to provide the 12:6 pitch roof?
44″. I’ve added that to the cut list. Sorry for missing that info
OK. The project is complete and I have a nice roofed pavilion to help me enjoy the PNW outdoors year-round. During the process, I deviated from the plans, made mistakes, and learned a few things. I’d like to pass them onto the next guy. I’d also love to post pics, but don’t know how to do so, on this site.
1. I decided to use post bases rather than sink the posts into concrete footings. I am very happy with the result and won’t have to worry about them rotting any time soon. The structure is very stable. I used the post bases at this link and sank them into 12″ sonotubes: https://www.dhcsupplies.com/store/p/3725-CBSQ66-SDS2HDG-Hot-Dipped-Galvanized-Standoff-Column-Base.html
*Yes, I tend to over engineer.
2. I didn’t pay attention to the spacing of the footings and assumed that 16 ft one way meant 24 ft the other. This mistake resulted in some longer top plates, ridge beams, and a 28 ft long structure! No worries, I live in county land and the overall footprint is still under 400 sq ft!
3. While preparing to make the necessary notches, I realized my circular saw could not cut deep enough. **You WILL NEED at least an 8 1/4″ circular saw to make these notches (these ARE NOT available off-the-shelf of your local hardware or big box stores** My attempt to continue the project with various saw/sander/chisel combinations resulted in increased time, frustration, and inaccurate notches. So, I stepped up and bought a 10 1/4″ Makita that is also capable of cutting 4 x 4 lumber in a single pass for future projects.
4. The 15 lbs of circular saw helped me develop great muscle tone on my right arm while cutting necessary notches!
5. Although I don’t recommend it, my tractor, brute strength, and I were able to accomplish all buildings tasks, except: squaring/checking guidelines for footers, placing/squaring ridge beams on king posts, installing top ridge braces, and installing metal roof. I also developed Wallenda-like balance while walking around the top plates during assembly!
6. I was not a fan of cutting two bird’s mouths into 30+ rafters. I attempted various mathematical calculations, the scientific method, critical thinking, and ugly carpentry to no avail. I finally threw the wasted wood in the fire and just went with the tried and true method of developing a template that works/looks good enough. Once I had a template, it was on with the show. Yes, the bird’s mouths have excess gaps that I will have to live with for the rest of my life.
7. I went with a metal roof laid on 1 x 6 purlins. It proved easy/fast enough to install and came with an $800-ish price tag. Ensure your chalk line is true before laying your first panel. The top cap and drip trim only cover so much mistake!
8. In a weird attempt to avoid staining trim to match the treated lumber, I went with 2 x 8s on the eaves and 2 x 12s on the gables. Yes, I am crazy. This required two days of help from friends but resulted in trim that should outlast the structure. The gable trim joint is a geometrical marvel requiring a few trips up and down the ladders. I used my table saw to cut a bevel on the top of the eave trim pieces which allowed me to match the height of and use the trim as a final purlin for the metal roof. Of course, as soon the cuts were made, the wood began to twist. Luckily, I have strong friends who helped brute force the trim straight and true while I operated the hammer drill!
I hope some of my mistakes won’t be repeated by others. In the end my wife is happy with the structure and enjoyed weeks of sitting in the shade watching me struggle. It cost me approximately $3000.00 to build using treated lumber, new saw included. If I had chosen cedar, the lumber alone would have been approximately $4500.00. If I did it again, I would have run a quarter round router bit along the edges of the posts and post supports. Treated lumber has some rough edges and splinters.
Thanks to Ovidiu for the quick responses to my queries.
Steve this was great. I am preparing to build this structure in the summer. Was the roof change easier/faster and less expensive? I love the look of a metal roof. I am in Portland, OR and could really use a cover to better use my outdoor kitchen. appreciate your post and insight.
Is it possible to build this with the roof running in the opposite direction?
Yes, that is possible, but considering the width span, the roof will be much higher and you will most certainly need engineered trusses.
I recently took a cut sheet to a local mill and they are currently cutting out my pavilion. I went with all 8×8’s and 4×6’s for the rafters. My question is how did you make the “three way joint” in the middle of the pavilion? I’m talking about where the two 12’ ridge boards meet the middle 16’ cross timber at the “T” intersection. If you had a detailed close up picture of this joint that would be wonderful! Thanks in advance.
It’s a half lap joint, nothing special. The beams are 12 ft and 2 3/4″ long
I am interested in building this pavilion in the up coming weeks. are there direction as to the number of screws that are needed at each connection point?
2 to 4 screws
i love this simple design and sleek look. I have a Argentine bbq with chimney in the corner where i want to cover the patio. It rains quite a bit in Oregon and want to get more use of the patio. What is the best way to run the chimney through the roof? also, the size of the cover i need is 14′ 19′. Measurement is outside of post to outside of post. Can these plans be used and what needs to be adjusted?
I just started the 16×24 pavilion. I had to lay it out where you enter from the 24 ft side. How fare down does the roof line extend past the top, of the Top Plate? I’m trying to determine where to cut the posts. Thanks
I’m currently in the process of building the pavilion, making my cuts. I had a question about the top ridge. On the first page it shows the length at 145 1/4, however in the diagram showing the half lap it’s showing as 146 3/4. Thank you.
The diagram is correct. I’ve updated the cut list.
Hi – thank you for the plans for this 16×25 Pavilion. My question is .. what would be all the new dimensions if we wanted a 4:12 roof slope? (how much do I reduce the height of the center ridge beam posts and what does it do to the angles to cut into the rafters?)
I am just not familiar with roof slope measurements to figure that out? Any help would be greatly appreciated.
Anyone have a rough cost for supplies on this? Thanks
I am looking at building the 16×24 pavilion. The question I have is how long is the post that supports the ridge beam?
Dimensions in the cut list
Thank you for your designs and plans. We are interested in building the 16 x 24 pavilion. We are trying to get the structure permitted. Our county is in need of wind and weight testing. Are there any documents to help support this?
Thank you again for your time.
No, you need to work with a local engineer for that.
Hi, i’m looking at the 16×24 pavilion. I’d prefer using 8×8 posts and top plates. perhaps the center ridge beam too with 8×8. Is it easy enough to just substitute the 6×6’s with 8×8’s? Thank you!!
How do you actually print out the plans or purchase them ? I need the 16×24 pavilion
Anyone have flex in the cross beams? Seems like a lot to me. Anyway to secure it?
Is there any way to mount this to existing concrete without tearing it up ?
Second that Michael – can this be done with a lag bolt into post base?