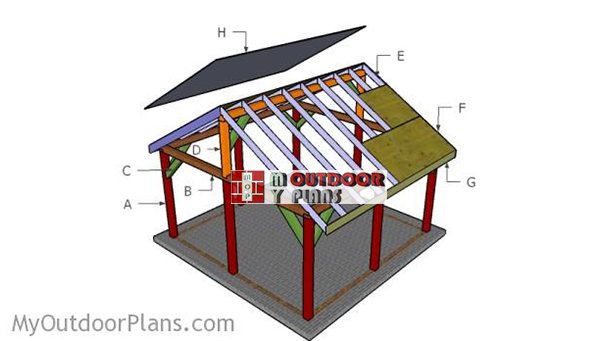
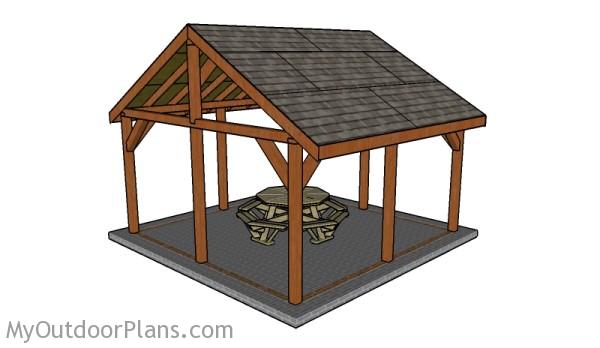
This step by step diy woodworking project is about a 16×16 outdoor pavilion plans. This article features detailed instructions for building an outdoor picnic shelter using 6×6 lumber for the structure and 2×6 beams for the rafters. Check out PART 2 of the project to learn how to frame the roof for the pavilion. Take a look over the rest of our woodworking plans, if you want to get more building inspiration.
When buying the lumber, you should select the planks with great care, making sure they are straight and without any visible flaws (cracks, knots, twists, decay). Investing in cedar or other weather resistant lumber is a good idea, as it will pay off on the long run. Use a spirit level to plumb and align the components, before inserting the galvanized screws, otherwise the project won’t have a symmetrical look. If you have all the materials and tools required for the project, you could get the job done in about a day. See all my Premium Plans HERE.
Projects made from these plans
16×16 Outdoor Pavilion Plans
Building-a-16×16-pavilion
Cut & Shopping Lists
- A – 8 pieces of 6×6 lumber – 96″ long POSTS
- B – 4 pieces of 6×6 lumber – 192″ long TOP RAILS
- C – 10 pieces of 6×6 lumber – 39 1/4″ long BRACES
- D – 2 pieces of 6×6 lumber – 51″ long, 1 piece – 192″ long TOP RIDGE
- 8 pieces of 6×6 lumber – 8′
- 8 pieces of 6×6 lumber – 16′
- concrete form tube
- 20 pieces of 8″ screws
- 20 pieces of 5″ screws
- 50 pieces of 3 1/2″ screws
- wood glue, stain/paint
- post anchors
- beam to post connectors
- structural screws for connectors
- strong tie T
Tools
![]() Hammer, Tape measure, Framing square, Level
Hammer, Tape measure, Framing square, Level
![]() Miter saw, Drill machinery, Screwdriver, Sander
Miter saw, Drill machinery, Screwdriver, Sander
Time
![]() One day
One day
Related
- PART 1: 16×16 Pavilion Plans
- PART 2: 16×16 Pavilion Roof Plans
Building a Backyard Pavilion Plans
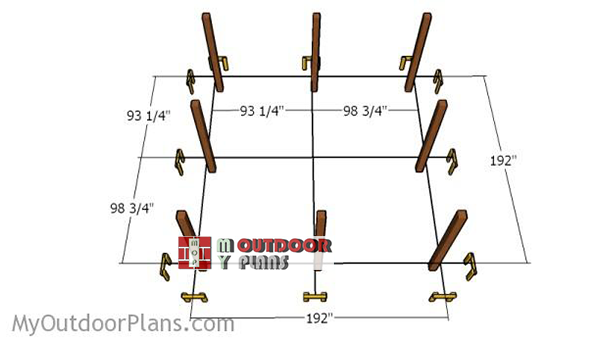
Laying-out-the-posts-for-the-pavilion
The first step of the project is to layout the posts for the pavilion. Use batter boards and string to lay out everything in a professional manner. Apply the 3-4-5 rule to every corner, to make sure they are right-angled. In addition, measure the diagonals and make adjustments until they are perfectly equal.

Anchoring the posts of the anchor
There are several ways to lock the posts into place. Therefore, you could dig 2′ holes in the ground and set the posts into concrete, or you could use post anchors. Use tube forms so that the footing will be really strong.
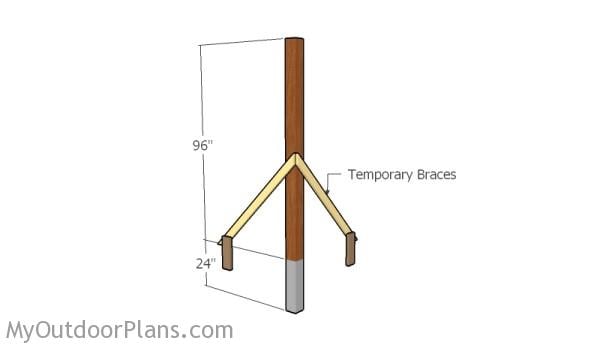
Fitting the posts
If you want to set the posts in concrete, then you need to use temporarily braces. Plumb the posts with a spirit level. Read the local building codes for finding the right depth of the footings. It is essential to set the footing at the right depth to avoid them being heaved by the Winter freeze/thaw cycle.
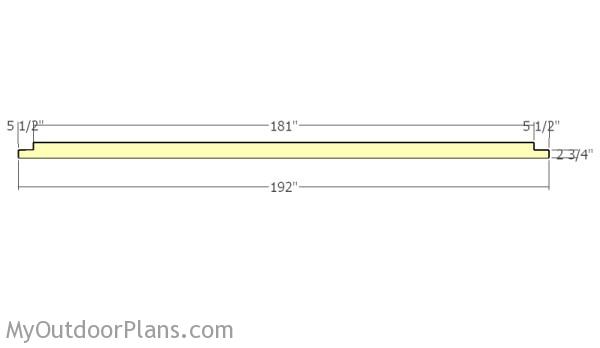
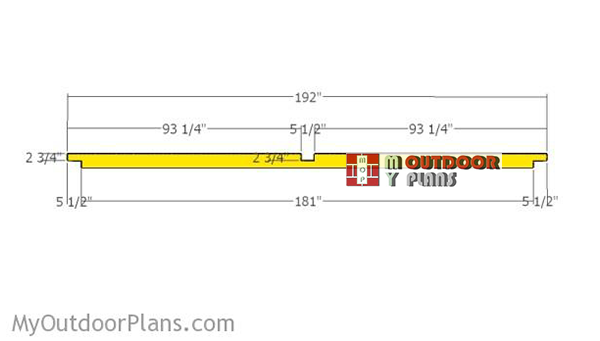
Side top rails
Build the side top rails from 6×6 lumber. As you can easily notice in the diagram, you need to make notches to the ends of the beams. Use a circular saw to make 2 3/4″ deep cuts to the marked area. Make parallel cuts to the marked areas and clean the notches with a chisel. Smooth the surface with sandpaper.
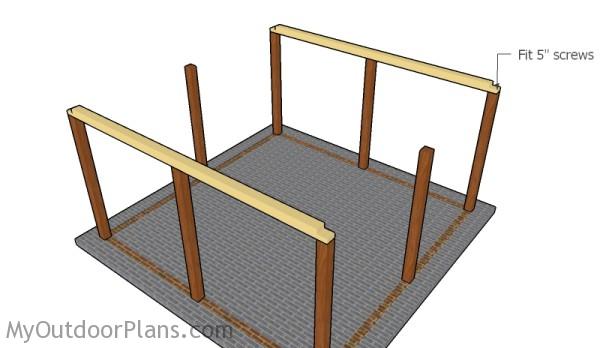
Fitting the side top rails
Fit the rails to the sides of the outdoor pavilion. Make sure the posts are plumb and check if the corners are square. Drill pilot holes and insert 5-6″ screws to lock the components into place.
Front-and-back-top-rails
Build the top rails for the front and back of the pavilion. Make notches to the 6×6 beams, as shown in the diagram. Clean the recesses with a chisel and smooth the surface with sandpaper.
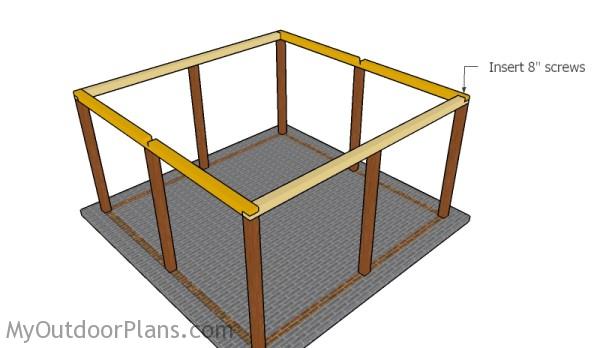
Fitting the front and back top rails
Fit the beams to the top of the pavilion. Drill pilot holes and insert 8″ screws so that you lock the rails to the posts.
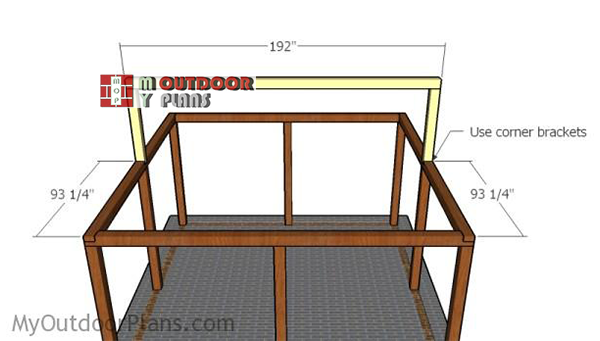
Fitting-the-ridge-beam
Next, you need to fit the vertical supports to the top rails, as shown in the plans. Use a spirit level to plumb the supports. In addition, use corner brackets to create strong joints. Afterwards, attach the top beam to the supports. Make sure the corners are square, before locking the top ridge into place with screws.
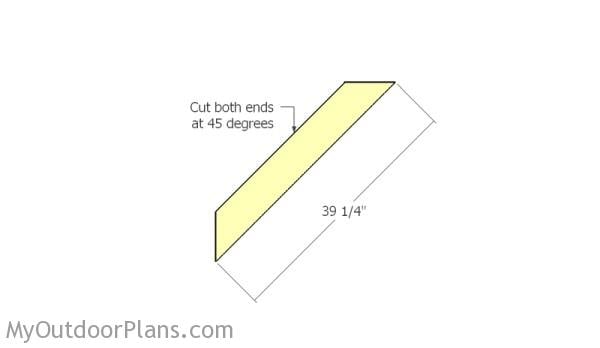
Building the braces
Build the braces from 6×6 lumber. Cut both ends of the braces at 45 degrees.
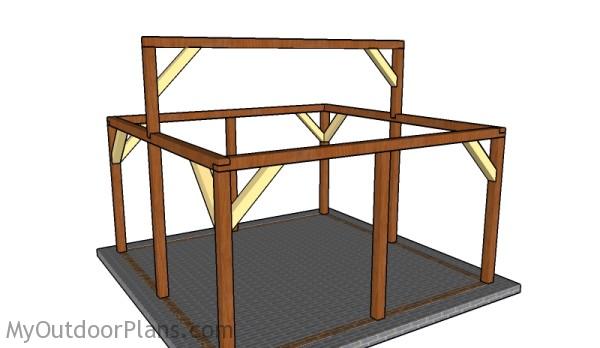
Fitting the braces
Make sure the corners are square and then set the braces to the structure, as shown in the diagram. Drill pilot holes and insert 3 1/2″ screws into the posts and top rails.
Building a picnic table
Fill the holes with wood putty and let them dry out for a few hours. Smooth the surface with 100-220 grit sandpaper and remove the residues with a damp cloth.
Top Tip: Apply a few coats of paint or stain to the components, to enhance the look of the project. Check out PART 2 of the project so you learn how to build the roof for the pavilion.
This woodworking project was about 16×16 outdoor pavilion plans free. If you want to see more outdoor plans, check out the rest of our step by step projects and follow the instructions to obtain a professional result.

30 comments
Love the look!
Link to part 2 is not here. Do you have 8 by 12 plans?
You need to press the NEXT button to see part 2. The smallest size is a 10×12: http://myoutdoorplans.com/pergola/picnic-shelter-plans/
What pitch is the roof?
The pitch is 6.9:12 and the slope is 30 degrees
What is the snow load. I want to build one in upstate New York. How hard would it be to expand this to a 16×24 pavilion?
I don’t know your local codes, so I cannot advice you in that direction. You can easily modify these plans to 16×24.
Is there a way to not have the post in the middle of the front and back?
No, they are needed for this project.
Is there a way to not have the center post in the front and back? Can the Beam be upsized?
They are compulsory for this design.
How did you miter the 6×6’s
Are you referring to the cuts for the diagonal braces?
That is correct. I’ve built the structure excluding these braces. Doing it by hand is difficult :).
Yes sir.
That is correct. The diagonal braces. does this also prevent it from wobbling? My structure seems to wobble without them (just haven’t gotten to that part).
You need to add them, they stiffen up the structure.
Hi, it is a great project and easy to follow, but there is something that I cannot understand. Why if the project requires 6×6 lumber and the side top rails end beams you cut at 2 3/4 deep cuts and then the front and back top tracks end measurements are 5 1/2 and 2 3/4. The sum of 2 3/4 +2 3/4= 5 1/2. I believe 1/2 is going to be extra. Also, the vertical supports to the top rails cuts won’t fit unless you cut 6″ instead 5 1/2 as shown in the plan. Please correct me if I’m wrong. I might have missed something!
v/r Radames
6×6 lumber is 5 1/2″x5 1/2″ Read this table:https://myoutdoorplans.com/imperial-to-metric-conversion/
Was curious about the roof for this project and the necessity for the front and back posts. Do i have to use the front and back posts Or can I implement the brackets and trusses like in your 16×24 backyard pavilion plans by adding a middle beam going across and eliminate the front and back posts?
thank you!
Yes, you can use the techniques shown in the 16×24 pavilion tutorial and remove the middle posts from front and back. But the problem is if you remove them from the sides, there are no middle posts so you can install the middle plate. So you need to have 3 posts on the sides regardless.
Thank you for 16×16 plans. my wife and i are taking on this project and we are first time DIY’S. under the material list it references beam to post connectors and strong tie T to be used during this project. the directions aren’t explicit as to when and where to use them but am i to assume that we will use post and beam connectors on every post and beam connection/ what about the strong tie T?
thanks in advance
The T tie is to connect the beam to the ridge beam supports. Make the joint more sturdy.
Thanks for the quick response. So will we use the notch (Timber Frame)method along with the post and beam (brackets and connectors) method?
Is there a way to eliminate the center post on the open end of this structure? I am building this structure over an existing bar area and I do not want the post in the center. Can I do anything to upgrade the structure at the front in order to eliminate the post? Thank you.
Take a look over this plan: https://myoutdoorplans.com/pergola/16×16-gable-pavilion-plans/
I ‘m using PT lumber for the posts. What type of lumber do you recommend for the rest of the project?
Pine, cedar, redwood
I bought your premium plans, and I’m interested in using rough cut lumber. I understand your plans are for nominal lumber. Aside from adjusting measurements to account for the size difference, can you give me any insight as to the roof rafters? I’ve always struggled with the angles of the cuts on these and I’m not sure how to ensure I’ll have the right measurements for both the ridge and the birds mouth cuts. Would the depth,angle and placement change on these specially if using rough cut? Thank you!
All my plans use actual size vs nominal dimensions. Therefore, if you use rough cut lumber, all dimensions in the plan will be changed