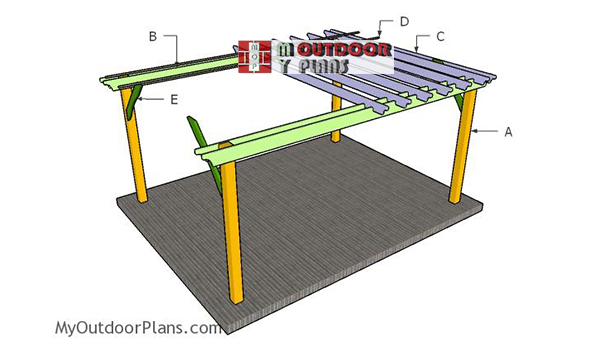
This step by step diy project is about 12×16 pergola plans. This outdoor pergola has a base of 12×16, while the roof is 14×18. I have designed this free plans for the free standing patio pergola, so you can create some shade in the backyard for a sofa or even a dining table with a few chairs. Take a look over the rest of my woodworking plans, if you want to get more building inspiration. Premium Plans for this project available in the Shop.
When buying the lumber, you should select the planks with great care, making sure they are straight and without any visible flaws (cracks, knots, twists, decay). Investing in cedar or other weather resistant lumber is a good idea, as it will pay off on the long run. Use a spirit level to plumb and align the components, before inserting the galvanized screws, otherwise the project won’t have a symmetrical look. If you have all the materials and tools required for the project, you could get the job done in about a day. See all my Premium Plans HERE.
Projects made from these plans
12×16 Pergola Plans
Building-a-12×16-pergola
Cut & Shopping Lists
- A – 4 pieces of 6×6 lumber – 8′ long POSTS
- B – 4 piece of 2×8 lumber – 18′ long SUPPORT BEAMS
- C – 13 pieces of 2×6 lumber – 14′ long SHADE ELEMENTS
- D – 6 pieces of 1×2 lumber – 18′ long SLATS
- E – 4 pieces of 2×6 lumber – 4′ long BRACES
- 4 pieces of 6×6 lumber – 8′
- 4 pieces of 2×8 lumber – 18′
- 13 pieces of 2×6 lumber – 14′
- 2 pieces of 2×6 lumber – 8′
- 6 pieces of 1×2 lumber – 18′
- 1 5/8″ screws, 4 1/2″ screws
- tube form
- 6×6 post anchor 4 pieces
- post to beam connector 8 pieces
- rafter ties
- 8 pieces of 7″ carriage bolt
- wood filler , wood glue, stain/paint
Tools
![]() Hammer, Tape measure, Framing square, Level
Hammer, Tape measure, Framing square, Level
![]() Miter saw, Drill machinery, Screwdriver, Sander
Miter saw, Drill machinery, Screwdriver, Sander
Time
![]() One day
One day
Related
How to build a 12×16 pergola
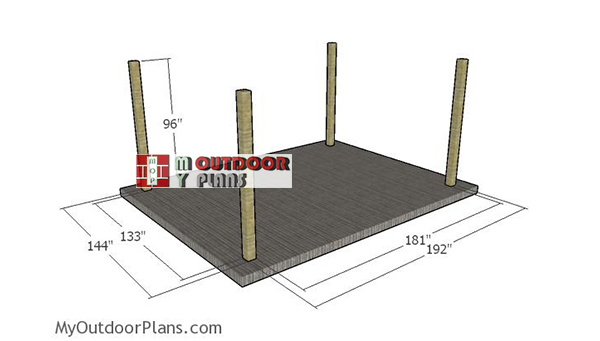
Laying-out-the-posts
The first step of the 12×16 pergola project is to layout the posts. Use batter boards and string to layout the location of the posts. Apply the 3-4-5 rule to every corner and then measure the diagonals to make sure they are perfectly equal. You need to make adjustments until you get the desired result.
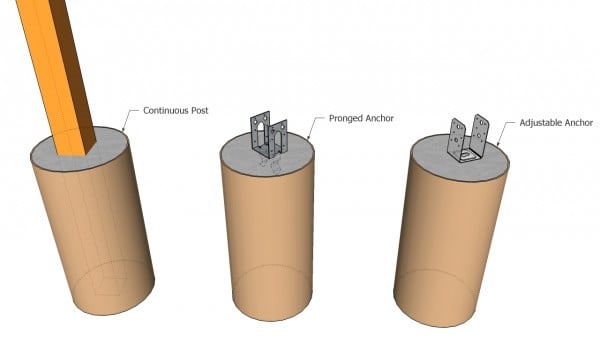
Anchoring the posts of the anchor
There are a few ways to secure the 6×6 posts into place. You can set the posts in concrete or you can use adjustable anchors and pour footings. Dig the holes 3′ deep (or under the front line) and about 12-13″ in diameter. Compact a layer of gravel to the bottom of the holes and then fit the tube forms. Fit the posts, align them and plumb them with a spirit level. Fill the forms with concrete, while the posts are locked into place with temporarily braces. If you use anchors, you need to align and set them into concrete. Fit the posts after the concrete dries, using lag screw.
Smart tip: Read the local building codes, so you dig the holes at the appropriate depth.

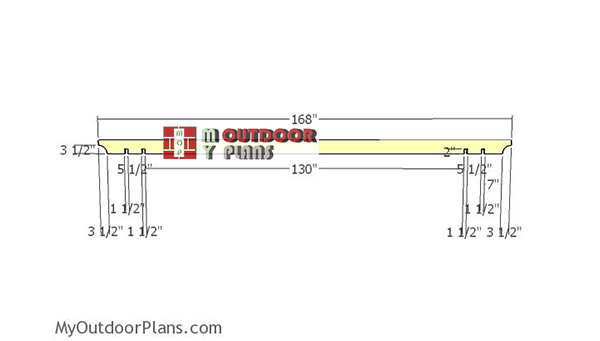
Building the support beams
Use 2×8 lumber for the support beams. Make decorative cuts to both ends of the beams. You can use a large circular item so you can draw the curved lines. Get the job done with a jigsaw and then smooth the edges for a neat result.
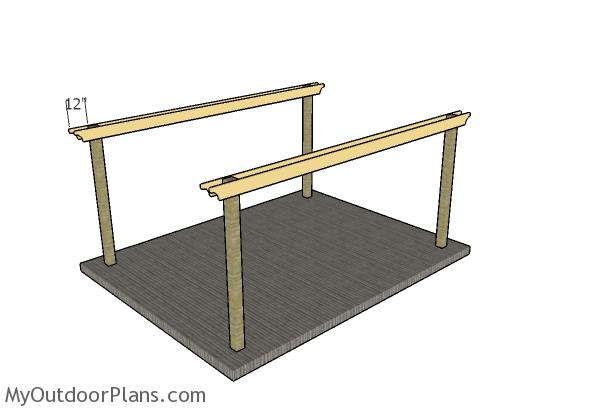
Fitting the supports beams
Fit the support beams to the top of the posts. Use a spirit level to plumb the support beams and then clamp the beams into place tightly. Drill pilot holes through the beams and through the posts. Insert the 9″ carriage bolts and then tighten the nuts.
Building-the-rafters
Use 2×6 lumber for the shade elements. Make the curved decorative cuts to both ends of the beams. Mark the cut lines and then get the job done with a saw. In addition, you need to make a few 2″ deep notches, so you can fit the shade elements to the support beams.
Mark the cut lines on the beams and then use a circular saw to make parallel cuts. Use a chisel to remove the excess and then smooth the recess with sandpaper. When cutting both ends of the rafters you can choose from more templates, so make sure you choose the design that suits your needs.
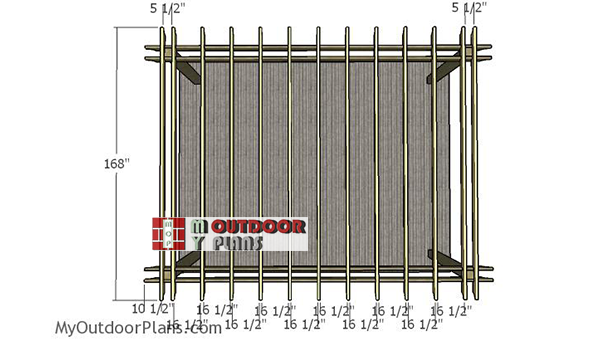
Fitting-the-shade-elements
Fit the shade elements to the support beams. Place the shade elements equally spaced and then lock them into place with rafter ties. Alternatively, you could drill pilot holes through the shade elements (above the notches) and insert 5 1/2″ screws so you can lock them into place tightly.
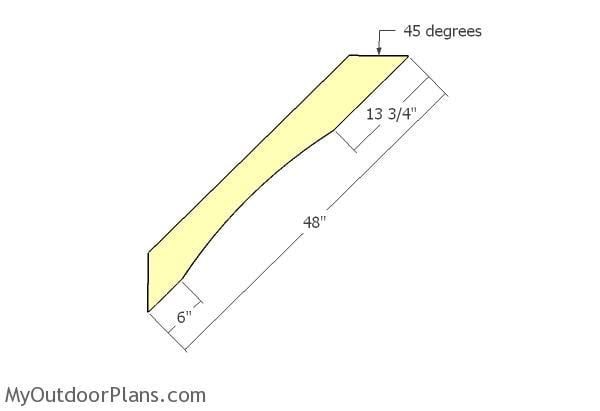
Braces
The diagonal braces are needed if you live in a windy area. Moreover, these braces have a decorative effect on the pergola, adding value to the project. Make 45 degree cuts to both ends of the braces. Moreover, use a jigsaw to make the curved cut to the braces and smooth the edges with 120-220 grit sandpaper.
Fitting the braces
Fit the braces to the sides of the pergola. Align the edges drill pilot holes and insert 4 1/2″ screws to lock the braces into place tightly.
Fitting the top slats
Fit the 1×2 slats to the top of the pergola. Place these slats equally spaced for a professional result. Center the slats to the rafters and then drill pilot holes, before inserting the 1 5/8″ screws.

12×16 Pergola Plans
Last but not least, you need to take care of the finishing touches. Therefore, fill the holes with wood putty and then smooth the surface with 120-220 grit sandpaper. You can also fit braces, if you live in a windy area. Apply a few coats of paint or stain over the components, to enhance the look of the pergola and to protect the components from decay.
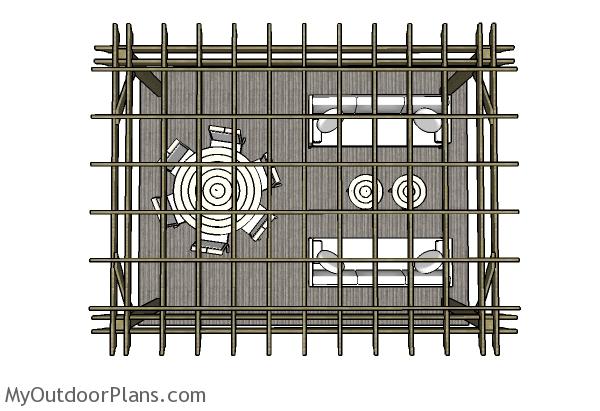
12×16 Pergola Plans – Top View
This pergola provides plenty of space for setting several chairs, an outdoor sofa and an outdoor table. You can even cover the pergola of you want to obtain even more shade, especially during the hot summer days.

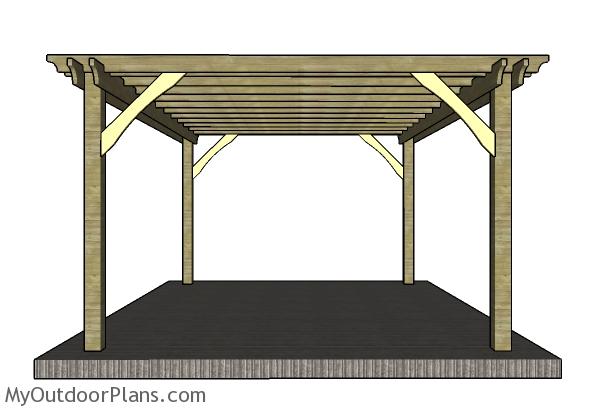
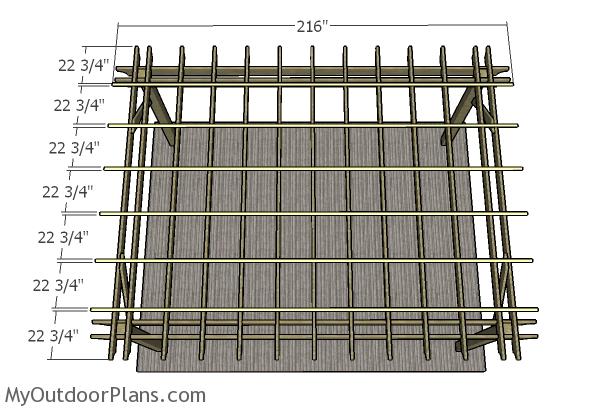
12×16 Pergola Plans. – Side view
This large pergola is a good compromise between costs and comfort, as it offers you plenty of space for fitting an outdoor sofa or a table with chairs. This rectangular pergola features an elegant design that would match any home. Check out the rest of my pergola plans, as I have many designed and sizes you can choose from. Premium Plans for this project available in the Shop.
If you want to get PREMIUM PLANS for this project (different design and re-engineered structure), in a PDF format, please press GET PDF PLANS button bellow. Thank you for the support.

This woodworking project was about 12×16 pergola plans free. If you want to see more outdoor plans, check out the rest of our step by step projects and follow the instructions to obtain a professional result.
23 comments
Is there anyway you could send me a pdf file that I can download and print for the 12 X 16 pergola? Thank you in advance.
If you read the FAQs, you can see how you can do that by yourself: http://myoutdoorplans.com/faq/
Hey! This may be a super stupid question but I cannot find 1″X2″X18′ pieces of wood (or longer to cut down) for the slats. I’ve looked on Home Depot and Lowes sites and googled it in general and found no results at all. Can you advise on a place to buy this size? Or do you cut them out of a bigger piece? Please let me know as this is the exact size I’m looking to build! Thanks for sharing!
If you can’t find then at 18′, then you can use two pieces of 10′ slats. Make sure the joint is on the middle of the rafter.
Can a 2×8 span 16 ft without a center support?
Yes. You can use 2x10s if you have concerns.
How would I adjust for a 12×16 patio slab?
I could make a guess, but I’d prefer to ask you!
I don’t understand the question, the footprint is 12×16. do you want a smaller pergola ?
what size anchors should I use ?
I wanna build a 12 x 12 pergola and what anchors would be ggod?
I have a link in the materials list for the recommended anchors.
In your list of materials you list a tube form, if I’m anchoring into a concrete patio I’m guessing I don’t need one. Correct?
You don’t need that. The tube forms are for pouring footings.
What type of wood should be used for this project?1. All pressure treated
2. A mix of pressure treated and Cedar (PT for the Posts and support beams, Cedar for the Shade and Slates)
3. All Cedar
If you could explain why you choose one over the other that would be great. THANK YOU so much for your time, posting this information to the web, and for giving your knowledge and experience.
I don’t recommend a mix because the pergola will look weird. You can go all with PT or Cedar. All cedar is best option in all aspects except for costs. If you have the money go for cedar or redwood. If it’s a budget build, use pressure treated.
Hi, I would like to build it on top of stone slab (interlocks). Should I pour foot in my case? Thanks!
You need proper footings.
What size of pergola could be built on a patio that does not have footings of any kind under it? Thank you.
No size.
I am thinking of building a pergola over a 16’ 3” by 12’ deck. I would like to keep the posts on the outside of the deck to keep the 16’ 3” X12 feet a clear area. Also would like to canterliver the 12 foot side approx 4 feet if possible can this be done?
Hi,
I have a 12×20 patio slab and I would like to make a 12×16 pergola. How would I attach the posts around the outer edges of the patio? Would I need to add more concrete forms around the outer edges of the patio for drilling the bolts?
Trying to buy plans for this pergola. Please help
Great write up! I have a quick question. When building this on as part of my deck, could I incorporate my handrails into the two sides that lead to the edge of the deck? I’m thinking of using this plan to make a lean to pergola that connects to my house. There are some anchor points currently in place since the previous owners had a canopy installed at some point.