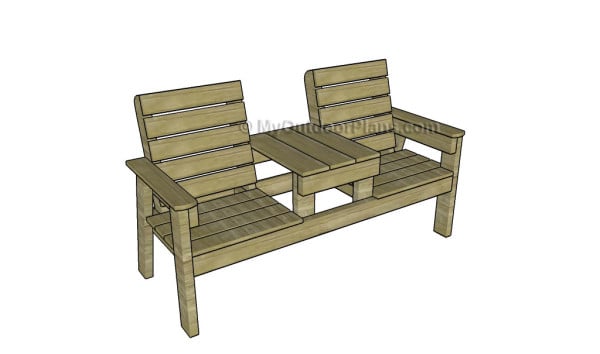
This step by step woodworking project is about double chair bench with table plans. This article features detailed instructions for building a nice double chair with table. The best part of this project is that you can build the wooden bench with table in less than a weekend. The total cost of the materials should be less than 30 dollars. We have designed the plans to keep the expenditures under control and to involve the least amount of work possible. It is an ideal project for a deck or a backyard patio. Premium Plans for this project available in the Shop.
When buying the lumber, you should select the planks with great care, making sure they are straight and without any visible flaws (cracks, knots, twists, decay). Investing in cedar or other weather resistant lumber is a good idea, as it will pay off on the long run. Use a spirit level to plumb and align the components, before inserting the galvanized screws, otherwise the bench won’t have a symmetrical look. If you have all the materials and tools required for the project, you could get the job done in about a day. See all my Premium Plans HERE.
Projects made from these plans
It’s that simple to build your own chair with table bench!
Double Chair Bench with Table Plans

Building a double chiar with table
Cut + Shopping List
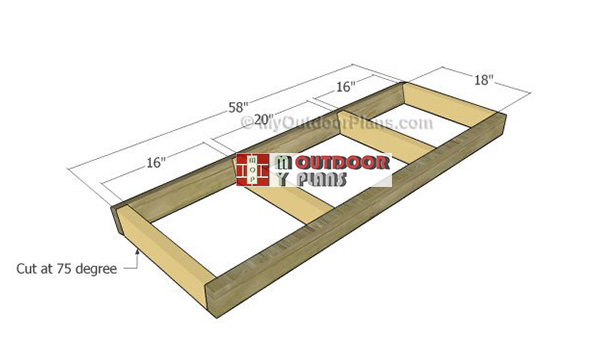
- A – 2 pieces of 2×4 lumber – 58″ long, 4 pieces – 18″ long FRAME
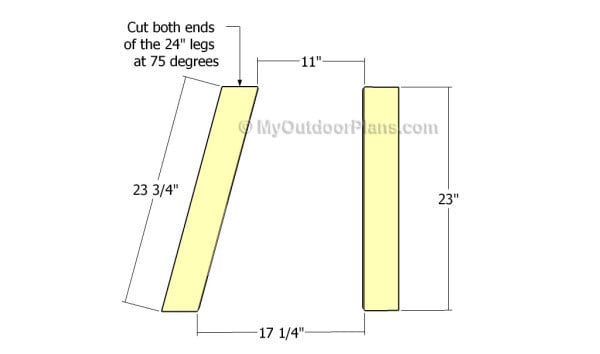
- B – 2 pieces of 2×4 lumber – 23″ long, 2 pieces – 24 3/4″ long LEGS
- C – 2 pieces of 2×4 lumber – 21 3/4″ long SUPPORTS
- D – 4 pieces of 2×4 lumber – 24″ long BACKREST SUPPORTS
- E – 2 pieces of 1×4 lumber – 22 1/4″ long ARMRESTS
- F – 3 pieces of 1×4 lumber – 22″ long, 1 piece – 20 1/2″ long 2xSEAT
- G – 5 pieces of 1×4 lumber – 19″ long 2xBACKREST
- H – 2 pieces of 2×4 lumber – 12″ long, 2 pieces – 17″ long, 3 pieces of 1×6 lumber – 21 3/4″ long TABLE
- 6 pieces of 2×4 lumber – 8′
- 5 pieces of 1×4 lumber – 8′
- 1 piece of 1×6 lumber – 8′
- 100 pieces of 1 1/4″ screws
- 100 pieces of 2 1/2″ screws
- glue, stain
Tools
![]() Hammer, Tape measure, Framing square, Level
Hammer, Tape measure, Framing square, Level
![]() Miter saw, Drill machinery, Screwdriver, Sander
Miter saw, Drill machinery, Screwdriver, Sander
![]() Safety Gloves, Safety Glasses
Safety Gloves, Safety Glasses
Time
![]() One day
One day
Related
Step 1: How to build the frame for the double chair bench
Building-the-seat-frame
The first step of the project is to build the seat frame for the double chair bench. Use 2×4 lumber for the components, making sure you cut them at the right dimensions. Additionally, cut one end of the short components at 75 degrees. This means you have to set the miter saw to 15 degrees.
Drill pocket holes at both ends of the short components and secure them to the long components using 2 1/2″ screws. Add glue to the joints and make sure the corners are square. Also, leave no gaps between the components.
Step 2: Building the side frames for the double chair bench
Building the legs
Next, you need to build the legs for the double chair bench with table. Cut both ends of the back leg at 75 degrees. This means you need to set the miter saw at 15 degrees. Smooth the edges with sandpaper.
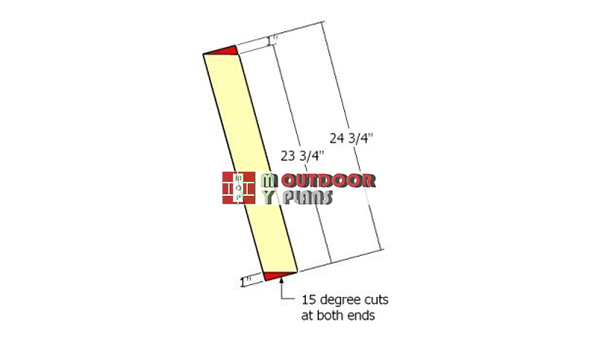
Back-legs-plans
You can see in the diagram more information about cutting the back legs. As I have already said, cut both ends at 75 degree, which means you need to make 15 degree cuts. Use the information from the diagram to build the back legs properly. The easiest way to get accurate angle cuts is to use a miter saw. Smooth the cut edges with sandpaper.
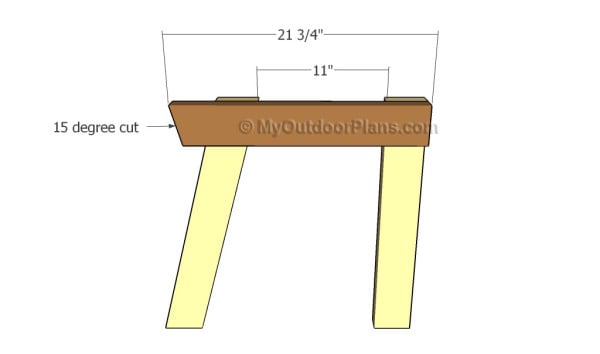
Attaching the armrest support
Continue the project by attaching the top support to the side legs. Cut one end of the 2×4 support at 75 degrees. Attach the support to the top of the legs, making sure the edges are perfectly aligned. Drill pilot holes and secure the support to the legs using 2 1/2″ screws. Pre-drilling prevents the wood from splitting.
Similarly, use a carpentry square to make sure the corners are 90 degrees. In addition, you an set the legs against a straight line, so you make sure they are aligned properly, before attaching the horizontal supports.
Step 3: Assembling the bench with table

Attaching the sides
After assembling the sides of the bench, you need to attach it to the seat frame, as shown in the diagram. Make sure the corners are square. Plumb the sides with a spirit level and check if the seat is perfectly horizontal. Insert 2 1/2″ screws through the frame into the legs.
Step 4: Attaching the backrest

Building the backrest supports
Build the backrest supports out of 2×4 lumber. Round the top corner of the supports using a jigsaw. Smooth the edges with sandpaper and remove the residues with a damp cloth.
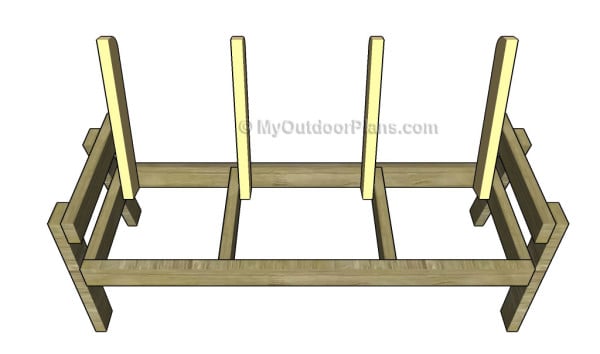
Attaching the backrest supports
In addition, attach the supports to the seat frame, as shown in the diagram. Drill pilot holes through the supports and insert 2 1/2″ screws into the seat frame. Leave no gaps between the components.
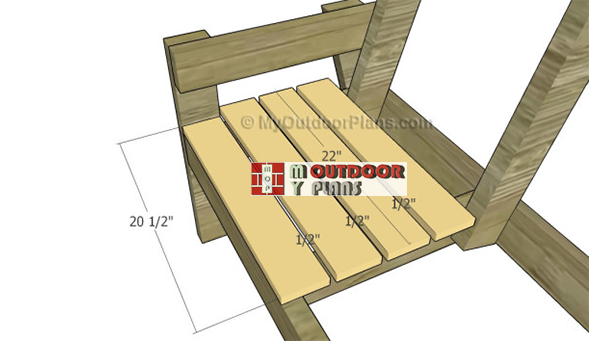
Slats-for-the-bench-seat
Build the seat slats out of 1×4 lumber. Cut the components at the right dimensions and secure them to the frame using 1 1/4″ screws. Place the seat slats equally-spaced, if you want to get a professional result. Place a piece of 1/2″ plywood between the slats to get consistent gaps.
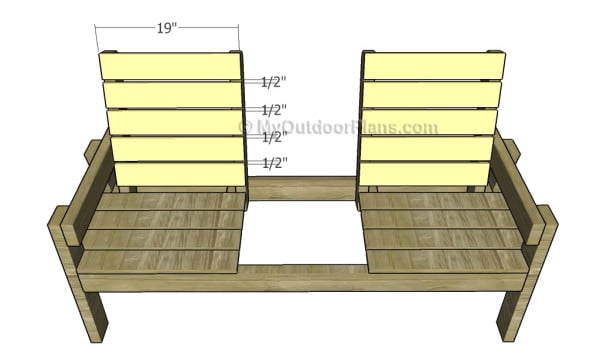
Fitting the backrest slats
Next, attach the 1×4 slats to the backrests of the chairs. Place the slats equally-spaced and lock them to the supports using 1 1/4″ screws. Smooth the edges with sandpaper. Align the edges before inserting the screws.
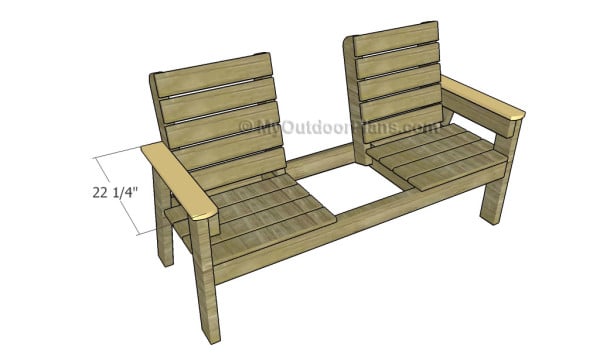
Attaching the armrests
Continue the project by building the armrests out of 1×4 lumber. Round one end of the components and smooth the edges with 120 grit sandpaper. Use 1 1/4″ screws to secure the armrests into place. Fill the holes with wood putty.
Step 5: Building the table for the bench
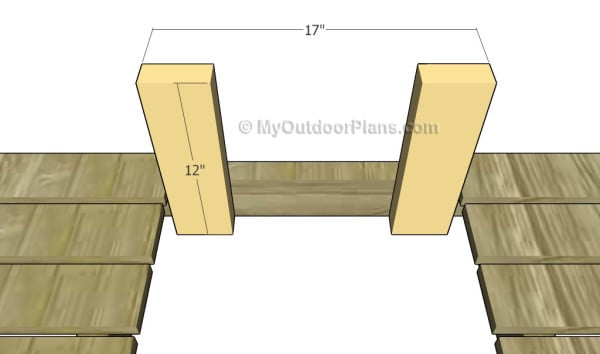
Table supports
One of the last steps of the woodworking project is to create the table for the bench. Start by attaching the 2×4 supports to the front face of the bench frame. Use 2 1/2″ screws to secure the supports to the frame
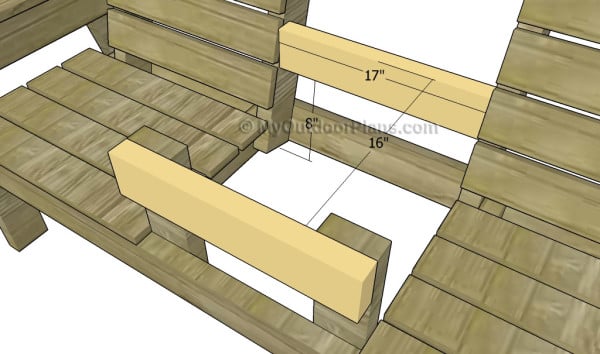
Fitting the tabletop supports
Next, fit the horizontal supports to the structure, as described in the diagram. Drill pocket holes at both ends of the support placed between the backrests. Use 2 1/2″ screws to lock them into place tightly.
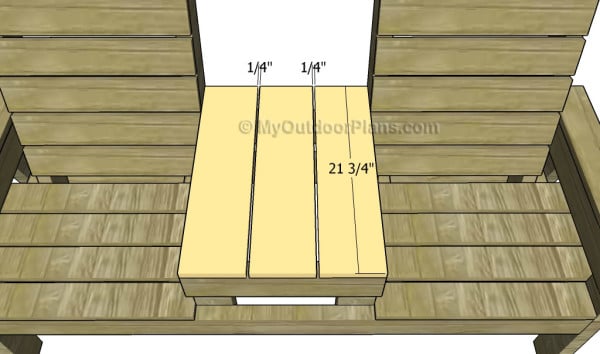
Attaching the tabletop
Also, fit the 1×6 slats to the supports to create the tabletop. Leave 1/4″ between the slats and secure them to the frame using 1 1/4″ screws. Smooth the exposed edges with sandpaper.
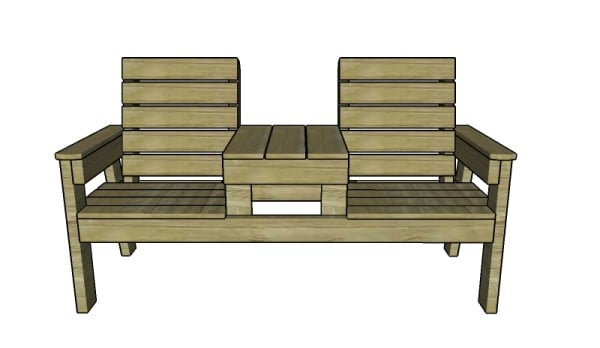
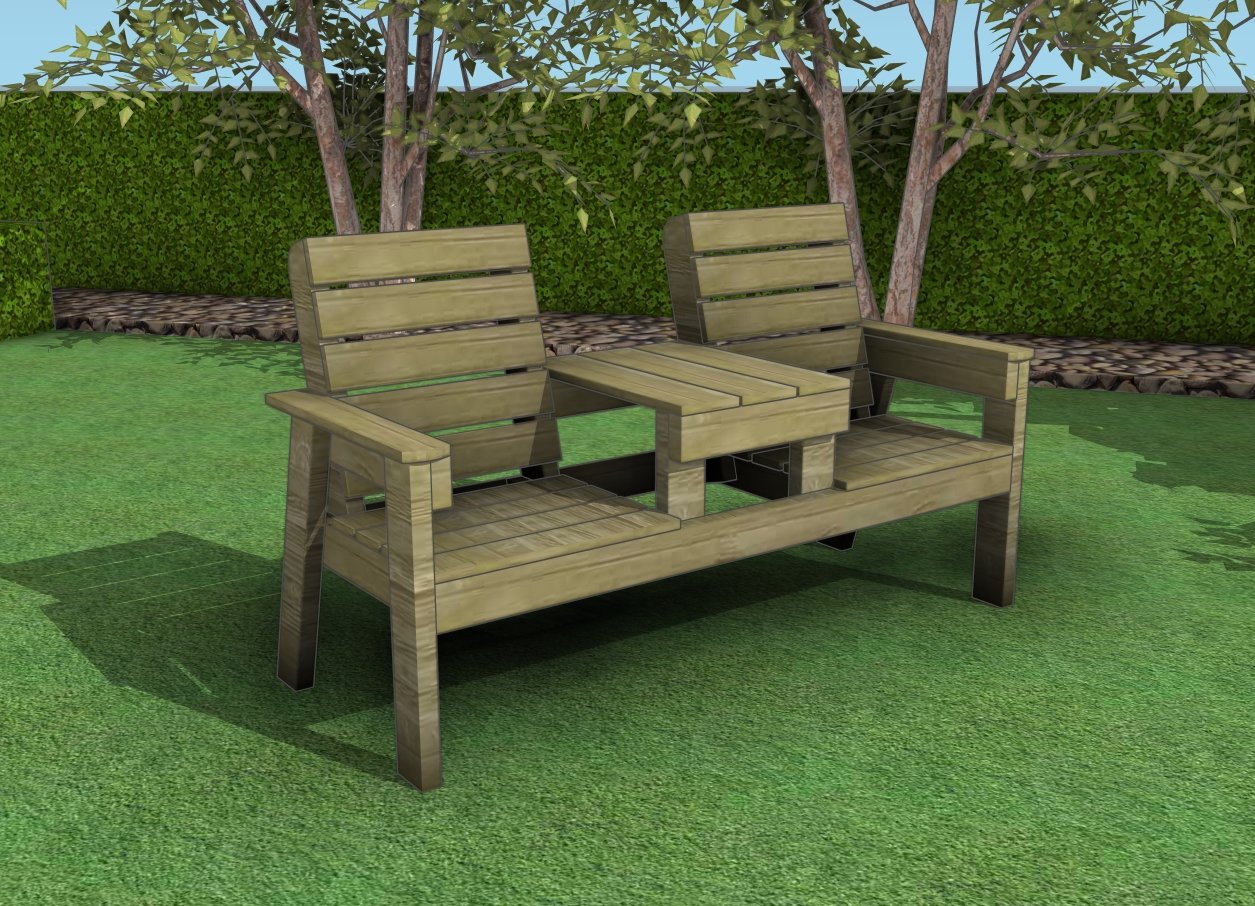
Double chair bench with table plans
If you are looking for outdoor furniture plans or you are just trying to learn how to build an outdoor bench, this the perfect starting point to your woodworking journey. This double bench project is the right choice if like to relax on the front porch, or reading a good book next to the loved ones. The small table makes it easy to drink your coffee or a cold lemonade in the hot summer days, while breathing fresh air and watching the singing birds.
In addition, if you liked this patio furniture plan, then you would also love the corresponding chair. In this manner, you can create a relaxation area where you can hang out with your friends and family. These would also be perfect around a fire pit or under a pergola.
Double chair bench with table plans
One of the last steps of the woodworking project is to take care of the finishing touches. Therefore, fill the pilot holes with wood putty and smooth the surface with 120-grit sandpaper.

How-to-build-a-double-chair-bench
You can see a full tutorial on how I built the double chair bench for my backyard HERE.

Double chair bench with table – dimensions
Double chair bench – Free DIY Plans
Top Tip: If you want to enhance the look of the project and to protect the wooden bench from decay, we recommend you to cover the components with paint or stain. You can get the premium plans for this project by clicking the GET PREMIUM PLANS bellow. If you want the free plans, just read the blog FAQs.

This woodworking project was about double chair bench with table plans. If you want to see more outdoor plans, we recommend you to check out the rest of our step by step projects. LIKE us on Facebook and Google + to be the first that gets out latest projects and to hep us keep adding free woodworking plans for you.
78 comments
Paper plans call for 75 deg cut and no 2×6. Video calls for all 15 deg cuts and one 2×6. Whats up? We are getting started.
The video doesn’t call for anything, as there are no references to dimensions. Just follow these plans and read the instructions more attentively; you don’t need 2x6s for this project. I’m here if you have other questions.
It does state 2X6 second paragraph down in instructions and says all cuts 15°, I’m reading that pretty clear. I haven’t read all the instructions, Bob got my curiosity up with the 2X6 question, Bob’s right.
You will need a mitre saw, cordless drill, jigsaw and an orbital sander
All your cuts will be made on the mitre saw cutting all angles at 15 deg.
Jigsaw to cut out the notch on the two front legs. The 2×6 piece will eventually rest in the notch. Measure 9 1/2 inches up from the bottom of the 2×4 front leg and mark. Measure 1 1/2″ back (depth). Then measure from your nine-inch mark up 5 1/2″ and make one more mark. Connect the lines and cut out your notch on both pieces.
I think you are confusing the plans. What notch are you talking about? What 2x6s? There is no notch in my plans and no 2x6s required This is MyOutdoorPlans.com
I would like double chair bench with table plan. And your table plan. Thanks
You can print the plans by clicking the green printer widget, either on the left of the screen or after the projects.
I remember a guy used this plan and put a built in cooler between the seats. He had a picture of it in the comment section, but I can’t find it anymore.Do you recall this? He had told his measurements. Thanks.
It wasn’t here. You can’t post images to comments on my site.
I found an Ozark Trail 30 Quart Hard Side cooler on Walmart’s website that I think would fit sideways. Than just attach the table top to the lid and add a drain valve.
HI Julian, I am so excited about building this. I have never built anything on my own but I told my husband that I am going to do this! Thank you for posting the plans, I look forward to building it.
You’re welcome, Sue! I’m sure you are going to do an amazing job with the project, even if it’s your first project. I’ve got you covered with the plans. Looking forward to seeing your bench after it’s done, so don’t forget to share a few images and thoughts about the project!
I am confused. Whey we are building the legs the back leg you cut at a 75 degree angle on both sides. Then the next step you cut it at a 15 degree angle. Why are we cutting the same board twice?
You don’t have to cut them twice. You just have to cut them AT 75 degrees, which is actually a 15 degree cut; the faces of the same coin. I made the second diagram just to make cutting easier, by providing more information. So to sum it up, if you already made the 75 degree cuts to both ends and if they are 23 3/4″ long, you on the right track. Feel free to ask if you have more questions.
I am going to build this but I think I wil use 5/4 deck boards instead of the 1X4 and 1X6. Is there any reason why I wouldn’t? I guess I would use 1 1/2 wood screws instead of 1 1/4 to attach the boards as well.
Thanks
It will work but I recommend you to use at least 2″ screws for the 5/4 decking boards.
Why do you say cut at 75 degrees? Then the next thing you say is cut at 15 degrees? I’m assuming I don’t understand. I already cut the seat at 75 degrees? Because you said cut the seat at 75 degrees.
One more question, when you say “Attach handles to the lid, to ease the opening process.” What lid are you talking about.
Sorry for that. It was my standard ending phrase taken from other project.
Cheers for the plans. Easy to follow missus very happy. ??
You’re welcome. It would be great if you share a few pics with the project. I love seeing DIY projects!
Can I just say that the measurements are wrong, the right angle pieces of the frame are 18 inches, minus 4 inch for back support, plus 2 inches for the front piece comes up to 16 inches. Impossible to fit 4 pieces of 4×1 with a gap of 1/2 inch into 16 inches. Nobody seemed to have commented on it. I only realised that after I tried fitting the pieces onto the frame and failed.
The plans are flawless. There are no errors in the measurements or in the angles. 2×4 lumber is actually 1 1/2″ x 3 1/2″ and the 1x4s are 3/4″ x 3 1/2″ Please make sure you understand the whole picture before making false statements. Good luck!
I actually worked ahead a little and when i stopped to go back and compare measurements with your plans they were exact. Thank you
I went to huw greys, which is a timber merchant for the builders in uk. The 1×4 are actually nearly 1x4s and the 1x6s are also 1×6 s minus less than 1/8 of an inch (22mm x150mm). The 4×2 s are 47mmx 100mm. There is no point naming them 1×4 and 1×6 unless they actually are. I have hit problems at every turn due to the measurements. I am not a professional builder but rather I build wooden structures as a hobby. I usually draw my own plans or modify others but the first time, I have followed the exact plans has turned into a great hassle. Huge disappointment. I hold 4 graduate degrees and if I struggle, then I cannot believe that I am the only one to expect exact measurements and the only one to struggle either.
I would urge that the fact that the 1×4 and 1×6 are not exact measurements be stated upfront.
Everything is stated upfront on this site: http://myoutdoorplans.com/imperial-to-metric-conversion/ I am sorry for your problem, but this is the american system and if you had to make the conversion to the metric system, you should have checked the table or ask for help.
4×2 and 1×6 etc are the names of the standard timber sizes when rough sawn, when the timber is dressed (or gauged) to create smooth clean timber, there is always a loss to the original size hence 47mm x 90mm etc.
Maybe Julian could have stated this was built with dressed timber in the article?
I went to download the plans but my antivirus software blocked your site.
Maybe you should try and print them directly, without downloading them.
I am struggling with the pocket holes. When I put pocket holes in the short components on one of the first steps, to make the frames, they are coming out when I screw then into the 58″ components. I am not a pro at pocket holes and I have tried to look up videos but I am coming up short. Any advice?
First of all you need to use 2x4s. Next, you need to set the pocket jig for the 1 1/2″ thickness. Then you should insert 2 1/2″ screws. If you follow these simple guidelines, the screws should create strong joints.
Screw your pocket holes backwards. Instead of doing them on the inside do them on the outside. You will need pocket hole plugs but it keeps the screw from going through the wood.
Julian in response to the first step with the pocket jigs and the short components…how many on each end…and where are we to put the pocket jigs with the 75 degree cut?….in your directions you just advise to put pocket jigs on both ends
Two pocket holes on each end. You place the pocket jig along the edge, making sure you center it.
What is the weight capacity of this bench??
I don’t know. If you are looking for a sturdier version, I have plans for that too: http://myoutdoorplans.com/furniture/large-double-chair-bench-plans/
Hi Julian, Thank you very much for this fantastic plan. You are a very patient person, if you know what I mean.
If not using pocket holes, what size screw would you recommend? 3″ and 2″?
You can use 3″ screws instead of the pocket screws, when joining the 2x4s for the frame.
legs…23 3/4 or 24 2/4 ….. ????
After you angle cut both ends the legs will have 23 3/4″.
Could I please have a set of the plans with cooler?
There are no plans for the bench with cooler. That was a modification a reader made based on my plans. You can print any plan on the site. See how at: http://myoutdoorplans.com/faq/
I would like the plans for the jack and jill double bench with table built on an angle?
I am sure you can customize the plans to suit your needs.
Thanks I’m building it now…I’m putting on the back supports and I sat in it…I feel its a little small like your sitting upright super proper…next one I’m gonna make it much bigger…thanks
I have a larger version of the plans here: http://myoutdoorplans.com/furniture/large-double-chair-bench-plans/
How do you figure out what angle to use for the legs I would like to make my grandchildren a smaller version of this. Thank you.
If you scale this down, the angles should remain the same.
many thanks for these plans, I have bought/sawn/sanded/painted the wood…. will try and get some pics up in the following days….. Had to adapt some measurements as 4×2 CLS in the UK is actually 3.5×1.4 😉
That sounds awesome. Looking forward to seeing how it comes out!
I am sorry but I can not save or download the plan I want ?????????
Please read the FAQs: http://myoutdoorplans.com/faq/
When attaching the side supports to the legs, how many screws are to be used; 2 or 4. Does this apply to all the other attachments. I don’t believe the plans tell you how many screws to use and the placement of the screws. Should the screws be visible or placed from the inside? Thanks
2 screws for each joint. It is up to you to choose if you want to leave the screws exposed, but in general I would try to hide them.
Hello. It is possible to accept it with measurements in centimeters and not in inches
Unfortunately I dont have a metric version. You should check out this for reference: http://myoutdoorplans.com/imperial-to-metric-conversion/
Great site
Thank you.
Why do I have to download your pdf converter/viewer? I already have Adobe DC Professional. How can I download without adding yet another application/add-on to my computer?
Thanks,
Don Engel
You don’t have to install anything. Just read the FAQs: https://myoutdoorplans.com/faq/
Perfect site for beginnner DIY
Do you have plans for a double chair bench slider?
No
hi
thanks for your plan which i am commencing to build
Just going through the plan the seat frame dimensions are not quite right i think.
the rail is 58″ long and you have specified that the bays are 16″ 20″ and 16″ which adds up to 52″. if you add 4 thicknesses of 2″ for the cross rails this makes 60″?
My thinking is the two bays of 16″ should be 15″ which would then add up?
This however might affect dimensions of other pieces like seat lumber for example?
Plans are accurate, but you are confused regarding lumber actual dimensions. 2x4s, 2x6s, and so on are 1 1/2″ thick. See this table: https://myoutdoorplans.com/imperial-to-metric-conversion/
Wood furniture truly are beautiful but it takes a lot of caring to keep its beauty. Thanks for the post.
… I’m a new subscriber but can’t print off plans. My ad blocker is off but there is no bar on the left side as stated in the FAQ section. how do I print? i am trying to do a simple print of plans for the double seat bench. Can you help?
You have a big button START HERE in the menu
I have made my overall frame out of 3×2 timber and 3×1 slats.. Should still be ok for weight you think?
Love your plans mate
It should work.
Thanks! Fantastic plans just finished it looks great!
Do you have plans for a single chair to match this bench
Yes. Here: https://myoutdoorplans.com/furniture/how-to-build-a-garden-chair/
Thanks for the plans. I’m probably missing it but where does it outline the 1/6 cuts?
See H in cut list
I knew I missed it. Thank you
i want to use 5/4 x6 for seat and back how do i change the size cant find 1×4 treated wood
I built 2 benches with this set of plans in 2017 from standard construction/framing materials. I’ve stained them twice and they’ve remained outside in all types of weather. This year is the first I’ll have to complete any type of repairs, I have a few seat slats and all of the table slats need to be replaced……but, these have outlasted any and all of the other store bought furniture we’ve purchased, including high end products.
After making the repairs, and re-staining a 2nd time, I fully expect these benches to last another 6+ years.