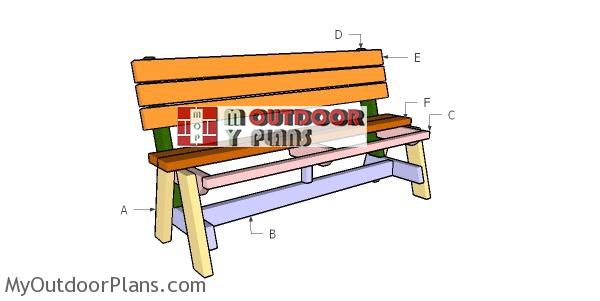
This step by step diy project is about 5 ft bench with back plans. I have designed this bench with backrest so you can enjoy quality time in the garden. This bench has a sturdy frame and it is very easy to build. Make sure you invest in weather resistant lumber, such as cedar or redwood, for a professional result and durability. Take a look over the rest of my woodworking plans, if you want to get more building inspiration.
When buying the lumber, you should select the planks with great care, making sure they are straight and without any visible flaws (cracks, knots, twists, decay). Investing in cedar or other weather resistant lumber is a good idea, as it will pay off on the long run. Use a spirit level to plumb and align the components, before inserting the galvanized screws, otherwise the project won’t have a symmetrical look. If you have all the materials and tools required for the project, you could get the job done in about a day. See all my Premium Plans HERE.
Projects made from these plans
5 ft Bench with Back Plans
Building-a-5-ft-bench
Cut & Shopping Lists
- A – 4 pieces of 2×4 lumber – 17″ long LEGS
- B – 2 pieces of 2×4 lumber – 17 1/4″ long, 1 piece – 51″ long SUPPORT
- C – 2 pieces of 2×4 lumber – 13 1/4″ long, 1 piece of 2×2 lumber – 54″ long, 1 piece – 4 3/4″ long SEAT FRAME
- D – 2 pieces of 2×4 lumber – 26 3/4″ long BACKREST SUPPORTS
- E – 3 pieces of 2×4 lumber – 60″ long BACKREST
- F – 4 pieces of 2×4 lumber – 60″ long BACKREST
- 6 pieces of 2×4 lumber – 10′
- 1 piece of 2×2 lumber – 6′
- 2 1/2″ screws
- wood filler , wood glue, stain/paint
Tools
![]() Kreg Jig
Kreg Jig
![]() Hammer, Tape measure, Framing square, Level
Hammer, Tape measure, Framing square, Level
![]() Miter saw, Drill machinery, Screwdriver, Sander
Miter saw, Drill machinery, Screwdriver, Sander
Time
![]() One day
One day
Related
It’s that simple to make a garden bench – Video!
How to build a 5 ft bench with back
Building-the-braces-for-bench
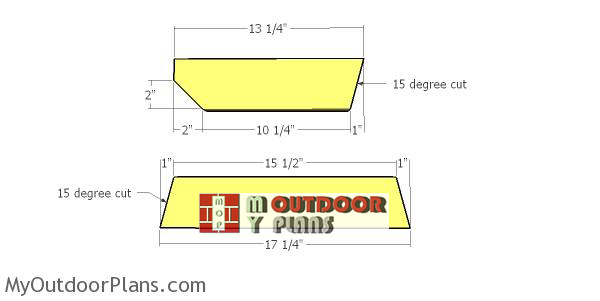
The first step of the project is to build the braces for the garden bench. Use a saw to make angle cuts to both ends of the supports, as shown in the diagram. Smooth the edges with attention.
Building the legs
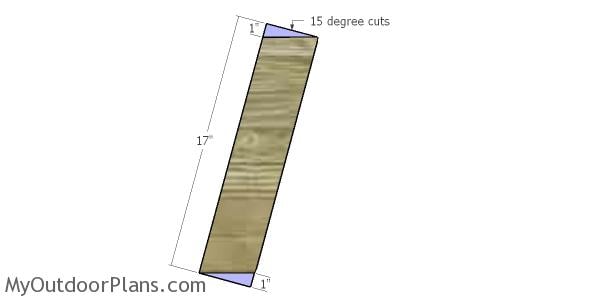
Use 2×4 lumber for the legs. Make 15 degree cuts at both ends of the legs, as shown in the plans.
Assembling-the-sides
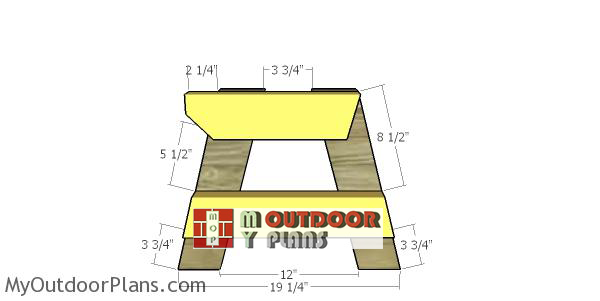
Next, lay the legs on a level surface and against a straight edge. Fit the braces to the legs and align the edges with attention. Drill pilot holes and insert 2 1/2″ screws to secure the braces to the legs.

Fitting the backrest supports
Use 2×4 lumber for the backrest supports. Use a jigsaw to round the top of the supports. Fit the supports to the sides of the bench, drill pilot holes and insert 2 1/2″ screws.
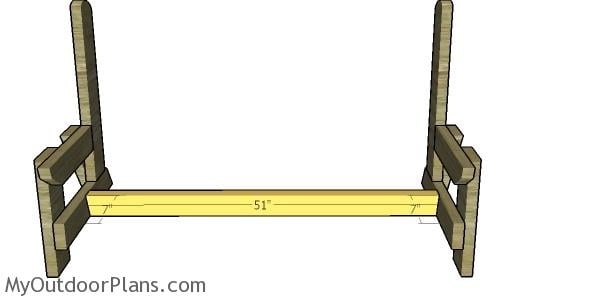
Fitting the stretcher
Fit the 2×4 stretcher to the bottom of the bench. Drill pilot holes through the braces and insert 2 1/2″ screws into the stretcher. Make sure the corners are square and plumb the sides with a spirit level.
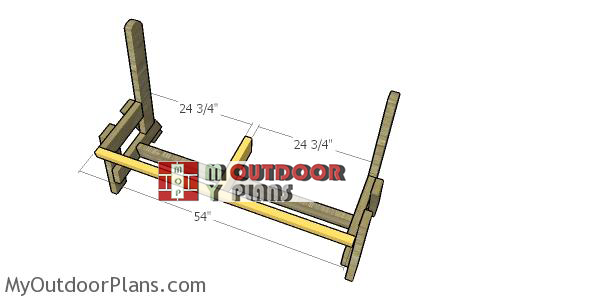
Assembling-the-seat-frame
Next, build the bench frame, as shown in the diagram. Drill pilot holes and insert 2 1/2″ screws to lock everything together tightly.
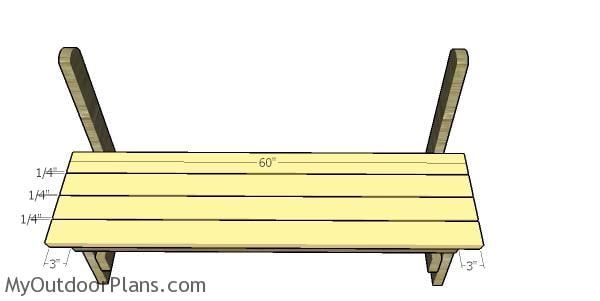
Fitting the bench seat slats
Lay the 2×4 slats to the frame of the bench to build the seat. Center the slats leaving 3″ overhang on both sides. Fit a piece of 1/4″ plywood to create even gaps. Frill pilot holes and insert 2 1/2″ screws to secure the slats to the frame.
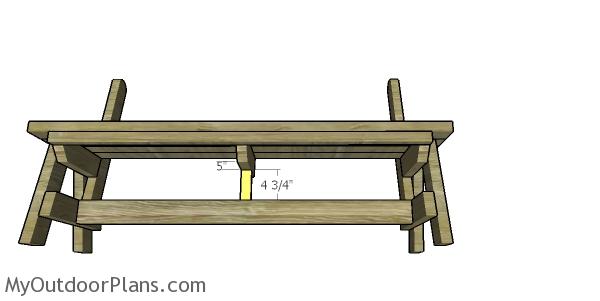
Middle support
Fit a 2×2 support under the seat. Drill pocket holes and insert 2 1/2″ screws
Fitting the backrest slats
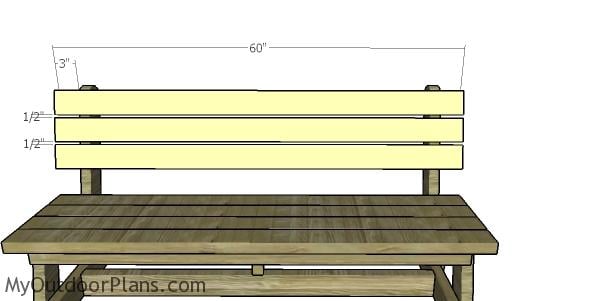
Fit the 2×4 boards to the back of the bench. Center the slats into place, drill pilot holes and insert 2 1/2″ screws.
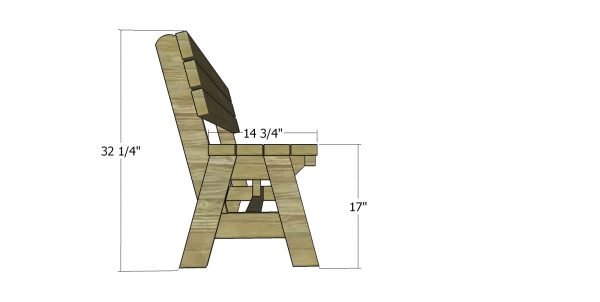
Bench dimensions
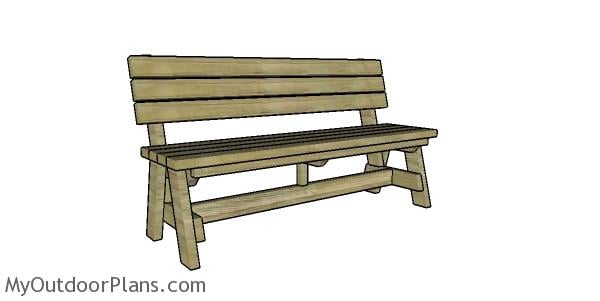
5 ft Bench with Back Plans
Make sure you take care of the finishing touches. Fill the holes with wood putty and then smooth the surface with 120-220 grit sandpaper. Apply a few coats of paint or stain over the components to protect them from decay.
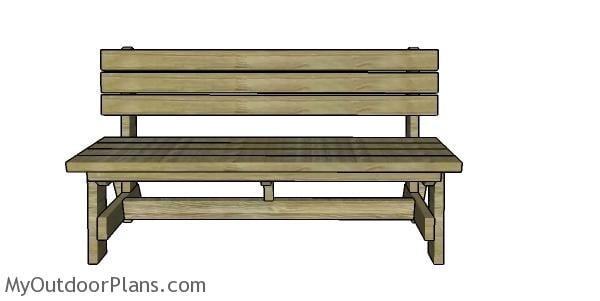
5 ft Bench with Back Plans – front view
You can easily make adjustments to my plans to suit your needs and tastes. See all my bench plans HERE. Moreover, you can adjust the height of the legs. See all my outdoor furniture projects HERE.
This woodworking project was about 5 ft bench with back plans free. If you want to see more outdoor plans, check out the rest of our step by step projects and follow the instructions to obtain a professional result.
7 comments
how can you fit 4 4×2 slats for the seat plus quarter inch spacers, when the top brace is only 13″ long?
The brace is 13 1/4″ and you add the front trim that is 1 1/2″. 2x4s are actually 1 1/2″x3 1/2″, so you can fit the 4 slats 🙂
Hi, can you share the overall dimensions of the bench? Including seat height, and overall height from ground to top? Thanks!
I’ve added a new diagram with the info you requested.
Fantastic- thank you!
I really like your designs and was thinking about adapting a couple of them as im trying to fit them in a really awkward space, i was wondering what software you use to create your designs?
Please read the FAQs: https://myoutdoorplans.com/faq/