This step by step diy woodworking project is about 10′ picnic table plans. If you want to learn more about building a long picnic table, we recommend you to take a look over the instructions described in the article. A sturdy 10 feet picnic table is a great addition to any backyard, as it will gather all the loved ones to take a nice meal in nature. Check my other 10′ picnic table design here.
Work with good judgement and don’t forget to take a look over the rest of the related plans, as there are many designs and woodworking projects to select from. Work with attention and don’t forget that a good planning will save you from many issues and it will keep the costs withing the total budget. Invest in high quality materials, such as pine, redwood or cedar. Drill pocket holes before inserting the galvanized screws, to prevent the wood from splitting. See all my Premium Plans HERE.
Projects made from these plans
10′ Picnic table plans
Building a long picnic table
Cut & Shopping Lists
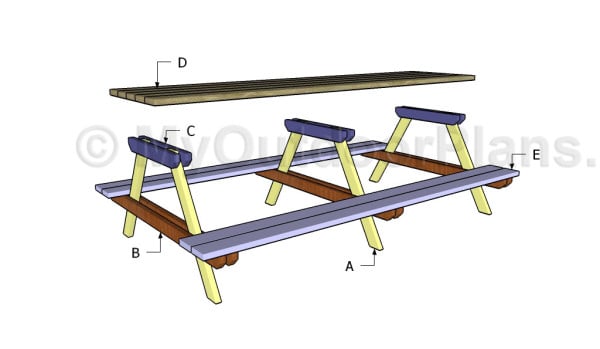
- A – 6 pieces of 2×4 lumber – 40″ long LEGS
- B – 6 pieces of 2×4 lumber – 70″ long SEAT SUPPORTS
- C – 6 piece of 2×4 lumber – 29″ long TABLETOP SUPPORTS
- D – 6 pieces of 2×6 lumber – 120″ long TABLETOP
- E – 4 pieces of 2×6 lumber – 120″ long SEAT
- F – 2 pieces of 2×4 lumber – 54″ long BRACES
Tools
![]() Hammer, Tape measure, Framing square, Level
Hammer, Tape measure, Framing square, Level
![]() Miter saw, Drill machinery, Screwdriver, Sander
Miter saw, Drill machinery, Screwdriver, Sander
Time
![]() One day
One day
Related
How to build a long picnic table
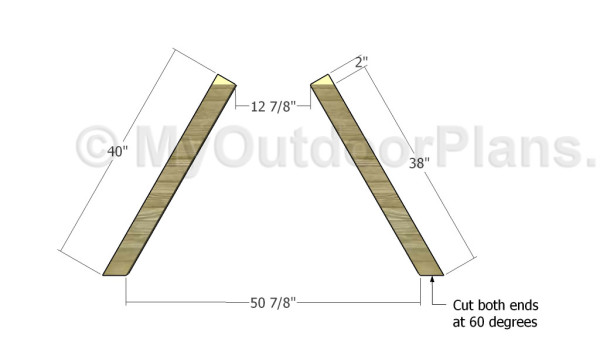
Building the legs
The first step of the project is to build the legs for the picnic table. Use 2×4 lumber to build the legs. Use a miter saw to cut both ends of the legs at 60 degrees. Smooth the edges with fine-grit sandpaper and remove the residues with a damp cloth.
If you find this design atypical, you should check out my other 10′ picnic table plans HERE.
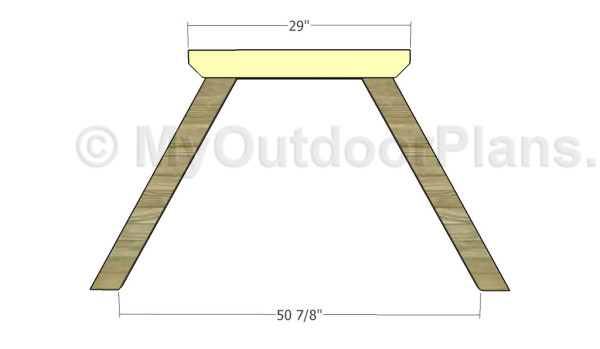
Fitting the tabletop supports
Build the tabletop supports out of 2×4 lumber, as shown in the diagram. Cut both ends of the supports in a decorative manner using a circular saw. Clamp the braces to the legs, making sure the edges are all aligned. Drill pilot holes through the legs and through the braces, before inserting the 5″ carriage bolts.
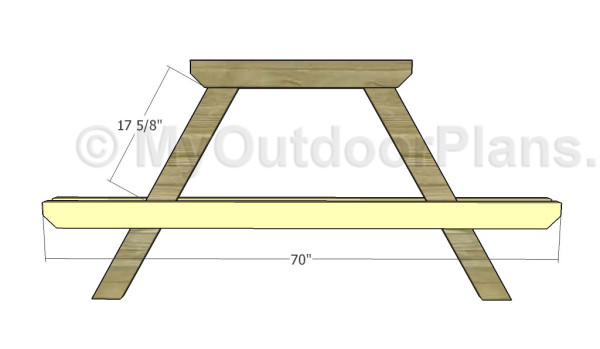
Fitting the bottom supports
Build the seat supports out of 2×4 lumber. Cut the components at the right size and use a saw to make both ends decorative. Clamp the supports to the legs, after aligning everything with great care. Drill pilot holes through the supports and through the legs, before inserting the 5″ carriage bolts.

Building the frame of the picnic table
After building the sides for the picnic table, we recommend you to secure them to the tabletop. Lay the slats on a level surface, making sure they are equally-spaced. Fit the sides to the slats, drill pilot holes through the supports and insert 2 1/2″ screws to lock them together tightly. Plumb the sides with a spirit level, to prevent the wood from splitting.

Building the diagonal braces
In order to enhance the rigidity of the long picnic table, we recommend you to fit diagonal braces. Cut both ends of the braces at 69.2 degrees.
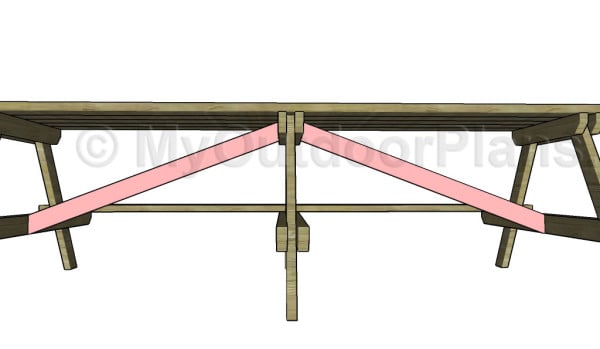
Fitting the braces
Drill pilot holes at both ends of the braces and secure them to the tabletop supports using 2 1/2″ screws. Make sure the legs are plumb before inserting the screws, to get a professional result.
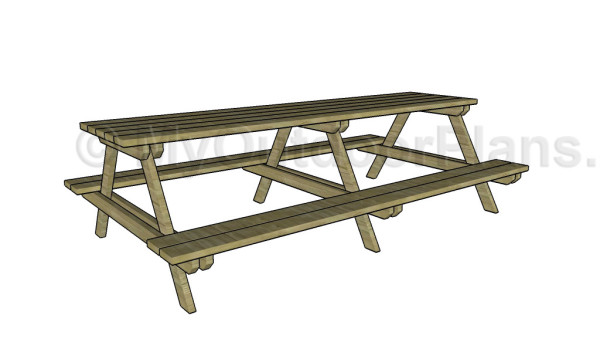
Fitting the seat slats
After fitting the diagonal braces, you need to get the job done by attaching the seat slats to the 10 feet long picnic table. Center the slats to the frame and secure them to the supports using 2 1/2″ screws. Pre-drill the components before inserting the screws, to prevent the wood from splitting.
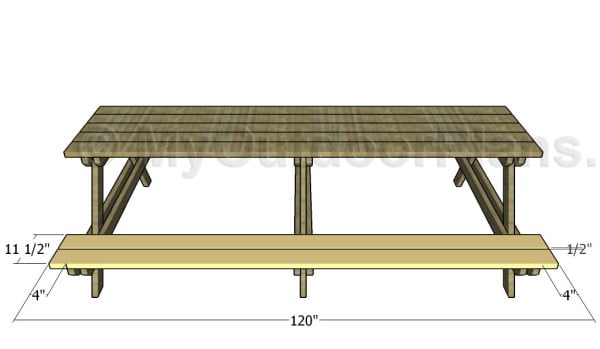
10′ Picnic table plans
One of the last steps of the woodworking project is to take care of the finishing touches. Therefore, fill the pilot holes with wood putty and smooth the surface with 120-grit sandpaper.
Top Tip: If you want to enhance the look of the project and to protect the stand from decay, we recommend you to cover the components with paint or stain. See my newer picnic table plans HERE.
This woodworking project was about 10′ picnic table plans. If you want to see more outdoor plans, we recommend you to check out the rest of our step by step projects. LIKE us on Facebook and Google + to be the first that gets out latest projects and to hep us keep adding free woodworking plans for you.
9 comments
Looking for reasonable plans to construct a few 12 foot picnic tables with Handicap Accessibility on both ends and also a sheltered roof that is permanently attached to the table.
I’ll give it a shot. I have a few ideas and I hope it’s what you envisioned.
is there an installation plan and material list for hardware?
You need 24 pieces of 5″ carriage bolts and about 100 pieces of 2 1/2″ screws for this project. I hope this helps.
I like this plan, I intend to use it. The material numbers for the lumber are a incorrect though, unless the plan is to build a few of them. 🙂
Thanks for letting me know. I’ve updated the list. You should also check my latest plans for a 10 foot picnic table here: http://myoutdoorplans.com/furniture/10-foot-picnic-table-plans/
This projects dimentions are all incorrect. I built the table to plan and ended up having to re doo the leg structures as there should only be 12 inches in height from the seat to the top not 17+ inches unless you are Andre the Giant or like resting your head on the table to shovel in your food. When I corrected this height it threw everything else out .It cost me a lot of extra work to get it right. So you would be better off to follow the This Old House picnic table plan and insert the third set of legs for a 10 foot table
Sorry for your trouble. I agree this design might be a little atypical and not suitable for everyone, that is why I have designed a traditional 10′ picnic table here: http://myoutdoorplans.com/furniture/10-foot-picnic-table-plans/
REALLY wish we had read KEN’s comment above before building this, as we are now in the same proverbial boat. It would be super helpful if you would rename this plan “Andre the Giant Style” or “Atypical” so folks know ahead of time that this is NOT a traditional 10 ft picnic table. Super bummed to have to reconfigure.