This step by step diy woodworking project is about arbor swing plans. This detailed article features instructions and complete diagrams about building a an exquisite arbor swing. Adjust the design of the simple gazebo to suit your needs and budget. This project requires basic tools and materials, so that any person with basic skills can get the job done in less than a week. See here how to build the swing bench.
Work with good judgement and don’t forget to take a look over the rest of the related plans, as there are many designs and woodworking projects to select from. Work with attention and don’t forget that a good planning will save you from many issues and it will keep the costs within the total budget. Invest in high quality materials, such as pine, redwood or cedar. Drill pocket holes before inserting the galvanized screws, to prevent the wood from splitting. See all my Premium Plans HERE.
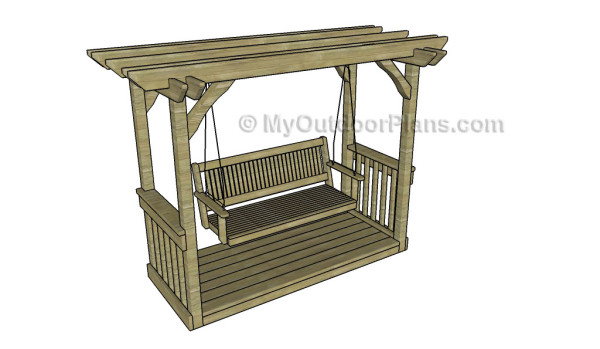
Projects made from these plans
It’s that easy to build an arbor swing!
Arbor Swing Plans
Building an arbor swing
Cut & Shopping Lists
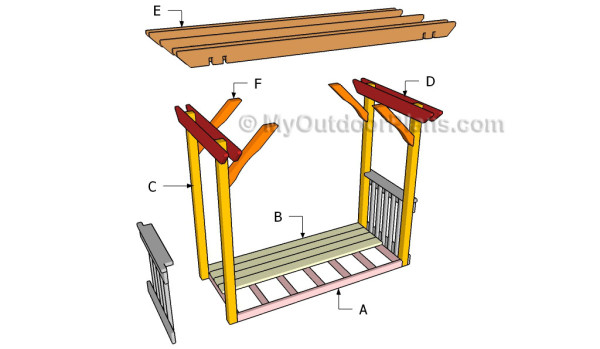
- A – 2 pieces of 2×4 lumber – 89″ long, 7 pieces – 37″ long FRAME
- B – 7 pieces of 2×6 lumber – 89″ long DECKING
- C – 4 piece of 4×4 lumber – 86″ long POSTS
- D – 4 pieces of 2×6 lumber – 60″ long BEAMS
- E – 5 pieces of 2×6 lumber – 120″ long RAFTERS
- F – 4 pieces of 4×4 lumber – 30 1/2″ long BRACES
- G – 3 pieces of 2×6 lumber – 40″ long, 5 pieces of 2×2 lumber – 35 1/2″ long 2xRAILING
- 6 pieces of 2×4 lumber – 8 ft
- 13 pieces of 2×6 lumber – 8 ft
- 3 pieces of 2×2 lumber – 8 ft
- 6 pieces of 4×4 lumber – 8 ft
- 5 pieces of 2×6 lumber – 10 ft
- 2 1/2″ screws
- 1 1/4″ screws
- wood putty, wood stain
Tools
![]() Hammer, Tape measure, Framing square, Level
Hammer, Tape measure, Framing square, Level
![]() Miter saw, Drill machinery, Screwdriver, Sander
Miter saw, Drill machinery, Screwdriver, Sander
Time
![]() One day
One day
Related
How to build an arbor swing
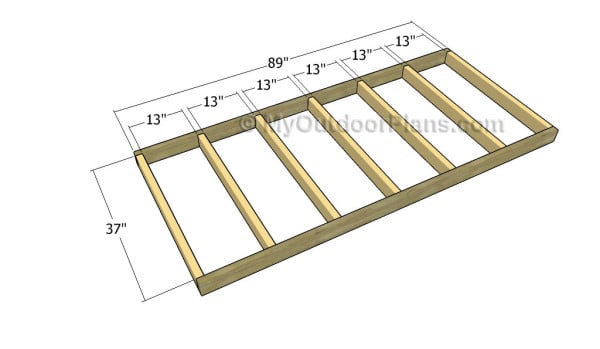
Building the floor frame
The first step of the project is to build the frame for the arbor swing. Build the components out of 2×4 lumber. Drill pilot holes through the rim joists and insert 2 1/2″ screws into the 37″ long beams. Make sure the corners are right-angled before inserting the screws, to prevent the wood from splitting.

Fitting the decking
Next, you need to attach the 2×6 decking to the floor frame. Align the edges with great care, drill pilot holes and insert 2 1/2″ screws into the joists. Place a nail between the decking boards to make sure the water will drain properly.
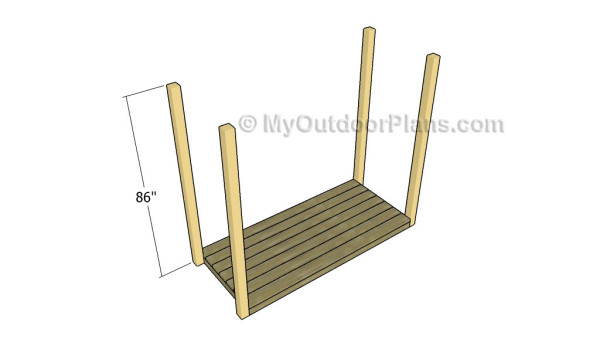
Attaching the posts
Continue the outdoor woodworking project by attaching the 4×4 posts to the frame. Drill pilot holes through the frame and insert 3 1/2″ screws into the posts. Plumb the posts with a spirit level before locking them to the floor frame. If you want to give your project extra-support, you should use anchors to secure the structure to a concrete slab.

Building the support beams
Build the support beams out of 2×6 lumber. Cut both ends in a decorative manner, by using a circular saw.
Fitting the support beams
Attach the beams to the top of the wooden posts and clamp them into place, after making sure the edges are aligned properly. Drill pilot holes through the beams and through the posts. Insert 7″ carriage bolts to lock all the components together.
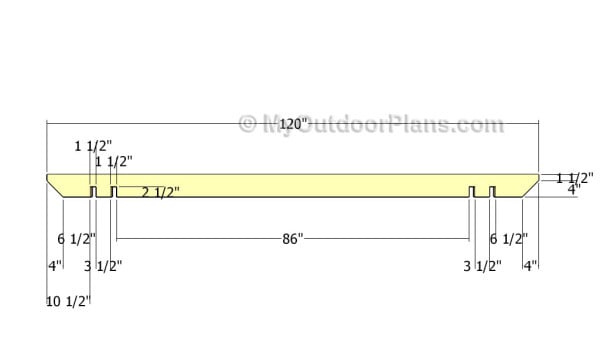
Building the rafters
Build the shade elements out of 2×6 lumber using the information described in the diagram. Make the notches to the shade elements and cut both ends on a decorative manner.
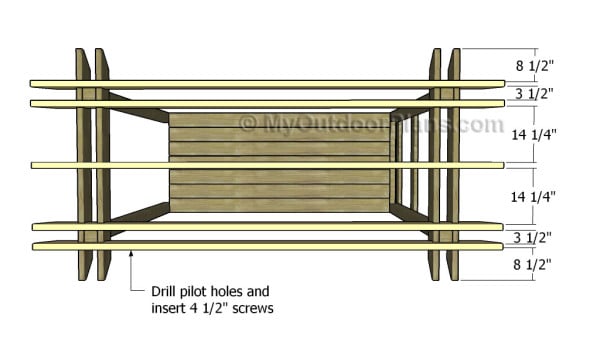
Fitting the rafters
Attach the rafters to the support beams, making sure you place them as in the diagram. Drill pilot holes through the rafters and insert 4 1/2″ screws into the support beams.
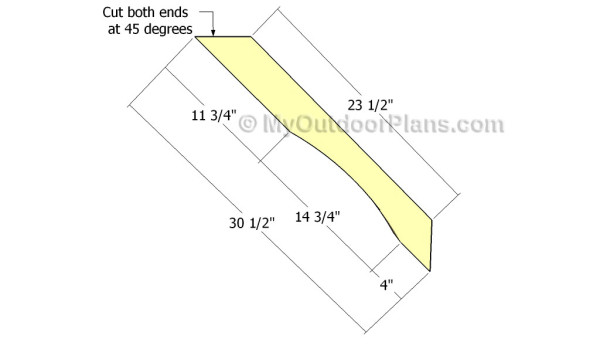
Building the braces
Build the cross-braces for the arbor out of 4×4 lumber. Cut both ends at 45 degrees and make a curved notch, for a professional
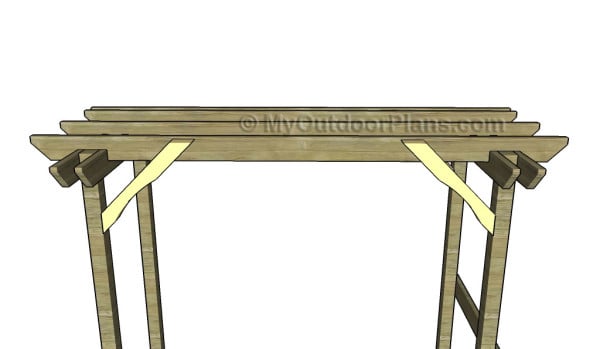
Fitting the braces
Fit the braces to the arbor swing, as shown in the diagram. Drill pilot holes through the braces and insert screws into the posts at one one and in the rafters at the opposite end.
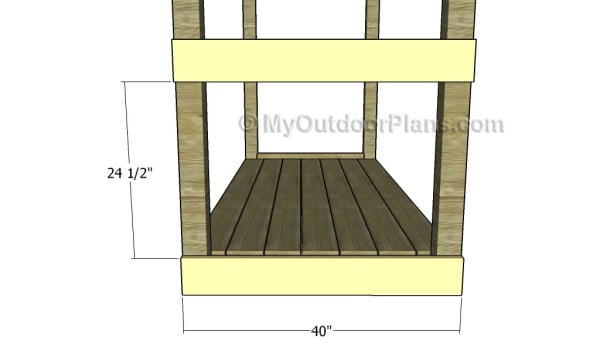
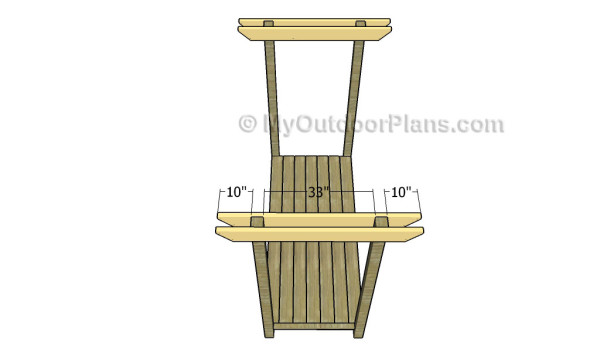
Fitting the cleats
Build the side railings starting with the 2×6 horizontal cleats. Drill pilot holes and secure the cleats to the posts using 2 1/2″ screws. Make sure the cleats are horizontal before inserting the screws. Use a spirit level to make sure the cleats are perfectly horizontal.
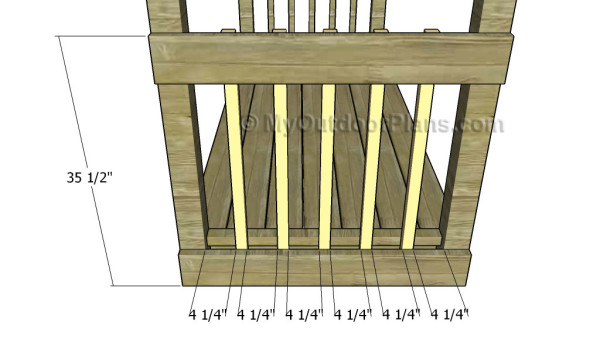
Fitting the balusters
Next, attach the 2×2 balusters to the sides of the arbor swing. Drill pilot holes through the balusters and secure them to the cleats using 2 1/2″ screws. Place the balusters equally-spaced for a professional result.
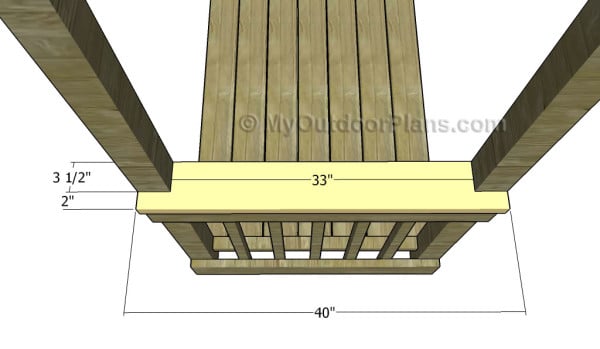
Fitting the handrails
Build the handrail out of 2×6 lumber. Cut notches to the slat and fit it to the cleats using 2 1/2′ screws. Leave no gaps between the components and round the exposed edges with a router.
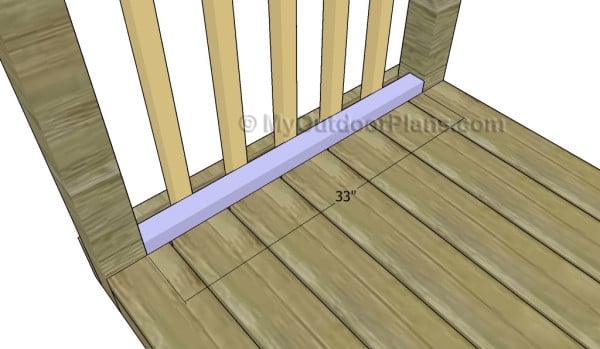
Fitting the trims to the balusters
In order to enhance the look of the arbor swing, we recommend you to fit 2×3 trims to the sides, as shown in the diagram. Cut the components at the right dimensions, drill pocket holes at both ends and secure them to the posts with 2 1/2″ screws.
Arbor swing plans
One of the last steps of the woodworking project is to take care of the finishing touches. Therefore, fill the pilot holes with wood putty and smooth the surface with 120-grit sandpaper.
Top Tip: If you want to enhance the look of the project and to protect the wooden garden swing stand from decay, we recommend you to cover the components with paint or stain.
This woodworking project was about arbor swing plans free. If you want to see more outdoor plans, we recommend you to check out the rest of our step by step projects. LIKE us on Facebook and Google + to be the first that gets out latest projects and to hep us keep adding free woodworking plans for you.
- EXPLORE MORE IDEAS FOR -
 |
 |
 |
 |
12 comments
I love this swing pergola! We made it for our backyard and just love it!!!
We love it so much we are going to build two more structures in our backyard! Basically, just bigger structures than this one!
Just a suggestion:
Step E says to get 15 pieces of lumber. I do believe you meant to write “5”. 🙂
Thanks for the feedback. I ve updated the cut list. I am glad to hear you like the plans and already have built the pergola swing. It would be lovely if you shared a few pics to inspire other DIY-ers around the word! Thank you.
Quick question on how you attach chain/rope to the middle rafter? My bench came with screw in eyeballs, but I would prefer large bolts with a washer to spread the load on the top side of the board. Unfortunately, I am not sure about drilling through 5.5 inches of the rafter with a width of only 1.5 inches. Are you wrapping the chain around the rafter?
I don’t think that’s a good idea. You could join together two rafters to make the middle rafter thicker or use 4×6 lumber. I would use something like this: http://amzn.to/2op0pwN
What is the best way to connect the middle rafter to the support beam?
Rafter ties and screws.
Do you recommend pine or redwood?
Also, would a 4×4 be a better center beam for holding the swing?
Redwood is far superior in all areas except price. A 4×4 would ruin the design, I suggest gluing two 2×6 rafters together.
Have you noticed if the structure rocks at all when you get swinging…or is the base wide enough to keep it from moving. Also did you make the seat or did you buy it?
The base should be wide enough for proper support. However, this is not designed for high swinging. I have plenty of swing bench plans here: https://myoutdoorplans.com/category/swing/
Hi may friend
How to calculate the load against the lumber dimension of rafters.
Many thanks in advance