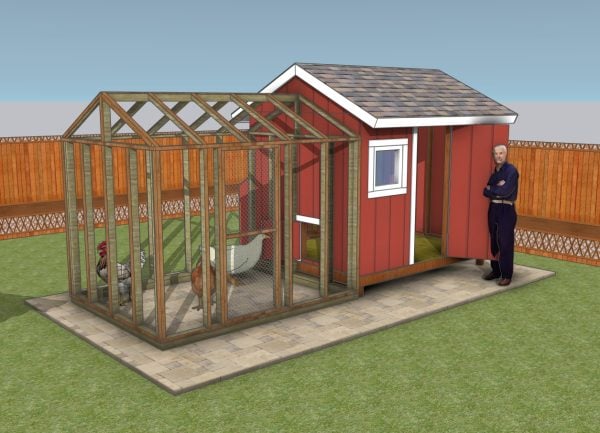
This step by step diy project is about free 8×10 large chicken coop plans. I have designed this large chicken coop shed so you can grow up to 20-30 chicken in a professional manner. This chicken coop features a neat design, with a large front door, two side windows and a large coop run. Take a look over the rest of my woodworking plans, if you want to get more building inspiration. The free woodworking plans come with step by step 3D diagrams, instructions, a full cut and shopping list and it is print friendly. As well, the plans are PDF download, so you can take the printed plans with you in the workshop.
Building your own chicken coop not only saves you money but also gives you the satisfaction of creating a custom home for your flock. With plenty of space and great ventilation, your chickens will be happy and healthy. So grab your tools, follow these plans, and let’s build a fantastic coop for your feathered friends!
When buying the lumber, you should select the planks with great care, making sure they are straight and without any visible flaws (cracks, knots, twists, decay). Investing in cedar or other weather resistant lumber is a good idea, as it will pay off on the long run. Use a spirit level to plumb and align the components, before inserting the galvanized screws, otherwise the project won’t have a symmetrical look. If you have all the materials and tools required for the project, you could get the job done in about a day. See all my Premium Plans HERE.
Projects made from these plans
Large Chicken Coop Plans

Building-a-large-chicken-coop
Cut + Shopping Lists
- A – 4 pieces of 4×4 lumber – 12″ long POSTS
- B – 2 pieces of 2×6 lumber – 120″ long, 6 pieces – 93″long FLOOR
- C – 2 pieces of 3/4″ plywood – 48″x96″ long, 2 pieces – 24″x48″ long FLOORING
- D – 2 pieces of 2×4 lumber – 89″ long, 5 pieces – 84″ long, 1 piece – 22 1/2″ long 2xSIDE WALL
- E – 2 pieces of 2×4 lumber – 120″ long, 2 pieces – 44″ long, 10 pieces – 84″ long, 6 pieces – 38 1/2″ long, 4 pieces – 24″ long, 6 pieces – 10 1/2″ long, 2 pieces – 78 1/2″ long, 8 pieces of 2×6 lumber – 27″ long, 2 pieces – 35″ long FRONT WALL
- F – 2 pieces of 2×4 lumber – 120″ long, 4 pieces – 84″ long, 2 pieces – 113″ long, 4 pieces – 37 1/2″ long FRONT WALL
- G – 6 pieces of T1-11 – 48″x87″ long, 2 pieces – 40″x48″ long, 1 piece – 24″x40″ long, 1 piece – 7″x24″ long SIDING
- 2 pieces of 2×6 lumber – 10′
- 10 pieces of 2×6 lumber – 8′
- 1 pieces of 4×4 lumber – 8′
- 5 pieces of 2×4 lumber – 10′
- 39 pieces of 2×4 lumber – 8′
- 1/2″ plywood – 5 1/2″x75″
- 3 pieces of 3/4″ plywood – 48″x96″
- 9 pieces of T1-11 – 48″x96″
- 8d nails, 2 1/2″ screws, 3 1/2″ screws
- wood filler , wood glue, stain/paint
Tools
![]() Hammer, Tape measure, Framing square, Level
Hammer, Tape measure, Framing square, Level
![]() Miter saw, Drill machinery, Screwdriver, Sander
Miter saw, Drill machinery, Screwdriver, Sander
Time
![]() One day
One day
Related
- PART 1: Large Chicken Coop Plans
- PART 2: Large Chicken Coop Roof Plans
- PART 3: Large Chicken Coop Nest Boxes Plans
- PART 4: 8×10 Chicken Run Plans
It’s that easy to build a large coop – Video!
Step 1: How to build a large chicken coop floor
Building-the-chicken-coop
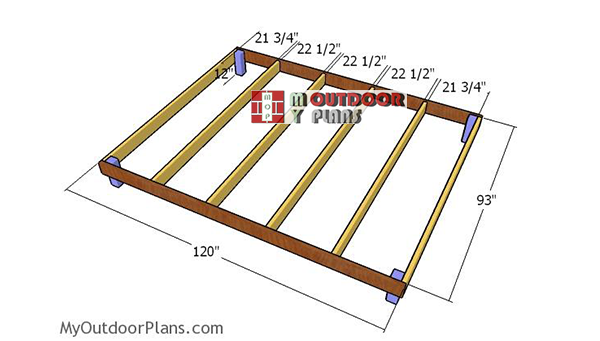
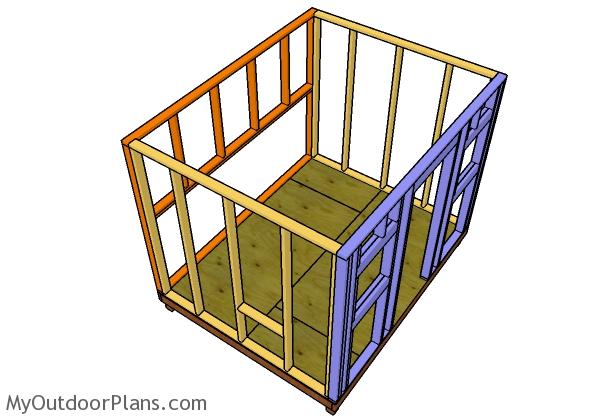
The first step of the project is to build the floor frame. Cut the joists from 2×6 lumber as shown in the diagram. Next, lay the joists on a level surface and then drill pilot holes through the rim joists. Align the edges flush and make sure the corners are square. Insert the 3 1/2″ screws to lock the frame together tightly and place the joists every 16″ or 24″ on center.
In order to raise the floor frame from the ground, you should fit 4×4 posts to the corners. Use 3 1/2″ screws to secure the posts into place and adjust their size to suit your needs.
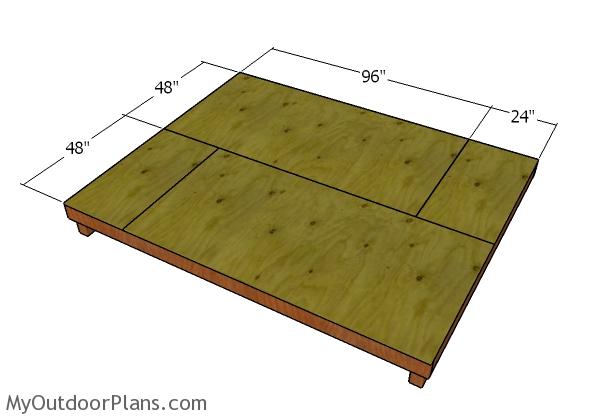
Fitting the floor sheets
Also, fit the 3/4″ plywood sheets to the floor frame and align the edges flush. Drill pilot holes and insert 1 5/8″ screws every 8″ along the joists. Leave no gaps between the sheets for a professional result.
Step 2: Building the wall frames
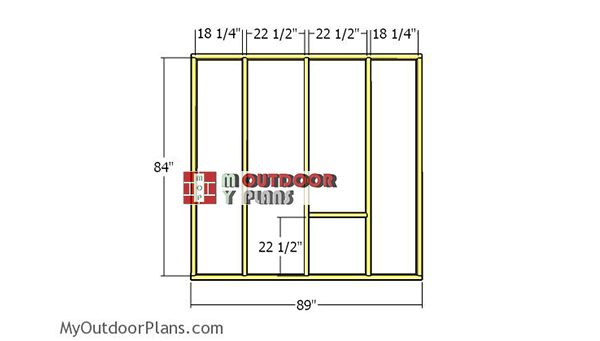
Side-wall-frame
Continue the project by assembling the side walls for the chicken coop. Cut all the components from 2×4 lumber and then lay them on a level surface. Drill pilot holes through the plates and insert 3 1/2″ screws into the studs. Place the studs every 24″ on center for a professional result. Furthermore, frame the chicken coop door by attaching a 2×4 support between the studs, as shown in the diagram.

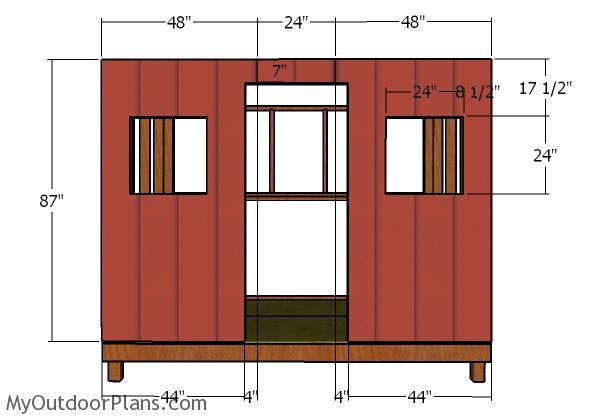
Front-wall-frame
The next step of the woodworking project is to build the front wall for the chicken coop. Drill pilot holes through the plates and insert 3 1/2″ screws into the studs. Moreover, as you can easily notice in the diagram, you need to frame a door opening and two window openings. Use 2×6 lumber and 1/2″ plywood for the double headers. However, insert 2 1/2″ screws to sandwich the plywood between the 2×6 beams.
Toenail the headers into place tightly. Make sure all the corners are square and then align the edges flush. You can easily adjust the size of the windows and the door size to suit your needs.
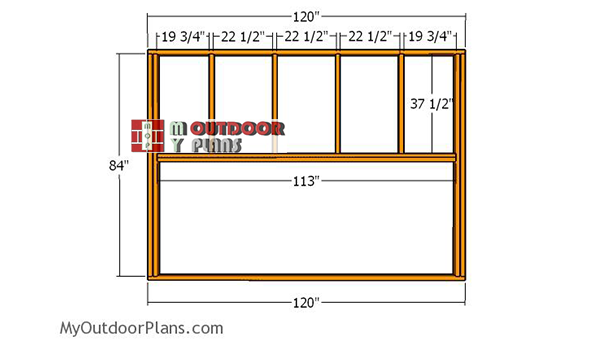
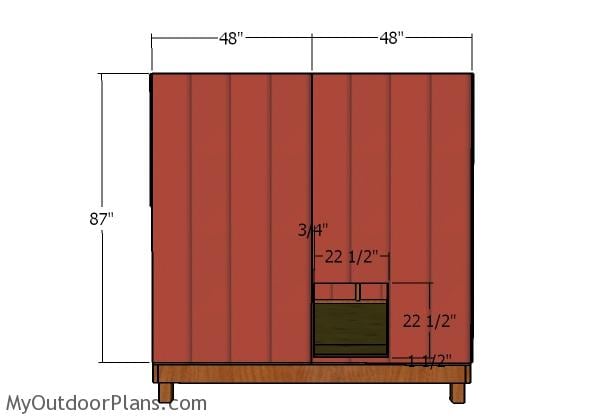
Back-wall-frame
Framing the back wall is a straight forward process, if you follow the instructions in the diagram. As you can easily notice in the plans, you have to leave an opening for the nesting boxes. Drill pilot holes through the plates and insert 3 1/2″ screws into the studs. Place double studs at both ends of the wall frame and fit 1/2″ plywood between the double studs for a professional result.
Assembling the chicken coop frame
Lay the wall frames to the floor of the shed. Align the edges flush and use a spirit level to plumb the wall frames. Drill pilot holes through the bottom plates and insert 3 1/2″ screws into the floor. Moreover, you need to lock the adjacent walls together tightly with 3 1/2″ screws. Make sure the corners are square for a professional result.
Step 3: Attaching the wall siding sheets
Side siding – Panels
Continue the large chicken coop project by fitting the T1-11 siding panels to the sides of the frame. Alternatively you can use plywood or OSB. Make an opening to the side wall that has the chicken door. Align the sheets with attention and then insert 6-8d nails every 8″ along the framing.
Front wall – Siding
Fit the T1-11 siding sheets to the front of the chicken coop. Make cuts around the window opening and around the door opening, following the instructions in the diagram. Align the edges flush and insert 6-8d nails to secure them into place tightly.
Step 4: Finishing touches
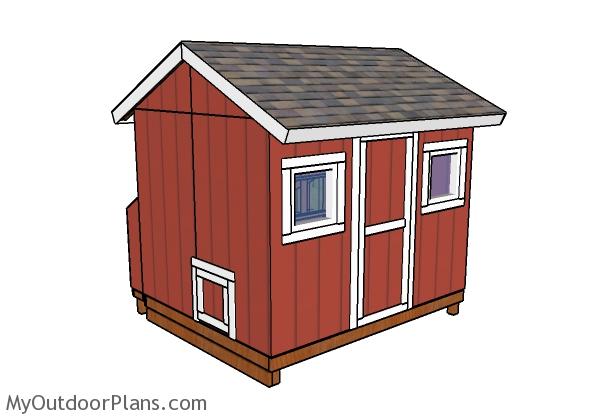
Large chicken coop shed plans
You need to take a look over PART 2 of the project, so you learn how to frhttp://myoutdoorplans.com/animals/8×10-chicken-coop-roof-plans/ame the gable roof for the 8×10 chicken coop and how to make the doors.
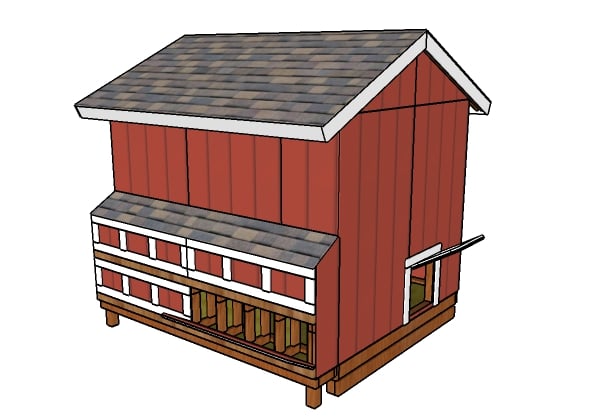
Large chicken coop plans – Back view
In PART 3 of the project I show you how to build the nesting boxes for the coop.

Large chicken coop plans – Front view

8×10 chicken coop
Last but not least, in PART 4 of the large chicken coop project I show you how to build the 8×10 run. This is a straight forward project that will help you raise up to 20-30 chickens. The only thing that stands between your wish to have fresh eggs every day and reality is you building the coop!
Large chicken coop plans
If you want to get PREMIUM PLANS for this project, in a PDF format, please press GET PDF PLANS button bellow. Thank you for the support.

This woodworking project was about 8×10 chicken coop plans free. If you want to see more outdoor plans, check out the rest of our step by step projects and follow the instructions to obtain a professional result.

EXPLORE MORE IDEAS FOR:
 |
 |
 |
 |
32 comments
It says on your homepage that the plans are printable via a widget on the page. I am using a PC but get no widget.
Suggestions?
Wanting to print the Large Chicken Coop plans
Read the FAQs for instructions: http://myoutdoorplans.com/faq/
I DID read the faq but did you read my comment? The faq says there is a green widget on the page but only on a pc. I am using a pc but get no green widget
I have, but I am using a PC, as well, and the widget is there. On the left of the screen (the tower of icons; the top is the print button, then facebook, google plus, pinterest, twitter, email etc.)
I need help on the large chicken coop: Back wall – 1/2 in. plywood between the vertical studs – check. What about between the two 113 in. horizontal boards? Plywood between them?
No. There will go the nesting boxes. See here: http://myoutdoorplans.com/animals/large-chicken-coop-nesting-boxes-plans/
Shouldn’t 113 actually be 114 ? 1 1/2 * 4 = 6 , 120-6 = 114
There is a 1/2″ gap between the double studs, so they can march the 3 1/2″ perpendicular studs.
I need help on the large chicken coop: Back wall – 1/2 in. plywood between the vertical studs – check. What about between the two 113 in. horizontal boards? Plywood between them?
Sorry for the repost. Slow internet. I want to make sure I’m not off 1/2 inch for the nesting boxes. I have a question there too. Will post in a second. So to be clear, those two 113″ boards are right next to each other?
Yes, the 113″ boards are next to each other. No gap between them.
Where do you put the roosts? Any interior pictures?
Is the material list for the roof also ?
No, each part of the plans comes with a materials list.
is there a PDF or printable version?
Yes. Please read the FAQs: http://myoutdoorplans.com/furniture/2×4-adirondack-chair-plans/
How many birds does this coop hold? I have chickens now and ducks soon.
25 at most. If you are conservative I would say 20.
Nice Plan, my only suggestion is the that you actually add a material list, what you have is a cut list which is fairly good, but an actual material list would really help the purchaser of material. I look forward to giving this a try, and post my experience. thanks
Well… it already has a material list. The first list (A, B, C… ) is the cut list. The second list is the Shopping list.
How do you create a plan
Please read the Faqs: https://myoutdoorplans.com/faq/
Quite frustrating. The directions on how to print plans found in the FAQ are useless. There is no ‘floating widgit’ containing the ‘print’ button and the pages are all protected so they can’t be printed. Plans for 8×10 large chicken coop with run not in premium plans either. Love the plans but need to be able to print them.
The widget works.
Hi, I am trying to figure out how to buy these plans so I can print them out. When I go to the options that you have for sale this 8×10 coop is not available only smaller coops. Is there another way to access this? I saw this question above but the link provided takes me to plans for a chair.
Thank you!
Here: https://myoutdoorplans.com/faq/
Is there anyway I could get these plans in PDF? My son is looking for plans to build a coop for my wife and this would be perfect.
Yes, read the FAQs
Is the floor built on posts or skids?
The material list mentions 4 pieces of 4×4 skids that are 12” long so I’m guessing posts mislabeled as skids?
Some of the pics further down show the coop on posts, some on skids.
They are vertical posts
Thanks for the clarification!
Still, no reason why the coop couldn’t be built on 4×4 skids and just use rafter ties to secure the rim joists to the skids? The ground where I want to put the coop is a little soft, but I do plan to put some gravel down first. Just seems like more ground contact would be better.
The only thing that I have found missing from the plans is the plans for the windows. I priced out some pre-made windows in the size needed and they were quite pricey…$175 each