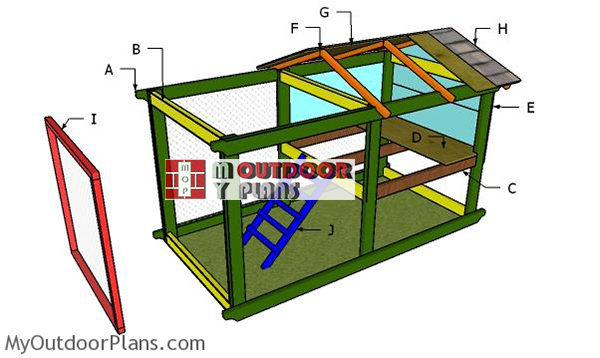
This step by step diy project is about 4×8 backyard chicken tractor plans. I had several requests for a simple chicken tractor that is inexpensive to build and easy to move from one place to another. Therefore, this is a 4×8 tractor with a 4×4 coop integrated in a stylish way. Take a look over the rest of my woodworking plans, if you want to get more building inspiration.
When buying the lumber, you should select the planks with great care, making sure they are straight and without any visible flaws (cracks, knots, twists, decay). Investing in cedar or other weather resistant lumber is a good idea, as it will pay off on the long run. Use a spirit level to plumb and align the components, before inserting the galvanized screws, otherwise the project won’t have a symmetrical look. If you have all the materials and tools required for the project, you could get the job done in about a day. See all my Premium Plans HERE.
Projects made from these plans
Backyard Chicken Tractor Plans
Building-a-4×8-simple-chicken-coop
Cut & Shopping Lists
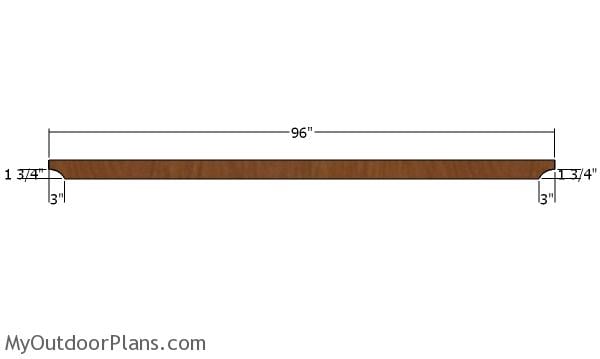
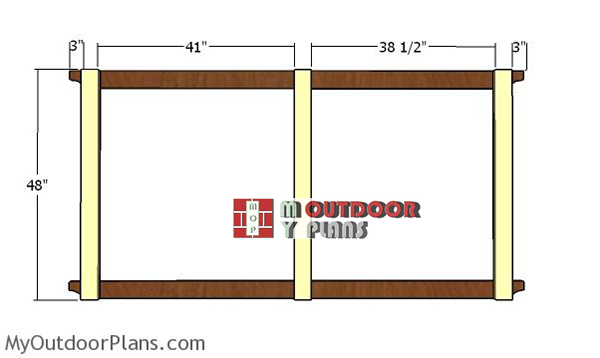
- A – 4 pieces of 2×4 lumber – 96″ long, 6 pieces – 48″ long FRAME
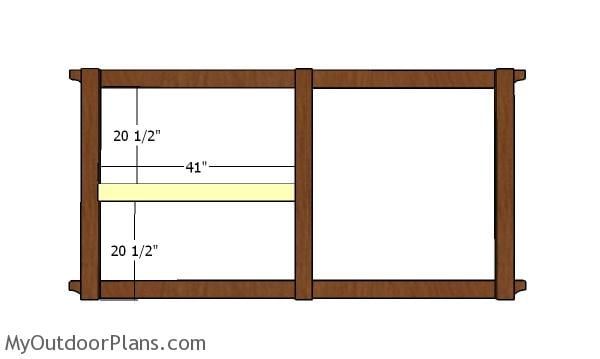
- B – 7 pieces of 2×4 lumber – 42″ long SUPPORTS
- C – 2 pieces of 2×4 lumber – 41″ long, 1 piece – 45″ long FLOOR FRAME
- D – 1 piece of 3/4″ plywood – 45″x48″ long FLOOR
- E – 2 pieces of 1/2″ plywood – 24″x48″ long, 1 piece – 45″x37 1/2″, 1 piece – 45″x21 1/2″ long, 1 piece – 16″x45″ long WALLS
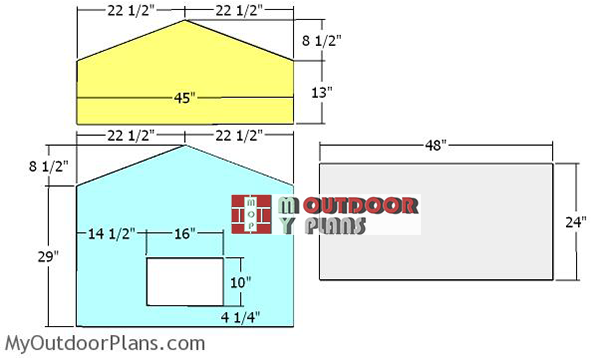
- F – 6 pieces of 2×2 lumber – 30″ long RAFTERS
- G – 2 pieces of 3/4″ plywood – 30″x56″ long ROOF
- H – 30 sq ft of tar of paper, 30 sq ft of asphalt shingles ROOFING
- I – 2 pieces of 2×2 lumber – 38″ long, 2 pieces – 42″ long DOOR
- J – 2 pieces of 2×2 lumber – 34 3/4″ long, 5 pieces of 1×2 lumber – 16″ long LADDER
- 13 pieces of 2×4 lumber – 8′
- 2 pieces of 3/4″ plywood – 8′
- 2 pieces of 1/2″ plywood – 4’x8′
- 3 pieces of 2×2 lumber – 8′
- 1 piece of 1×2 lumber – 8′
- 30 ft of tar paper, 30 sq ft of asphalt shingles
- 2 1/2″ screws, 3 1/2″ screws, 1 5/8″ screws
- 4d nails, 6d nails,
- wood filler , wood glue, stain/paint
- chicken wire
- latch
- hinges
Tools
![]() Hammer, Tape measure, Framing square, Level
Hammer, Tape measure, Framing square, Level
![]() Miter saw, Drill machinery, Screwdriver, Sander
Miter saw, Drill machinery, Screwdriver, Sander
Time
![]() One day
One day
Related
Chicken tractor – Video!
How to build a 4×8 backyard chicken tractor
Building the skids – Chicken tractor
The first step of the chicken tractor project is to build the skids for the structure. As you can see in the diagram, you should make cuts to both ends of the 2×4 beams, using a jigsaw. In this manner, the tractor will slide easier along the grass.
Assembling-the-side-panels
Next, build the sides for the chicken coop by attaching the vertical supports. Fit the supports to the skids, making sure the corners are square. Drill pilot holes and insert 2 1/2″ screws to lock everything tightly.
Assembling the sides for the chicken tractor
Fit the chicken coop supports to the sides of the tractor. Drill pocket holes at both ends of the supports and lock them into place with 2 1/2″ screws. Make sure the corners are square and check if the corners are square.

Assembling the frame of the chicken tractor
Continue the project by assembling the frame of the tractor, by joining the two sides together. Cut the supports from 2×4 lumber and drill pocket holes at both ends. Fit the supports as shown in the free plans and insert 2 1/2″ screws to lock them into place. Check if the corners are square.
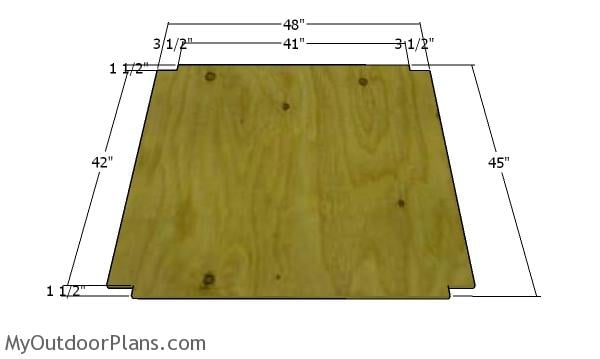
Floor sheet – chicken tractor
Use 3/4″ plywood for the chicken coop floor. Use a circular saw to make the notches to the corners of the sheet.
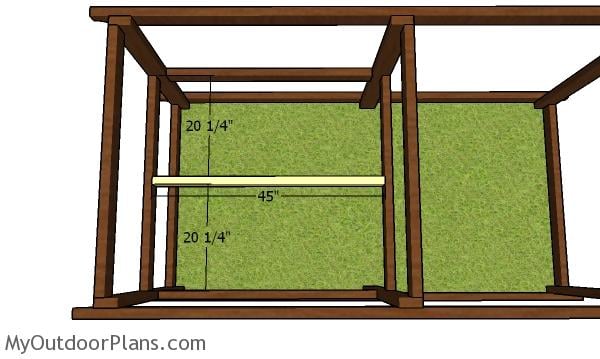
Fitting the floor support
Use 2×4 lumber for the floor support. Drill pilot holes through the frame of the coop and insert 2 1/2″ screws to lock them into place tightly.
Fit the floor to the coop and lock it into place with 1 5/8″ screws, every 8″ along the framing.
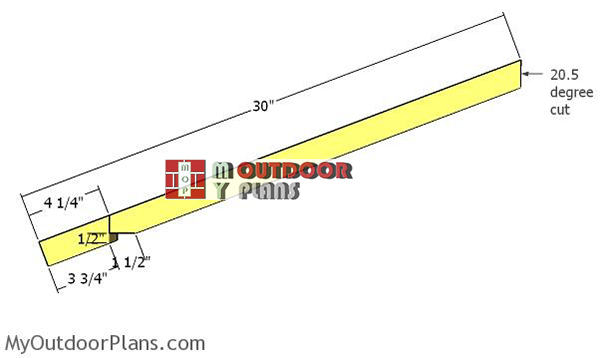
Building-the-rafters—tractor-coop
Use 2×2 lumber for the rafters. Make a 20.5 degree cut to one end of the rafter. Mark the cut lines on the rafters and then make the notches with a circular saw.
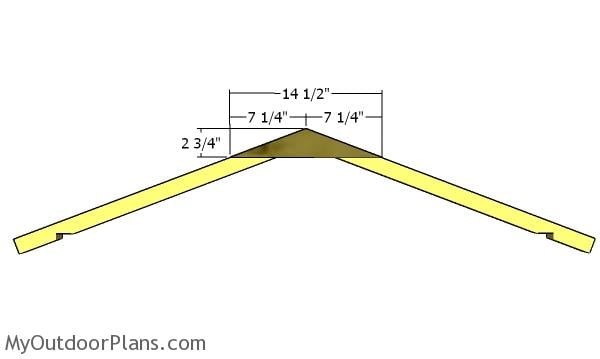
Fitting the gussets
Lay the rafters on a level surface and then attach the 1/2″ plywood gussets to lock them together tightly. Use 1 5/8″ screws to secure the gussets into place tightly.
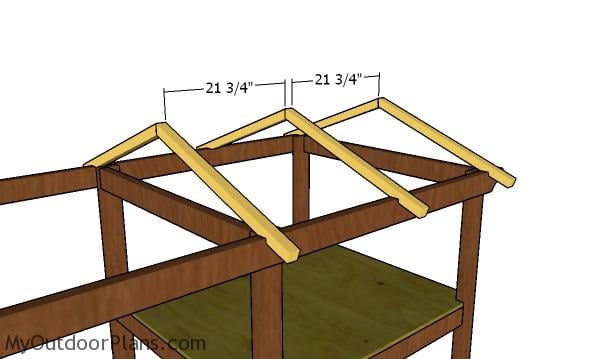
Fitting the rafters
Fit the trusses to the top of the coop, making sure you place them equally spaced. Plumb the trusses and lock them to the frame with 3 1/2″ screws.
Exterior-panels-chicken-tractor
Use 1/2″ plywood for the exterior walls. Mark the cut lines on the plywood sheets and then get the job done with a circular saw.

Fitting the exterior walls to the chicken coop
Fit the walls to the frame of the chicken coop and align the edges flush. Insert 1 5/8″ screws to secure the panels into place, every 8″ along the framing.
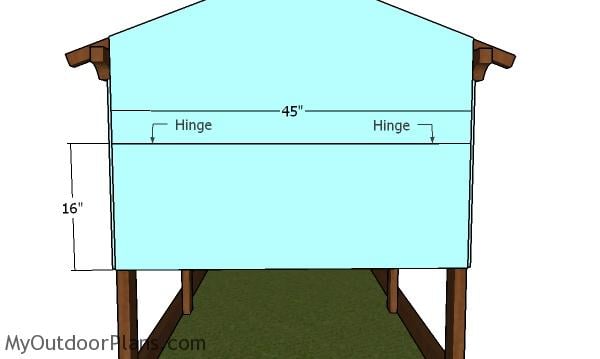
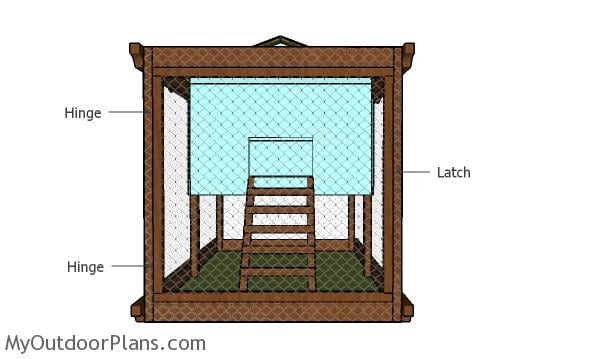
Fitting the back door
Use 1/2″ plywood for the back door. Attach the door to the back opening and then use hinges to lock it to the coop. Fit a latch so you can keep the door locked.
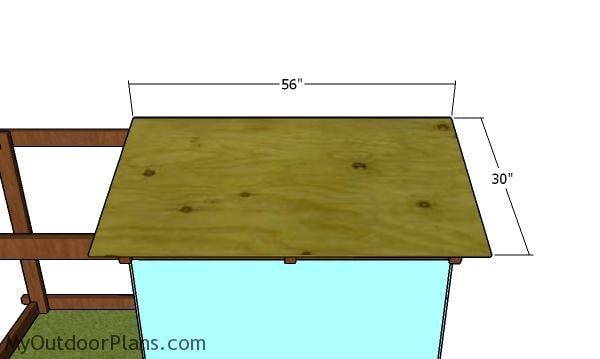
Fitting the roof sheets
Fit the 3/4″ plywood sheets to the top of the chicken coop. Center the sheets to the rafters and insert 1 5/8″ screws, every 8″ along the framing.
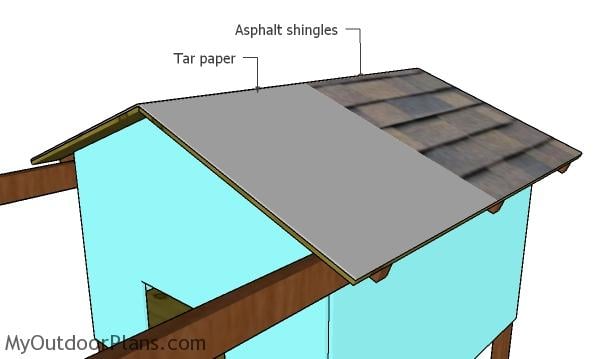
Fitting the roofing
Fit the tar paper to the roof of the coop and then install the asphalt shingles.
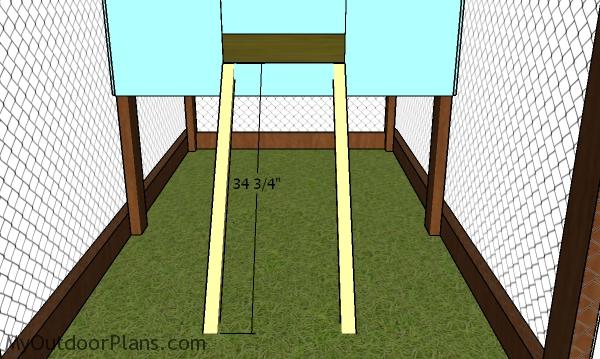
Ladder posts – Chicken Tractor Plans
Use 2×2 lumber for the ladder frame. Use 2 1/2″ screws to secure them to the coop.
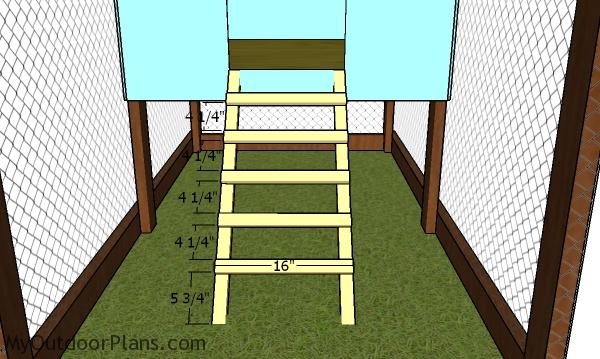
Fitting the ladder steps – chicken tractor
Fit the 1×2 steps to the ladder and secure them into place with 1 5/8″ screws.
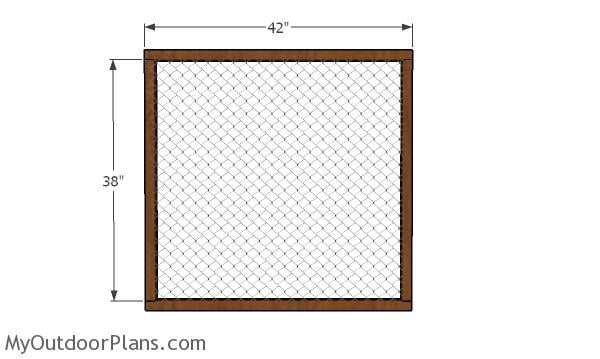
Building the tractor run door
Build the frame of the door from 2×2 lumber. Use 1/2″ plywood for the corner gussets and then secure them into place with 15/8″ screws. Staple chicken wire to the door frame.
Fitting the chicken tractor run door
Fit the door to the front opening of the chicken tractor run. Use hinges to secure the door to the run. Install a latch to lock the door into place tightly.
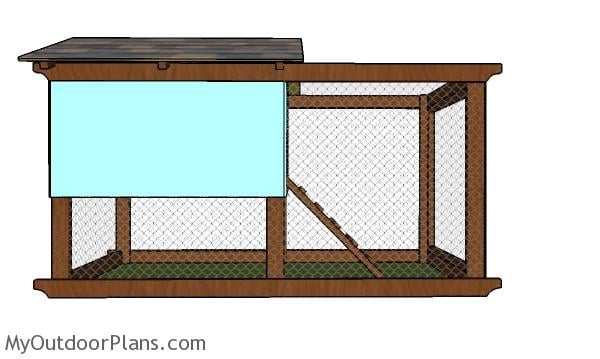
Chicken tractor plans – side view
Staple the chicken wire to the tractor.

Chicken coop plans – back view
Last but not least, you need to take care of the finishing touches. Apply a few coats of paint to the chicken coop to make it stand out and to protect the components from the elements.
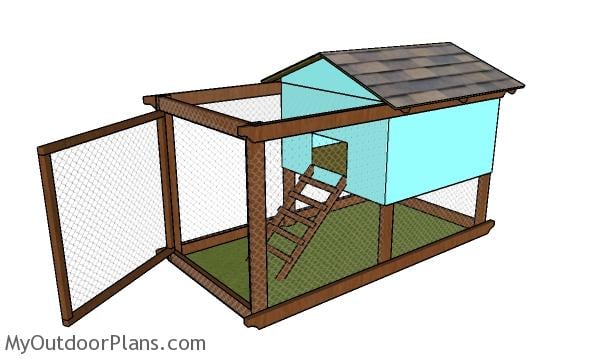
Chicken coop plans free
I have lots of other chicken coop projects on the site, so take a look over them HERE. If you want to get this plan as a PDF file, please take a look over the GET PDF PLANS button. Thank you for the support.

This woodworking project was about 4×8 backyard chicken tractor plans free. If you want to see more outdoor plans, check out the rest of our step by step projects and follow the instructions to obtain a professional result.
EXPLORE MORE IDEAS FOR:
 |
 |
 |
 |
11 comments
Bonjour,
Très beau poulailler et bonne idée.
Beau travail !!!
Where can I find PART 2 referenced in the plans for building the nesting box and doors? Thank you!
What nesting box and what doors? This is a chicken tractor and the full plans are here. I think you are mistaking this plans with my other designs that do have attached nesting boxes.
Hi there, thank you for posting all these plans! I had similar question as above, at the end of these chicken tractor plans, it’s says “Please take a look over Part 2 of the project so you learn how to learn how to (sik) build nesting boxes and doors.” Is this referencing another plan? Thanks!
No part 2 of this project, it’s just an error in the text.
Hey There!
I love this plan! Just what we are looking for. Is it possible to adjust the numbers (in google sketch or whatever software) to a 25% smaller build?
Yes, it is possible. If you ask me to do it, I can’t help since I don’t customize the plans
ok, who could I talk to about it?
I don’t understand the question. As I said, I don’t customize the plans. Therefore, it is up to you to find someone who has the time to do that
Is it possible to just get the plans for the building, without the run or related framing? I have a 10′ x 20′ run and I’m looking for just the coop. The coop in this plan looks perfect!
No, sorry, you would have to modify the plans by yourself.