This step by step diy woodworking project is about A-frame dog house plans. If you want to learn more about how to build an A-frame dog house, we recommend you to pay attention to the instructions described in the article. Plan every step of the woodworking project from the very beginning and invest in the best materials you can afford, if you want to save both time and money.
An A-frame dog house is a nice addition to any property, as it has a pleasant design and it will protect your pet from bad weather. However, this isn’t the most efficient shape for a dog house, especially if you have a large pet. If this is the case, we recommend you to pay attention to the rest of the plans featured on our website and to choose the one that suits you needs best and fits within the budget. See all my Premium Plans HERE.
Projects made from these plans
It’s that simple to build an A-frame dog house!
Cut & Shopping Lists
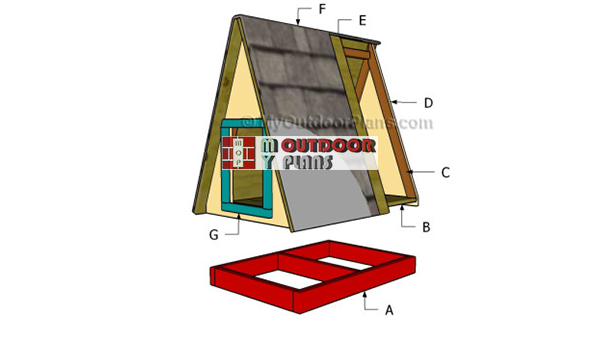
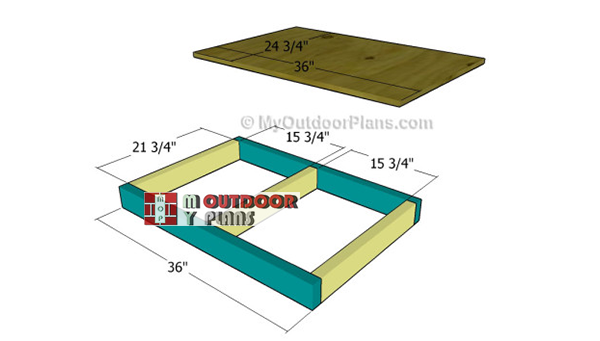
- A – 2 pieces of 2×4 lumber – 36″ long, 3 pieces – 21 3/4″ long FLOOR
- B – 1 piece of 3/4″ plywood – 24 3/4″x36″ FLOORING
- C – 6 pieces of 2×2 – 36″ long RAFTERS
- D – 2 pieces of 3/4″ lumber – 24 3/4″x35 1/2″ long FACES
- E – 2 pieces of 3/4″ plywood – 37 3/4″x40 3/4″ long ROOFING SHEETS
- F – 30 sq ft of tar paper and asphalt shingles ROOFING
- G – 2 pieces of 1×2 lumber – 13″ long, 2 pieces – 14″ long TRIMS
Tools
![]() Hammer, Tape measure, Framing square, Level
Hammer, Tape measure, Framing square, Level
![]() Miter saw, Drill machinery, Screwdriver, Sander
Miter saw, Drill machinery, Screwdriver, Sander
Time
![]() One day
One day
Related
A-frame Dog House Plans
Building-a-dog-house
Top Tip: If you want to create more space for your pet, we recommend you to enlarge the base of the dog house. Work with attention and adjust the size and the design of the A-frame dog house to your needs.
Building an a-frame dog house
Building-dog-house-floor
The first step of the woodworking project is to build the frame of the floor. Cut the 2×4 slats at the right size and lock them together with 2 1/2″ galvanized screws. Make sure the corners are right-angled before inserting the screws, to prevent the wood from splitting.
Add waterproof glue to the joints if you want to enhance the rigidity of the frame. Attach the piece of 3/4″ plywood over the joists and secure it into place with galvanized screws.
Building-the-roof-of-the-A-dog-house
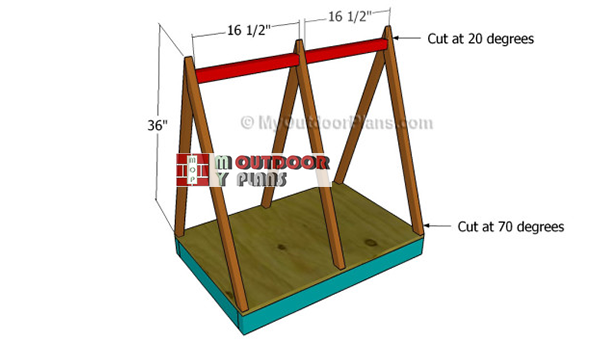
Afterwards, you should build the rafters and attach them to the floor of the dog house. Cut the ends of the rafters at the right angle and assemble them together with screws before fitting them into place.
Place the rafters equally-spaced and install wooden blockings between them, in order to get the job done in a professional manner. Drill pilot holes at both ends of the blockings and insert 2 1/2″ screws.

Building the faces of the dog house
Continue the woodworking project by attaching the faces to the structure, as shown in the plans. Cut the 3/4″ plywood sheets at the right size and lock them to the rafters with screws, after aligning the components properly.
Top Tip: Cut out the door opening by using a jigsaw, after drilling a starting hole. Smooth the cut edges with sandpaper, as to prevent your dog from getting injured.

Attaching the roofing sheets
The next step of the project is to attach the roofing sheets to the rafters. Cut the 3/4″ plywood at the right size and secure them into place with galvanized screws.
Top Tip: Make sure the sheets overhang the faces of the dog house several inches, to protect the structure from water damage. Cut the top of the sheets at 70 degrees, if you want to get a professional result.

Attaching the trims
If you want to enhance the look of the dog house, we recommend you to fit trims around the door opening. Cut the 1×2 trims at the right size and secure them into place with galvanized screws. Add waterproof glue to the joints, if you want to get the job done in a professional manner.

Attaching the roofing
If you want to protect the structure from decay or bad-weather, we recommend you to cover the roofing sheets with tar paper. Secure the strips of tar paper to the roofing sheets with staples, after making sure they overlap for at least 2″.
Install asphalt shingles over the tar paper, starting with the bottom left of the roof. Don’t forget to fit drip edges, in order to drain the water in a professional manner.

A-frame dog house plans
One of the last steps of the woodworking project is to take care of the finishing touches. Therefore, fill the pilot holes with wood putty and smooth the surface with 120-grit sandpaper.
Top Tip: In order to protect the lumber from water damage, we recommend you to cover the components with several coats of paint. Place the wooden chair in a proper location and move it whenever necessary.
This woodworking project was about a-frame dog house plans. If you want to see more outdoor plans, we recommend you to check out the rest of our step by step projects. LIKE us on Facebook and Google + to be the first that gets out latest projects.
EXPLORE MORE IDEAS FOR:
 |
 |
 |
 |
1 comment
Does anybody have an idea on the cheapest way to roof this house. I am a teacher and have a very limited budget. The cheapest place arond me seems to be Lowes. Thanks for any help!