This step by step woodworking project is about outdoor playhouse plans. Building a garden playhouse is not an expensive nor a time consuming project, so why not to brighten-up the afternoons of your kids, if it’s so easy. First of all, you need to plan everything from the very beginning, starting with the size of the construction, up to the materials and tools you are going to use. In most of the cases you won’t need a building permit, as it’s not a permanent construction, but it’s always better to go to your local building department and find more about the legal requirements.
Buy quality materials if you want to build a durable playhouse, staring with the 2×4 beams up to the 3/4” plywood. Make sure the lumber is perfectly straight and in a good condition, otherwise the end result might not raise up to your expectations. Pre-drill all the wooden components before inserting the screws, to prevent the wood from splitting. In addition, check the corners for squareness, after every step. See all my Premium Plans HERE.
Projects made from these plans
Cut & Shopping Lists
- A – 2 pieces of 2×4 lumber 96” long, 7 pieces of 2×4 lumber 45” long JOISTS
- B – 1 sheet of 3/4″ tongue and groove plywood 4×8′ FLOORING
- C – 4 pieces of 2×2 lumber 94 1/2” long, 4 pieces of 2×2 lumber 43 1/2” WALL PLATES
- C – 22 pieces of 2×2 lumber 45” long WALL STUDS
- D – 150 sq ft 3/4” grooved plywood EXTERIOR SIDING
- E– 14 pieces of 2×2 lumber 34” long – cut at 45º at both ends, 1 pieces of 2×2 lumber 94 1/2”” RAFTERS
- F – 50 sq ft of 1/2” tongue and groove plywood ROOFING SHEETS
- G – 50 sq ft of tar paper ROOFING UNDERLAYMENT
- H– 50 sq ft of asphalt shingles SHINGLES
- I – 100 ft of 1×3 lumber, 24 ft of 1×4 lumber TRIMS
- 500 pieces of 2 1/2″ screws
- 500 pieces of 1 1/4″ screws
- tar paper, asphalt shingles
- wood glue, stain/paint
- wood filler
Tools
![]() Hammer, Tape measure, Framing square
Hammer, Tape measure, Framing square
![]() Miter saw, Drill machinery, Screwdriver, Sander
Miter saw, Drill machinery, Screwdriver, Sander
Time
Backyard kids playhouse plans

Backyard-playhouse-plans
Building an outdoor playhouse is one of those project that don’t require a large investment, but it would certainly put a big smile on you kids faces. Before beginning the actual construction of the playhouse, you should make sure its size fits the needs of your children. Adjust its design in order to suit your tastes and place it in a good location, as to add value to your garden.
Top Tip: Buy quality materials for this project, if you want to build a durable playhouse. Build the floor, the walls and the roof from 3/4” plywood, as it is rigid enough for this type of construction.
Outdoor Playhouse Plans
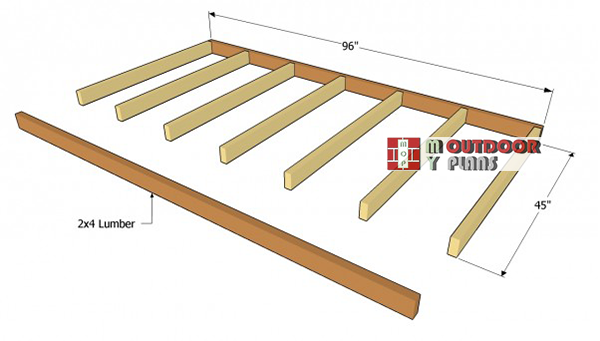
Building-the-floor-frame
The first step of the woodworking project is to build the base of the garden playhouse. Therefore, build the joists from 2×4 lumber and lock them together with 3” wood screws. Make sure the corners are right-angled, before driving in the screws.
Top Tip: Drill pilot holes in the rim joists, to prevent the wood from splitting. Measure the diagonals of the frame and adjust the position of the joists, until they are equal.
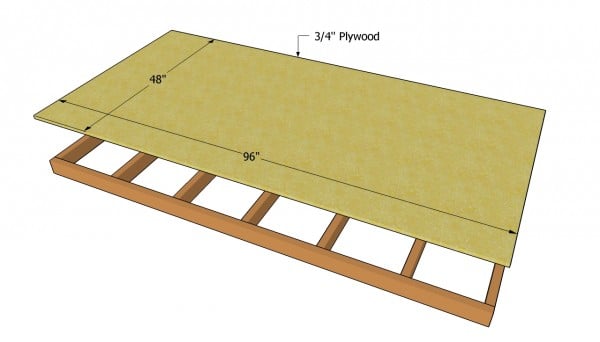
Installing the flooring
Next, you have to attach the flooring of the outdoor playhouse. In order to get the job done as a professional, we recommend you to install a 4×8′ sheet of 3/4” plywood, using 2” wood screw every 10”, along the joists.
Top Tip: Make sure the edges of the plywood sheet are perfectly flush, otherwise adjust the fame. Work on a sturdy and level surface, in order to obtain a horizontal surface.
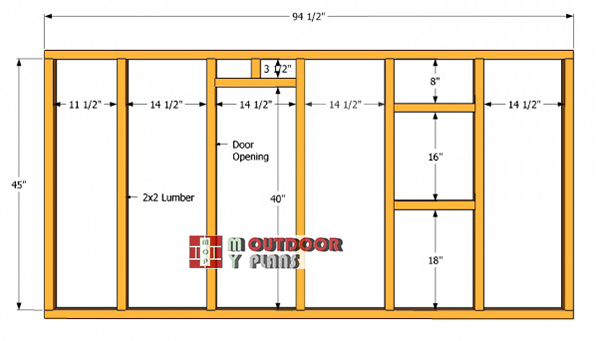
Front-wall-frame
The next step of the project is to build the wall frames and to fit them into place with 3 1/2” screws. Use 2×2 lumber to build the plates and the wall studs, as they are thick enough to make the whole structure rigid.
Top Tip: When building the wall frames, let enough space for a door opening, as well as for a window. Adjust their dimensions according to your needs ans tastes.
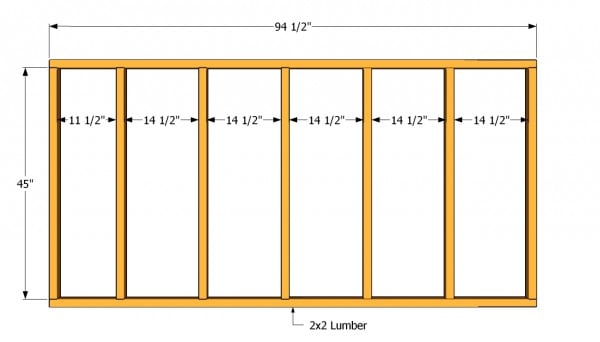
Back wall plans
Building the back wall is a straight forward job, as you need to use the same techniques described above. Cut the components at the right size with a meter saw, before assembling the frame. Drill pilot holes in the plates and insert 3” screws in the studs.
Top Tip: Build the frame on the ground, before securing it into place with 3 1/2”. Make sure the corners are right angled, after each step of the project.
Side-wall-frame
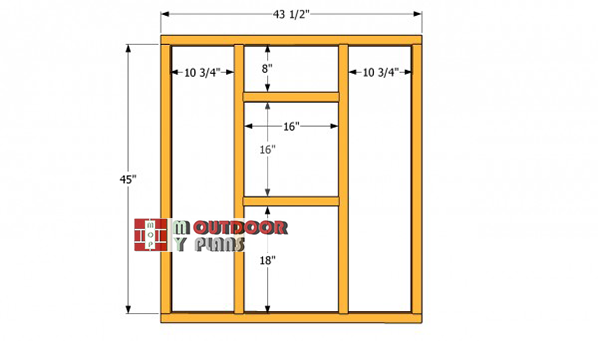
Continue the project by building the side walls. As you can see in the plans, you need to frame a 16×16” window using 2×2 lumber. Adjust the size and the location of the window opening, according to your needs and tastes. Work with great care and good judgement, as to avoid costly mistakes.
Top Tip: Place the frames into place (leave 3/4” to the edges of the floor), plumb them with a spirit level and lock them with 3 1/2” to the joists.
Attachin the exerior siding
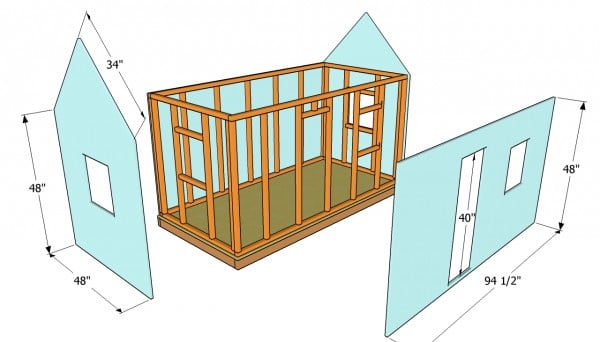
Next, you need to install the exterior siding and to secure it into place with 1 1/4” nails. We recommend you to use 3/4” plywood, as it is a good material for this purpose, but you could use thinner siding, as well. Cut the plywood sheets with a circular saw and cut out the openings, using a jigsaw.
Attach the sheets to the walls, clamp them into place and insert the 1 1/4” nails. Ensure the siding sheets are flush with the edges of the frame.
Installing the roof of the playhouse
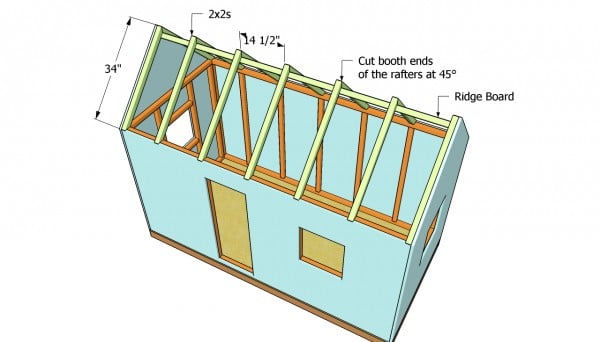
Building the roof of the outdoor playhouse isn’t as complicated as it might look at first glance, if you use the right plans. Cut the rafters at 45º at both ends, before securing them to the top plates with 2” wood screws. Make sure the rafters are perfectly equal and place them equally spaces, 16” O.C.
Fit the ridge board as in the image. Drive in 2” screws from the exterior in the ridge board. Secure the rafters to the ridge, using 3” screws.
Attaching the trims
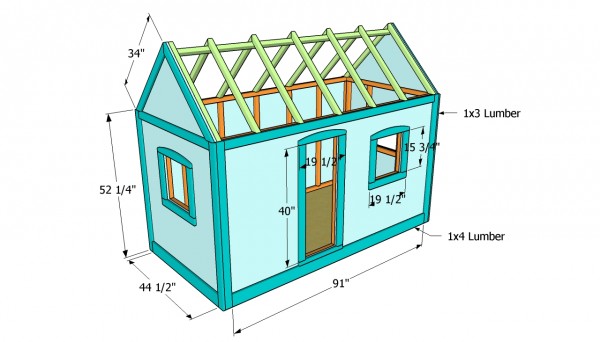
Build all the trims, except the ones placed at the bottom of the playhouse, from 1×3 lumber. Sand the cut edges and the visible edges with medium-grit sandpaper. Insert 1 1/4 nails” trough the trims, to lock them into place, after aligning them properly at both ends.
Top Tip: The bottom trims, made of 1×4 lumber, will hide the joists, so make sure you use quality lumber. Round the top trims, around the door and windows, using a jigsaw.
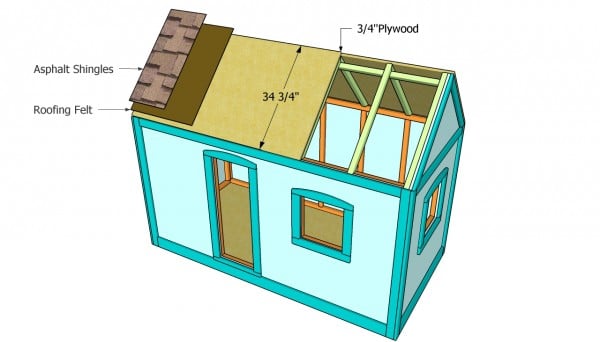
Playhouse roof plans
Attach 3/4” plywood to the rafters and secure them with 1 1/4” nail, every 6”. Make sure the sheets are perfectly flush on all sides. Use tongue and groove plywood, as the sheets connect together easily.
Top Tip: Cover the roof with tar paper and lock it into place with staples, along the rafters. Next, install the asphalt shingles starting with the left bottom of the roof, and secure them with a nail gun ans appropriate nails.
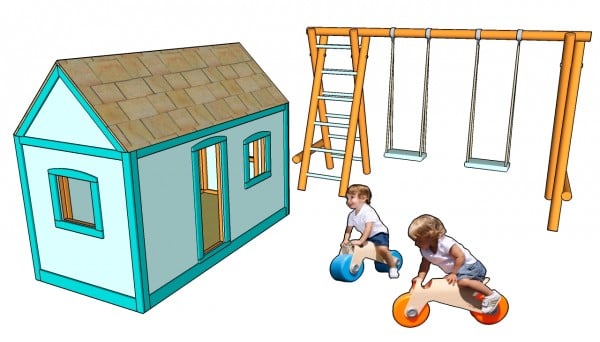
Outdoor playhouse plans
Last but not least, you have to fill the holes, the head of the screws and the gaps with a good filler or a bead of silicone. Let the compound to dry out for several hours, before sanding the surface with 120-grit sandpaper.Vacuum the surface thoroughly, to remove the residues.
Top Tip: Apply several coats of primer and water-resistant paint, to protect the playhouse from rot . Don’t forget to wear a respiratory mask wile applying the paint.
This article was about outdoor playhouse plans free. If you want to see more outdoor plans, check out the rest of our step by step projects and follow the instructions to obtain a professional result.

23 comments
After spending several hours checking out plans, this was the winner by far. Thank you for your acurate and simple plans,
I am happy to hear this. I am here if you have questions regarding the project. I’m looking forward to seeing the end result.
Can you estimate the cost?
It depends on many factors, but it should be around 300 $. The easiest way to get an estimate is to go with the cut list to a lumberyard. If you have other questions, I am here to assist you.
where do I place the 43 1/2 inch 2×4 boards for step C??? Vertically? Horizontally? On the side wall? Sorry, kind of a beginner still, thank you!
The 43 1/2″ boards are the top and bottom plates for the side walls, therefore they are horizontal. You should print the plan and follow the step by step diagrams and instructions for making this project easier. Feel free to ask, if you have more questions.
In your parts list.
C – 4 pieces of 2×2 lumber 94 1/2” long, 4 pieces of 2×4 lumber 43 1/2” WALL PLATES
the 2×4 is a typo right? this should still be 2×2.
Yes. I’ve modified the list. Thanks for letting me know.
Hi! I love this, I’m very excited to start building. What windows should I buy for this project? Thank you!
For this project you don’t need any windows at all. I have designed the playhouse so you leave the openings like this. However, if you want to seal the playhouse, you can custom order some vinyl or wood windows.
Hi again! We’re getting started on Monday, im not sure I understand how the ridge pole is placed.
After you place the rafters, you fit the ridge pole, makings sure the distance between the rafters is equally spaced. Then use secure it into place with 2 1/2″ screws.
Can you share the sketchup file for this project?
I don’t share the skp files.
I agree with the review by Garris May. I spent time searching all over the internet for an clear instruction. This is the best by far. Simple instructions, good illustrated sketches, and good details about what types of sullies I need. As a mother, I feel I could build it. Thank you
Thank you. You should also take a look over the rest of my free playhouse plans here: http://myoutdoorplans.com/category/playhouse-plans/
how big does this play house measure. I am trying to make a playhouse for my girls who are 12 and 10
It is 4’x8′ and it has 4′ walls and roof height at 6′. I recommend you to take a look over my latest plans, as well: http://myoutdoorplans.com/playhouse/6×6-simple-playhouse-plans/ and http://myoutdoorplans.com/playhouse/playhouse-building-plans/ These playhouses have 5′ high walls.
How long would it take for one man to build simples 6×8 playhouse? How many hours approximately 20-30?
I will need to hire a handyman for the job and trying to calculate labor cost.
For a skilled person, I would say 16 hours.
Hello, is there a link that I can download this plan?
Please read the FAQs: https://myoutdoorplans.com/faq/
Do you have any plans that are for a little larger house, and maybe are a lean-to style? I have a 13 year old who would like to build one this summer. We are also getting some windows replaced, so could use the old windows in it to give some natural light inside and such. Thanks!