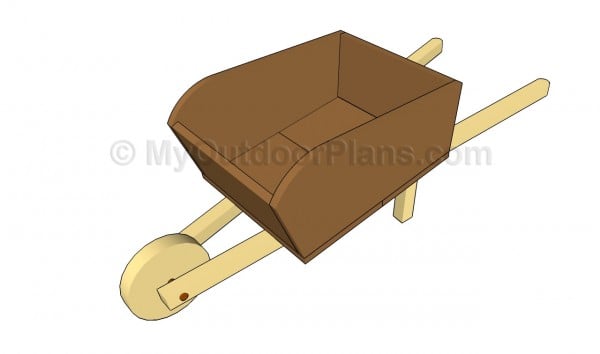
This step by step diy project is about wooden wheelbarrow plans. Building a wheelbarrow out of wood will enhance the look of your garden and add value to your backyard at a small cost. Even if you are an amateur builder, you can get the job done in just a few hours, as these instructions pint out the main things you should know before starting the construction. You can use the wooden wheelbarrow as a planter, or leave it as it is.
There are several things that you should take into account before starting the woodworking project. Therefore, we recommend you to cut the components at the right size, using a saw with a sharp blade and align them at both ends, before locking them together. Drill pilot holes trough the components before inserting the 1 1/4″ finishing nails and add waterproof glue, in order to enhance the rigidity of the structure. See all my Premium Plans HERE.
Projects made from these plans
Cut & Shopping Lists
- A – 2 pieces of 1×10 lumber – 16″ long BOTTOM
- B – 2 pieces of 1×10 lumber – 21 3/4″ long SIDES
- C – 2 pieces of 1×8 lumber – 14 1/2″ long FRONT AND BACK
- D – 2 pieces of 2×2 lumber – 48″ long SUPPORTS
- E – 1 piece of 2×8 lumber – 8″ long, 1 piece of 1/2″ dowel – 8″ WHEEL
- 100 pieces of 2 1/2″ screws
- 100 pieces of 1 1/4″ screws
- 2″ brad nails
- wood glue, stain/paint
- wood filler
Tools
![]() Hammer, Tape measure, Framing square
Hammer, Tape measure, Framing square
![]() Miter saw, Drill machinery, Screwdriver, Sander
Miter saw, Drill machinery, Screwdriver, Sander
Time
Related
Building a wooden wheelbarrow
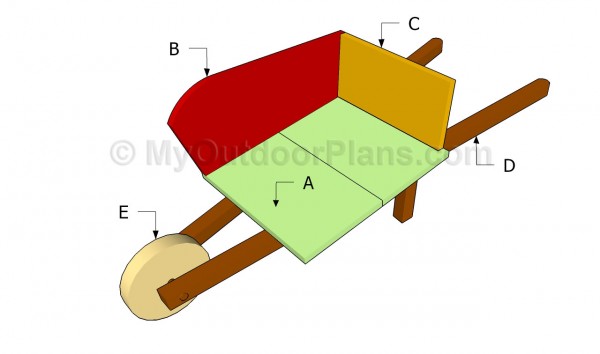
Building a wooden wheelbarrow
Top Tip: Building a small wheelbarrow is a fun project that doesn’t require a significant investment. In addition, any person that knows how to use the basic tools can get the job done in less than a day, if you use proper plans.
Wooden wheelbarrow plans
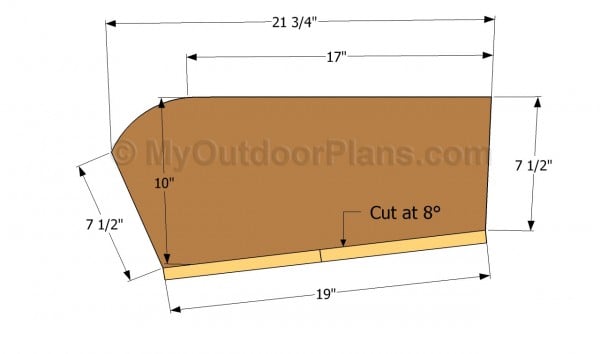
Buidling the side components
The first step of the project is to build the side components of the wheelbarrow. As you can easily notice in the image, you need to cut the components from 1×10 boards. After marking the cut lines on the slats, we recommend you to get the job done by using a good jigsaw.
Don’t forget to smooth the edges of the components by using medium-grit sandpaper. There are many designs you can choose form, so make sure this is the best shape for your needs.
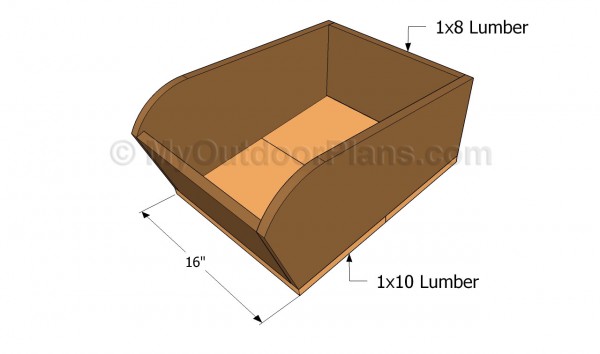
Building the frame
The next step of the woodworking project is to attach the 1×10 slats to the bottom of the frame, as well as to fit the front and the back components. In order to get a professional result, we recommend you to drill pilot holes and to insert 1 1/4″ finishing nails.
Add waterproof glue to the joints, in order to enhance the rigidity of the wooden wheelbarrow. Always align the components at both ends before locking them together, if you want to get a neat look.
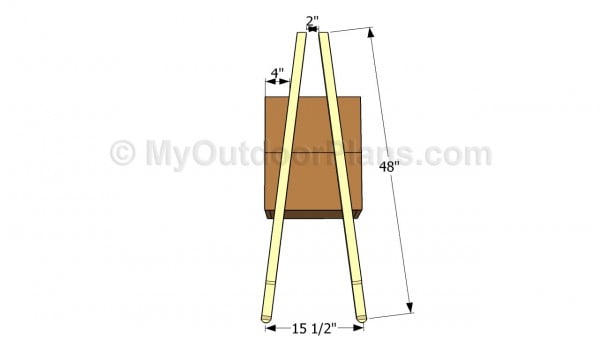
Installing the handles
Continue the project by building the handles and fitting them to the back of the wheelbarrow planter. In order to get a professional result, we recommend you to use 2×2 lumber and 2″ wood screws.
Top Tip: Align the components at both ends, according to your needs. In addition, we recommend you to cut out a small piece of wood at both ends of the handles, as to give them a pleasant appearance.
Installing the supports
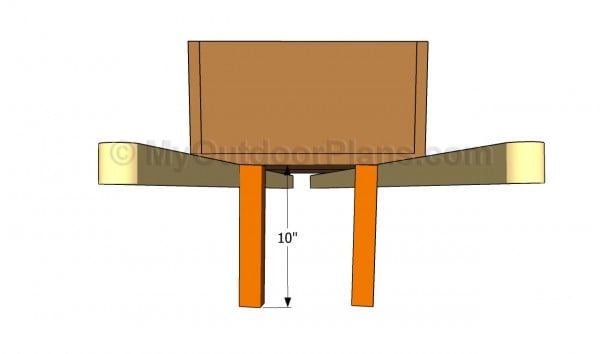
Install 10″ pieces of 2×2 lumber to the handles as to tilt the wooden wheelbarrow. Don’t forget that you can adjust the size of the supports, as well as the angles of the slope.
Top Tip: Drill pilot holes, to prevent the wood from splitting. Countersink the head of the screws and fill the holes with wood putty. In addition, you could round the exposed edges, by using a router and a 3/4″ bit.
Installing the front wheel
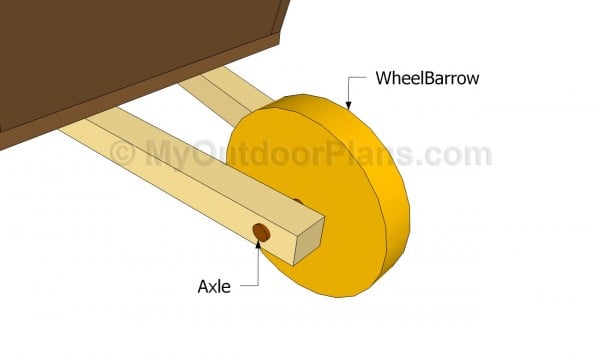
One of the last steps of the project is to build the front wheel of the planter and to fit it into place. In order to add character and style to your project, we recommend you to use 2×8 lumber and a good jigsaw.
Smooth the cut edges with medium-grit sandpaper and drill a 1/2″ holes inside the wheel and trough the supports. Fit an axle into place and lock it to the supports with waterproof glue and screws.
Wooden wheelbarrow plans
Last but not least, you should take care of the finishing touches. Therefore, fill the holes with wood putty and let the compound to dry out for several hours. Smooth the surface with medium-grit sandpaper along the wood grain.
Top Tip: Apply several coats of stain or paint to enhance the look of the outdoor storage box and to protect the components from decay. Check out the rest of the project, to how how to build the deck stair rails.
This project was about wooden wheelbarrow plans. If you want to see more outdoor plans, we recommend you to check out the rest of the projects. Don’t forget to share our projects with your friends, by using the social media widgets.
