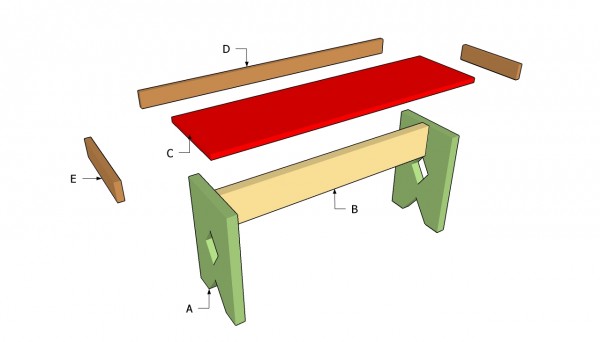
This step by step woodworking project is about simple bench plans. If you want to enhance the look of your garden or you want just a place to relax, but you don’t have the time or the skills required to undertake a complex project, a simple bench is the solution to your needs. There are many designs and shapes you could choose from, so make sure you take into consideration several alternatives, before choosing the final plans.
After you design the bench, according to your needs, you should buy the materials required for the project, from your local diy store. Choose lumber designed for outdoor use, such as cedar, pine or redwood, ensuring they are straight and in a good condition. In order to assemble the bench, you need the following tools: a drill machinery, a screwdriver, a circular saw, a sander and a router. Work with good judgement and align all the components, before inserting the screws.
Projects made from these plans
Cut & Shopping Lists
- A – 2 pieces of 2×12 lumber 18 1/4” long LEGS
- B – 1 pieces of 2×6 lumber 37” long BRACE
- C – 1 pieces of 2×12 lumber 46 1/2” long SEAT
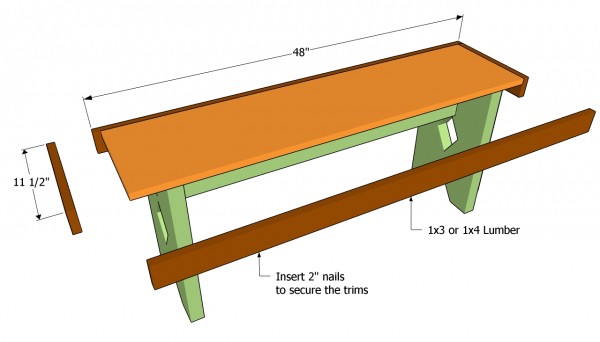
- D – 2 pieces of 1×3 lumber 48” long FRONT AND BACK TRIMS
- E – 2 pieces of 1×3 lumber 11 1/2” long SIDE TRIMS
Tools
![]() Hammer, Tape measure, Framing square
Hammer, Tape measure, Framing square
![]() Miter saw, Drill machinery, Screwdriver, Sander
Miter saw, Drill machinery, Screwdriver, Sander
Time
Build a basic garden bench
Building a simple bench is a straight forward project that can be done by anyone, in just a day. In order to obtain a professional result, you have to use proper tools, materials and woodworking techniques.
Top Tip: Make sure the legs and the seat of the bench have the same width, otherwise you should adjust it, until they are equal. Drill pilot holes in the components before inserting the screws, to prevent the wood from splitting. Add glue to enhance the bond of the joints.
Simple Bench Plans
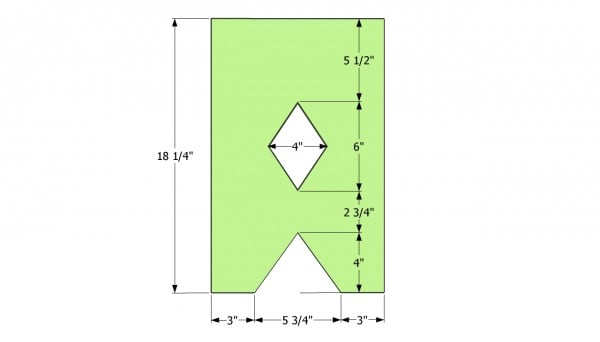
Bench legs plans
First of all, you have to build the legs of the bench, out of 2×12 lumber. Use a circular saw to cut the legs and to enhance the look of the components. In addition, use a jigsaw to cut out the rhomb hole, as in the image. Drill a starting hole and make the cuts with a jigsaw.
Top Tip: Sand the cut edges of the components with medium grit and round the exposed edges with a router and 1/4” bit.

Installing the brace
Afterwards, you cut the brace out of 2×6 lumber and secure the two legs together. In order to get the job done as a professional, you should drill pilot holes trough the legs, as in the plans.
Top Tip: Align the brace, making sure it is perpendicular on the legs and drive in the 3” wood screws. The brace should be flush with the top of the legs and properly centered. Add glue to enhance the bod of the joint.
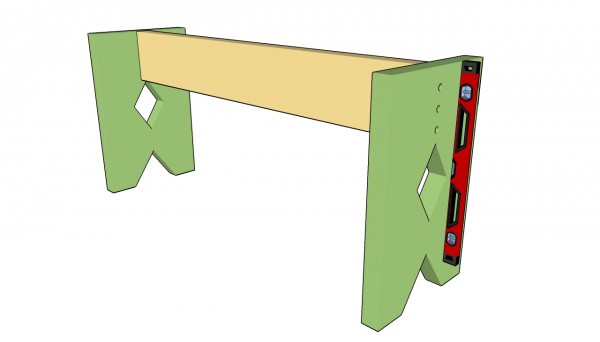
Plumbing the bench
We recommend you to plumb the wooden legs of the bench using a spirit level, as in the image. It is essential to take care of these aspects, if you want to build a simple bench with a neat appearance, in just one day.
Proceed in the same manner and attach the opposite leg to the brace. Work on a sturdy surface, to get consistent results. Make sure the top of the bench is perfectly level.
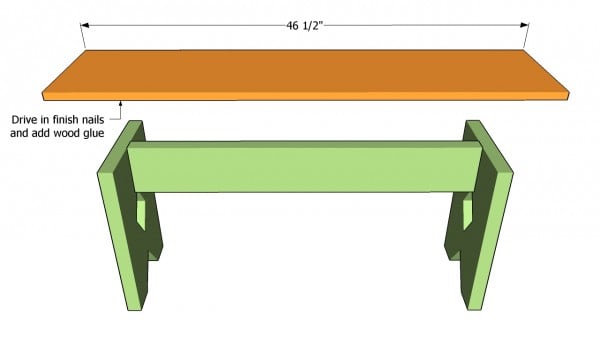
Attaching the seat
The next step of the project is to build the seat of the bench and to attach it into place. As we have already said, you should build the seat from 1×12 lumber, in order to fit properly into place. Center the seat properly, leaving an overhang of 3 1/4” on each side.
Top Tip: Add glue to the top of the legs and fit the top into place. Drive in several 2” finish nails trough the seat into the legs and brace.
Attaching the trims
If you really want to enhance the look of the look of the bench, we recommend you to install the side trims. Build the trims out of 1×3 or 1×4 lumber and fit them into place. Make sure the top of the trims trims are flush with the top of the seat, before locking them into place with finish nails.
Top Tip: Add wood glue to increase the rigidity of the joints. Check if there are gaps between the trims and the seat.
Simple bench plans
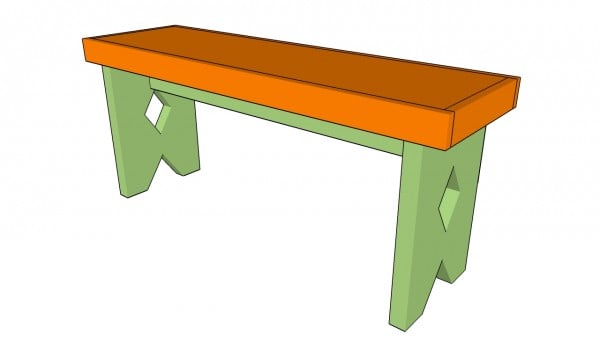
Last but of not least, you have to take care of the finishing touches. Therefore, fill the cracks and the holes with wood filler and let the compound dry out for several hours. Sand the wooden components with 120-grit sandpaper and remove the debris with a dry cloth.
Top Tip: In order to protect the wood from water damage and decay, apply several coats of stain, according to manufacturer’s instructions.
This woodworking project was about simple bench plans. If you want to see more outdoor plans, check out the rest of our step by step projects. Follow the instructions, as to obtain a professional result.

