This step by step diy woodworking project is about outdoor sectional sofa plans. If you want to learn more about building a sectional sofa for your backyard patio, this article is exactly what you need. Follow the step by step instructions and diagrams, before starting the actual construction of the backyard wooden sofa.
Work with good judgement and don’t forget to take a look over the rest of the related plans, as there are many designs and woodworking projects to select from. Work with attention and don’t forget that a good planning will save you from many issues and it will keep the costs within the total budget. Invest in high quality materials, such as pine, redwood or cedar. Drill pocket holes before inserting the galvanized screws, to prevent the wood from splitting. See all my Premium Plans HERE.
Projects made from these plans
Outdoor sectional sofa plans
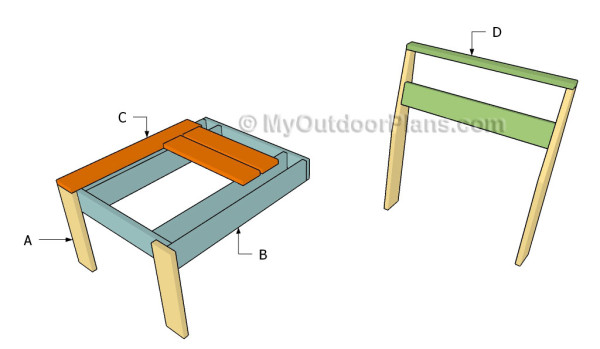
Building a sectional sofa
Cut & Shopping Lists
- A – 2 pieces of 1×4 lumber – 14 1/4″ long, 2 pieces – 28 1/4″ long LEGS
- B – 2 pieces of 1×4 lumber – 26″ long, 2 pieces – 25 1/4″ long, 1 piece – 21″ long, 1 piece – 22 1/2″ long SEAT FRAME
- C – 2 pieces of 1×4 lumber – 24″ long, 6 pieces – 17″ long, 1 piece – 22 1/2″ long SEAT
- D – 1 piece of 1×4 lumber – 22 1/2″ long, 1 piece of 1×2 lumber – 24″ long BACKREST
- 7 pieces of 1×4 lumber – 8 ft
- 1 piece of 1×2 lumber – 2 ft
- 2 1/2″ screws
- 1 1/4″ screws
- wood putty, wood stain
Tools
![]() Hammer, Tape measure, Framing square, Level
Hammer, Tape measure, Framing square, Level
![]() Miter saw, Drill machinery, Screwdriver, Sander
Miter saw, Drill machinery, Screwdriver, Sander
Time
![]() One day
One day
Related
- Part 1: Outdoor sectional – Free chair plans
- Part 2: Outdoor sectional – Free corner chair plans
Building a sectional sofa
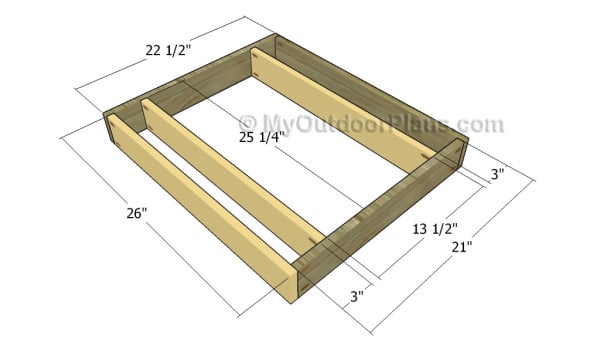
Building the frame of the chair
First of all, you need to build the seat frame for the sectional sofa chairs. Cut the components at the right dimensions using 1×4 lumber. Drill pocket holes to the components, as described in the diagram. Align everything with great care and lock them together with 1 1/4″ screws. Add glue to the joints and make sure the corners are right-angled. Make sure the edges are flush before inserting the screws, to get a professional result.
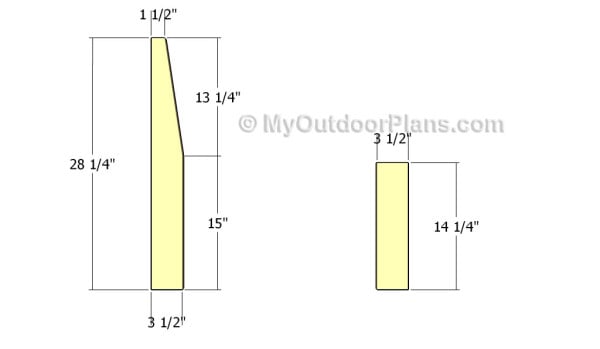
Building the legs
Build the legs for the outdoor sectional sofa out of 1×4 slats. Mark the cut lines on the slats and get the job done with a circular saw. Smooth the edges with fine-grit sandpaper and remove the residues with a damp cloth.
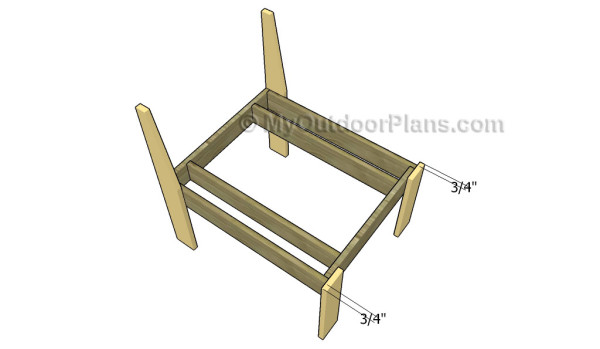
Attaching the legs
Continue the project by attaching the legs to the frame of the seat. Align the components with attention and drill pilot holes through the legs. Insert 1 1/4″ screws to lock the legs to the frame of the seat. Plumb the legs with a spirit level and make sure the seat is perfectly horizontal.
Fitting the seat slats
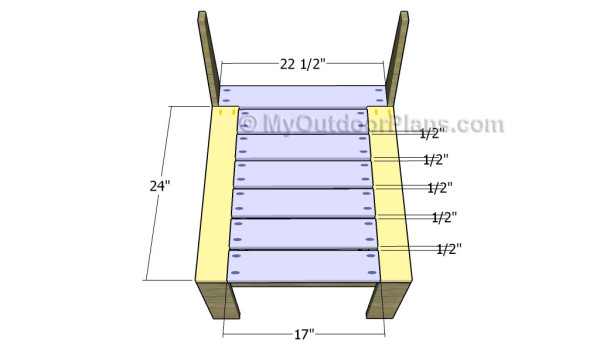
Build the seat for the modular chairs out of 1×4 lumber. Drill pocket holes to the components, as shown in the diagram. Insert 1 1/4″ screws to lock everything together. Add glue to the joints and remove the excess with a damp cloth. Drill pilot holes through the seat slats and insert 1 1/4″ screws into the frame of the chair.
Building the backrest
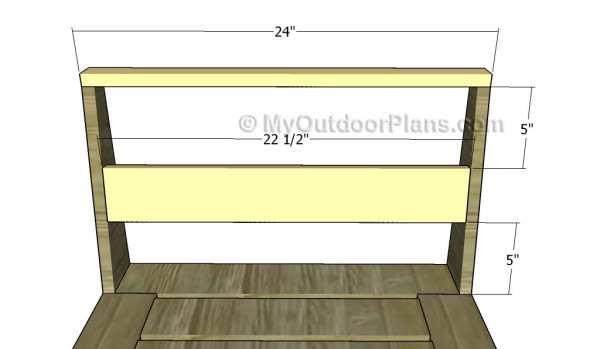
Building the backrest of the chair is a straight forward process. Use 1×2 lumber for the top component and 1×4 lumber for the backrest. Drill pocket holes at both ends of the 1×4 slat and secure it to the back legs using 1 1/4″ screws. Secure the top slat to the legs using 1 1/4″ brad nails.
Outdoor sectional sofa plans
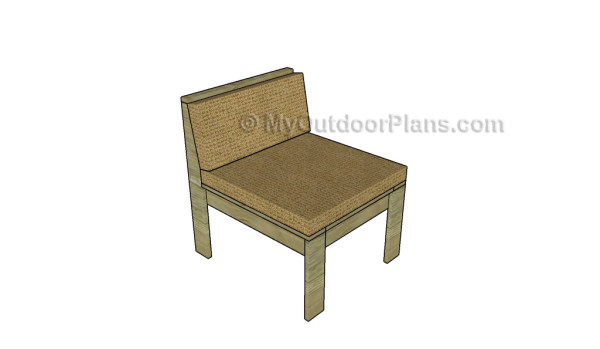
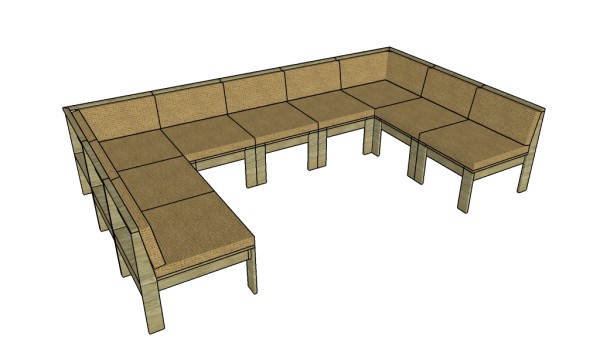
Make or buy appropriate cushions for outdoor sectional sofa, choosing a color that matches the style of you property. You can use several chairs and corner components to assemble your dream outdoor sofa. Check out the rest of the project to learn more about how to build the corner chairs.
Outdoor sectional plans
One of the last steps of the woodworking project is to take care of the finishing touches. Therefore, fill the pilot holes with wood putty and smooth the surface with 120-grit sandpaper.
Top Tip: If you want to enhance the look of the project and to protect the outdoor chair from decay, we recommend you to cover the components with paint or stain.
This woodworking project was about outdoor sectional sofa plans. If you want to see more outdoor plans, we recommend you to check out the rest of our step by step projects. LIKE us on Facebook and Google + to be the first that gets out latest projects and to hep us keep adding free woodworking plans for you.
<< Previous | Next >>

10 comments
just what i was looking for tanks
You’re very welcome! Let me know how it comes out; I love seeing DIY projects!
I was wondering what kind of wood (untreated, pressure treated (to what degree)) you’d recommend? I was going to use pressure treated but I’m considering trying shou sugi ban torching it, and wasn’t sure that’s a great idea. Thanks! -n
I recommend weather resistant lumber. However, you can use any type of lumber if you apply a few coats of appropriate products.
Curious about the top cross piece. You listed 1×2 stock but the width of the top of the back legs is 1 1/2″. Is the a 1/2″ over hang?
1×2 is actually 3/4″x1 1/2″
Hello, awesome plans! This is perfect for my patio. My only question is how to handle the corner seats? I imagine you’d need tapered back on 2 sides to accommodate the cushions, correct? Should I just add 2 more back supports or should I add 2 legs? Thanks so much for the plans!
Oh, i See the plans listed above. Thanks again!
Thank you so much for sharing. Quick question… what size cushions would you recommend for this plan?
Here: https://amzn.to/2PXiCEu