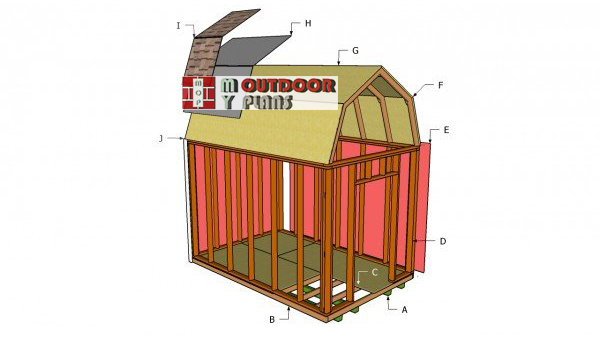
This step by step woodworking project is about gambrel shed plans free. If you need more storage space for your garden tools and other large items, but in the same time you want to add style to your property, you should consider building a nice gambrel shed. You can save a significant amount of money if you choose to get the job done by yourself, but you need to plan everything form the very beginning and use proper tools and materials. You shouldn’t miss my 14×16 barn shed plans, if you want more storage space.
We strongly recommend you to consult the local building codes, as to comply with the legal requirements. Therefore, it is essential to choose a proper location for the construction and to use quality materials. The building requirements vary according to your residence, so you should make sure you build a sturdy foundation that matches the soil structure. Moreover, choose the right plans for your needs or adjust them to fit your tastes. See all my Premium Plans HERE.
Projects made from these plans
Cut & Shopping Lists
- A – 4 pieces of 4×4 lumber, 144” long SKIDS
- B – 2 pieces of 2×6” lumber 144” long, 10 pieces of 2×6 lumber 93” long JOISTS
- C – 3 sheet of 3/4” tongue and groove plywood, 4 x 8′ FLOORING
- D – 31 pieces of 2×4 lumber 90”, 2 pieces of 2×4 76 1/2”, 4 pieces of 2×4 lumber 12” WALL STUDS
- D – 4 pieces of 2×4 – 144”, 2 pieces of 2×4 – 137”, 4 pieces of 2×4 – 89”, 2 pieces of 2×4 – 96” PLATES
- E – 14 pieces of 5/8” T1-11 siding SIDING
- F – 14 pieces of 2×4 36”- 70º cuts at both ends, 14 pieces of 2×4 41 1/4”- ends cut at 70º and 60º RAFTERS
- G – 4 pieces of 3/4″ plywood – 36″x96″ long, 2 pieces – 36″x48″ long, 2 pieces – 41 1/4″x96″ long, 2 pieces – 41 1/4″x48″ long ROOFING
- H – 180 sq ft of roofing felt ROOFING FELT
- I – 180 sq ft of asphalt shingles ASPHALT SHINGLES
- J – 2 pieces of 2×4 lumber – 71″ long, 2 pieces – 23 3/4″ long, 1 piece – 14 3/4″ long 2xDOOR
- J – 2 pieces – 78″ long, 1 piece – 50 1/2″ long DOOR JAMBS
- Read the instructions and pay attention to the diagrams for the other components
- 3 pieces of 4×4 lumber – 12′
- 2 pieces of 2×6 lumber – 12′
- 10 pieces of 2×6 lumber – 8′
- 60 pieces of 2×4 lumber – 8′
- 6 pieces of 2×4 lumber – 12′
- 9 pieces of 3/4″ plywood – 4’x8′
- 14 pieces of T1-11 – 4’x8′
- 180 sq ft of tar paper, 180 sq ft of shingles
- 100 pieces of 1 1/2″ nails
- 500 pieces of 2 1/2″ screws
- 500 pieces of 1 1/4″ screws
- wood glue, stain/paint
- hinges, latch, handle
Tools
![]() Hammer, Tape measure, Framing square
Hammer, Tape measure, Framing square
![]() Miter saw, Drill machinery, Screwdriver, Sander
Miter saw, Drill machinery, Screwdriver, Sander
Time
![]() One weekend
One weekend
Gambrel Shed Building Plans
Free-gambrel-shed-plans
Building a gambrel shed is a complex project, but you can get the job done by yourself, if you pay attention to our tips and use the right tools and materials. There are many plans and designs you can choose from, so you should select the ones that fit your needs.
Top Tip: Adjust the size of the shed according to your needs, but make sure you use the carpentry skills described in this project. Add a small loft, if you need additional storage space.
Gambrel shed plans
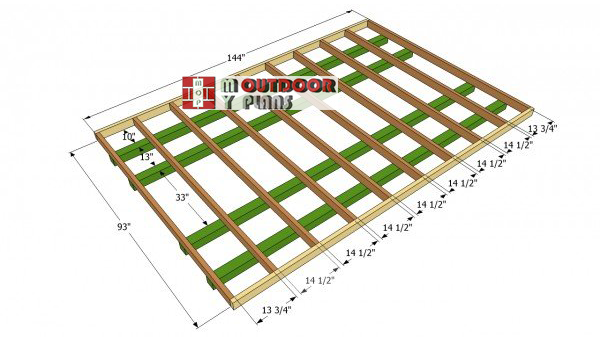
Floor-frame-plans
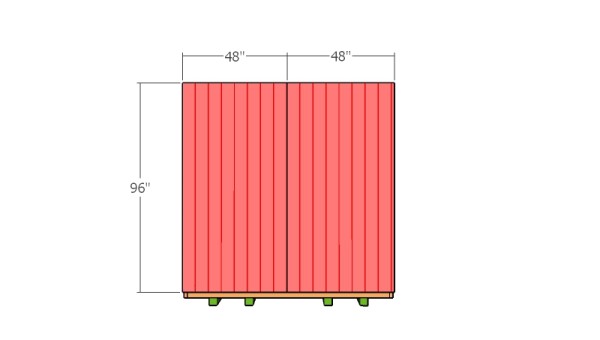
The first step of the project is to build the frame of the floor. Therefore, cut the joists from 2×6 lumber, at the right dimensions. Place the joists on a level surface, drill pilot holes and insert the 3” screws. Use a carpentry square to make sure the corners are right-angled.
Place the frame on several skids or on a concrete slab. On the other hand, you could pour concrete footings and secure the frame tightly to them.

Attaching the flooring sheets
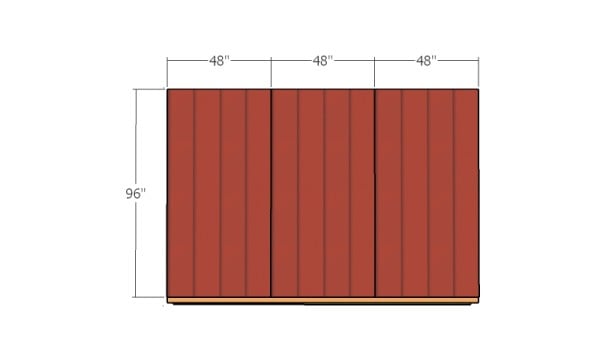
Afterwards, install 3/4” tongue and groove plywood sheets to the frame and secure them into place with 2” screws, along the joists, every 8”. Make sure the sheets are flush with the frame, before driving in the screws.
Top Tip: Using tongue and groove plywood will make the installation process much easier. Install the sheets to the joists, using the pattern you can see in the image.

Side-wall-plans
Continue the project by building the sides of the barn shed. As you should notice in the free plans, you have to cut bottom and top plates from 2×4 lumber and to secure them together with 3” screws. Use a carpentry square to make sure the corners of the wall frames are right angled.
Fit 1/2” plywood block between the studs placed at the ends of the frames. Pre-drill the lumber to prevent the wood from splitting.

Back wall plans
Continue the woodworking project by building the back walls of the gambrel shed, using our plans. In order to build the components and to assemble the frame together, you should use the same techniques described above.
If you want to let the light in, you should frame a 3×3 window. Place the studs as in the image, as the plans are optimized for a minimum amount of materials required.
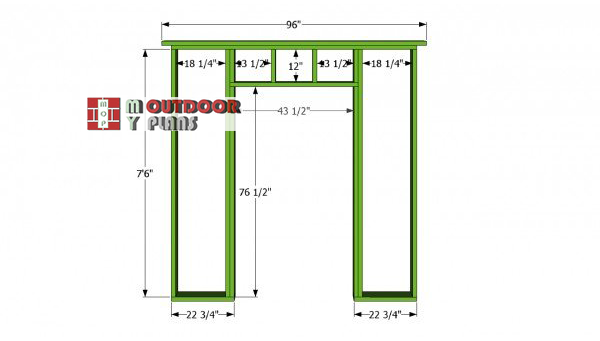
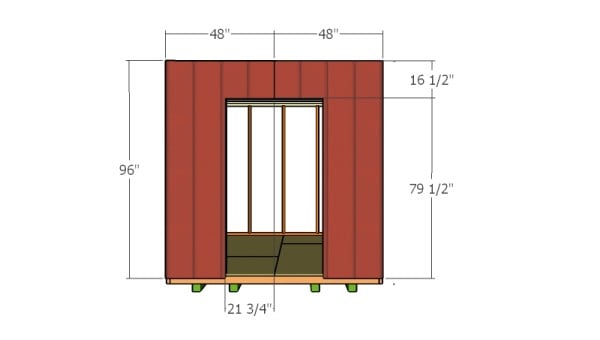
Front-wall-frame-with-door
Building the front front is a straight forward task, if you work with attention and use the right woodworking techniques. Don’t forget to leave enough space for a door opening, according to your needs. Make the frame more rigid by installing cripple studs, as well as trimmer studs.
Secure the side walls with 3 1/2”, trough the bottom plates. Plumb the frames and secure them with braces, before inserting the front and back ends.
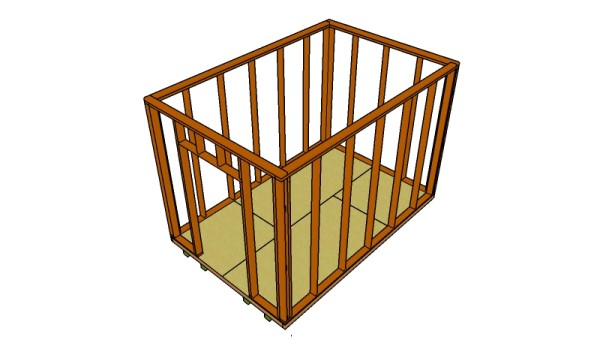
Assembling the shed walls
Make sure the wall frames are flush with the flooring, before inserting the 3 1/2” trough the bottom plates. Lock adjacent frames together with 3” screws. Plumb the frames with a spirit level after each step.
Fitting the back walls
Use 5/8” T1-11 siding and secure the panels to the walls with 1 1/4” nails to the studs, every 8”. Use a circular saw with a sharp blade to obtain accurate cuts.
Fitting the side walls
Attach the siding panels to the sides of the shed, as well.
Fitting the front walls
Make sure you make some cuts to the front sheets, so that the panels fit easily around the door opening.
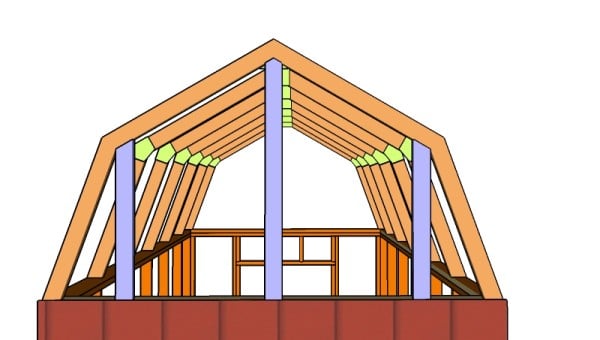
Gambrel-shed-truss-plans
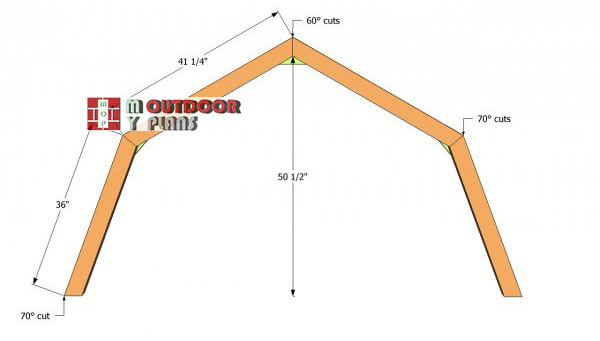
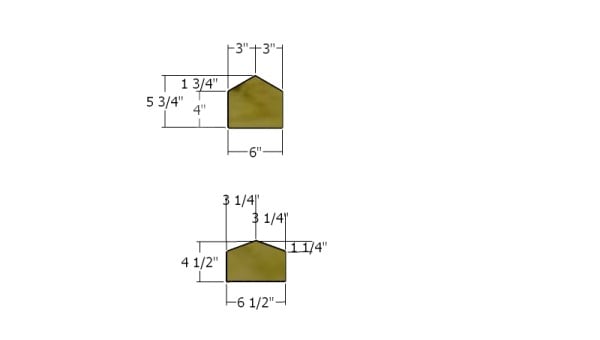
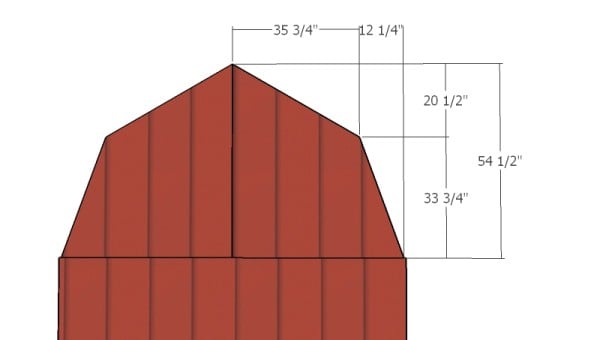
Afterwards, you have to build the roof of the gambrel shed. In order to get the job done as a professional, you have to build the trusses on the ground, making sure they are all equal. Use the dimensions from the image to cut the rafters with a miter saw.
Building the gussests
Reinforce the joints of the rafters with 1/2” plywood gussets. If the trusses don’t have the same size and shape, the roof won’t be symmetrical.

Installing the roof trusses
Fit the trusses on top of the gambrel shed and secure them to the plates with 3 1/2” screws. Drill pilot holes trough the rafters, to prevent the wood from splitting. In addition, plumb the trusses with a spirit level, before driving in the screws.
Top Tip: You could also install front and back overhangs, if you want to enhance the look of the shed. Buy galvanized nails as they are weather resistant.
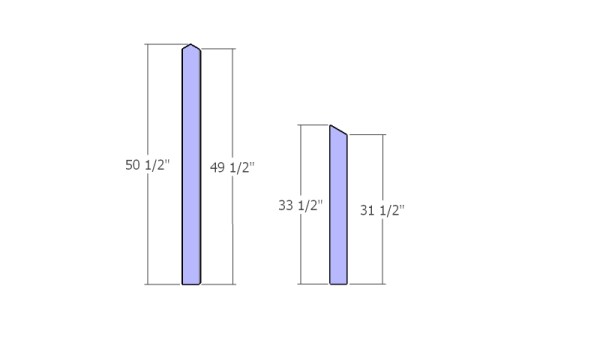
Building the gambrel ends supports
Build the supports for the gambrel ends from 2×4 lumber.
Gambrel ends supports
Toenail the supports into place, as shown in the plans.
Fit the T1-11 panels to the gambrel ends. Use nails to lock the sheets into place, every 8″.
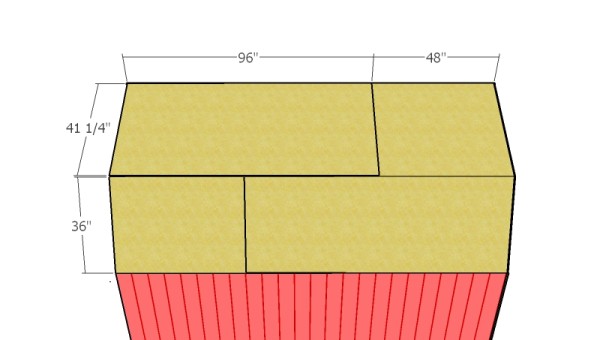
Attaching the roofing sheets
Installing the 3/4 tongue and groove plywood sheets and securing them with 2” nails. Align the plywood sheets at both ends and lock them into position with galvanized nails, along the rafters, every 8”.

Installing the roof of the barn shed
Install the side drip caps under the roofing felt, while the front and back sides should be placed over the tar paper. The tar paper should overlap 2-4”. Install the asphalt shingles starting with the bottom left of the roof.

Fitting the trims
Next, you should fit the trims to hide the corners of the shed, as well as to enhance the front and the back ends. Build the trims from 1×4 lumber and secure them into place with 2” finish nails. Use a good miter saw to obtain accurate cuts.
Top Tip: In addition place the trims around the door opening. In this manner, you can fit the doors and secure them properly.Work with good judgement, if you want to build a durable shed.
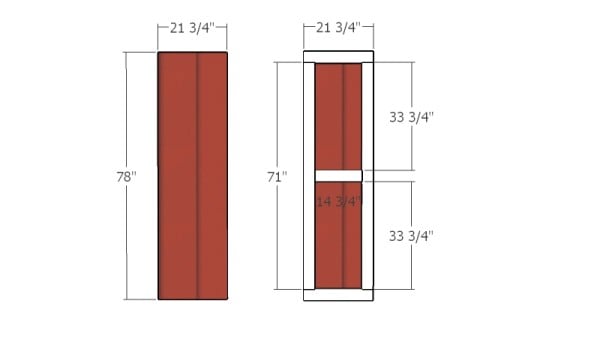
Building the doors
Build the doors from 5/8” plywood and 2×4 trims. You can install a large door or build double doors. Cut the panels with circular saw and attach the trims to the plywood. Secure them with 1 1/4” nails, every 6”.
Top Tip: Make sure the corners are right-angled, using an L-square. Fit the doors into the opening, lock them with a couple of hinges and a also fit a nice latch.
Fitting the door jambs
Fit the door jambs around the opening. Cut the 2×4 slats at the tight dimensions and lock them into place with 2 1/2″ nails.

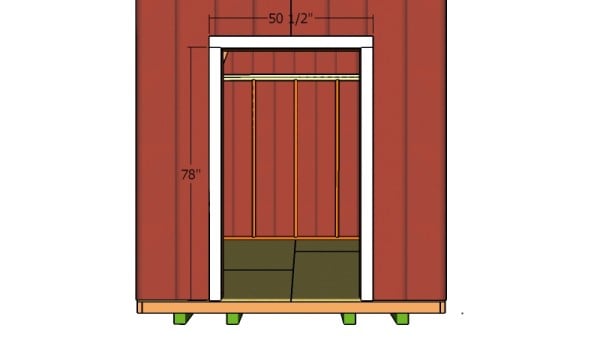
Shed door plans
Fit the doors to the opening and lock them to the jambs using hinges. In addition, fit a latch to lock the doors into place.

Gambrel shed plans
Last but not least, you have to take care of the finishing touches. Therefore, fill the holes with a good wood filler and let it dry out properly, before sanding the surface with 120-grit sandpaper, along the wood grain.
Top Tip: Vacuum the surface thoroughly, before applying the coats of primer and paint. Make sure the colors match the design of constructions on your property.
This woodworking project was about free gambrel shed plans. If you want to see more outdoor plans, we recommend you to check out the rest of our step by step projects.
22 comments
looking for plans for a shed 10X10 with a gambrel roof. using 2X4 throughout 24 in. centers. walls will be 6 ft.
We don’t have plans for a 10×10 gambrel shed. This is the closest to what you are looking for. I’ll add your request to out to-do list, but it will take a while.
Looks simple enough. I am tying to build a 12×30 tiny house in this style.
That sounds like a great idea. Good luck and let me know how it turns out!
Is the plans for the Free Gambrel Shed Plans on the web page all there is? If we order plans ( if we can order them) is there more info and pictures on the ordered plans? As an example what the dimensions 1/2” plywood gussets. Yes i can wing making the gussets , just using it as an example.
MyOutdoorPlans.com is a website providing free woodworking plans. We do not sell plans. You can print our plans using the widget and we can get a little more in-depth with this specific plans, if you have trouble following it. In addition, you can check our latest 12×16 barn shed plans here: http://myoutdoorplans.com/shed/12×16-barn-shed-plans/
I’m interested in haviing a loft in the gambrel of my 8×12 shed. I wanted a 7’6″ lower section and at least a 6′ tall loft (on center only)
To give it the right height to width ratio, I was thinking of building the gambrel across the 12′ length.
What do you guys think of that idea?
It should work, but wouldn’t it be too narrow if you will make across the 12′ length, considering the double doors?
Hello. My shed is up and it looks great, on the outside. I would like to insulate and sheet it inside before I build any benches or shelves, but I’m having a problem with the truss gussets which are in the way. Can I trim them flush on the underside or will that weaken the structure?
This was a good plan for me and my limited building skills. Thanks
I understand you issue. You could cut out the excess, but attach metal plates on the opposite sides of the joints to make up for that, just to be sure. If you don’t mind, I would be thrilled to see how your shed turned out.
looking at your plans for the8x12 gambrel roof shed I am having trouble understanding the door way opening at 76 1/2″ when the wall stud height is 76″ its listed under front wall door plans
The wall studs are not 76″ long, but 7′ 6″ long which means 90″. Don’t forget to take a look over my 12×16 barn shed plans, as well: http://myoutdoorplans.com/shed/12×16-barn-shed-plans/
Hi,
I’m trying to download the file. You mentioned a widget but don’t know what you’re talking about here… thanks
Please read the FAQs: http://myoutdoorplans.com/faq/ You can only download and print plant on desktop (doesn’t work on mobile or tablet).
I am building an 8×8 gambrel shed. What is the technique used to bend the shingles over the upper pitch to the lower pitch of the roof?
Sorry, but I can’t help you with that. If anyone knows, feel free to add a comment.
I am looking for blue print’s or plan’s for an 8′ foot wide by 33′ foot Long barn shed with 3″ inch over hang roof gambrel with high lower ridges angle
I don’t have plans for that.
I am looking for plans for a 12×8 barn style with double doors and one window on each side of the door on the 12′ side. I want the 12′ side as my front
Do you have those plans?
No, I don’t have plans for that.
looking for a 12×20/or24 or 14/24 gambrel plans
can you help??
Yes. Plans here: http://myoutdoorplans.com/shed/12×24-gambrel-shed-plans/