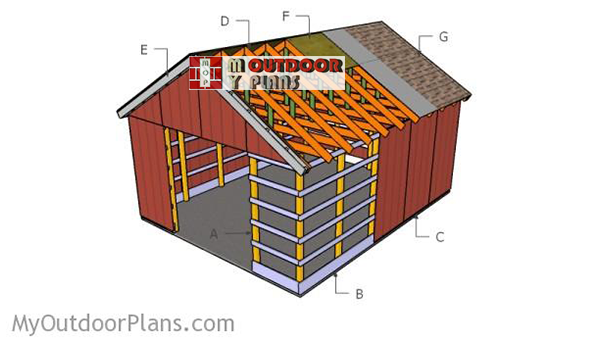
This step by step diy woodworking project is about free pole barn plans. The 16×20 pole barn has a gable roof. The project features instructions for building a simple and fairly cheap barn using common materials and tools. You need to set the posts into the ground and to secure them together to the top. In addition, attach a roof to protect the construction from bad weather. Make sure you take a look over the rest of plans to see alternatives and more projects for your garden.
When buying the lumber, you should select the planks with great care, making sure they are straight and without any visible flaws (cracks, knots, twists, decay). Investing in cedar or other weather resistant lumber is a good idea, as it will pay off on the long run. Use a spirit level to plumb and align the components, before inserting the galvanized screws, otherwise the project won’t have a symmetrical look. If you have all the materials and tools required for the project, you could get the job done in about a day. See all my Premium Plans HERE.
Projects made from these plans
It’s that simple to build a pole barn!
Free Pole Barn Plans
Building-a-16×20-pole-barn
Cut & Shopping Lists
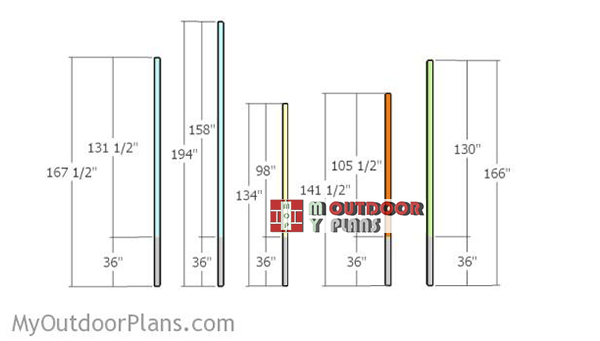
- A – 4 pieces of 4×4 lumber – 141 1/2″ long, 8 pieces – 134″ long, 2 pieces – 130″ long, 2 pieces – 167 1/2″ long, 1 post – 194″ long POSTS
- B – 10 pieces of 2×4 lumber – 240″ long, 2 pieces of 2×10 lumber – 240″ long, 10 pieces of 2×4 lumber – 46 1/2″ long, 2 pieces of 2×10 lumber – 46 1/2″ long, 5 pieces of 2×4 lumber – 189″ long, 1 piece of 2×10 lumber – 189″ long SUPPORTS
- C – 16 pieces of T1-11 siding – 48″x96″ long, 4 pieces – 48″x34 1/2″ long, 4 pieces – 62 1/4″x48″ long SIDING
- D – 2 pieces of 2×6 lumber – 120″ long, 1 piece – 192″ long, 2 pieces – 23 3/4″ long, 1 piece – 50 1/4″ long 11xTRUSS
- D – 2 pieces – 12″x13 3/4″ long, 1 piece – 12″x24″ long, 2 pieces – 3 1/2″x11 1/2″ long, 3 pieces – 3 1/2″x9 1/2 long 11xGUSSETS
- E – 4 pieces of 2×6 lumber – 120″ long, 7 pieces – 2 1/4″ long 2xOVERHANG
- F – 4 pieces of 3/4″ plywood – 48″x96″ long, 24 pieces – 48″x48″ long, 2 pieces – 24″x48″ long, 1 piece – 24″x96″ long ROOFING
- G – 400 sq ft of tar paper, 400 sq ft of tar paper ROOFING
- 12 pieces of 4×4 lumber – 12 ft
- 2 pieces of 4×4 lumber – 14 ft
- 3 pieces of 4×4 lumber – 16 ft
- 18 pieces of 2×4 lumber – 8 ft
- 10 pieces of 2×4 lumber – 20 ft
- 5 pieces of 2×4 lumber – 16 ft
- 11 pieces of 2×6 lumber – 16 ft
- 22 pieces of 2×6 lumber – 10 ft
- 1 piece of 2×10 lumber – 8 ft
- 2 pieces of 2×10 lumber – 20 ft
- 1 piece of 2×10 lumber – 16 ft
- 20 pieces of T1-11 siding 5/8″ – 4’x8′
- 500 pieces of 2 1/2″ screws
- 500 pieces of 1 5/8″ screws
- 13 pieces of 3/4″ plywood – 4’x8′
- 2 pieces of 1/2″ plywood – 4’x8′
- 22 pieces of rafter ties
- 2 boxes of 1 1/2″ structural screws
- 500 ft tar paper, 500 ft of asphalt shingles
- tube forms
- concrete
Tools
![]() Hammer, Tape measure, Framing square, Post hole digger, Level
Hammer, Tape measure, Framing square, Post hole digger, Level
![]() Miter saw, Drill machinery, Screwdriver, Sander
Miter saw, Drill machinery, Screwdriver, Sander
![]() Safety Gloves, Safety Glasses
Safety Gloves, Safety Glasses
Time
![]() One week
One week
Related
How to build a 16×20 pole barn
Building-the-posts-for-pole-barn
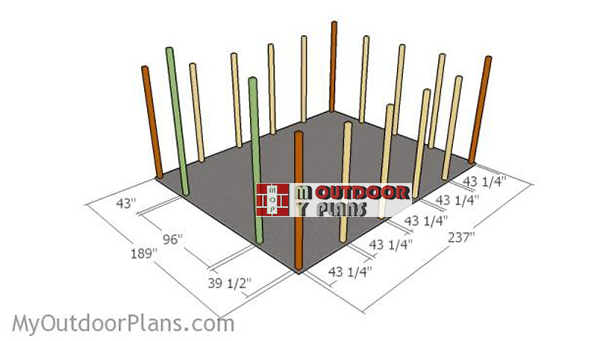
The first step of the project is to build the posts for the barn shed. The green posts are for the front of the barn. The brown posts are the ones for the corners of the barn. The yellow posts are the side posts. The blue posts are for the back of the barn (you can also use yellow posts for the back of the barn, if you want to simplify everything).
You need to set the posts into concrete for about 3-5′. Dig holes into the ground and remove the vegetation layer before inserting the screws. Use a post hole digger to get the job done quickly.
Fitting-the-poles
Use the color code from the diagram to place the posts properly. Use batter boards and string to lay out the posts in a professional manner. Apply the 3-4-5 rule to the corners to make sure they are square. In addition, make sure the diagonals are equal.

Fitting the back poles
It is essential to take accurate measurements before fitting the posts.
Installing the posts
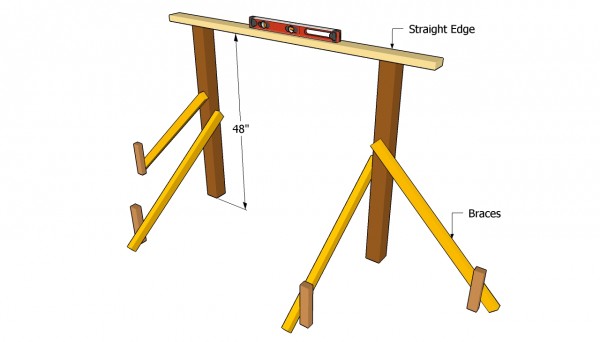
Use a spirit level to plumb the posts. Tamp the bottom of the holes thoroughly and make sure it is plane. In addition, use temporary braces to lock the posts into place tightly while pouring the concrete in the holes. Let the concrete to dry out before continuing the project. Make sure the top of the side posts are horizontal and cut out any excess.
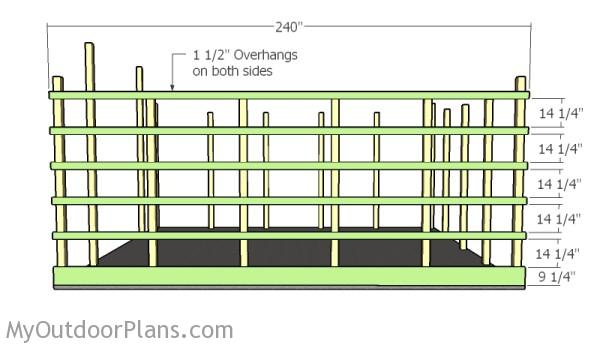
Fitting the supports to the sides
Fit the 2×4 supports to the sides of the barn, as shown in the diagram. Place the supports equally-spaced and lock them to the the poles using 2 1/2″ screws. Fit a 2×10 beam to the bottom, to add strength to the structure. Make sure you invest in weather-resistant lumber as the components will be exposed to moisture.
As you can notice in the plans, you need to make sure the supports overhang on both sides for 1 1/2″ screws.
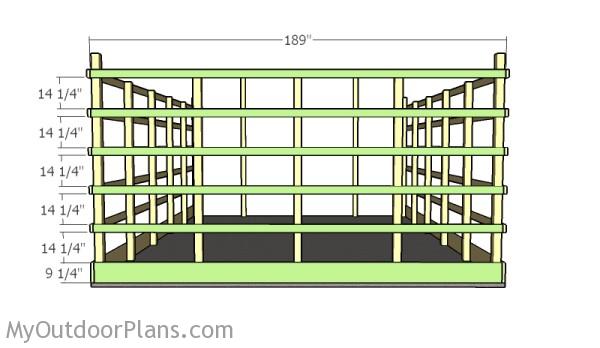
Fitting the supports to the back
Fit the 2×4 horiozntal supports to the back of the barn. In addition, fit the bottom beam to the posts. Drill pilot holes through the beams and insert 2 1/2″ screws into the posts.
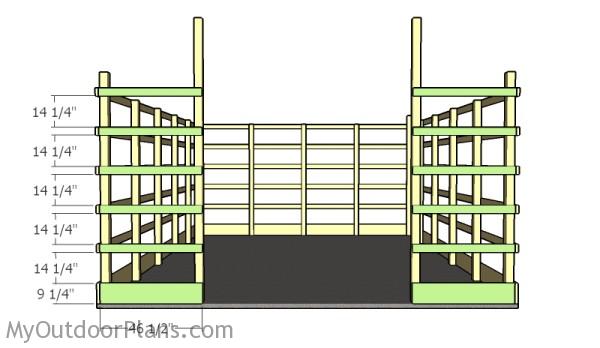
Fitting the supports to the front
Install the supports to the front face of the barn. You should remember that you can adjust the width of the opening to suit your needs.
Fitting the siding sheets
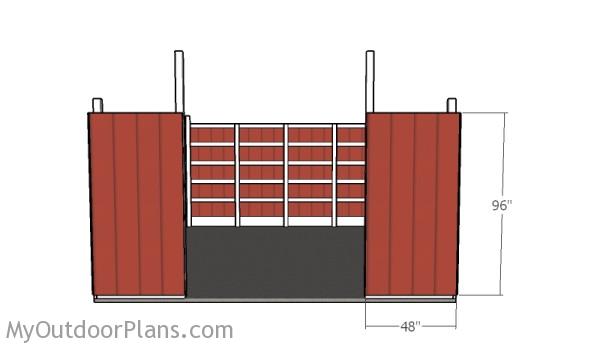
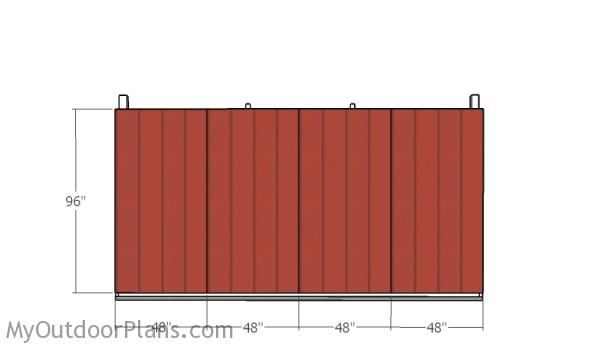
Fitting the panels to the front
Continue the project by attaching the T1-11 siding to the exterior of the barn. Align the sheets to the top supports and secure them into place using 1 5/8″ screws or nails. Leave no gaps between the components and secure them to the supports every 8″.
Fitting the panels to the back
Fit the 4×8 sheets to the back of the barn. Align the edges and leave no gaps between the siding sheets.
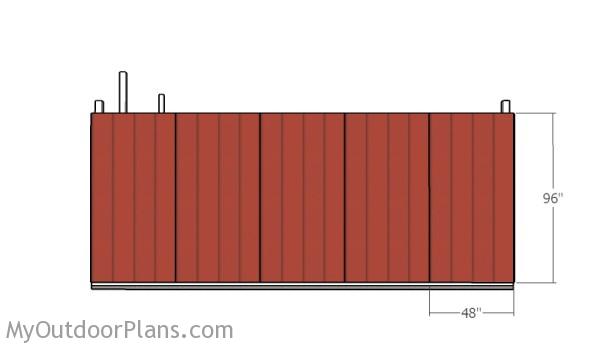
Fitting the panels to the sides
Continue the project by fitting the panels to the sides of the barn. Make sure you leave no gaps and secure the sheets tightly to the horizontal supports.
Building the roof
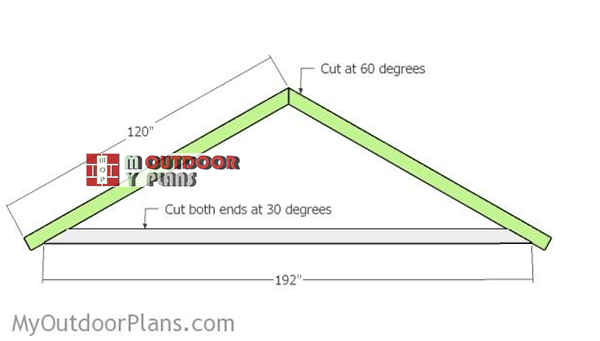
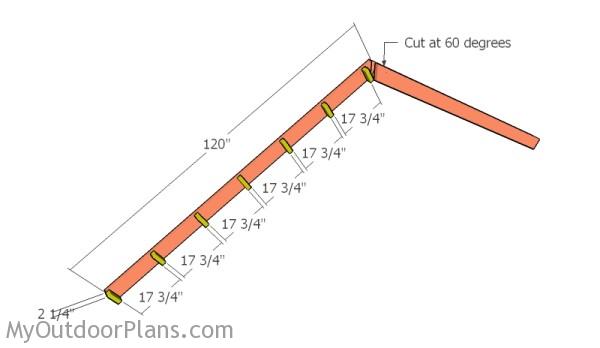
Building-the-trusses
Building the roof for the barn requires 2×6 lumber. Cut both ends of the bottom rafters at 30 degrees. Cut one end of the regular rafters at 60 degrees.
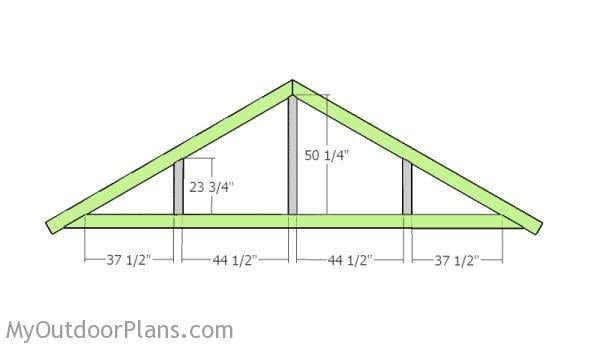
Fitting the supports
Next, you need to install the supports to the trusses. Cut the top of the supports at 60 degrees. Cut both sides of the middle support at 60 degrees.
Use 1/2″ plywood to make the gussets for the trusses. Mark the cut lines on the plywood sheet and get the job done with a circular saw.
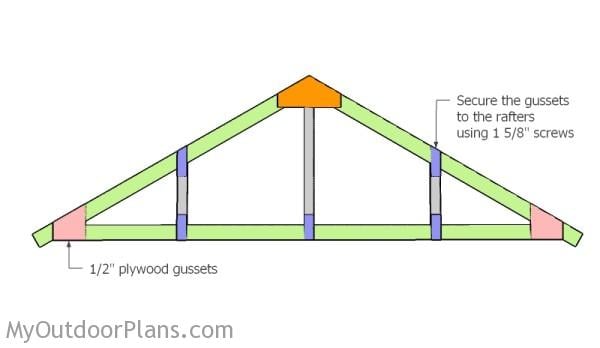
Fitting the gussets
Fit the gussets to the joints of the components, as shown in the diagram. Align the edges with attention and insert 1 5/8″ screws into the rafters.
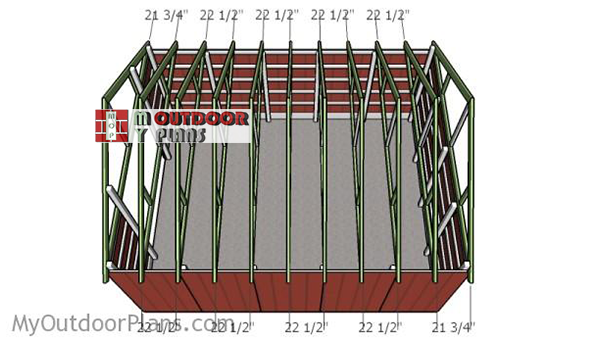
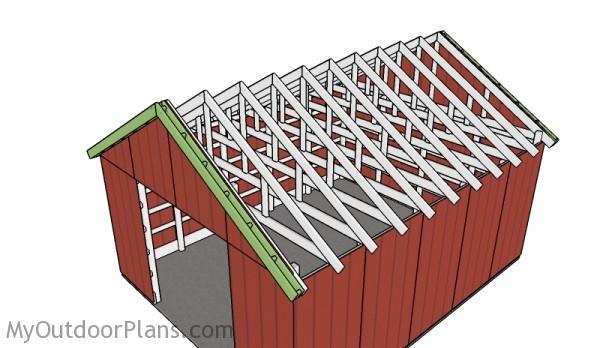
Attaching-the-trusses-to-pole-barn
Place the trusses to the top plates of the 16×20 pole barn. Place the trusses every 24″ on center. Use appropriate hardware to secure the trusses to the top supports of the barn. Use a spirit level to make sure the trusses are plumb.
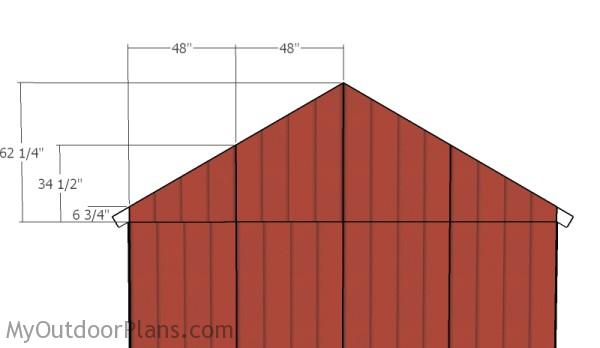
Fitting the end gable panels
Cut the panels for the gable ends at the right shape and attach them to the front and back of the pole barn, as shown in the diagram. Align the edges with attention and secure the panels to the supports using 1 5/8″, every 8″.
Building the overhangs
Build the front and the back overhangs for the barn shed. You can adjust the size of the overhangs to suit your needs. Drill pilot holes through the rafters and insert 2 1/2″ screws into the blockings.
Fitting the overhangs
Attach the overhangs to the front and to the back of the barn shed. Use 2 1/2″ screws to secure the overhangs to the structure, after drilling pilot holes.
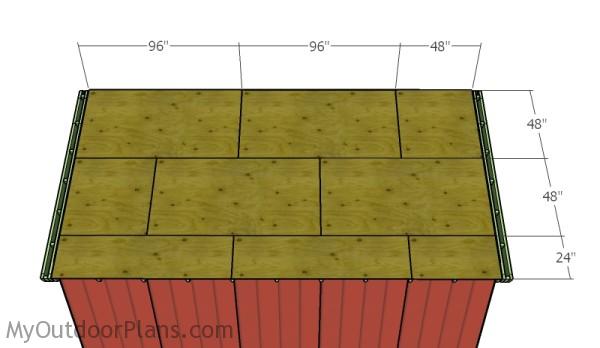
Fitting the roofing sheets
Next, you need to attach the roofing sheets to the rafters, as shown in the diagram. Use 3/4″ tongue and groove plywood. Align the edges with attention and follow the pattern described in the plans. Secure the sheets to the rafters every 8″ with 1 5/8″ screws.
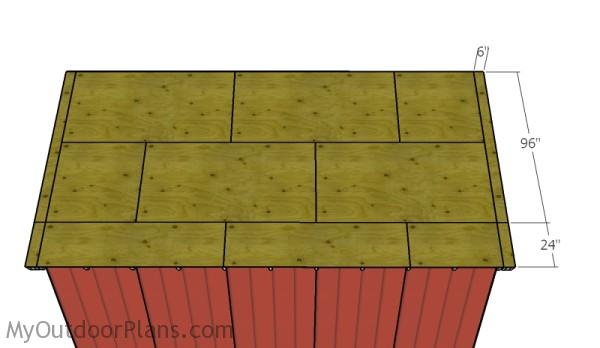
Fitting the overhang roofing
Cut the remaining pieces of plywood for the overhangs. Align the sheets and secure them to the rafters using 1 1/4″ screws. Leave no gaps between the components for a professional result.

Fitting the asphalt shingles
Cover the roof with tar paper, making sure the strips overlap at least 2″. Then install the asphalt shingles starting with the bottom of the roof. Read here more about how to install the asphalt shingles.
Finishing touches
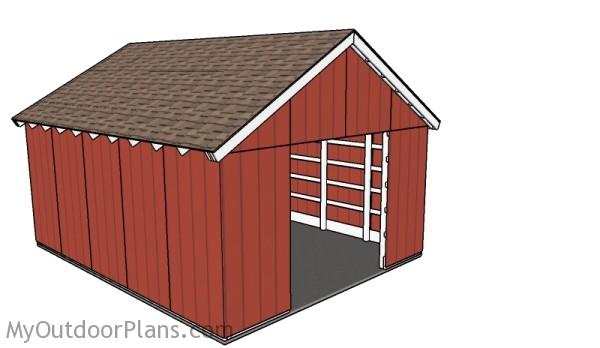
Free pole barn plans
Last but not least, you should take care of the finishing touches, as to be able to continue the process with the rest of the steps. Therefore, we recommend you to check if all the components are installed properly into place.
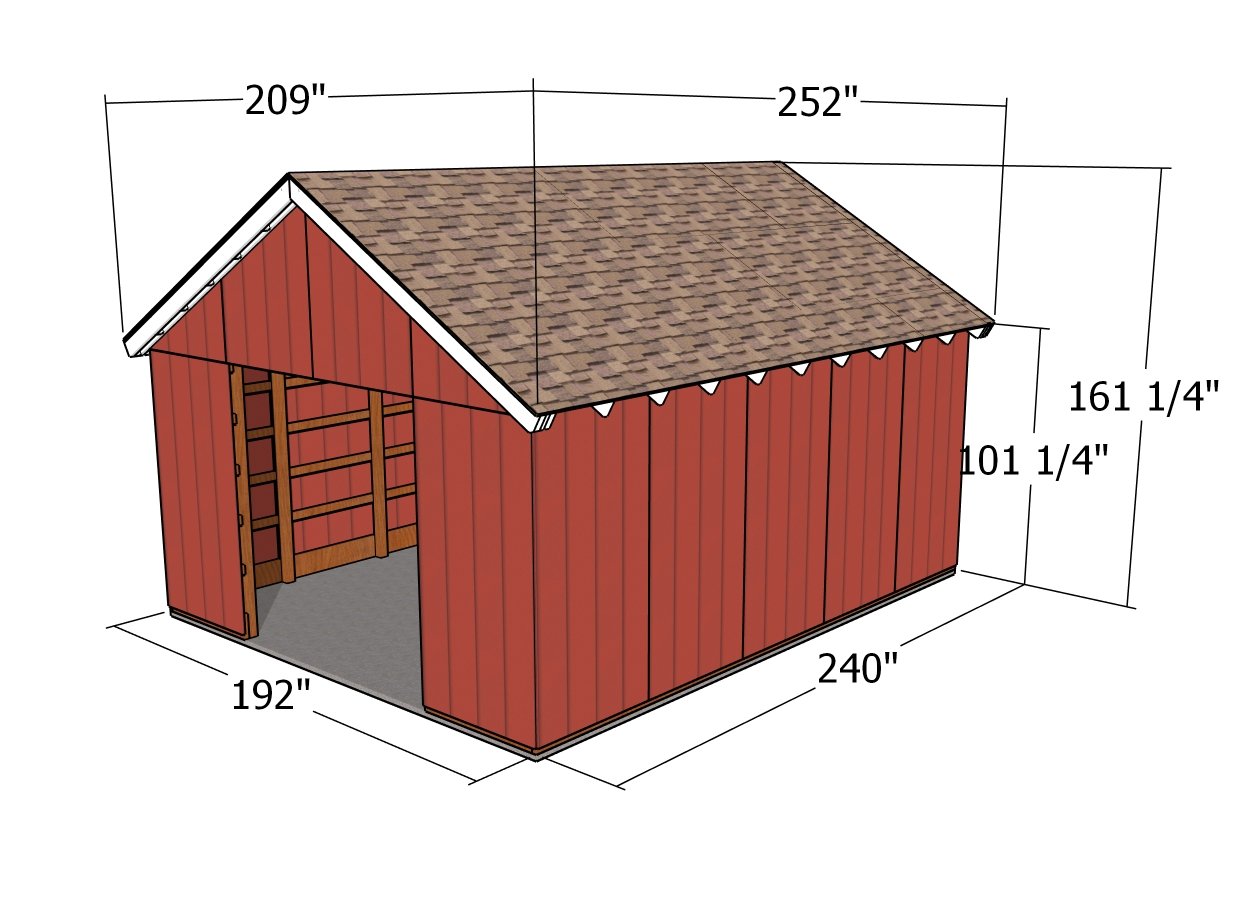
16×20 Pole Barn – dimensions
Building a 16×20 pole barn with a gable roof and post frame construction will likely cost you between $5,000 and $8,000, depending on the materials and finishes you choose. The post frame design is cost-effective and sturdy, making it an excellent choice for a durable, long-lasting structure. This investment gives you a versatile space that can be used for anything from equipment storage to a workshop, with the classic gable roof adding both function and style.

How to build a 16×20 pole barn
You can expect to spend about 6 to 8 weekends constructing your 16×20 pole barn with a gable roof. The post frame construction is straightforward, but the size of the barn and the gable roof design will require careful planning and execution. With steady progress, you’ll have a solid, spacious structure that meets all your storage or workspace needs.

16×20 pole barn – free plans
The gable roof adds both height and ventilation, making the barn suitable for a variety of uses, from storing equipment to housing livestock or even setting up a workshop. This project combines the best of practicality and craftsmanship, providing you with a reliable, versatile structure that enhances your property and meets your needs.
Top Tip: Check out the rest of the shed projects for more inspiration for your backyard. Check out my 16×24 pole barn plans, as well. I think you will like those plans even more! To download the free plans, read the blog FAQs.
This woodworking project was about 16×20 pole barn plans. If you want to see more outdoor plans, check out the rest of our step by step projects and follow the instructions to obtain a professional result.
8 comments
This plan is missing the steps on how to close up gap for side overhangs between the end of the trusses and the siding to keep enclosed entirely
If you want to seal those gaps you can fit blockings between the trusses and then install soffit.
free plan 16×20 pole barn
needs plans for a 40×60
12 x 18 pole building
Interested in building a 12′ X 20′ Pole Barn
Plans would be extremely helpful.. Thanks
I have a question, not a comment.
This plan calls for 4×4 posts, with no truss supports; your free 16×24 unit calls for 6×6 posts, with 2×10 truss supports, which is obviously much stouter construction. Would there be a problem extending this design out to 24″ by simply adding four feet, or is there something about the engineering that I need to worry about?
Just add two trusses and extend with another post on each side and lengthen supports. Also increase the roofing materials.