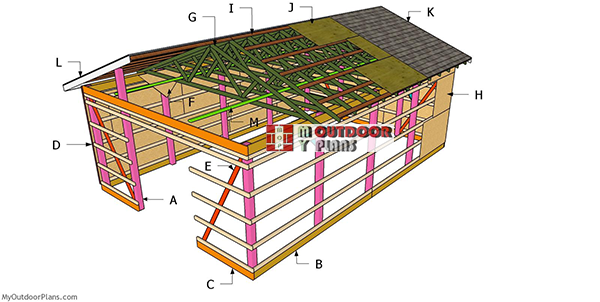
This step by step diy woodworking project is about free 20×30 pole barn plans. This pole barn is sturdy, easy to build, cost friendly and it features a pole barn with a 4:12 gable roof. The framing is super sturdy made from 6×6 posts and engineered trusses. Read the local building codes, so you make sure you comply with the building codes. In addition, attach a roof to protect the construction from bad weather. Make sure you take a look over the rest of plans to see alternatives and more projects for your garden.
When buying the lumber, you should select the planks with great care, making sure they are straight and without any visible flaws (cracks, knots, twists, decay). Investing in cedar or other weather resistant lumber is a good idea, as it will pay off on the long run. Use a spirit level to plumb and align the components, before inserting the galvanized screws, otherwise the project won’t have a symmetrical look. If you have all the materials and tools required for the project, you could get the job done in about a day. See all my Premium Plans HERE.
Projects made from these plans
20×30 Pole Barn – Free DIY Plans
20×30-pole-barn—building-a
Cut & Shopping Lists
- A – 10 pieces of 6×6 lumber – 120″ long, 4 pieces – 148 1/2″ long POSTS
- B – 12 pieces of 2×8 lumber – 178 1/2″ long SPLASH BOARDS & TRUSS CARRIERS
- C – 2 pieces of 2×8 lumber – 72″ long, 3 pieces – 240″ long SPLASH BOARDS & TRUSS CARRIERS
- D – 8 pieces of 2×4 lumber – 72″ long, 8 pieces – 240″ long, 24 pieces – 178 1/2″ long GIRTS
- E – 4 pieces of 2×4 lumber – 125″ long BRACES
- F – 8 pieces of 2×4 lumber – 36″ long, 4 pieces of 1/2″ OSB – 32 3/4″x65 1/2″ long GUSSETS
- 10 pieces of 6×6 lumber – 10 ft
- 4 pieces of 6×6 lumber – 14 ft
- 12 pieces of 2×8 lumber – 16 ft
- 3 pieces of 2×8 lumber – 20 ft
- 1 piece of 2×8 lumber – 12 ft
- 10 pieces of 2×4 lumber – 12 ft
- 8 pieces of 2×4 lumber – 20 ft
- 24 pieces of 2×4 lumber – 16 ft
- 4 pieces of 1/2″ OSB – 4’x8′
- 5 1/2″ screws
- 3 1/2″ screws
- 3 1/2″ lag screws
- 2 1/2″ screws
- 14 post anchors
- concrete
Tools
![]() Hammer, Tape measure, Framing square, Post hole digger, Level
Hammer, Tape measure, Framing square, Post hole digger, Level
![]() Miter saw, Drill machinery, Screwdriver, Sander
Miter saw, Drill machinery, Screwdriver, Sander
Time
![]() One week
One week
How to build a 20×30 pole barn – Free PDF Download
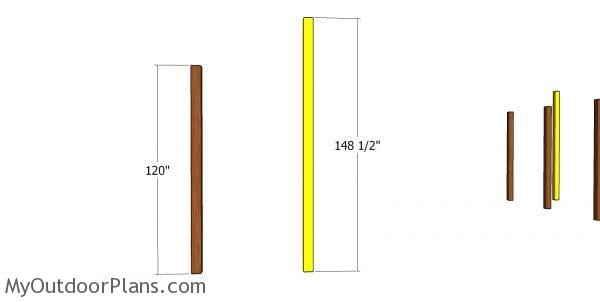
Posts for the pole barn
The first step of the project is to build the 6×6 posts for the large pole barn shed. You can set the posts in concrete for about 3-4′ (make sure you read the local building posts, to determine the depth exactly to your local front line specifications). You can dig the holes by hand, or you can use an auger drill. However, I have designed this project considering you will pour concrete footings and install post anchors.
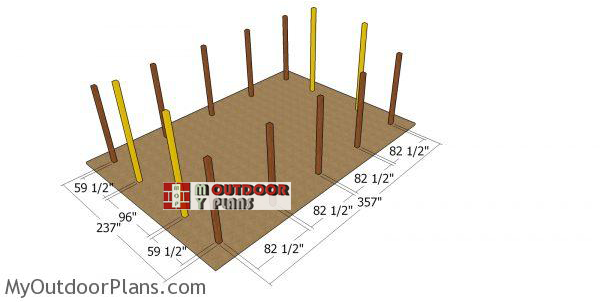
Laying-out-the-posts
Use the color code from the diagram to place the posts properly. Use batter boards and string to lay out the posts in a professional manner. Apply the 3-4-5 rule to the corners to make sure they are square. In addition, make sure the diagonals are equal. It is essential to take accurate measurements before fitting the posts. The middle end posts are slightly larger so you can attach the end trusses and have a back support to secure to.
Installing the posts
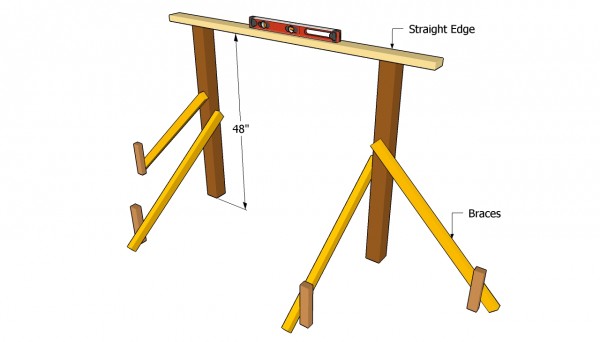
After marking the location of the posts, dig the 16″ wide holes and pour the concrete footings. Install the post anchors. Level the ground as much as possible, as this will help you later on. Use a spirit level to plumb the posts. In addition, use temporary braces to lock the posts into place tightly while pouring the concrete in the holes. Let the concrete to dry out before continuing the project. Make sure the top of the side posts are horizontal and cut out any excess.
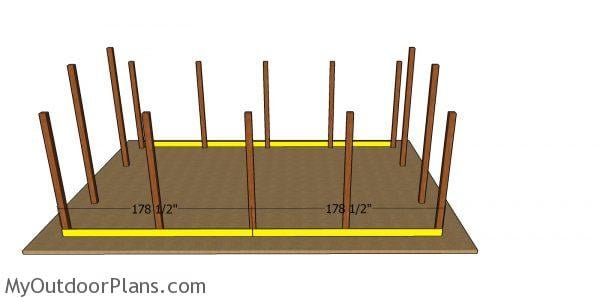
Slide splash boards
Next, fit the 2×8 lumber for the splash boards. Align the edges with attention and use a spirit level to make sure they are perfectly horizontal. Drill pilot holes and insert 3 1/2″ screws to lock them into place tightly. Invest in pressure treated lumber, as these boards will be exposed to moisture.
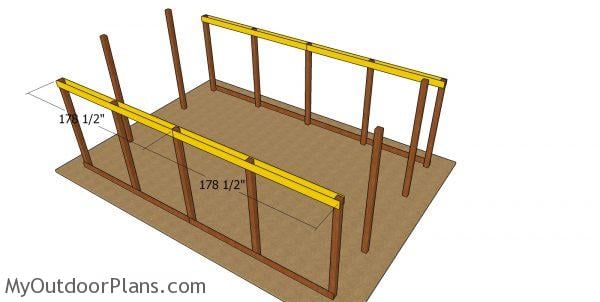
Fitting the truss carriers
Fit the 2×8 truss carriers to the top of the posts, to the sides of the pole barn. Align the edges flush and use a spirit level to check if the beams are perfectly horizontal. Clamp the beams to the posts, drill pilot holes and insert 3 1/2″ lag screws to lock them into place tightly.
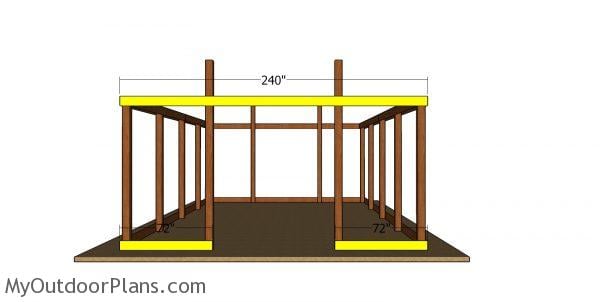
Splash boards
Continue the project by fitting the truss carriers to the front of the pole barn. Align the edges, make sure the beams are horizontal and then lock them to the posts with 3 1/2″ lag screws.

Back wall splash board
Continue the project by attaching the 2×8 beams to the back of the pole barn. Plumb the posts with a spirit level. Use a spirit level to check if the beams are perfectly horizontal.
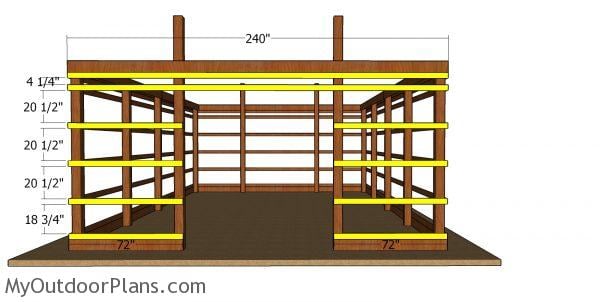
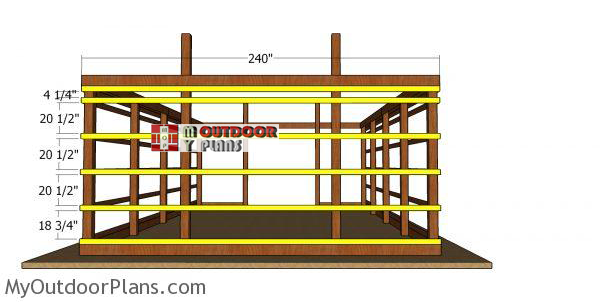
Front wall girt boards
Next, you should start attaching the girts to the front of the pole barn. Lay the 2x4s to the posts, as shown in the plans, every 24″ on center. Align the edges and insert 3 1/2″ screws to lock the girts to the posts.
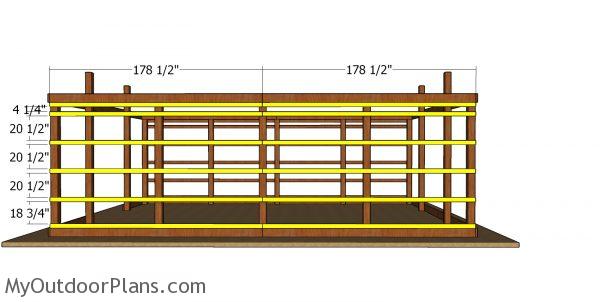
Back-wall-girts
Fit the 2×4 supports to the back of the barn, as shown in the diagram. Place the supports equally-spaced and lock them to the the poles using 3 1/2″ screws.
Side wall girt boards – large pole barn
Fit the girt boards to the sides of the large pole barn, as well. Use 3 1/2″ screws to lock the slats to the posts.
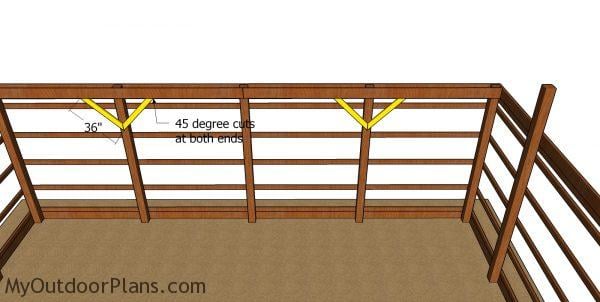
Braces for the pole barn
Use 2×4 lumber for the braces that go on the sides of the pole barn. Make 45 degree cuts to both ends of the braces and attach them to the post frame structure, as shown in the diagram. Drill pilot holes and insert 3 1/2″ screws to lock them into place.
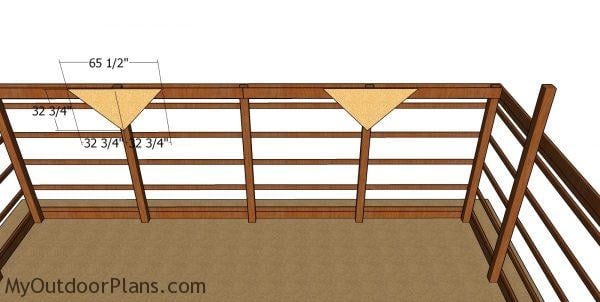
Gussets for the pole barn base
Use 1/2″ plywood for the gussets. Mark the cut libes to the plywood sheets and then get the job done with a circular saw. Attach the gussets to the braces and align the edges flush. Insert 1 5/8″ screws to lock the gussets into place tightly.
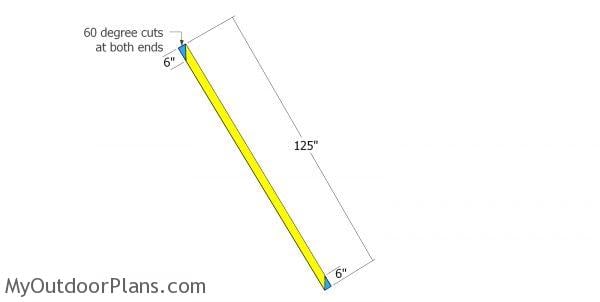
Braces for pole barn frame
Use 2×4 lumber for the diagonal braces. Make 60 degree cuts at both ends of the braces and then set them to the front and back of the pole barn.

Diagonal braces for the pole barn structure
The braces will keep everything locked together and add more rigidity to the structure. Drill pilot holes and insert 3 1/2″ screws to lock the braces to the posts. Check if the posts are plumb.
20×30-pole-barn-plans
Make sure you read PART 2 of the 20×30 pole barn project, where I show you how to build the gable roof. In addition, you should check out my free plans for building the 16×24 pole barn HERE.
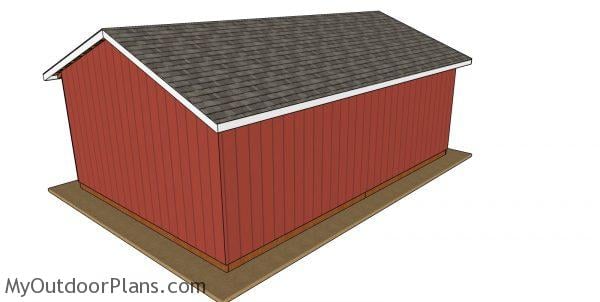
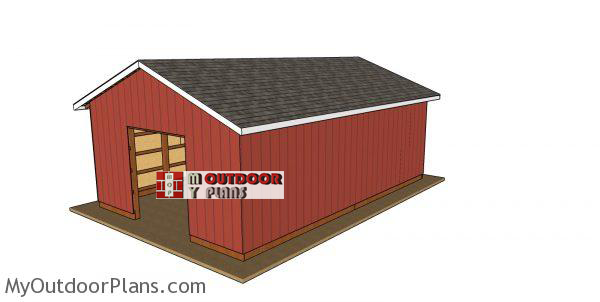
20×30 post frame barn plans
This is a large shelter that is built on a post frame structure to keep the costs down. The pole barn has front, back and side overhangs, as well as a generous 8 ft opening to the front. Considering the post frame structure, you can easily add windows to the sides of the pole barn, as well as a second door, for an easy access to the interior. You can add insulation to the wall frames and install OSB panels to the interior of the shed.
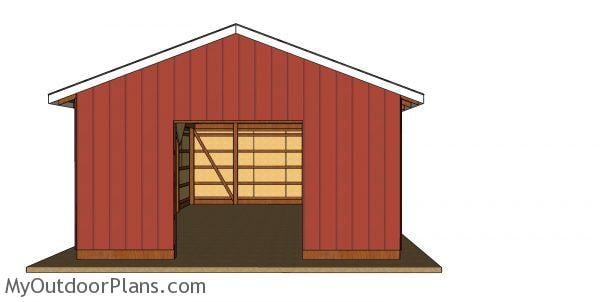
20×30 pole barn plans – front view
Last but not least, you should take care of the finishing touches, as to be able to continue the process with the rest of the steps. Therefore, we recommend you to check if all the components are installed properly into place.
Top Tip: Check out the rest of the shed projects for more inspiration for your backyard. You can see all my woodworking plans HERE.

This woodworking project was about 20×30 pole barn plans. If you want to see more outdoor plans, check out the rest of our step by step projects and follow the instructions to obtain a professional result.

EXPLORE MORE IDEAS FOR:
 |
 |
 |
 |
1 comment
Is it possible to exstend this Pole Barn to 20′ x 60?