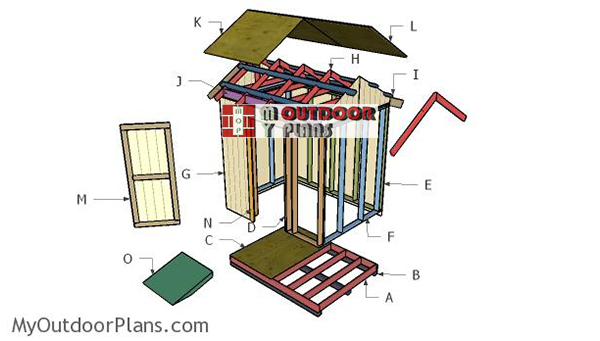
This step by step diy project is about 6×8 shed plans. I have designed this small garden shed with a gable roof so you can protect your tools and other small items from the elements. If you have a backyard, then chances are that you need more storage space, so building a simple shed is the straight-forward solution. Take a look over the rest of my woodworking plans, if you want to get more building inspiration.
When buying the lumber, you should select the planks with great care, making sure they are straight and without any visible flaws (cracks, knots, twists, decay). Investing in cedar or other weather resistant lumber is a good idea, as it will pay off on the long run. Use a spirit level to plumb and align the components, before inserting the galvanized screws, otherwise the project won’t have a symmetrical look. If you have all the materials and tools required for the project, you could get the job done in about a day. See all my Premium Plans HERE.
Projects made from these plans
Free 6×8 Shed Plans
Building–a-6×8-shed
Cut & Shopping Lists
- A – 2 pieces of 2×6 lumber – 96″ long, 7 pieces – 69″ long FRAME
- B – 3 pieces of 4×4 lumber – 96″ long SKIDS
- C – 2 pieces of 3/4″ plywood – 48″x72″ long FLOOR
- D – 1 piece of 2×4 lumber – 89″ long, 1 piece – 96″ long, 2 pieces- 30 1/2″ long, 6 pieces – 81″ long, 2 pieces – 77″ long, 2 pieces of 2×6 lumber – 35″ long FRONT WALL
- E – 2 pieces of 2×4 lumber – 96″ long, 1 piece – 89″ long, 5 pieces – 81″ long BACK WALL
- F – 2 pieces of 2×4 lumber – 65″ long, 1 piece – 72″ long, 4 pieces – 81″ long 2xSIDE WALL
- G – 6 pieces of 5/8″ T1-11 siding – 48″x90″ long, 2 pieces – 24″x90″ long SIDING
- 2 pieces of 2×6 lumber – 8′
- 8 pieces of 2×6 lumber – 6′
- 3 pieces of 4×4 lumber – 8′
- 33 pieces of 2×4 lumber – 8′
- 2 piece of 3/4″ plywood – 4’x8′
- 7 pieces of 5/8″ T1-11 siding
- 500 pieces of 2 1/2″ screws, 8d galvanized screws
- rafter ties
- wood glue, stain/paint, wood filler
Tools
![]() Hammer, Tape measure, Framing square, Level
Hammer, Tape measure, Framing square, Level
![]() Miter saw, Drill machinery, Screwdriver, Sander
Miter saw, Drill machinery, Screwdriver, Sander
Time
![]() One day
One day
Related
- PART 1: 6×8 Shed Plans
- PART 2: 6×8 Roof Shed Plans
- PART 3: Shed Ramp and Door Plans
Building a 6×8 garden shed
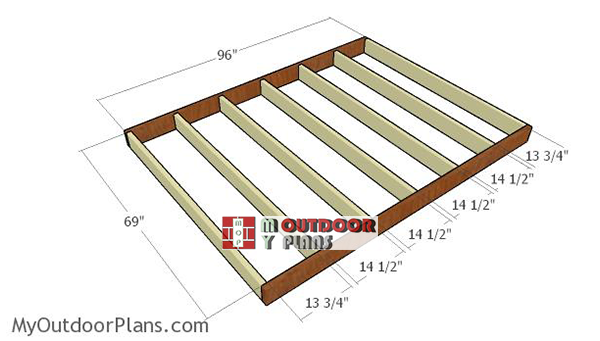
Building-the-floor-frame-small-shed
First of all you have to assemble the floor frame. Cut the components from 2×6 lumber at the dimensions shown in the plans. Drill pilot holes through the 96″ long joists and insert 3″ screws into the perpendicular components. Make sure the corners are square and align the edges with attention before inserting the screws.
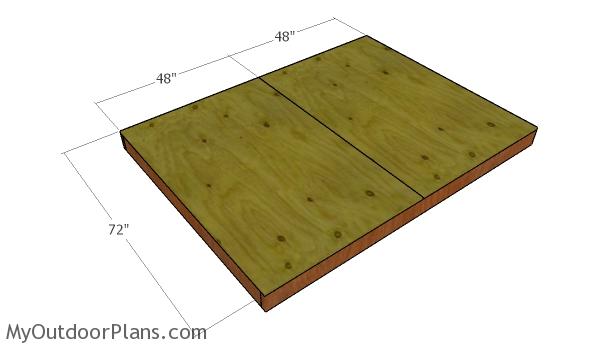
Fitting the floor panels
Next, attach the 3/4″ plywood panels to the floor frame. Align the edges and leave no gaps between the panels for a professional result. Drill pilot holes and insert 1 5/8″ screws every 8″ along the joists.
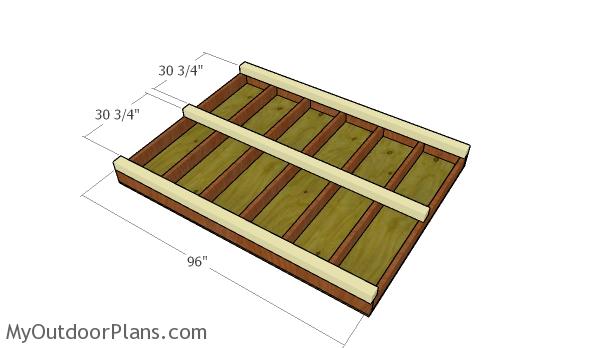
Fitting the skids
In order to keep the floor protected from moisture and water damage, I recommend you to attach 4×4 skids to the shed. Align the edges and use rafter ties to secure the skids to the joists in a professional manner.
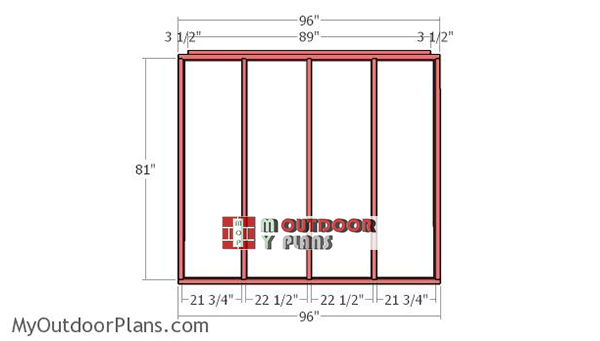
Building-the-back-wall-frame
Build the back wall for the shed using the information from the above diagram. Start by cutting all the components from 2×4 lumber. Drill pilot holes through the plates and insert 2 1/2″ galvanized screws into the studs. Make sure you place the place the studs spaced as shown in the plans, otherwise you won’t be able to install the siding panels. Make sure the corners are square and fit the double plate to the top of the wall using 2 1/2″ screws.
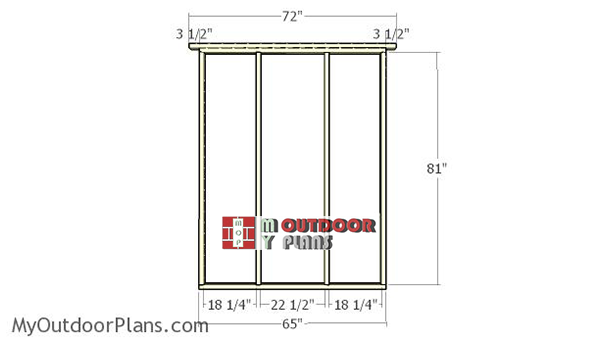
Building-the-side-wall-frame
Assemble the side walls in the same manner described above.
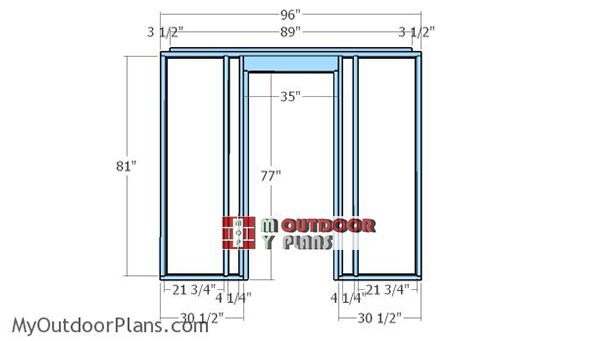
Building-the-front-wall
Building the front wall is a more complex job, as you need to frame the door opening. In addition, you need to fit the double header to the top of the opening.
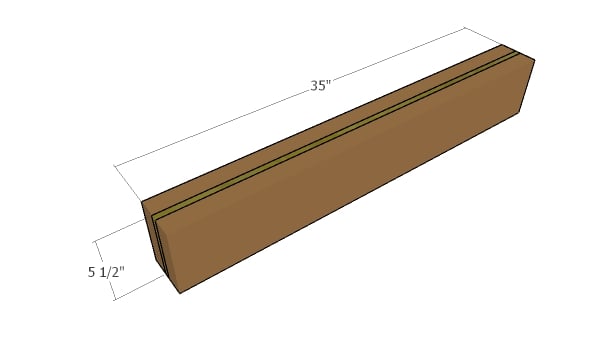
Building the header
Build the header from 2 pieces of 2×6 lumber and a piece of 1/2″ plywood. Use glue and 2 1/2″ screws to lock everything together tightly.
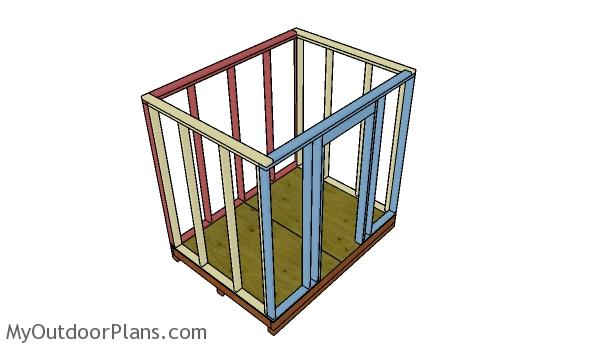
Assembling the shed frame
Fit the frames to the floor of the shed. Align the edges flush and make sure the corners are square. In addition, use a spirit level to make sure the walls are plumb. Drill pilot holes through the bottom plates and insert 2 1/2″ screws into the floor of the 6×8 shed. Don’t forget to lock the adjacent walls together, as well.

Building the sides
Build the exterior walls from 5/8″ T1-11 siding. As you can notice in the diagram, you need to make some cuts to the sheets that go to the front wall. In addition, you need to cut a sheet of 4×8 siding on half and attach it to the sides of the shed. Use 8d galvanized nails to secure the sheets to the wall frames. Align everything with attention and insert the nails every 8″ along the studs.
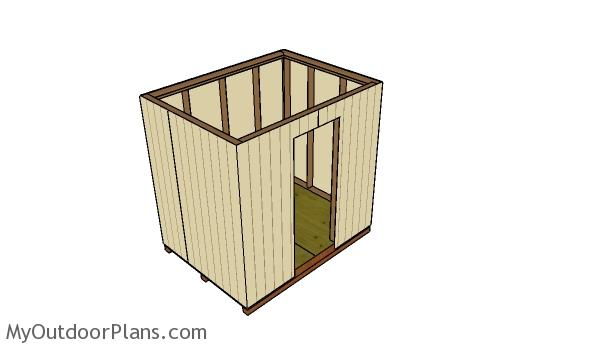
Fitting the siding
After building the frame for the shed, you need to double check all the joints. In addition, this is a good time to paint the exterior of the shed, as you have an easy access to the panels.
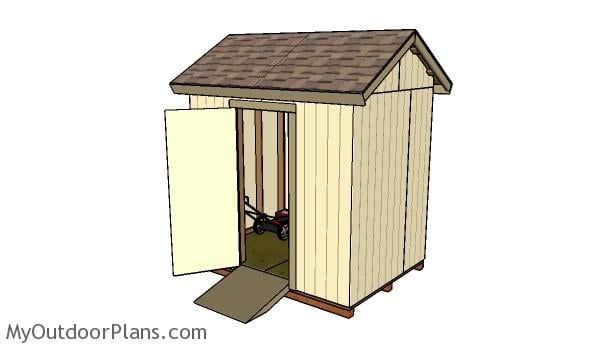
How to build a 6×8 shed with a gable roof
This shed with gable roof is the perfect addition to any garden, if you need more storage space for your tools and furniture. Don’t forget to take a look over PART 2 of the project, so you learn how to build the roof for the shed. If you build these, I would love to see your project.
This woodworking project was about 6×8 shed plans. If you want to see more outdoor plans, check out the rest of our step by step projects and follow the instructions to obtain a professional result.

13 comments
Would you be able to modify this plan so that the door is on the end wall instead of the side wall, and post or email that to me? I want to build this shed, however due to location it cannot have the door on the long wall.
Thanks in advance
John Bosch
8×6 shed plans look fantastic but how much do the materials come to roughly ?
I don’t have a cost estimate.
I went thru these plans piece by piece and re-used scrap lengths of wood wherever possible when calculating everything. Priced the cheapest options on materials from Lowes/Home Depot and skimped on the roof and chose 1/4 plywood instead of 3/4 as the plans call for since no one would ever walk on it. Calculated the cost with the cheapest shingles/hinges/latch/exterior paint I could find that would do the job. The cost for all of the materials is about $930 before sales tax, roughly $1005 after sales tax in NY . Local shed dealers sell pre-built 6X8 sheds for around $1725 after sales tax. Overall I think it is worth the 2 full days of work to save $700, plus you will have enough scrap to build interior shelves and a few small bonfires. The biggest cost hike is the 10 sheets of T1-11 plywood siding. If you can find a cheaper alternative you could potentially save a few hundred overall.
I also have the same issue as John Bosch; the area I have to fill would need the door on the 6′ side. Can this plan be modified to have the 8′ walls becoming the side walls; and the 6′ wall become the back wall and the front wall? I would have to modify the front wall entrance to accommodate a rider lawn mower. Great plans however!
Regards,
Bob Casey
Really Excellent plans. I’ve used it to build a dog palace that Paris Hilton would be proud of, including a 4 X 6 sliding glass door on the front. I’ve insulated it completely, added a cyclone vent to the roof, decorative side windows, and drywalled the interior. The entire cost was approximately $1800.
Is this shed heavy enough to withstand high-wind micro-bursts out here on the SE plains of Colo. Not a tornado but serious winds. We plan to anchor it with posts buried in concrete.
If you use hurricane ties and you lock everything together tightly I think it will hold on. But don’t take my word for granted, I have not seen those winds personally.
I think there a mistake 69″ + 2(2) = 73″ not 72″ why we have 1″ difference in base
2×4 is 1 1/2″ thick. There is no mistake.
I too have the need for an 6 foot end door placement rather than 8 foot side with high roof gable over door opening. Does this configuration exist on your site ?
No. Just this one
I built the 6×8 shed. I just inverted the numbers. I’m stuck on the rafters. Too much Trigonometry. I just need the numbers on the rafters. I think it’s a 9/12 pitch. The run is 72 inches. I need the length of the rafter
Thanks