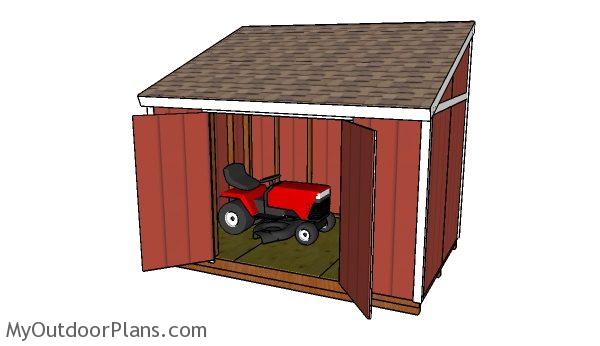
This step by step diy project is about 8×12 lean to shed plans. I have designed this 8×12 lean to shed so you can store many items in a stylish manner. The shed has a nice design and wide double front doors so you can access the interior easily. You can even store your lawn tractor in the shed. Read the local building codes to understand what are the requirements you need to comply with. Take a look over the rest of my woodworking plans, if you want to get more building inspiration.
When buying the lumber, you should select the planks with great care, making sure they are straight and without any visible flaws (cracks, knots, twists, decay). Investing in cedar or other weather resistant lumber is a good idea, as it will pay off on the long run. Use a spirit level to plumb and align the components, before inserting the galvanized screws, otherwise the project won’t have a symmetrical look. If you have all the materials and tools required for the project, you could get the job done in about a day. See all my Premium Plans HERE.
Projects made from these plans
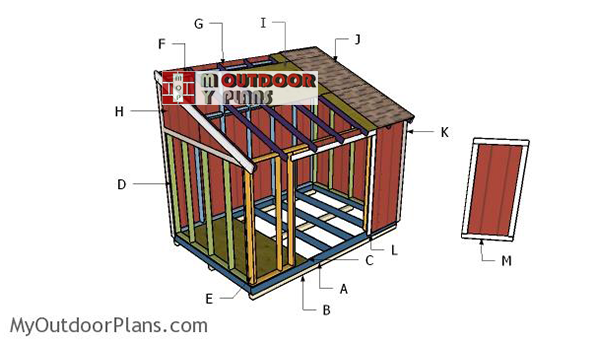
8×12 Lean To Shed Plans
Building-a-8×12-lean-to-shed
Cut & Shopping Lists
- A – 2 pieces of 2×6 lumber – 144″ long, 7 pieces – 93″ long FRAME
- B – 3 pieces of 4×4 lumber – 144″ long SKIDS
- C – 3 pieces of 3/4″ plywood – 48″x96″ long FLOOR
- D – 2 piece of 2×4 lumber – 144″ long, 9 pieces – 113 3/4″ long, 8 pieces – 22 1/2″ long, 4 pieces – 19 3/4″ long BACK WALL
- E – 1 piece of 2×4 lumber – 144″ long, 2 pieces – 34 1/2″ long, 8 pieces – 80″ long, 2 pieces – 76″ long, 2 pieces of 2×6 lumber – 75″ long FRONT WALL
- F – 2 pieces of 2×4 – 89″ long, 5 pieces – 80″ 2xSIDE WALL
- H – 5 pieces of T1-11 siding – 48″x86″ long, 3 pieces – 37 1/4″x40″ long, 1 piece – 7″x48″ long SIDING
- 2 pieces of 2×6 lumber – 12′
- 9 pieces of 2×6 lumber – 8″
- 3 pieces of 4×4 lumber – 12′
- 3 pieces of 3/4″ plywood – 4’x8′
- 3 pieces of 2×4 lumber – 12′
- 26 pieces of 2×4 lumber – 8′
- 9 pieces of 2×4 lumber – 10′
- 7 pieces of T1-11 siding
- 2 1/2″ screws, 3 1/2″ screws, 1 5/8″ screws
- 4d nails
- wood filler , wood glue, stain/paint
Tools
![]() Hammer, Tape measure, Framing square, Level
Hammer, Tape measure, Framing square, Level
![]() Miter saw, Drill machinery, Screwdriver, Sander
Miter saw, Drill machinery, Screwdriver, Sander
Time
![]() One day
One day
Related
- PART 1: 8×12 Lean to shed plans
- PART 2: Lean to shed roof plans
Building a 8×12 lean to shed
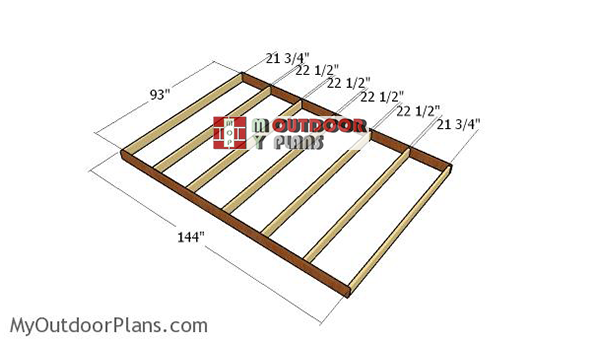
Assembling-the-floor-frame
The first step of the project is to assemble the floor frame using 2×6 lumber. Cut the joists at the right dimensions and lock them together with 3 1/2″ screws. Drill pilot holes through the rim joists and insert the screws into the perpendicular components. Align the edges flush and check if the corners are square.
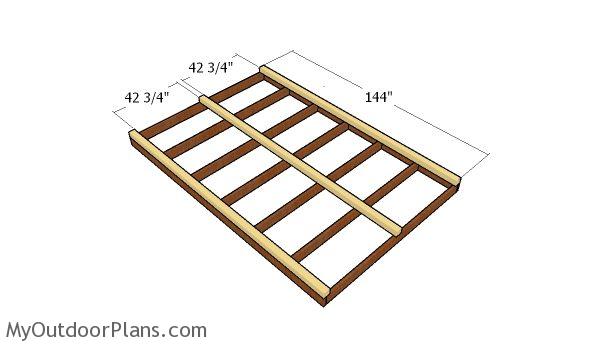
Attaching the skids
The nest step of the project is to attach the 4×4 skids to the frame of the shed. Align the beams at both ends, using the information in the diagram. Drill pilot holes and insert 4 1/2″ screws to secure the skids to the beams. Alternatively, you can use metal hardware to connect the components.
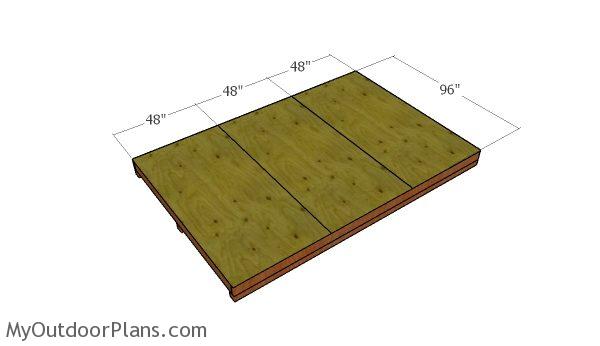
Fitting the floor sheets
Attach 3/4 tongue and groove sheets to the floor frame. Align the edges flush, drill pilot holes and insert 1 5/8″ screws every 8″ along the joists.
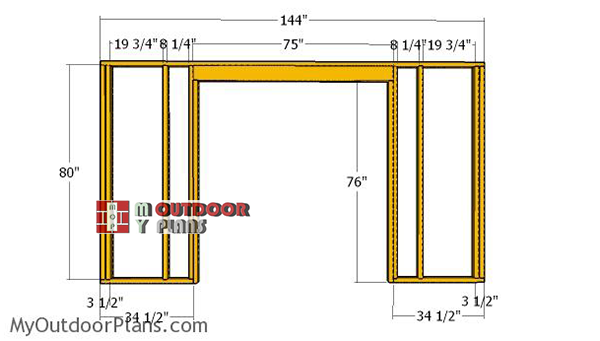
Building-the-front-wall-frame
The next step of the project is to build the front wall for the shed. Cut the components at the right dimensions, drill pilot holes through the plates and insert 2 1/2″ screws into the studs. Make sure the corners are square and align everything flush. As you can easily notice in the diagram, you need to double the ends studs and attach cripple studs for the door.
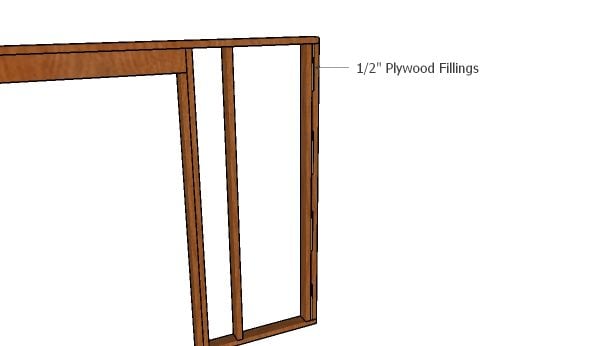
End posts
As you can see in the plans, you need to fit 1/2″ plywood fillings between the double end studs.
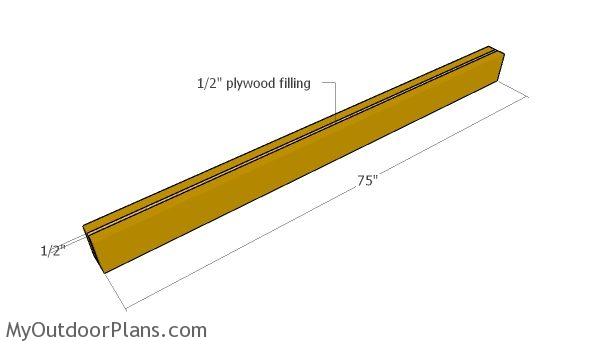
Building the door header
Build the double header for the door from 2×6 lumber and 1/2″ plywood. Align the edges with attention, add glue to the joints and insert nails to lock everything together tightly.
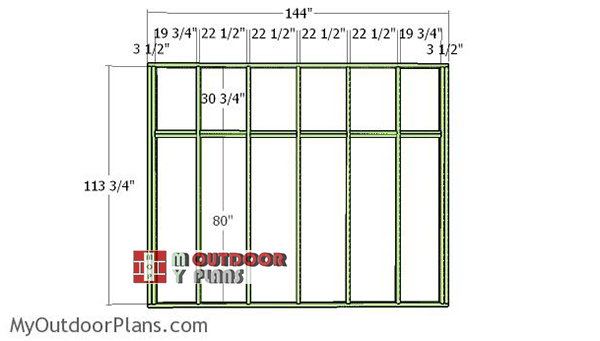
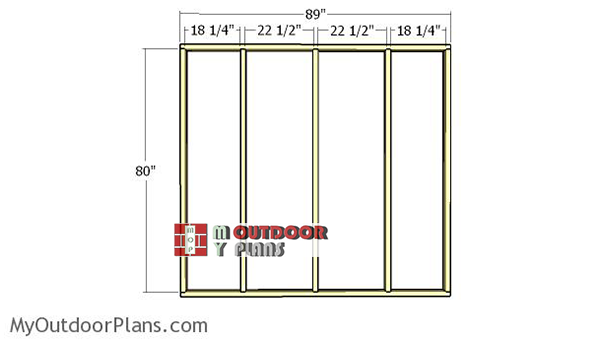
Building-the-back-wall-frame
Next, build the back wall from 2×4 lumber. Drill pilot holes through the plates and insert 2 1/2″ screws into the studs. Make sure the corners are square and align the edges flush for a professional result. Toe-nail the horizontal supports to the frame of the shed, after aligning the edges flush and making sure the corners are square.
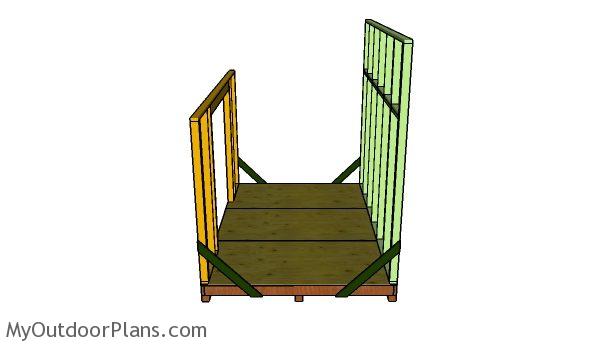
Attaching the front and back walls
Fit the front and the back walls to the shed floor. Use a spirit level to plumb the walls, drill pilot holes through the bottom plates and insert 3 1/2″ screws into the floor.
Building-the-side-wall-frames
Build the side walls from 2×4 lumber, using the same techniques described above.
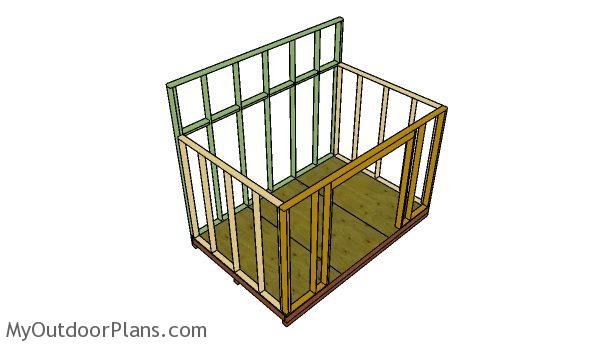
Assembling the frame of the shed
Fit the side walls to the floor of the shed and align the edges flush. In addition, drill pilot holes through the bottom plates and insert 3 1/2″ screws into the floor. Make sure the corners are right-angled and lock the adjacent walls together by inserting drill pilot holes and inserting 2 1/2″ screws.
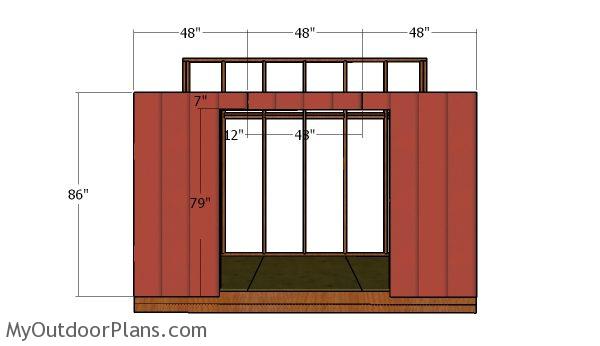
Attaching the front walls
Attach T1-11 siding panels to the front of the lean to shed. In addition, cut out the door opening and secure the panels to the framing with 4d nails. Align the edges flush with the wall frames before inserting the nails.
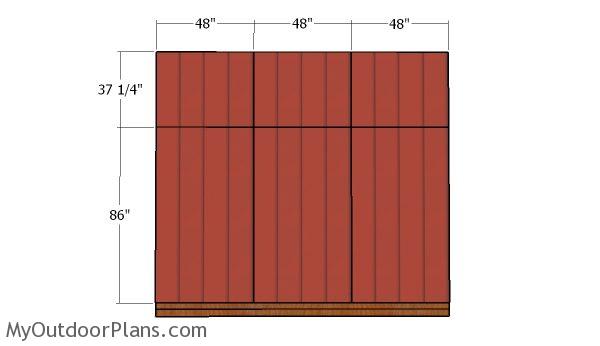
Fitting the back wall
Attach the T1-11 siding sheets to the back of the lean to shed. Leave no gaps between the sheets and secure them to the framing with 4d nails.
How to build a 8×12 shed
Make sure you take a look over PART 2 of the project, where I show you how to build the roof and how to make the double doors for the shed.
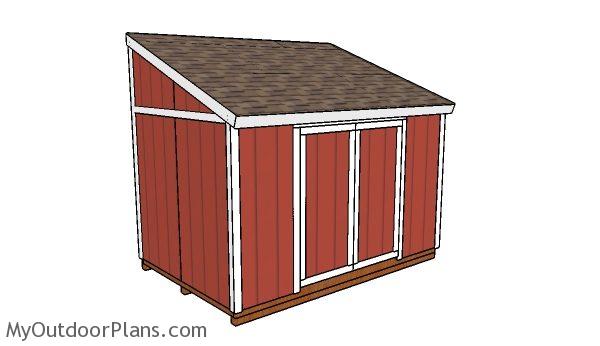
Lean to Shed Plain
This is a simple project you should be able to build in a few days without much effort. This 8×12 lean to shed is ideal if you want to attach it to an already existing building on your property or if you want to build it next to the property line, for example.
This woodworking project was about 8×12 lean to shed plans free. If you want to see more outdoor plans, check out the rest of our step by step projects and follow the instructions to obtain a professional result.

26 comments
When building the back wall, how do you install the cross studs at 80”? Once you have installed the first set of studs it will be impossible to drill into the sides of the next set because the previous set is in the way?
Pocket holes at both ends of the cross studs.
Are there any plans available that shows the door (s) on the taller side of the lean to shed? I need the doors on the taller side so the water runs off the roof and goes down the mountain not in front of the door. Thanks.
No, but that is a very simple modification to make. You just place the front wall frame to the back and the other way around.
Why not use 2x4x10’s on the tall wall?
Because the wall is 12′ long not 10′ long
Sorry I meant why did you not use 10ft vertical studs for the tall wall, but as I look closer I notice you did, and that there is 2×4 between the 2x4x10s, I’m assuming the pieces in between are just for nailing the sheathing, if that’s the case, couldn’t a 2×4 turned serve the purpose instead of 2 between each 2x4x10?
That’s correct: for sheeting and also for strengthening the shed frame. You can use just one 2×4 between the studs, but I personally find it easier and more durable to use 2 pieces.
Ovidiu,
Have you actually built this shed? I am in the process of building my own very similar to this. I’m on the roof part, I’m curious about your choice in 2×4 spaced @ ~24″ . From what I can tell it appears that will be to weak (unless maybe you live in the southern climate). I’m thinking 2×6 @ 24″ would be more appropriate for this roof. Can you elaborate on the design choice?
Is using 2×4 over the span @ 24 OC, enough? seems weak? I would think 2×6 @ 24 OC would bee needed, or at least 2×4 @16 OC. I’m not sure this could handle any sort snow load.
If you live in an area with snow, I would definitely recommend you to go for 2×6 every 16″ OC. The safest bet would be to read your local building codes.
It appears the materials callout incorrectly calls for:
* 25 pieces of 2×4 lumber – 6′
This will not be sufficient to create the following pieces:
* 8 pieces – 22 1/2″ long, 4 pieces – 19 3/4″ long BACK WALL
* 2 pieces – 34 1/2″ long, 6 pieces – 80″ long, 2 pieces – 76″ long FRONT WALL
* 2 pieces of 2×4 – 89″ long, 5 pieces – 80″ 2xSIDE WALL
… I calculate you would need 26 pieces of 2×4 that are 8′ long.
* 4 for the back wall (plus 2 x 34 1/2″)
* 8 for the front wall (except 2×34 1/2″, plus 2×19 3/4″)
* 14 for the side walls
so in the parts list, you’ve got 25 pieces of 6 foot 2×4. that should probably be 8 foot 2×4. I made the mistake of ordering what you listed, and now I’m kinda hosed
I’m sorry for that error. I will design entirely new plans so you can use the 2×4 6 ft. Do you want the lean to be forward or backward? Anything else like a window?
no, that’s not the issue. I’ll just have to return the lumber and get the proper stuff. there’s a few things that you don’t cover, like the 1/2″ plywood in the front wall build .
(Build the double header for the door from 2×6 lumber and 1/2″ plywood. Align the edges with attention, add glue to the joints and insert nails to lock everything together tightly.)
where is this 1/2″ plywood coming from?
You only need a scrap piece of 5 1/2″x75″ 1/2″ plywood, or a few 5 1/2″something pieces so the overall width of the header to be 3 1/2″. I’m aware that I don’t list everything (all nails, screws, plywood gussets / blockings) but these are miscellaneous items. I’m focusing on new and better designs. I really want to improve this 8×12 lean to shed design and add side overhangs, a window and maybe a second door. If you have suggestions, I would be happy to take them into account.
Honestly, no one could take your parts list, and these instructions and end up with the shed in the pictures
This is a really nice shed
Do you intend (but forget to mention) that the shed floor is flipped after attaching the skids?
I don’t need to mention that, since it’s visible in the diagrams and also common sense. If you need that specifically mentioned in the plans, please don’t build the shed as a DIY project, because you clearly aren’t prepared for that.
Amen
Hi. You say in the cut list that you will need 6) 2X4 @ 80” long, but from the picture I count 8. Am I wrong that The 2 by the door frame look to be the same length as all the others?
You’re right. There are 8.
Hi Ovidiu,
Do you have premium plans for this 8×12 lean to shed? I didn’t see it under premium plans. Thank you.
Not yet
Hi, I’m going to build your 8X12 lean to shed. Is the materials list correct? I really like it.