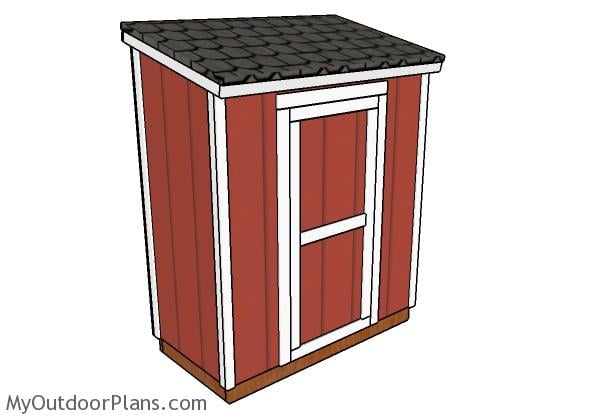
This step by step diy project is about diy 3×6 lean to shed shed plans. This small storage shed is ideal for narrow spaced. Moreover, although it is not a large shed, this project will store most of your garden tools. Roof pitch is 2:12. Moreover, I have designed shed with many sizes so check them out, as well. Take a look over the rest of my woodworking plans, if you want to get more building inspiration.
When buying the lumber, you should select the planks with great care, making sure they are straight and without any visible flaws (cracks, knots, twists, decay). Investing in cedar or other weather resistant lumber is a good idea, as it will pay off on the long run. Use a spirit level to plumb and align the components, before inserting the galvanized screws, otherwise the project won’t have a symmetrical look. If you have all the materials and tools required for the project, you could get the job done in about a day. See all my Premium Plans HERE.
Projects made from these plans
3×6 Lean to Shed Plans

Building-a-3×6-lean-to-shed
Cut List
- A – 2 pieces of 4×4 lumber – 72″ long SKIDS
- B – 2 pieces of 2×6 lumber – 72″ long, 6 pieces – 33″long FLOOR
- C – 1 piece of 3/4″ plywood – 36″x72″ long FLOORING
- D – 2 pieces of 2×4 lumber – 29″ long, 3 pieces – 74″ long 2xSIDE WALL
- E – 1 piece of 2×4 lumber – 72″ long, 2 pieces – 20″ long, 6 pieces – 74″ long, 2 pieces – 68 1/2″ long, 2 pieces of 2×6 lumber – 35″ long FRONT WALL
- F – 2 pieces of 2×4 lumber – 72″ long, 6 pieces – 81″ long BACK WALL
- G – 1 piece of T1-11 – 48″x85″ long, 1 piece – 24″x85″ long, 1 piece – 48″x78″ long, 1 piece – 24″x78″ long SIDING
Shopping List
- 5 pieces of 2×6 lumber – 6′
- 2 pieces of 4×4 lumber – 6′
- 6 pieces of 2×4 lumber – 6′
- 20 pieces of 2×4 lumber – 8′
- 1 piece of 2×6 lumber – 8′
- 1 piece of 3/4″ plywood – 48″x96″
- 3 pieces of T1-11 – 48″x96″
- 8d nails, 2 1/2″ screws, 3 1/2″ screws
- wood filler , wood glue, stain/paint
Tools
![]() Hammer, Tape measure, Framing square, Level
Hammer, Tape measure, Framing square, Level
![]() Miter saw, Drill machinery, Screwdriver, Sander
Miter saw, Drill machinery, Screwdriver, Sander
Time
![]() One week
One week
Related:
- PART 1: 3×6 Shed Plans
- PART 2: 3×6 Shed Roof Plans
How to build a 3×6 garden shed

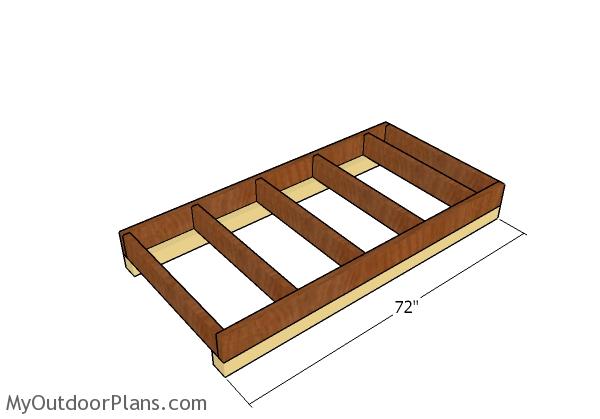
Building-the-floor-frame-small-shed
The first step of the project is to build the floor frame for the shed. Lay the joists on a level surface and lock the joists together with screws. Cut all the joists from 2×6 lumber. Drill pilot holes through the rim joists and insert 3 1/2″ screws into the perpendicular components. Make sure the corners are square and align the edges flush.
Fitting the skids
Select the location for the lean to shed. An existing building or the property line are great choices, as this will save you a lot of space. Level the surface and then compact a layer of gravel. The gravel will prevent the moisture from rotting the lumber. Lay the 4×4 skids and then fit the floor frame. Toenail the frame to the skids, after aligning the edges with attention.
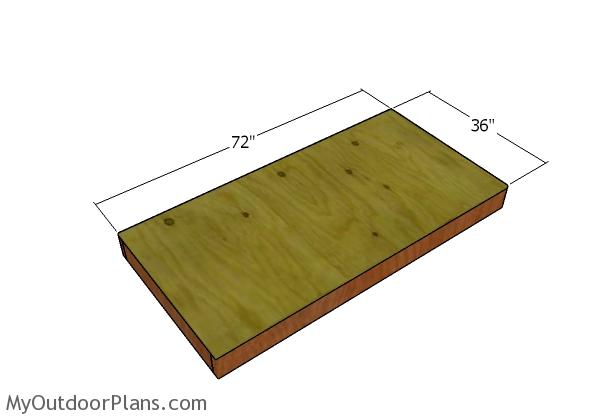
Fitting the floor frame
Use 3/4″ plywood for the floor of the shed. Cut the sheet at the right dimensions and then lay it to the floor. Align the edges flush, drill pilot holes and insert 1 5/8″ screws into the joists, every 8″. Leave no gaps between the components for a professional result.
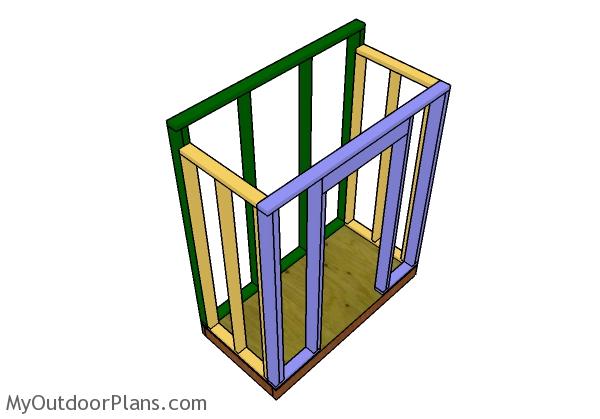
Building shed wall frames
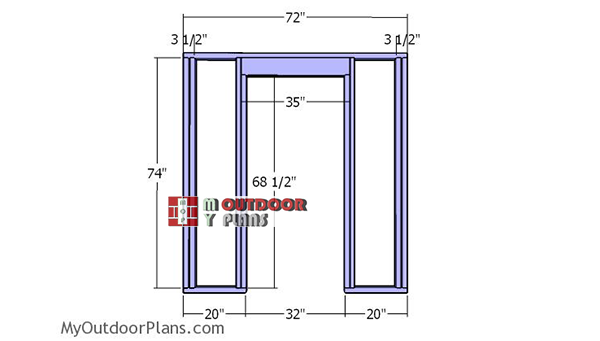
Front-wall-frame
Build the front wall from 2×4 lumber using the information from the diagram. Drill pilot holes through the plates and insert 3 1/2″ screws into the studs. As you can see, you need to double the studs placed at both ends of the wall. Fit 1/2″ plywood between the double studs so you enhance the rigidity of the structure.
Use 2×6 lumber for the double header. Fit 1/2″ plywood between the double headers and sandwich everything together with 2 1/2″ screws.
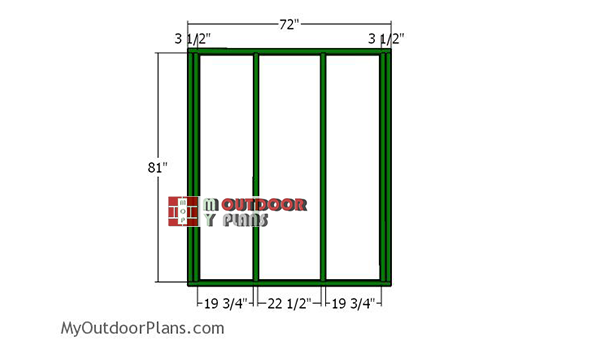
Back-wall-frame
Build the back wall for the 3×6 shed from 2×4 lumber. Cut the studs and the plates from 2×4 lumber and then lay them on a level surface. Drill pilot holes through the plates and insert 3 1/2″ screws into the studs. Place the studs every 24″ on center, as shown in the diagram. Align the edges flush and make sure the corners are square.
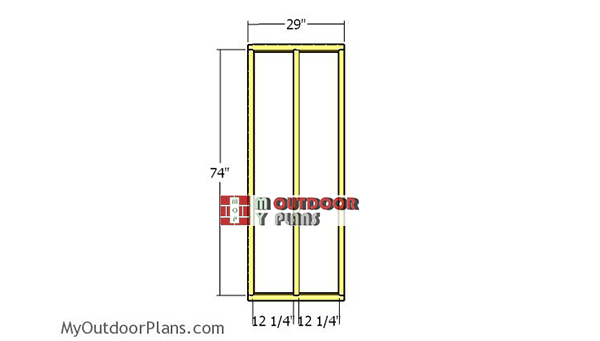
Side-wall-frame
Frame the side walls for the 3×6 storage shed from 2×4 lumber. Drill pilot holes through the plates and insert 3 1/2″ screws into the studs.
Assembling the shed
Assembling the shed frame
After assembling the four side walls, you need to fit them to the floor of the shed. Use a spirit level to plumb the walls and then align the edges flush. Drill pilot holes through the bottom plates and insert 3 1/2″ screws into the floor of the shed. Make sure the corners are square and lock the adjacent walls together with 3 1/2″ screws.
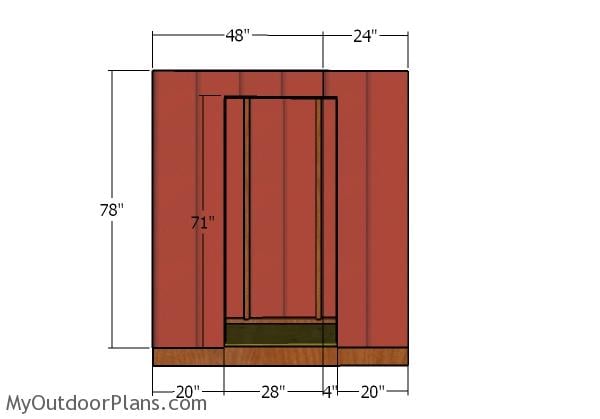
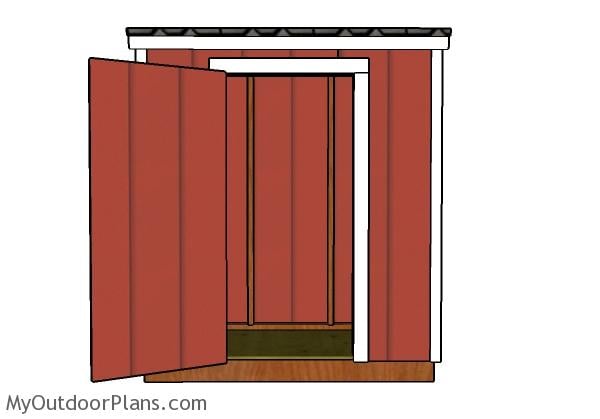
Front wall siding
Use T1-11 siding for the exterior walls of the shed. Cut the sheets to the right shape and size, using the information from the diagram. Align the edges with attention, making sure the sheets are flush with the top plates. Use 6-8d nails to secure the panels to the framing, every 8″. Leave no gaps between the sheets for a professional result.
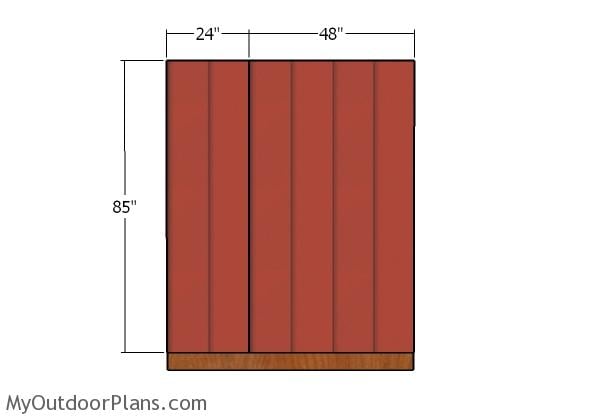
Back wall siding
Fit the T1-11 siding panels to the back of the shed, as well. Align the edges with attention and insert 6-8d nails to lock the siding panels into place tightly.
3×6 Shed Plans
You need to take a look over PART 2 of the shed project, where I show you how to build the roof. This lean to shed is ideal if you want a small shelter for your garden tools. You can adjust the size of the door, to suit your own needs.
3×6 Lean to shed plans
Make sure you check out the rest of the project, so you learn how to frame the roof and how to attach the door and the trims to the shed. In addition, I have lots of other shed projects on the site so I recommend you to browse through all alternatives before starting the building project.
If you want this project as a PDF file, with 1 full cut list and 1 full shopping list, please take a look over the GET PDF PLANS button bellow.

This woodworking project was about 3×6 lean to shed plans free. If you want to see more outdoor plans, check out the rest of our step by step projects and follow the instructions to obtain a professional result.

6 comments
Love your plans. Easy to understand and well articulated
Would be nice to have an option to download/print a PDF or at least be allowed to copy text or print the page.
There is. Read the FAQs
Can you please direct me to the FAQ so I can potentially download a copy of this page? Thank you.
It’s a big button in the menu. Here it is the link for the lazy readers: https://myoutdoorplans.com/faq/ 😉
Hello. I love your projects and greatly appreciate that they are free. Would you point me where I could find the barn door plans that I could add to this shed.